would you make markings for special squads we name. (ie..121st Tyger Squadron). i know would like to have some done
even tho they are not cannon or EU.
I'll see what I can do. ![]() I'm willing to try at least.
I'm willing to try at least.
would you make markings for special squads we name. (ie..121st Tyger Squadron). i know would like to have some done
even tho they are not cannon or EU.
I'll see what I can do. ![]() I'm willing to try at least.
I'm willing to try at least.
You rock MF... those look awesome.. I have new decal paper to try them out with... can't wait.
I have decal paper, and it's screaming to be used.
Thank you for your hard efforts!!
Just curious, but were are you getting the reference images for all of these?
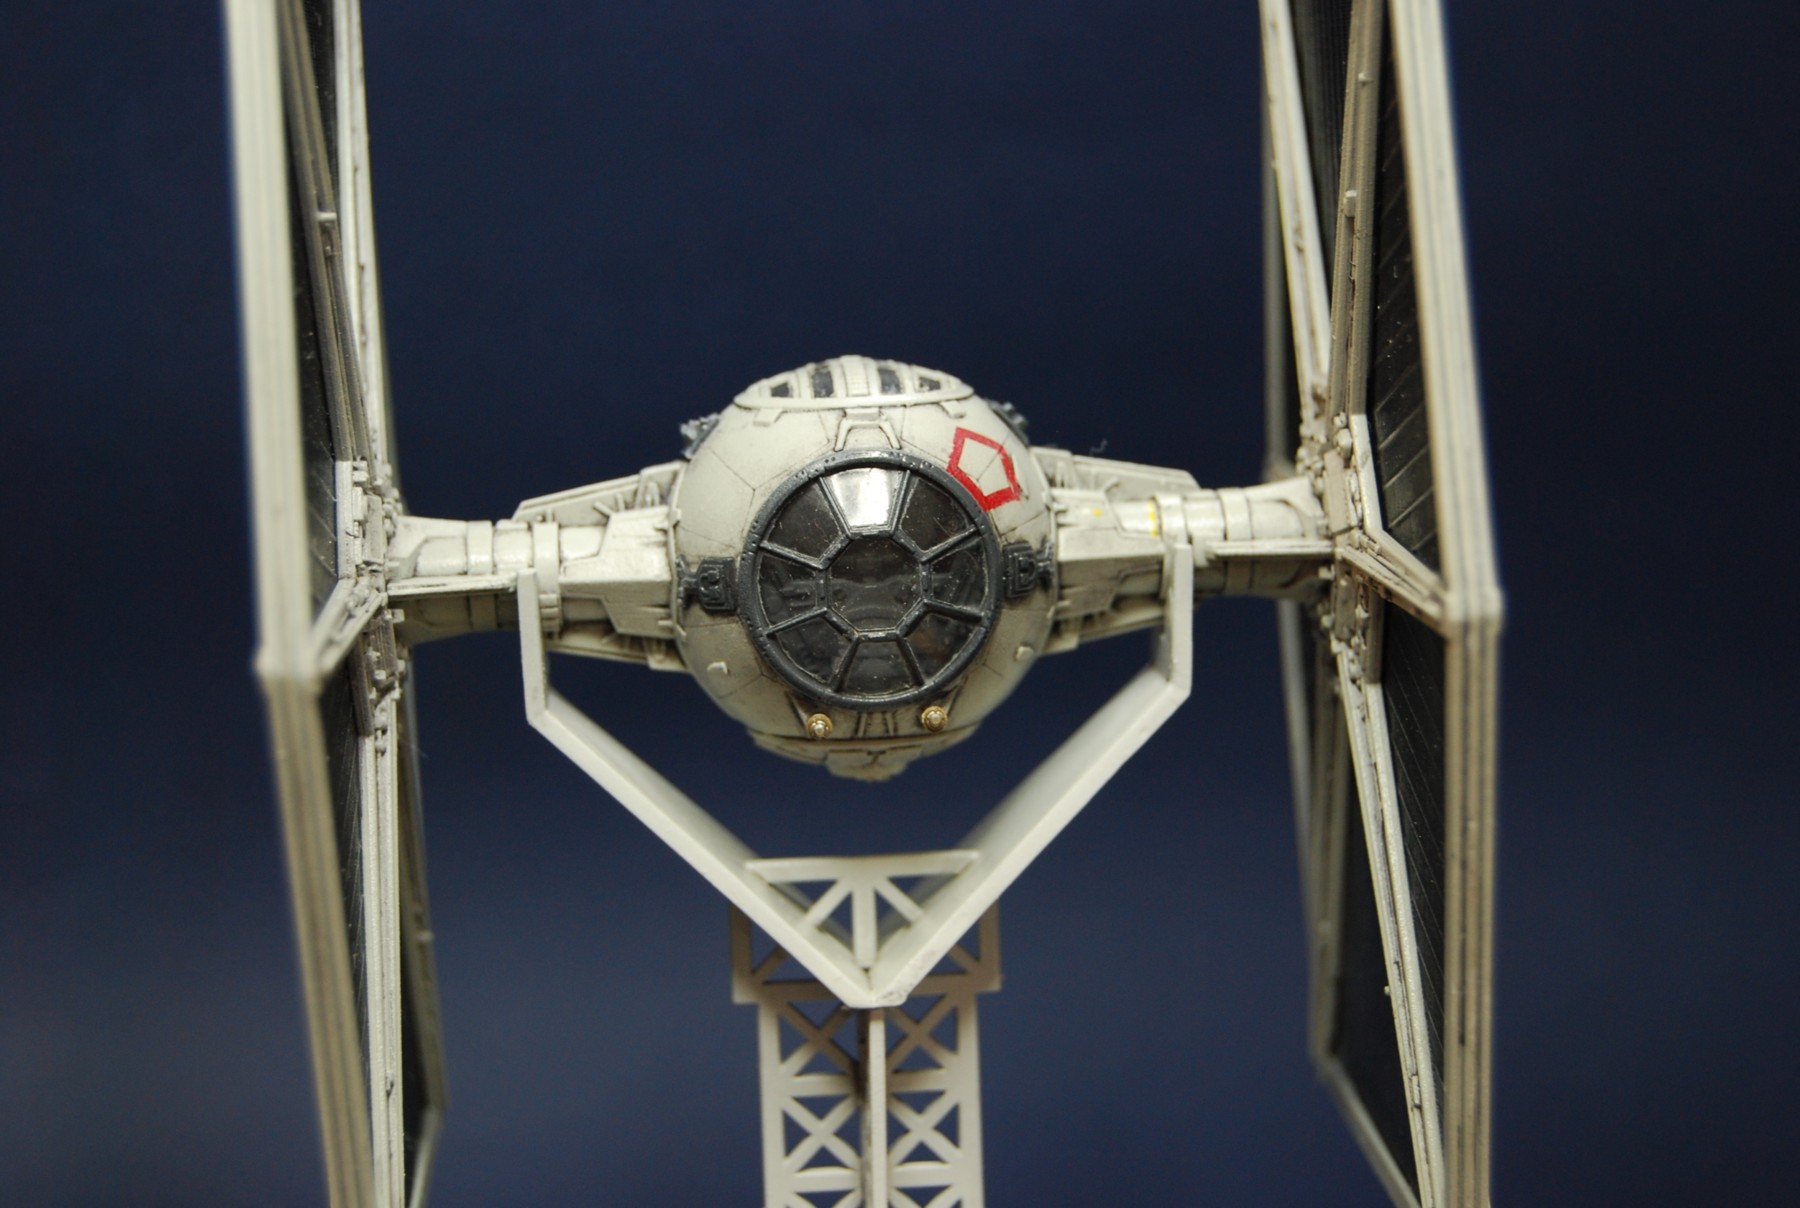
MF it's a red pentagon not hexagon on the Ties, it's also on the port hand side, I've painted a fair few... kill markings would also be good for ties, I know there is a least one picture of Soontir's TIE/IN with them along the starboard side.
What does this pentagon signify? A squadron marking?
Edited by Explosive EwokFantastic!
We just print these out on decal paper and get to work, then? They are already 1/270 scale?
Just curious, but were are you getting the reference images for all of these?
I posted links earlier in the thread, but there are only references for Reds 1-6 and Red 12, because that's the only X-wings that were built for A New Hope. The others are purely from my fevered imagination. ![]()
Fantastic!
We just print these out on decal paper and get to work, then? They are already 1/270 scale?
No, and no. They're still very much a WIP, I just finished making the panels. I still have to rearrange them on the paper to make them all standardized (otherwise you're gonna spend more time trimming them to fit) and print them out to get the sizing just right. When the decals are fitted precisely to the X-wings, I'll release them as PDF so you don't have to fiddle with scaling and all that.
MF it's a red pentagon not hexagon on the Ties, it's also on the port hand side, I've painted a fair few... kill markings would also be good for ties, I know there is a least one picture of Soontir's TIE/IN with them along the starboard side.
What does this pentagon signify? A squadron marking?
I dunno . . . I always assumed it was either a flight leader or elite pilot marking.
Okay, got some progress on Gold Squadron:

Looking great!! One question: what size page are these to be printed to? These are to be used with waterslide decal paper, right?
Thank you! ![]()
They'll be designed for 8.5"x11" paper, but you should still be able to print it on A4 if you're in Europe.
They are for waterslide decals, yes. I'll be creating a tutorial for them.
And that was two questions, not one. ![]()
Okay, the Y-wings are done!

Now lets get some TIE Fighter markings . . .
I made some TIE Fighter hexagons, and while I was at it, I decided to make some generic logos as well:
If anyone wants something put on here, let me know. I'm going to be making blast marks and oil streaks in the mean time.
I just want to see some of these printed out and on ships now!
You can't just keep us waiting forever!
Oh yes I can! ![]()
In all seriousness, I went out and bought some decal paper, and I'll be testing them out as soon as I get them arranged on the sheet correctly.
Just. So. Beautiful!
Oh, I need to mention something VERY important:
These decals CANNOT be applied over black or any other dark color, unless you print on white decal paper and trim off all the excess decal paper. Think of these like you would a color filter, which is basically what you'll be making.
The X-wing decals, for instance, are designed around you basically painting the whole thing off-white, applying the decals, and then giving the model a wash of black. You can't apply them over the existing paint job because the existing markings will show through.
Want want want want want want want!!
Thanks for all the effort you put into this - it looks fantastic!! I've got the decal sheets waiting here and the printer is already warmed up
Dude - my art skills (read: complete lack thereof) make doing this by any other method a statistical impossibility.
You are my hero.
Okay, the X-wings and Y-wings are all arranged and I've put outlines around each decal:

I had a minor setback in that I forgot to save the logos and things, but this might be for the best because I need to test out the X- and Y-wing decals anyway and this will help save ink. The logos aren't to any scale anyway, so I don't need to print them to test them out, other than perhaps testing them over certain colors.
Just out of curiosity, what would be your choice of paint to use to cover over the factory-done markings, before applying your beautifully designed decals?
You suggested an off-white, and for the X-wings I'd thought of using one of the Citadel paints (had some success a few days ago with painting up Kath Scarlet).
Also just a suggestion: use Micro-Set and Micro-Sol to apply the decals. Micro-Set provides a strong bond for the decal after it slides off the paper. Micro-Sol, applied gently, *really* gives it the effect that it's paint on the model instead of decal.
I plan on using Model Masters Camouflage Gray. It's a great color that looks perfect under a wash.
And yes, Micro Sol and Micro Set are required for the bumpiness of the hull, if you don't want silvering.
I began the battle damaged sections, starting with Red Five:

Again, I haven't yet tested these on a mini, so they may not be proportionally accurate. This is just a preview.
Sent you a PM, Millennium, but figured I'd chime in here, too - bump you back up to the front page where you belong! Your previews look great and I'd love to use your designs in some repaints I'm planning. Hope things are going well!
Also just a suggestion: use Micro-Set and Micro-Sol to apply the decals. Micro-Set provides a strong bond for the decal after it slides off the paper. Micro-Sol, applied gently, *really* gives it the effect that it's paint on the model instead of decal.
When using my own custom decals (40k) I always follow the following procedure.
1. Paint with gloss varnish to make a smooth surface.
2. Micro set.
3. Apply decal.
4. Apply and re-apply micro sol until happy. This softens the decal and lets it adhere/shape to the surface better.
5. Paint with gloss until you no longer see the decal seam.
6. Apply matte varnish.
It honestly achieves a painted look.
Depending on the product you use, be sure to coat the custom decal page you have printed. I use Testors decal paper and then apply Testors dullcote over it. There are other alternatives though.
To the OP. You are incredible. These are great!!!
Edited by ConandoodleUnless using black I've always been disappointed with clear decal film as the colours my printer(A Kodak model) produces are just not dense enough, even when putting the decal on white Plasticard.
Do you use any special printer set up options to increase the colour density?