Amazing work! I m interresting in your guide.
Fourtytwo brings a brush and colours to Imperial Assault
Thanks for your patience - I was swamped at work the past few weeks and just didn't have the time to do a write-up which goes a bit bit beyond the superficial, but at last, I got around to it.
English is not my native language (I'm german), so if you read anything below which can be phrased better, just give me a holler - I'll gladly welcome corrections.
So, here we go...
General tips for painting miniatures
Do not undercoat your figure solid black. A black undercoat will give you a hard time applying light and bright colours. It also makes it harder to distinguish sculpted details from each other and see where one element ends and another begins. Instead, Iprefer to give my figures some pre-shading by undercoating black, and then slightly spraying on some lighter gray in a 45° from above, thereby creating zenital highlights all over the mini. This gives a median mid-grey undercoat with upturned areas and raised details being the lightest and downturned areas and recesses being darker than the median grey tone.
Always thin your paints before applying them to the figure. Thinned paints result in smoother surfaces, preserve small sculpted details and take advantage of the pre-shading you created when undercoating your figure. They are also easier to control with you brush - the trick is not to overload your brush with liquid. Also, only with thinned paints you are able to paint lines and detail which are thinner than a hair.
Paint with the tip of your brush. When you use thinned paints, you can apply colour with just the barest touch of the tip of your brush. Again, this greatly increases you control over where colour ends up on the figure and is key to achieving neat and fine results. If you make a mistake, simply correct it by counter-painting your mistake with the neighbouring colour. Correcting mistakes is a huge part of the endeavour to create neat and pleasing results.
There are many great YouTubers out there if you look for content helping you to improve your painting. Aside from Sorastro's Painting I greatly recommend you to check out Vince Venturella's extensive and ongoing Hobby Cheating-series - it's great not only for picking up new ideas and techniques, but also for improving your very mindset when it comes to painting miniatures. it's great stuff!
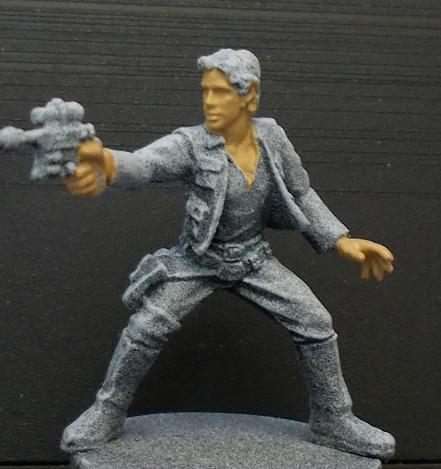
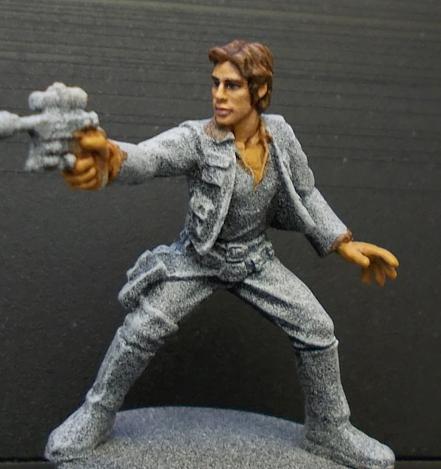
Using Han Solo as an example, here is a detailed breakdown on how I go about painting faces. It's my approach, and it isn't the be-all end-all. When it comes to painting miniatures, you need to experiment and find what works best for you, and if you keep at it, you will naturally become better at what you do and even create your own style.
I always start with applying a base colour, which always is my mid-tone for the intented result. You do not need to be neat at htis stage as you can correct mistakes later when you apply the base colours of neighbouring areas. Your aim should be a smooth and even application of the base colour.
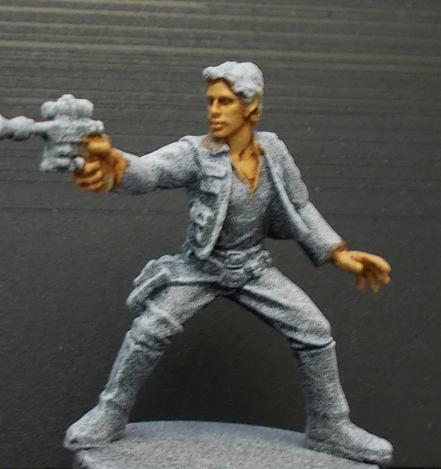
Next, I create shadows in the recesses. The most commonly used method is to apply some dark wash over the whole area you painted with the base colour before. I rarely do this any more, and if I do, then only on dark base colours. Applying a wash over a whole area often results in raised areas requiring some tidying-up by applying the base colour once again after applying the wash, this time leaving out the recesses and areas which should remain darker. This is both time-consuming and tedious. So, I only apply the wash to the recesses, corners and downturned areas which are in shadow. That way I can perfectly control where my wash goes and save both on time and effort. If need be, you can still go back and correct some mistakes by painting over them with the base colour.
With faces, I make sure to take some of the wash-colour into the tip of a brush with a very fine tip and then accurately apply the wash to the eyes, below the nose, between the lips, under the lower lip, under the cheek bones and to the sides of the bridge of the nose. The little spot right under the nose and between the eyebrows and each eye should be the darkest. The same goes for the area between the chin and the neck. The other shadows should be a bit lighter.
For the white of the eyes I thin white paint to a consistency akin to milk. I take a little bit of it into a mid-sized brush with a very fine tip, and then lightly touch the tip of the brush to the recesses of the eyes. The capillary-effect will perfectly fill the sculpted eyes with the white and sharply define their shape. You might want to repeat this once or twice, depending on how light you want the white of the eyes to be. Then I thin a dark colour for the pupils and again use a mid-sized brush with a very fine tip to lightly dot-on the pupils. I use a mid sized brush because I do not want the colour to quickly dry on the bristles, which will happen with a smaller brush.
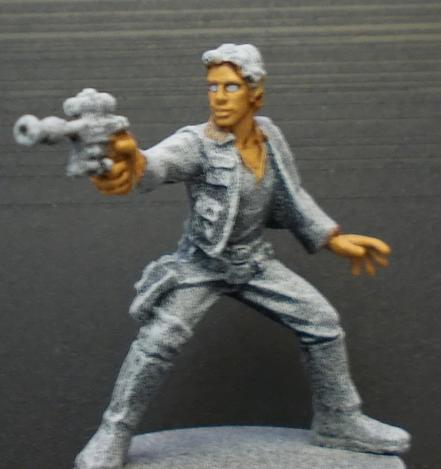
As for the pupils - lightly dot them onto or into the white. If you have trouble getting them both into the centre, paint them more into the right or left corner of the eyes and make your figure look to the side. With that done, I paint a very fine dark curve along the upper edge of the eyes which represents the shadow of the upper eye lid and the eyelashes. In the case of female figures, I usually pronounce these a little bit more. Do the same with the edge of the lower lid, just even more fine and with a lighter colour then the one we painted the edge of the upper eye lid.
With the eyes done, I usually turn to the eyebrows. These are often left out with many figures, but I strongly suggest to paint these, because they can give the faces of your figures a lot of expression. Make sure to paint them in a very fine dark curve. Take a look at comic book characters with their often slightly exaggerated eyebrows for shapes, positioning, and how both help create different expressions and moods.
Painting lips often proves to be another challenge, especially with female figures. Usually, the lips of female figures should be a bit darker than those of male figures and a bit more pronounced - but just a bit, because it's easy to quickly go overboard and thereby creating a look that is unnatural and comical. As a rule of thump, the lower lips should be a tiny bit more voluminous and lighter than the upper lip. Never paint over the edge of the sculpted lips, and make sure both the upper and lower lip are sharply defined. If you feel inspired, you can play a bit with the shape of the mouth, especially by playing twith the corners of the mouth. Again - look at comic book-characters for inspiration and how personality, attitude and mood can be created by different shapes of the mouth and lips.
The last thing I paint with faces are the highlights. You can layer them on wth some gradient towards the brightest highlights, which should be applied to the nose and the upper brow just below the hairline. The medium highlights should be placed on the upper parts of the cheeks, the edge of the upper lip, the lower third of the chin and the upper edge of the ears. Note that the position of highlights can actually change the shape of the face. A sharp bright highlight placed on the tip of the nose creates a pointy fine nose, while the same highlight placed on the upper third of the nose creates the look of a hooknose. Likewise, you can create different types of chin, jawline or cheekbones throught the intensity, shape, volume and placement of highlights. By the way - the same goes for shadows, just to a lesser extend.
I've been drawing and painting faces since I was a kid, and I also have a keen interest in visual character design since then. I always recomment to study faces in various artistic mediums - painting, comic books, animated shows like Clone Wars and REBELS for example, or whatever strikes your fancy - and try to apply what you learn to your miniatures. Talent is no factor at all on the long run, but a lot of practice and experimentation.
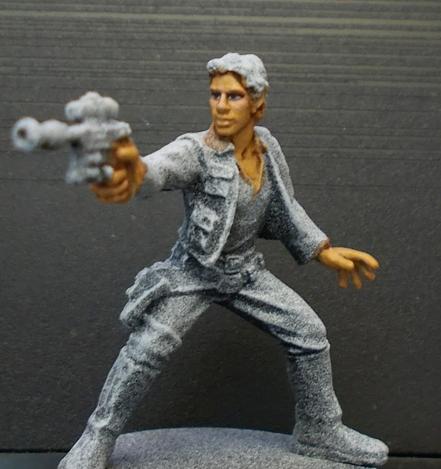
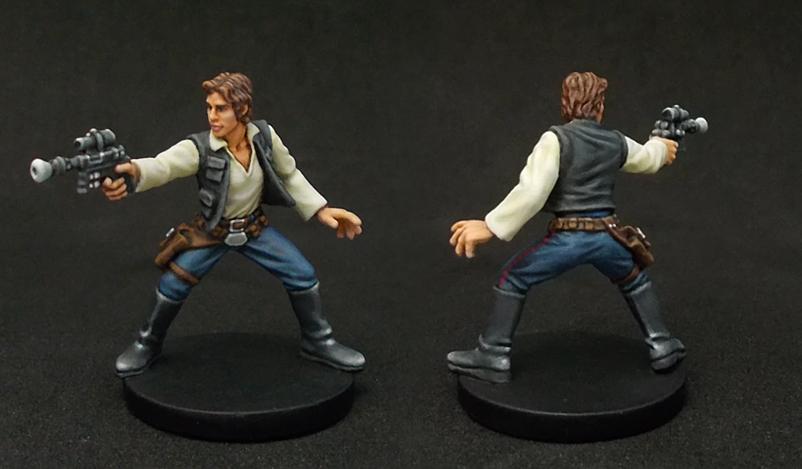
Here's my finished Han Solo:
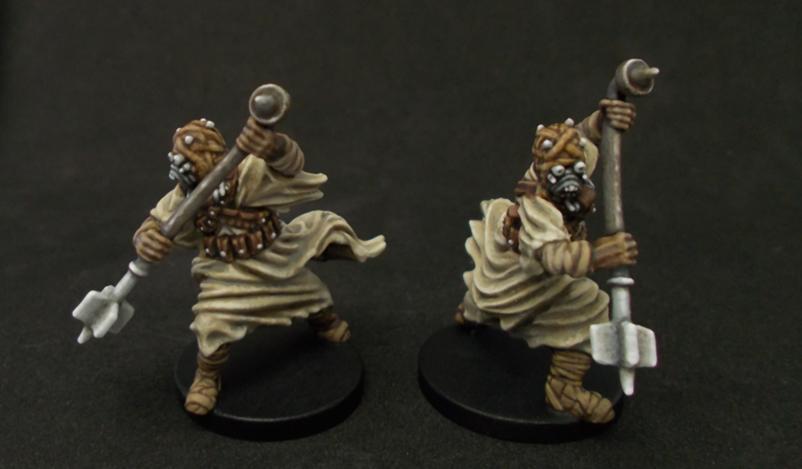
I also painted Tress Hacnua, two Tusken Raiders and a Clawdite Shapeshifter lately:

And I'm currently in the process of painting two more Jet Troopers:
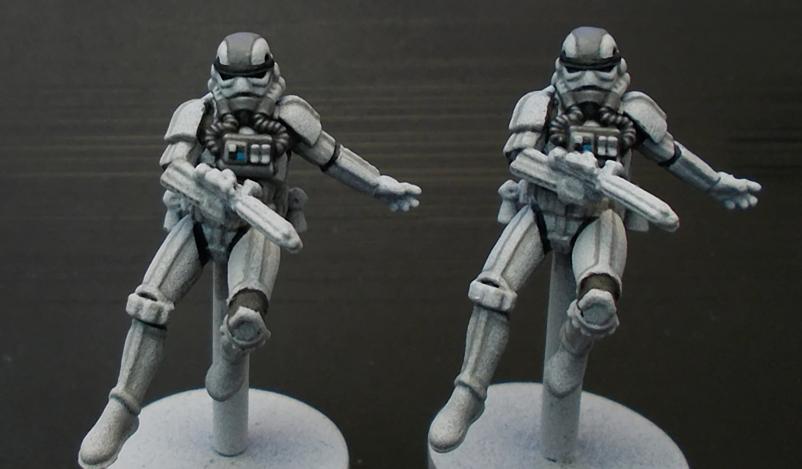
I modified their arm positions a bit to differentiate them from the other Jet Troopers deployment group without having to resort to symbols or colours on bases or shoulder pads.
Thank you for your article Fourty two.
Nice find "undercoating black, and then slightly spraying on some lighter gray in a 45° from above" I will try it!
I don't say this lightly, but that Tress might be one of your best yet. The shading on the clothing looks super smooth
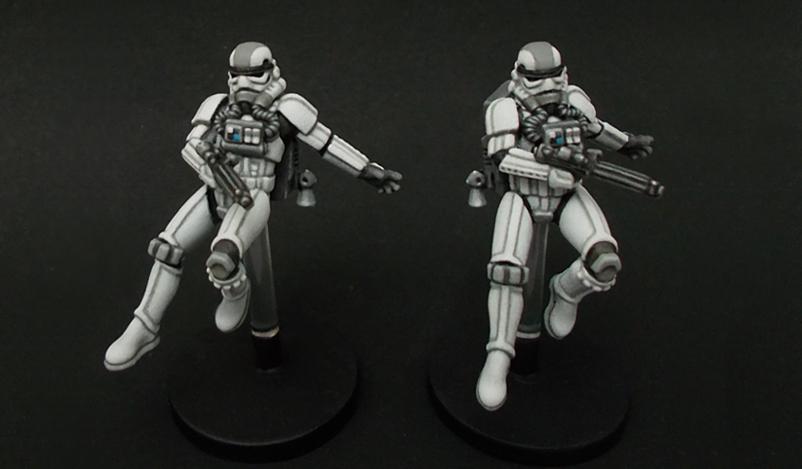
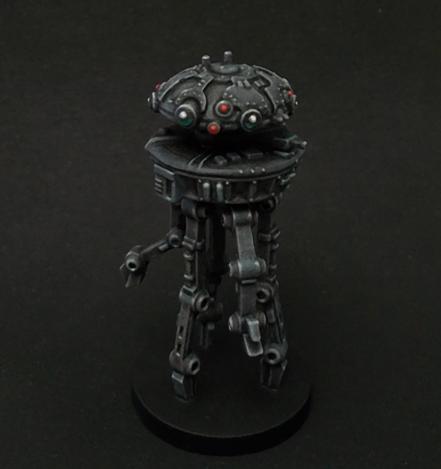
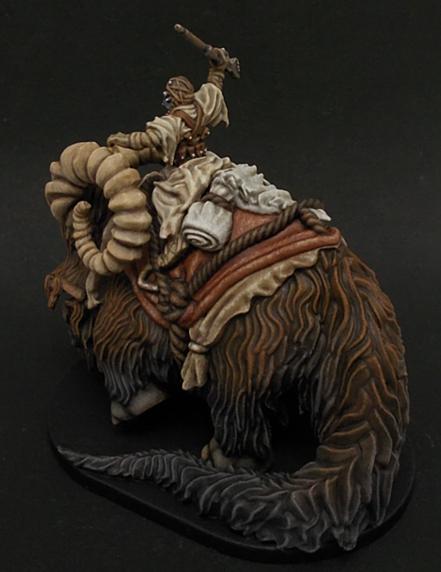
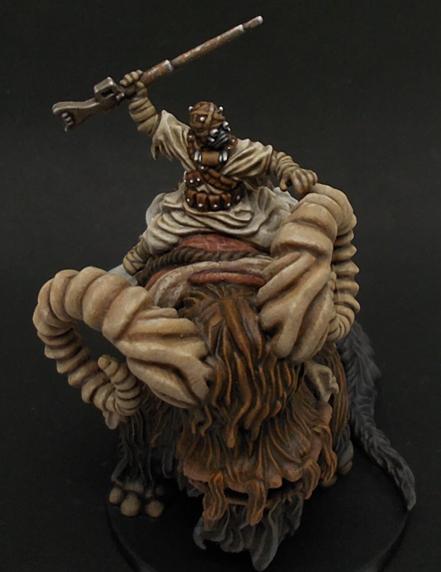
I finished the second set of Jet Troopers, and I also painted a Probe Droid, Agent Blaise and a Bantha Rider since my last post in this thread:

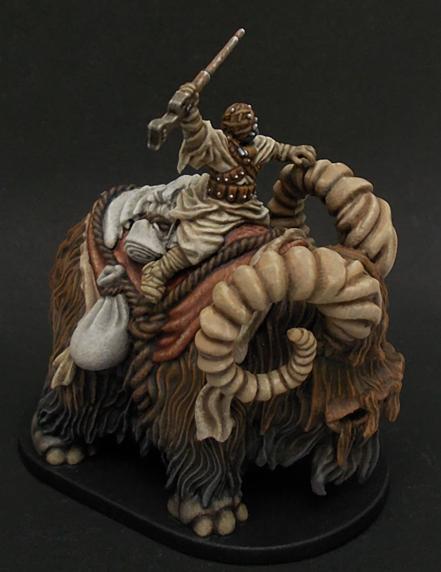
Mate, I absolutely love your work. Just superb. Han looks incredible, the Bantha Rider is legit amazing, and so is Tress. I think I've said it before, but Sabine still blows me away.
Man, I love how bright your colors turn out. None of them really bleed into each other without it being intentional. Great stuff.
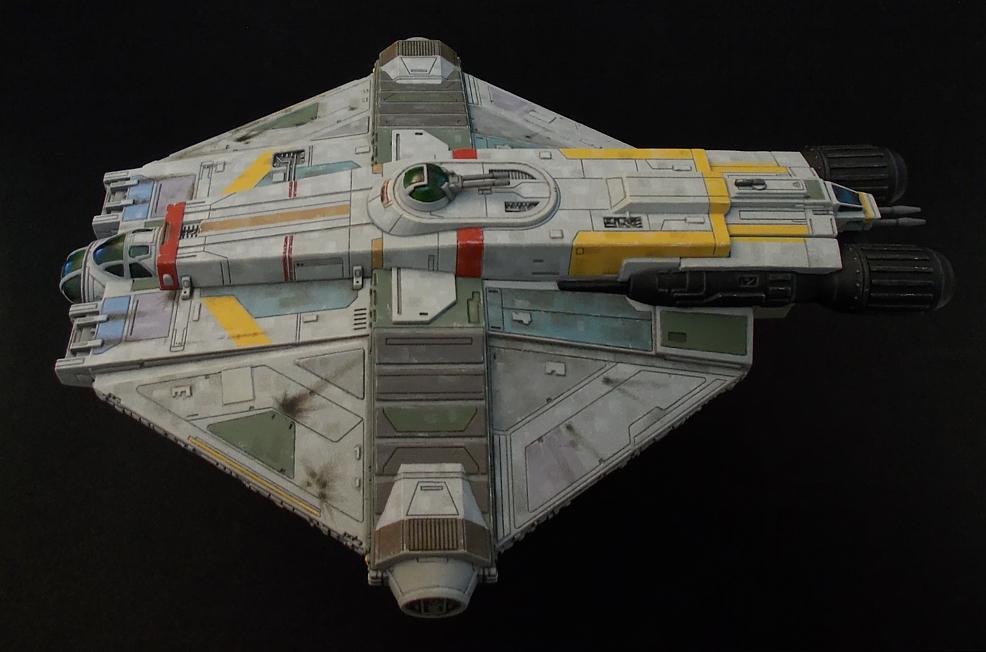
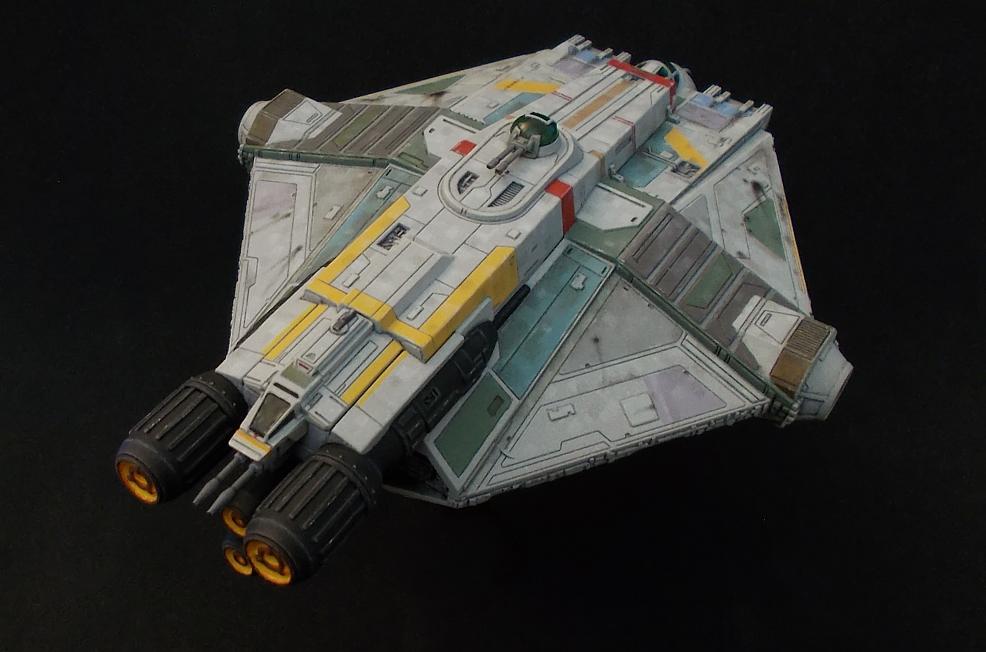
Thanks a lot, guys. To add some variety - I'm also building and painting other Star Wars-related stuff, and for those who are interested, here are two examples.
For fun, I painted the GHOST from FFG's X-wing Miniatures Game and my aim was - as usual - to get it as close to the original from the show as possible:
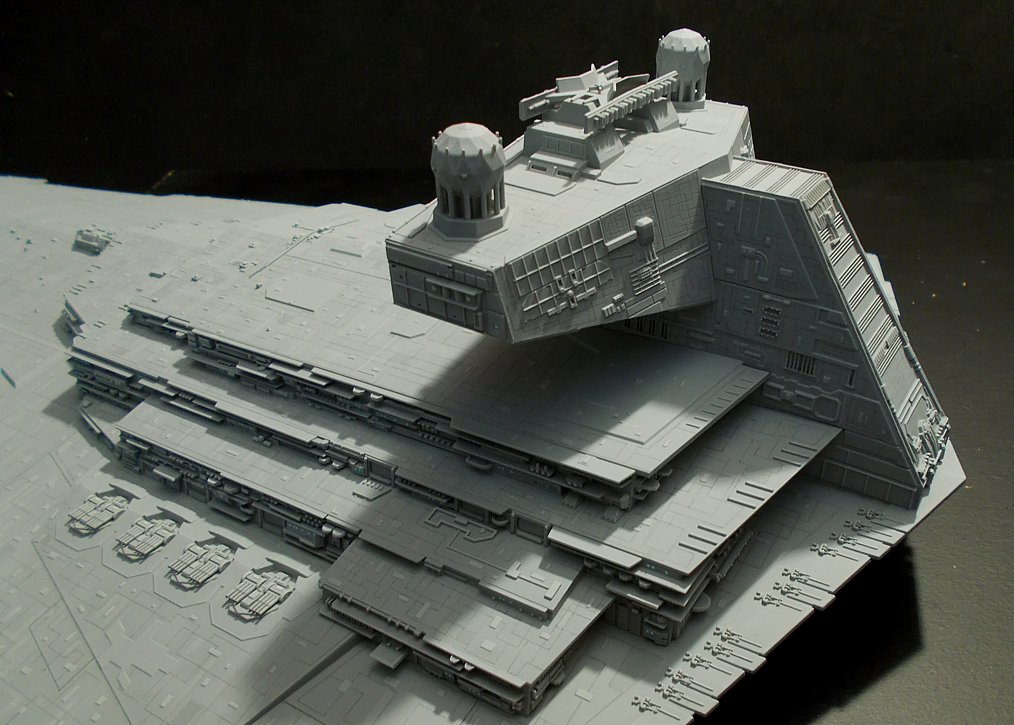
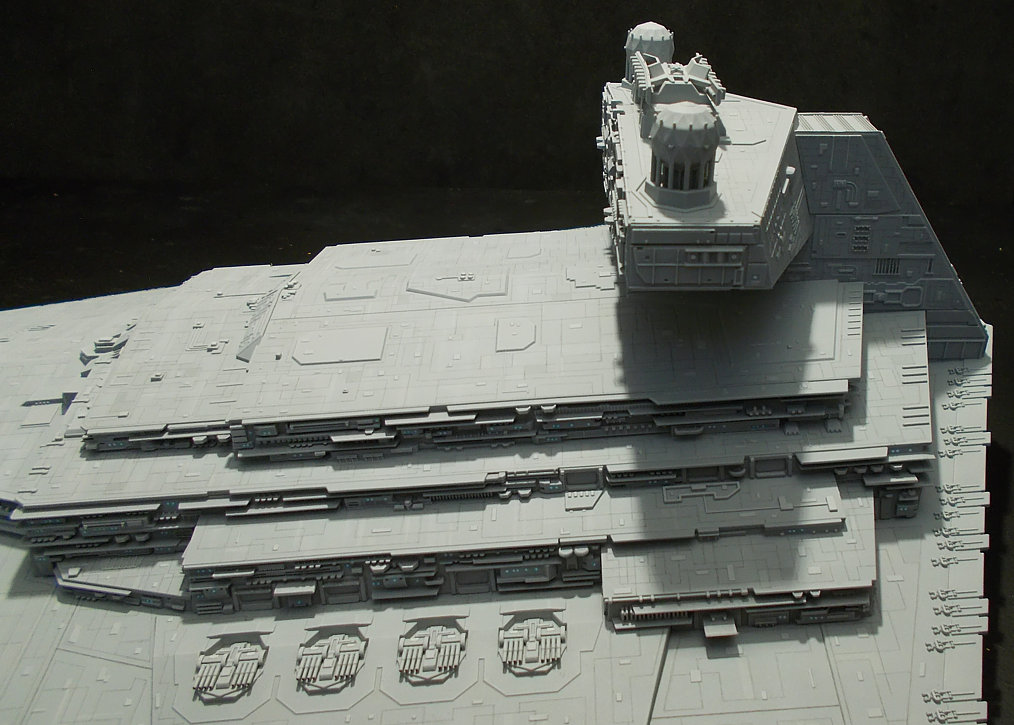
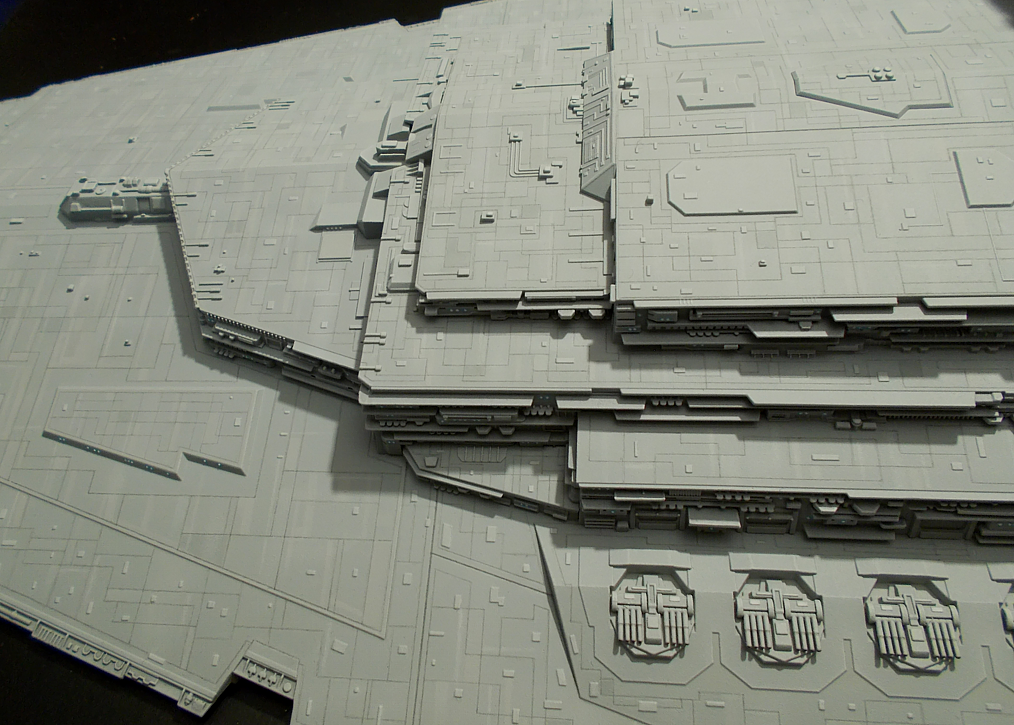
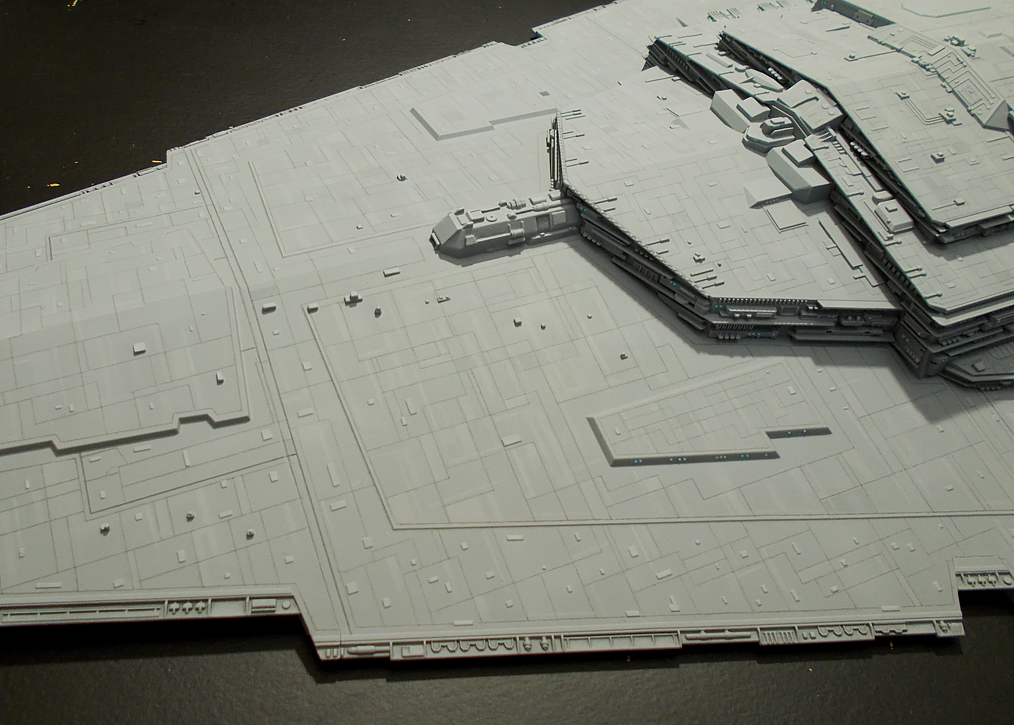
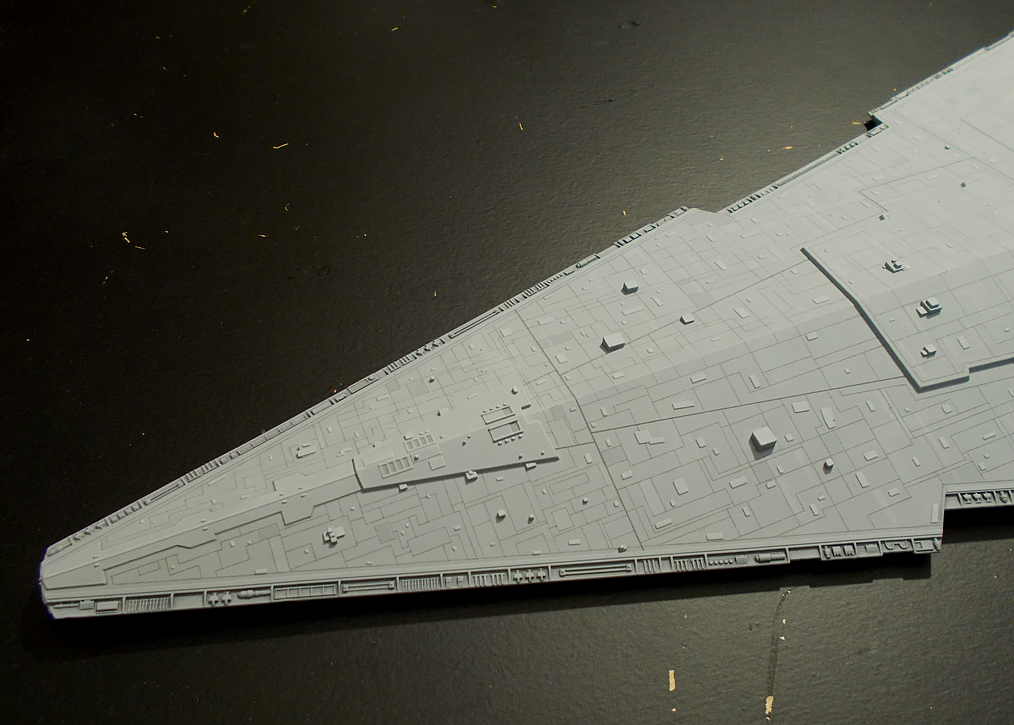
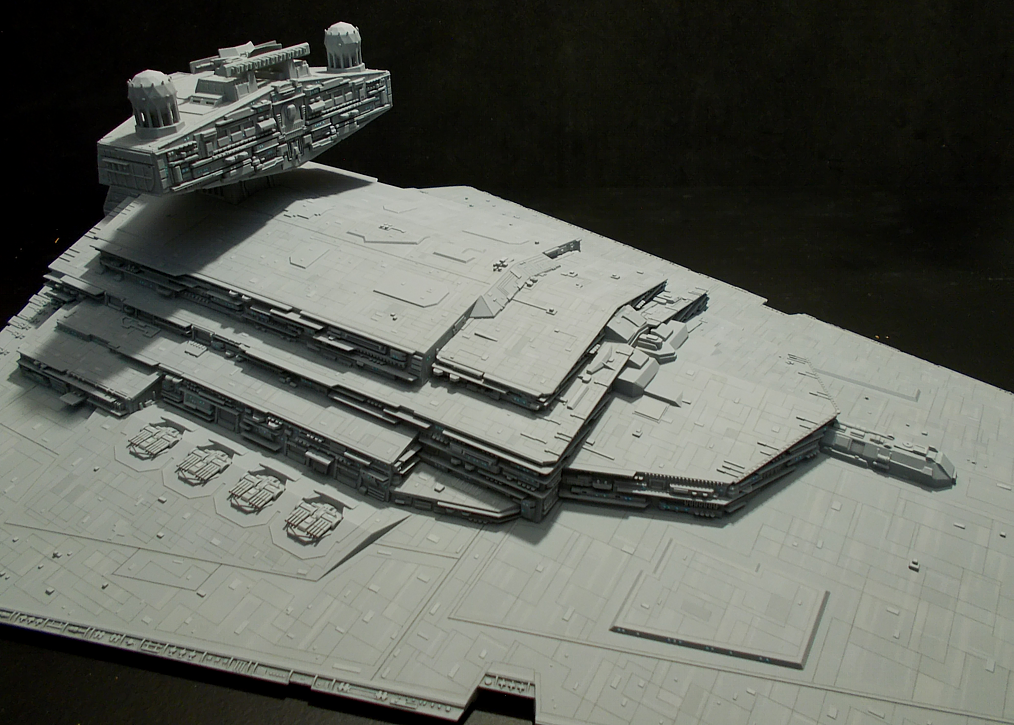
Today I also finished the first half of a long-term-project of mine wich I'm working on now and then - Zvesda's 1:2700 scale (60cm) Imperator 2-Class Star Destroyer. It's a great kit. I'm focusing on painting (electronics is not my thing. so no lighting) and I've also added over 150 teeny-tiny custom details to bring it closer to how the studio model looks. The upper half is done and sealed with matte varnish now.
Just wow. Man, you're a monster! A good one though ![]()
Any chance of seeing that Star Destroyer next to the Ghost and a couple of TIE Fighters for size comparison? The mind boggles! Looks amazing!
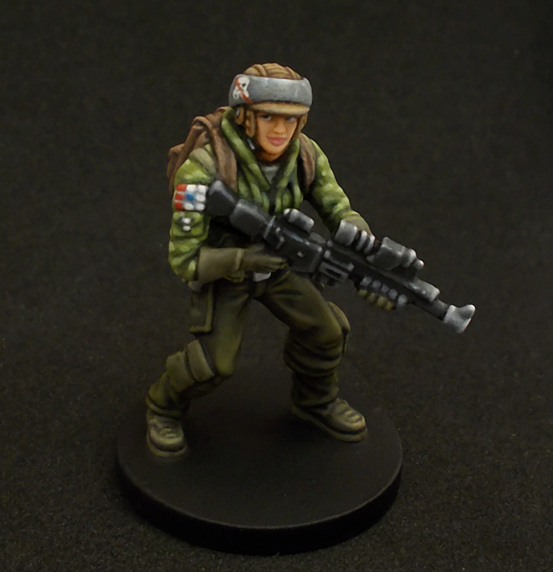
A quick update: I'm currently painting three Alliance Rangers, two of which I've re-posed and/or converted, so that all three now look unique. One I've just finished painting and varnishing:
I love the way you paint. Somehow your colors seem soft, en yet still bright. Your detail work like the faces is awesome. Keep posting!
Fantastic work Fourtytwo! Very smooth work...good color coverage.
On 1/15/2019 at 9:18 AM, Eddie said:Keep posting!
I will! ![]()
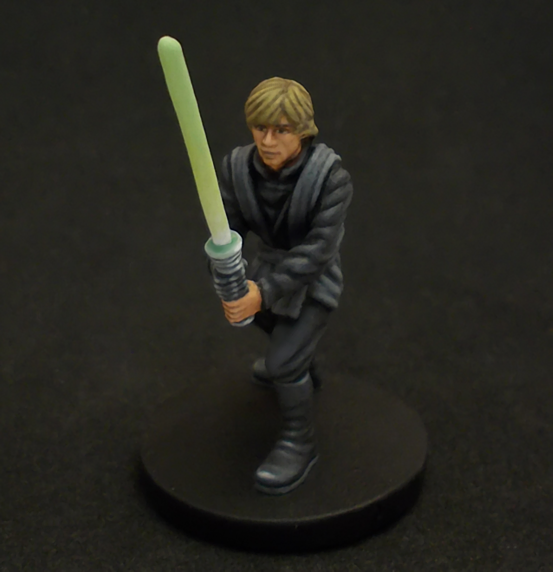
I've painted Luke Skywalker, Jedi Knight two weeks ago. It's currently going a bit slower with my Imperial Assault painting, since I've also started painting some X-wing and Y-wing for X-wing Miniatures, but I will continue painting more Imperial Assault minis, because it's my favorite Star Wars game and I just love all the characters.
Anyway - here's Luke:
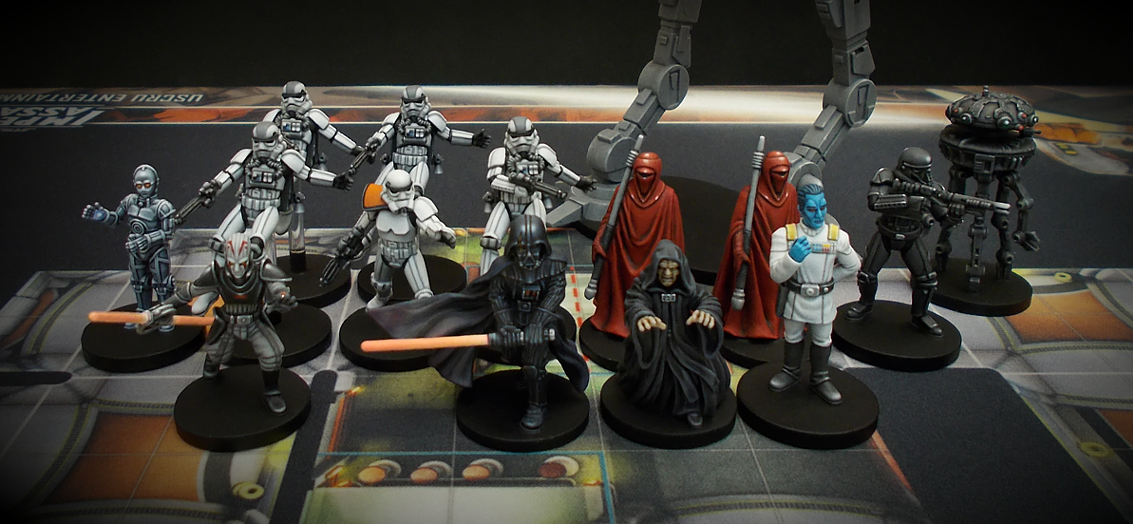
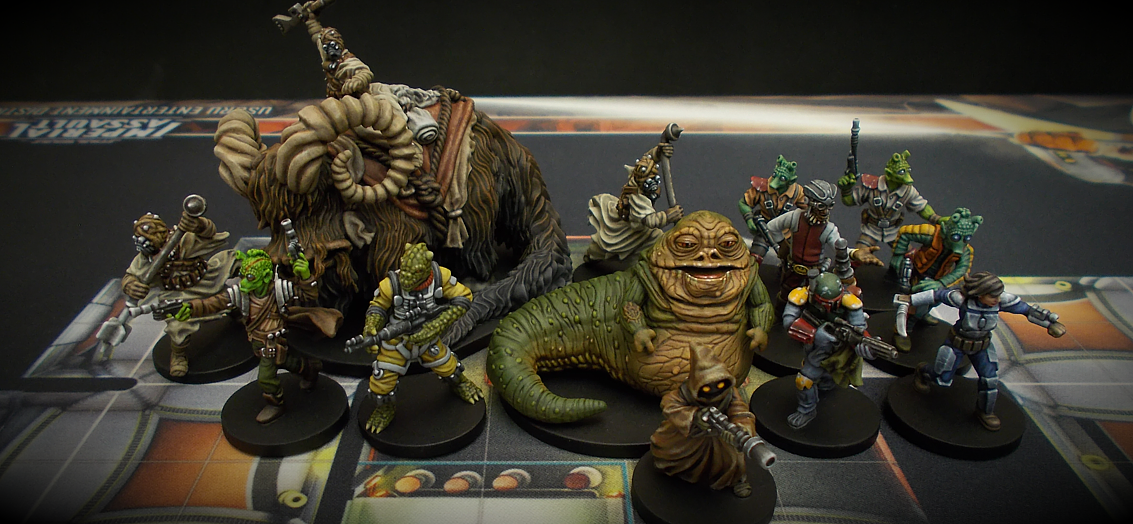
Edit: Here are also the first two of a few group shots I'll make:
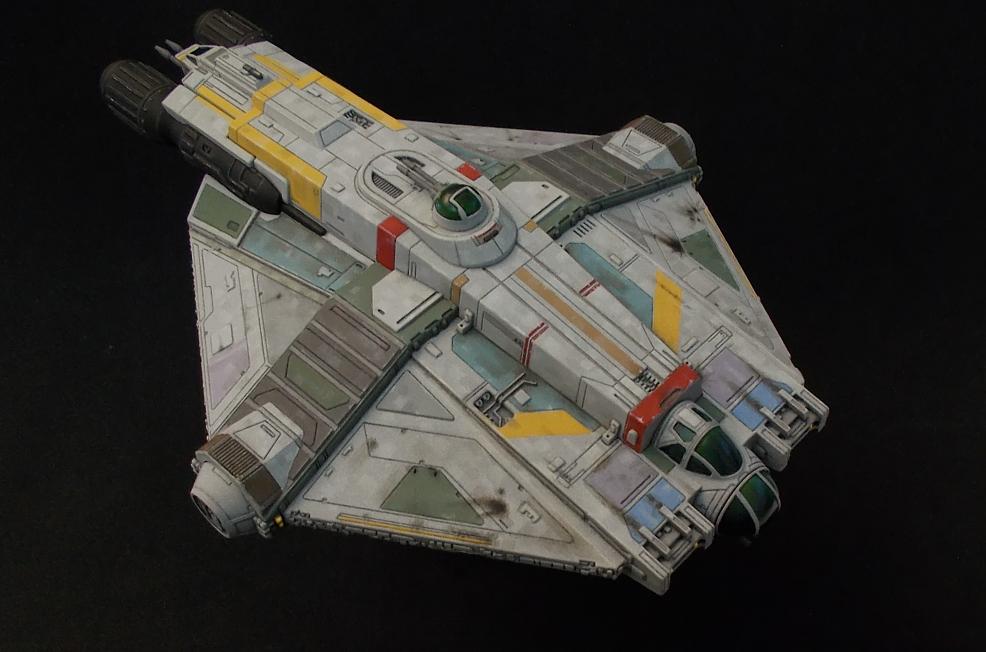
On 12/30/2018 at 7:52 PM, Fourtytwo said:Thanks a lot, guys. To add some variety - I'm also building and painting other Star Wars-related stuff, and for those who are interested, here are two examples.
For fun, I painted the GHOST from FFG's X-wing Miniatures Game and my aim was - as usual - to get it as close to the original from the show as possible:
I seriously thought I was looking at reference images for the Ghost here - high quality CG renders. Those pics were the painted model? My mind is officially blown.
I'm thinking about having a go at Hera next. Would it be cheeky to ask which colours you used for yours?
Haha! With the totally black background I can see where you’re coming from; it’s sooooo good 🤩
9 hours ago, udat said:I'm thinking about having a go at Hera next. Would it be cheeky to ask which colours you used for yours?
Not at all - let me think (it's been a while since I painted her)...
For the skin, I used Citadel Moot Green mixed with a teeny-tiny amount of Citadel Squig Orange as the base colour. For the shade I mixed one part Moot Green with one Part Citadel Agrax Earthshade. The Highlights were built up in transparent layers of the base skin colour gradually mixed with more White and a Tiny bit of Citadel Flash Gitz Yellow.
I can't exactly remember which colours I used for Hera's trousers, but if I'd have to re-create it, I'd start with a base of Flash Gitz Yellow mixed with a small part of Squig Orange. For the shade I'd mix a bit of agrax Earthshade into the base colour, and for the highlights some white.
14 hours ago, Fourtytwo said:Not at all - let me think (it's been a while since I painted her)...
For the skin, I used Citadel Moot Green mixed with a teeny-tiny amount of Citadel Squig Orange as the base colour. For the shade I mixed one part Moot Green with one Part Citadel Agrax Earthshade. The Highlights were built up in transparent layers of the base skin colour gradually mixed with more White and a Tiny bit of Citadel Flash Gitz Yellow.
I can't exactly remember which colours I used for Hera's trousers, but if I'd have to re-create it, I'd start with a base of Flash Gitz Yellow mixed with a small part of Squig Orange. For the shade I'd mix a bit of agrax Earthshade into the base colour, and for the highlights some white.
Thanks ![]() I don't think I have Squig Orange, but I'll see how different it is from Jokaero Orange. If I have to go into town to the Games Workshop I will
I don't think I have Squig Orange, but I'll see how different it is from Jokaero Orange. If I have to go into town to the Games Workshop I will ![]()
I'm currently taking a short break from painting Imperial Assault minis (I will continue in time, though, and still have a lot to paint and planned), because I need a change of pace now and then. However, this does neither mean that I'm idle, nor that I'm not working on something Star Wars-related. As you night know by now, I'm also building and painting models, and in february this year, I caught the Bandai-virus - this company produces awesome Star Wars kits which are not only perfect in production but also highly accurate to the original filming models in both proportions and detail, and since we are all Star Wars-fans here, I'd love to share with you what I did with them.
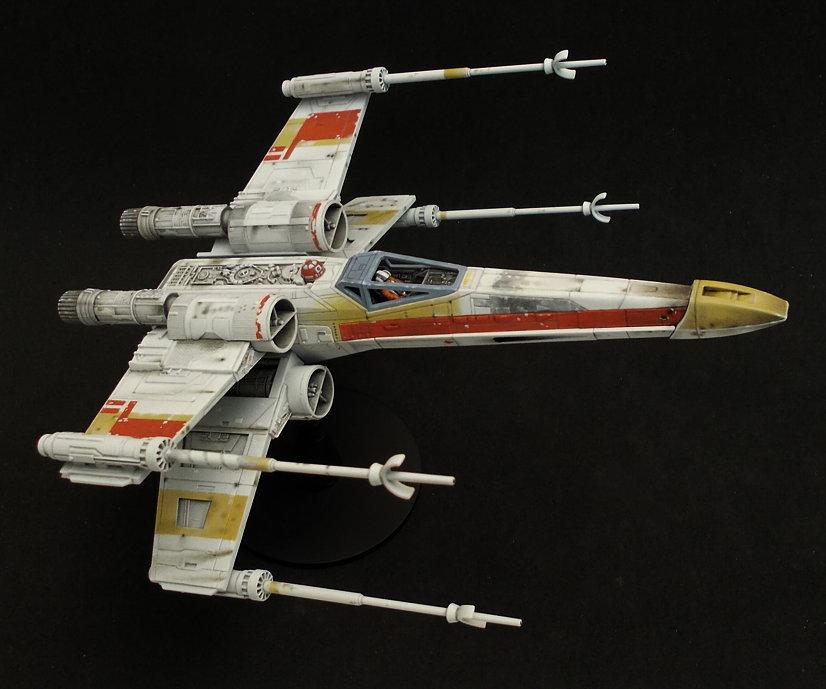
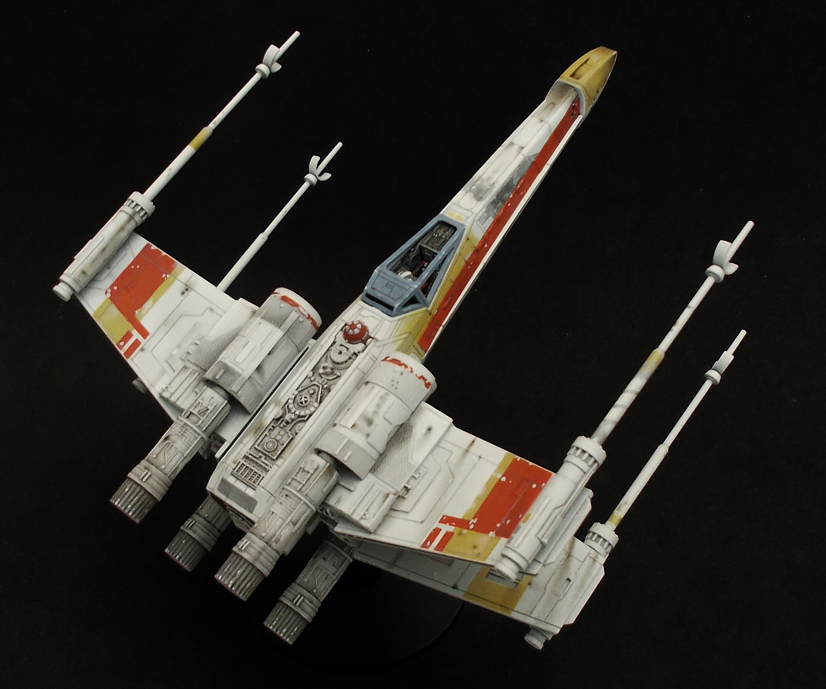
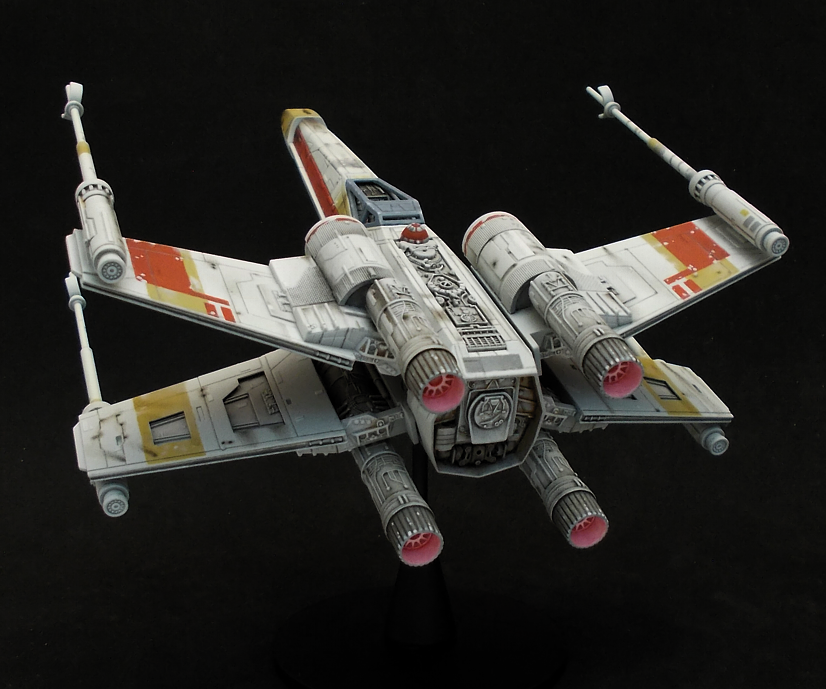
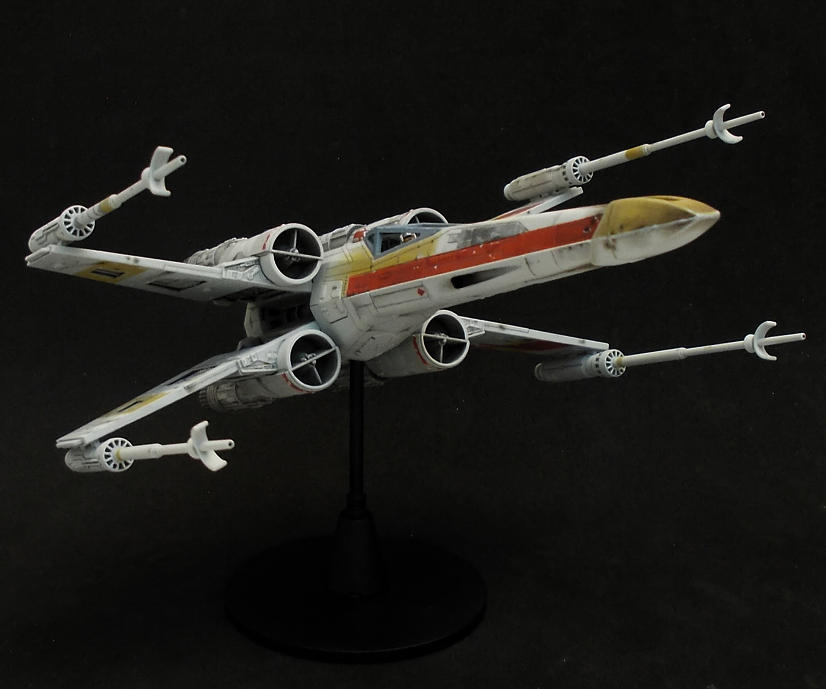
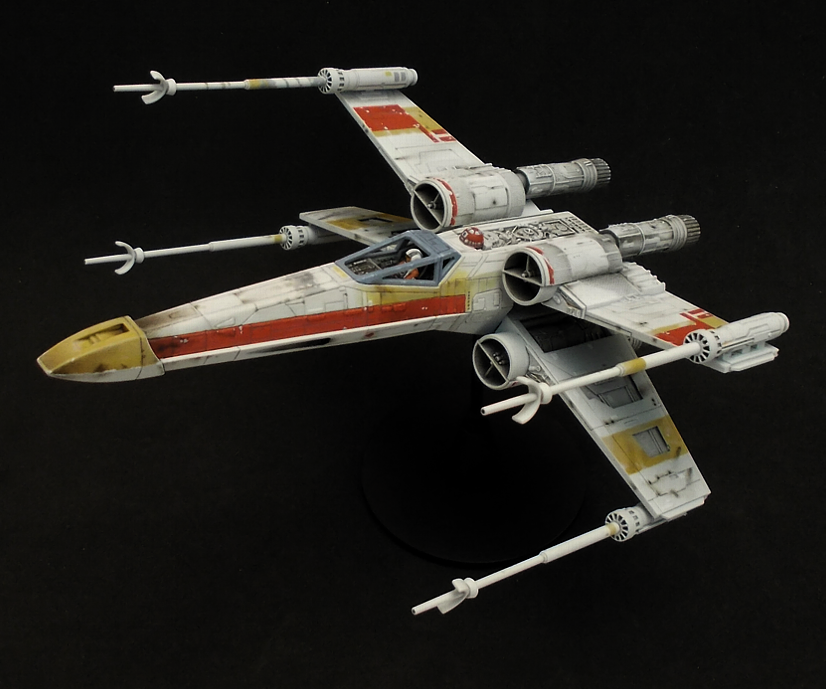
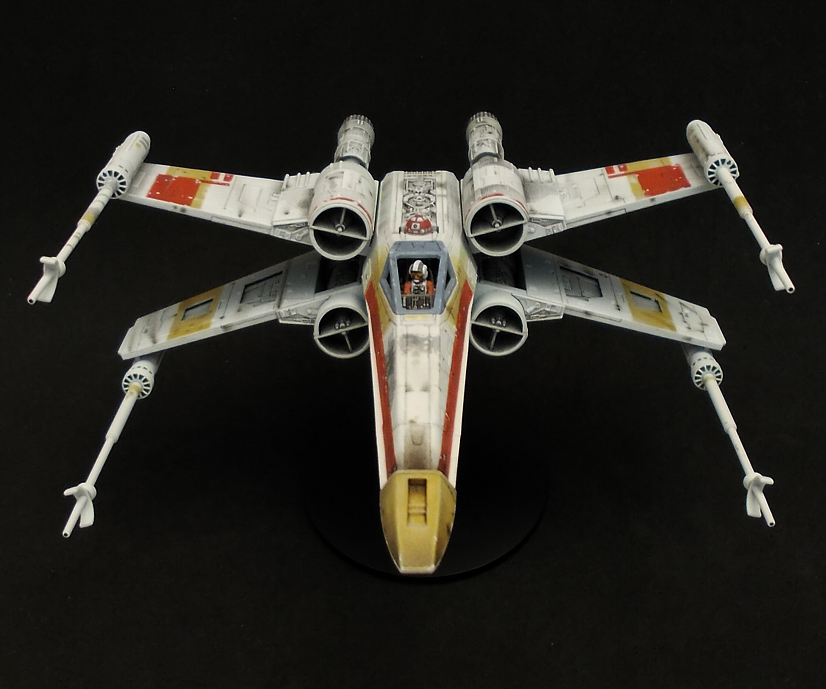
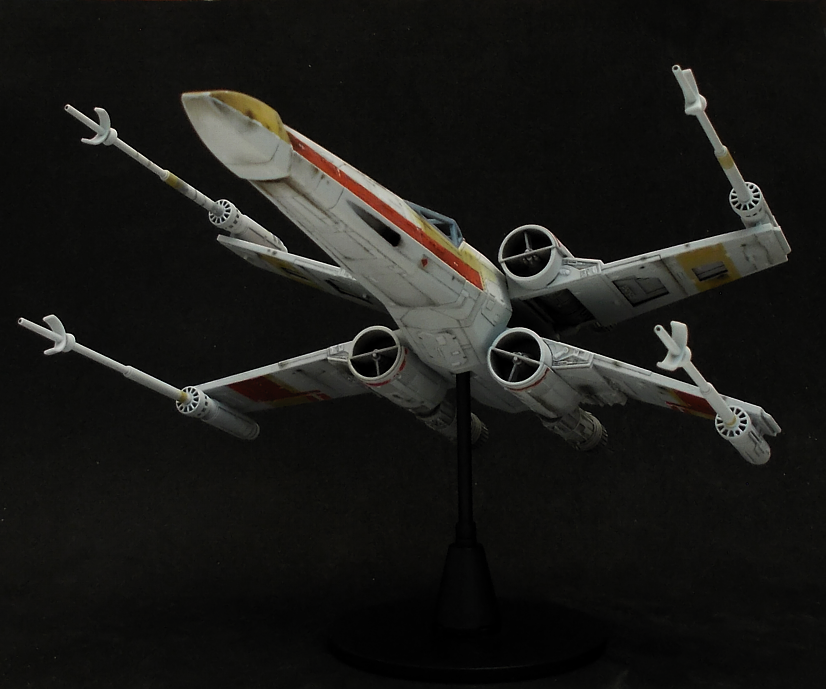
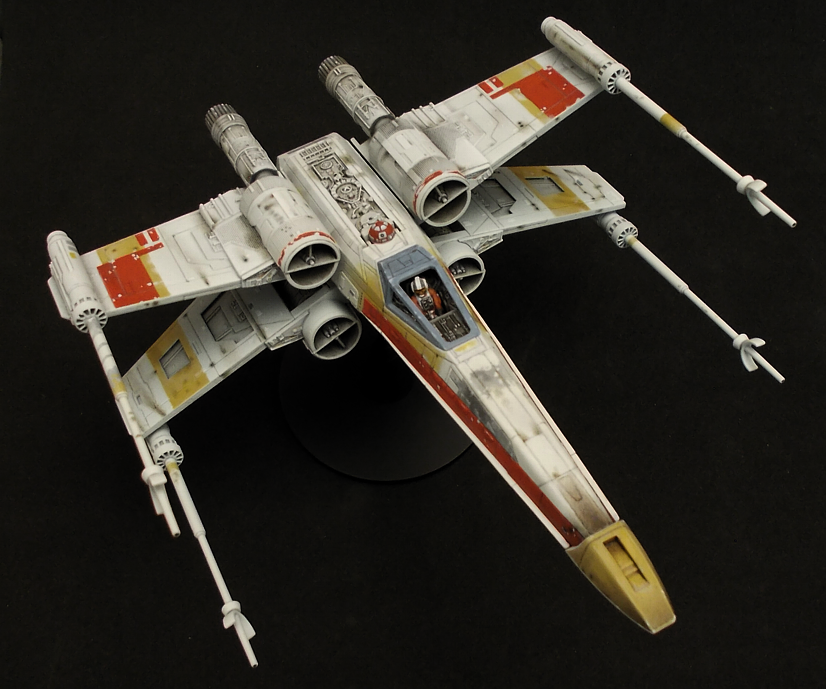
I first got myself their 1/72-scale X-wing, which builds you Luke Skywalker's Red 5 out of the box. I wanted to build and paint Wedge Antilles' Red 2, though, so I modified the fuselage accordingly and painted it very accurate to the Red 2 filming model, using several photos as reference material. Here we go:
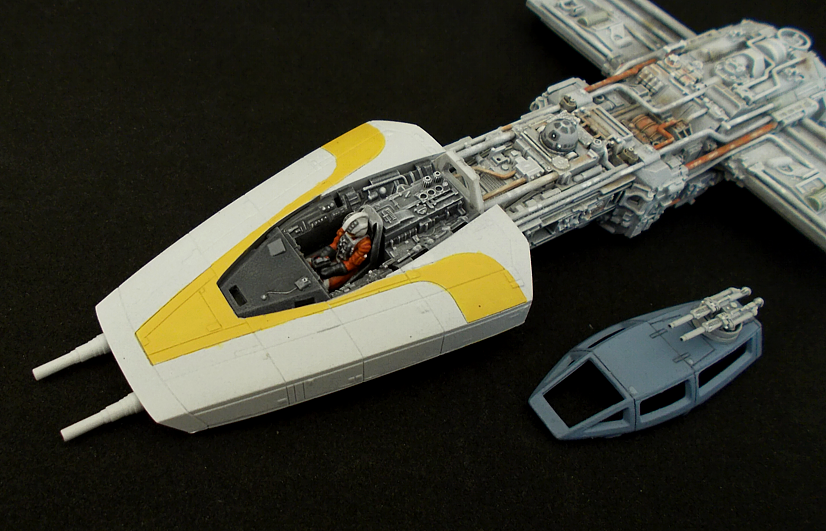
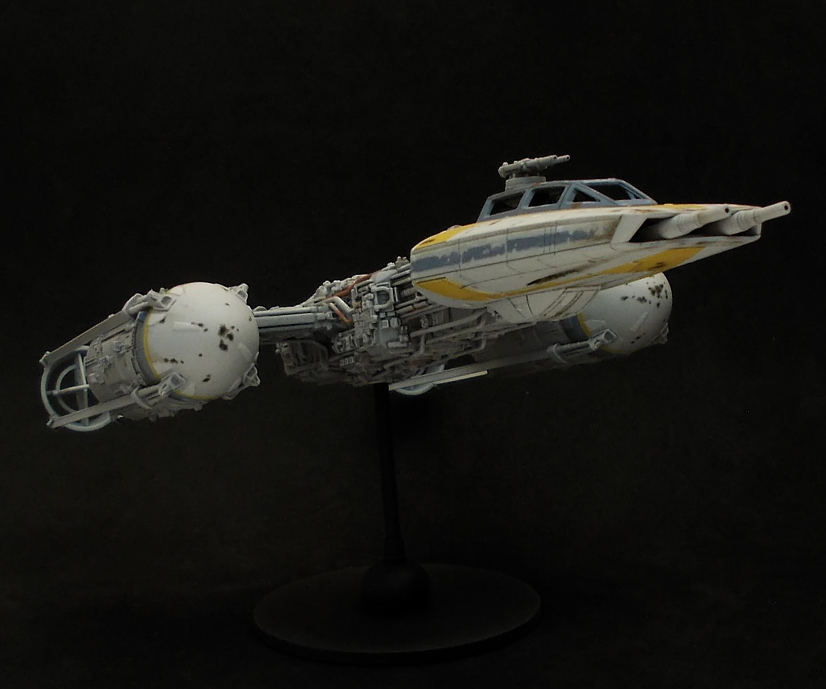
At the moment, I'm working on my second 1/72-scale Bandai kit: Gold Leader. Here are some work-in-progress-pictures:
Edited by Fourtytwo
You continue to amaze. Are the pilots in scale with IA minis?
12 minutes ago, aermet69 said:You continue to amaze. Are the pilots in scale with IA minis?
No, they are smaller. The IA-Minis are roughly 1/53-scale, the kits from Bandai are 1/72-scale.
Outstanding. Red 2 is a great choice. Only Porkins would have been cooler ![]()
Also impressed by the photography. What kind of lens are you using?
49 minutes ago, udat said:Also impressed by the photography. What kind of lens are you using?
Thank you. Regarding the lens… ummm… I'm using a pretty standard digital camera which cost around 100 bucks 5 years ago when I bought it. ![]()
Edited by Fourtytwo
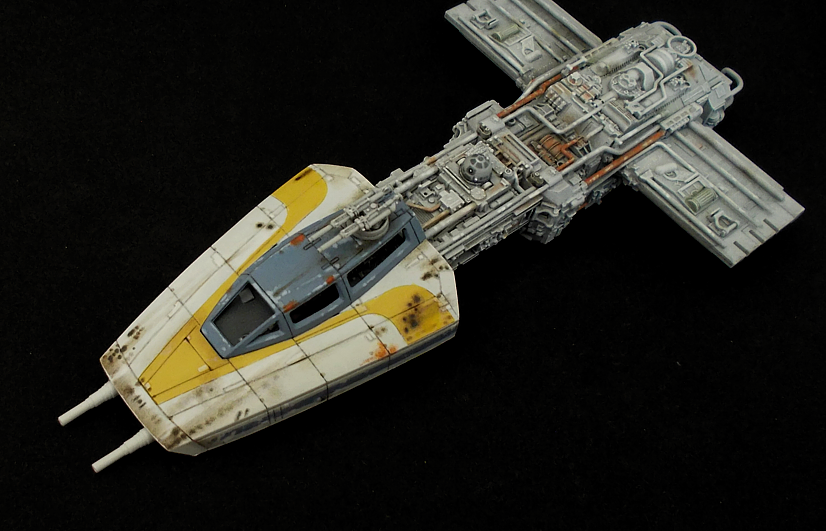
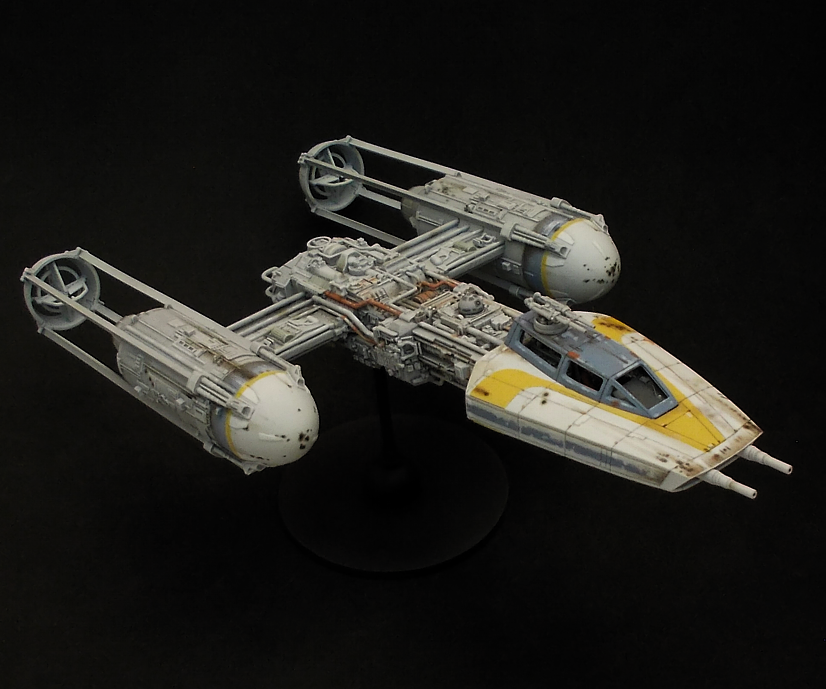
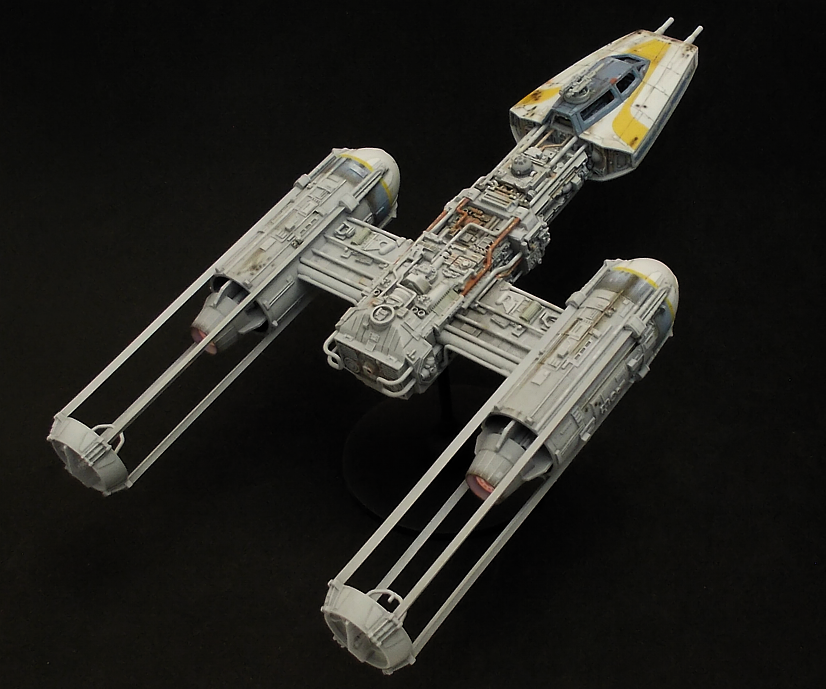
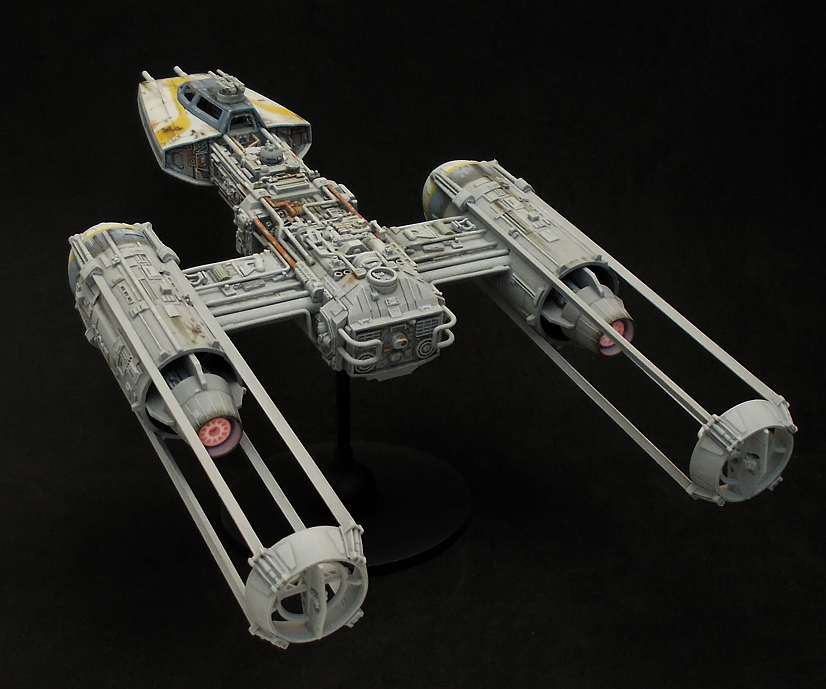
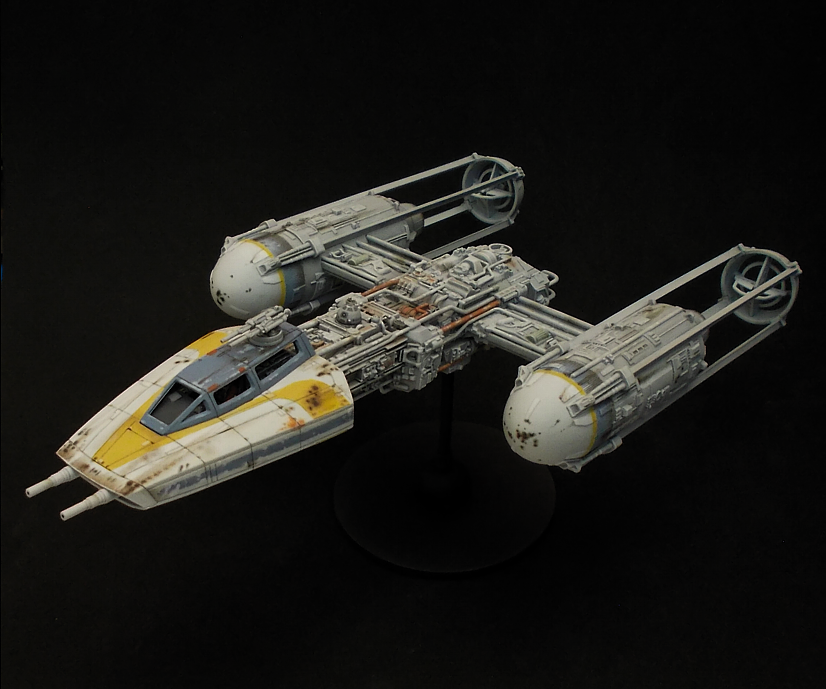
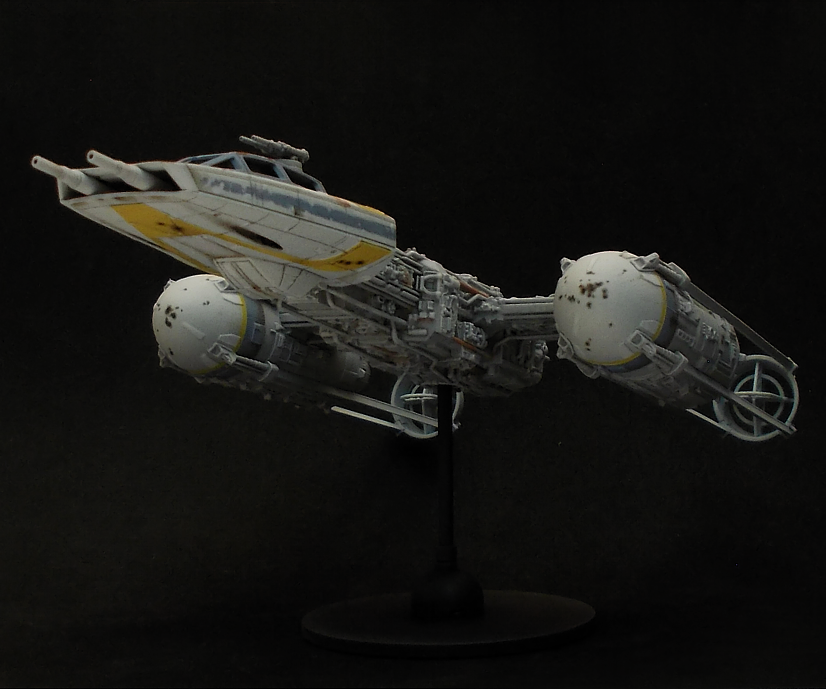
I've also finished my Bandai 1/72-scale Gold Leader this weekend:
Okay, next time, I will post new minis I painted for Imperial Assault - I promise! ![]()
Edited by Fourtytwo