Fourtytwo brings a brush and colours to Imperial Assault

By Fourtytwo, in Imperial Assault Painting and Modification

Hello there!

I'm a newbie to this forum and have only gotten into Imperial Assault recently. I'm a veteran to gaming and tabletop wargimg, though, and to painting (converting and sculpting) miniatures as well. I greatly enjoy the game and its potential for story-driven skirmish wargaming, and I'm almost ashamed I didn't give it a shot much earlier.

To me, it's the characters that make Star Wars what it is, and since my childhood in the early 80s Darth Vader and Luke have been my favourite characters, because they have the most interesting arcs of all characters in the original movies. I'm not chained by nostalgia, though, and Ahsoka Tano has become my favourite character for the same reasons Vader and Luke have been, and waiting for my pre-ordered copy of her for Imperial Assault is a true test of my patience.

So much for where I'm coming from. What better way to introduce myself than with some pictures of the first Imperial Assault miniatures I've painted in the past few weeks.

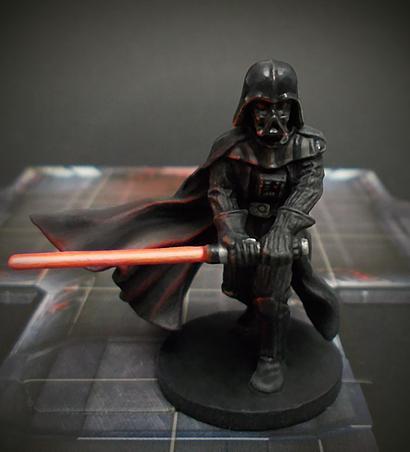
So, let's start with Vader. He's a challenge, being almost completely black, and my first instinct as an experienced miniature painter was to create the different textures through contrasting methods of highlighting - going for soft diffuse highlights with the matt and semi-glossy elements, and harsh, well-defined highlights for the glossy elements. Then I decided to do something different, though.

I primed the figure black and then painted all areas which are exposed to light from above with a very dark grey which barely registered. Next I carefully highlighted all raised details and textures with a dark grey, and then with a medium grey where details and textures are exposed to light from above. The chest armour was painted black and a dark gunmetal grey. The lightsaber blade was primed white with a teenyweeny tint of yellow and even less red. In order to get a deep vibrant red for the red aura of light a very bright saturated red was painted in transparent layers on the blade, leaving the bright almost white core of the blade. Next I painted the red reflections of the blade on the edges of the cape and on all parts of the suit and armour which are exposed to the light of the saber. In order to get these reflections to look real you need to make sure to create strong, well-defined and small reflections on the glossy parts, and soft, more diffuse reflections on the matt elements. After this and all the remaining details like the lightsaber-hilt and the control panels were done, it was time to varnish the miniature. I went with a very matt varnish as a base. Then I carefully painted gloss varnish in multiple layers on the helmet, the armour on Vader's chins and knees, and on the lightsaber-hilt. It took me about 10-15 layers to get the very smooth shiny result I wanted. As a last step, a very fine brush was used to paint gloss varnish in multiple layers on all the raised details and textures of Vader's mask, leaving the recesses matt black. This helps bringing out the features and avoiding having them be drowned out by reflections from recessed areas, something which always looks bad on such a small scale. I basically used the gloss to naturally highlight these areas. Although Vader is almost exclusively black, he provided to be quite a challenge, but I'm very happy with the result and I hope you like it, too:

59a2d15c950d5_IADarthVader.jpg.fc22214c397ab907c41a851df318a550.jpg

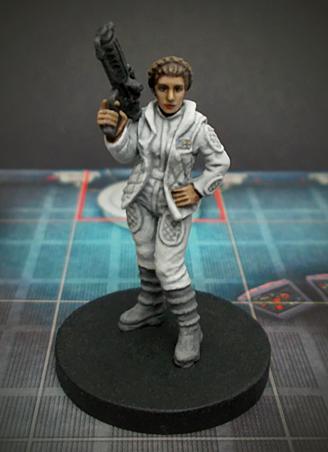
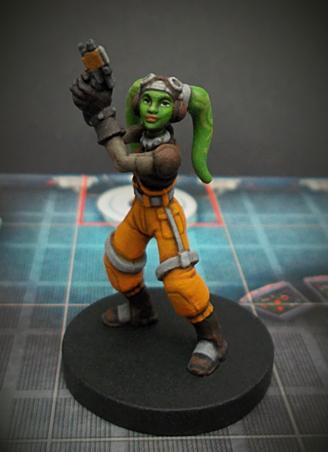
Hera Syndulla, Chopper and Leia were much more straight-forward to paint than Vader, and I always take my time when painting faces, because not getting these right can easily ruin an otherwise good paint job:

59a2d172826ba_IALeiaOrgana.jpg.c21bb869297dc0791e54f4015fa270de.jpg

59a2d164b6505_IAHeraSyndulla.jpg.32b6271cdd0778c115b69456cc89c848.jpg

59a2d16bc4575_IAChopper.jpg.7e995dc8c4dea9340f3259cfee4678fd.jpg

I have Luke Skywalker, Jedi Knight painted, too, but I cannot upload any more images currently, having reached my limit it appears. I hope this will be increased, soon, because I hate to upload to image hosts and linking to images.

Anyways, so much for my first post - constructive feedback is welcome, and I hope to be able to paint Ahsoka soon. In the meantime, I have a huge load of Ally- and Villain-Packs to paint as well as figures from the core game.

Have fun!

Edited by Fourtytwo

Very nice.

@Fourtytwo

You'll have to use a photo hosting site such as Imugr or similar and then paste the link to the photo with your comment or post. When you submit your reply, the pics will show up.

Also, your faces are probably some of the best on the forums! Would you care to walk us through what your process is? I know I could use the help!

Edited by Force Majeure
7 hours ago, Force Majeure said:

Also, your faces are probably some of the best on the forums!

Thanks! :)

7 hours ago, Force Majeure said:

Would you care to walk us through what your process is? I know I could use the help!

Sure. I will make a photographic tutorial, propably with Ahsoka once she is delivered, or with one of the heroes from the HotE-expansion. I've also ordered Maul - both he and Ahsoka would make excellent examples for showing how to do patterns on faces on such small figures.

Edited by Fourtytwo

Wow! Great job. And I agree on the faces. As well as just your overall strength of contrast... my stuff always blends too much together in a dirty way. I suck at highlighting.. :)

Really nice stuff, just amazed you could do the faces and eyes so we'll.

Thanks for the kind comments. After curing my shoulder, I can finally paint again and have started painting the characters for my Team Fulcrum - a small team of skilled specialists who accompany Ahsoka on daring missions during the early days of the Rebellion. This will be my first skirmish team, and I go more with what feels fitting and interesting than what is most effective from a sterile game mechanics point of view. Still, I want to include quite some spies and base my command deck to a good extend on spy cards, because they sound fun.

So, here are the first three members of Team Fulcrum. Ahsoka, Drokatta and Ko-Tun Feralo will be painted once they are released. Once Team Fulcrum will be finished, I will start assembling and painting an imperial skirmish team.

59b576c92634b_TeamFulcrum001.jpg.b58d5e0

Edited by Fourtytwo

These miniatures are masterpieces! :o I am seriously interested in your models, do you have a public site where you put pics of some of your other works? it would be wonderful if you had made in the past painting guides on how to achieve so realistic look, or guides to suggest to a painter who want to improve like me.

On 16.9.2017 at 10:18 AM, Sareth said:

These miniatures are masterpieces! :o I am seriously interested in your models, do you have a public site where you put pics of some of your other works? it would be wonderful if you had made in the past painting guides on how to achieve so realistic look, or guides to suggest to a painter who want to improve like me.

Thanks! Since you asked me, the first thing I want to say is that if you want to improve as a painter, you should experiment with the many different painting techniques in existence and find out what works best for you and the mini you are currently working on. There's no single trick or technique that will make you a great painter, and if you ask three experienced and skilled painters, they will all use different techniques and combinations of techniques. Never trust anyone who's telling you that there's only one way to paint 'correctly' or 'effectively'. I won't do it. All I can do is tell you how I did things and what works for me, and that there are propably methods out there which work better for you.

I've finished my first group of three Stormtroopers a couple of days ago, and here's how I painted those. Since you can always use a few Stormtroopers for scenarios set in the classic Star Wars era (REBELS, Rogue One, A New Hope, The Empire Strikes Back, and Return of the Jedi), I wanted to find a way to paint these relatively quickly, but still to a high level. Here's what I came up with:

As a first step, I undercoated the figures with Corax White spray colour from Citadel. Then I mixed one part Nuln Oil with one part Lahmia Medium and applied it as a thin wash over the whole miniature. When this was completely dry, I used Revell white colour spray (34105) to fog the figure from four directions in a 45° from above. I used the Revell colour spray and not Corax White from Citadel because the spray is finer and creates a better result when used to pre-highlight the mini. This creates the first soft transitions between the darker recesses and those areas which are exposed to light. Then I repeated the wash and the fogging steps described above once and now the figure looked like the Stormtrooper to the right in the picture below.

Next I mixed three parts Nuln Oil with one part Abaddon Black and used the tip of a fine brush to paint it into all the gaps between the white armour elements and into the frowny air-filter as well as the eye-lenses of the helmet. Now the figure looked like the one in the middle in the picture below.

For the last and most important and involving step, I mixed two parts White Scar with one part Lahmia Medium and carefully painted it in two or three transparent layers onto all elements exposed to light, gradually building up to an almost white on the top areas of all white elements. Next, I painted slightly dilluted White Scar on all edges and defining raised details, leaving the recesses darker. To finish the white parts, I painted a stark white glint on the upper forehead of the helmet, on the upper curves of the shoulder armour and on the upper back parts of the chin armour to simulate a strong reflection of light.

Once this was done, the rest was some detail work and finishing touches: Painting the gloves and the guns black and carefully highlighting them with dark grey and a lighter grey to make some details pop, as well as painting the black communications strip above the eye-lenses black. I also neatened-up some elements and details with a fine brush using Nuln Oil and White Scar. Now the Stormtrooper is finished and looks like the figure to the left in the picture below.

59b89d0a4b1c5_StormtroopersWIP001.jpg.ce

Here's the completed group of three Stormtroopers - all painted using the methods and techniques described above:

59bd6187a92ae_Stormtroopers001.jpg.9129c

And still waiting for Ahsoka..!

Edited by Fourtytwo

Your minis are awesome! And I appreciate the instructional text alongside the photos.

Gotta try this. I've painted my Rebels (mostly) from the core set and a few other expansions, but the Stormies always gave me pause.

Thanks for the toot.

I've just finished Captain Terro, and I really like the figure. The Stormtrooper armour has been painted using the methods I described in my post with the first three Stormtroopers above, but since we know Dewbacks from harsh, hot and dry climates, I gave his armour a good measure of weathering, going for a dust- and sand-effect. I also heavily weathered the saddle bags, the reins and the gear Terro carries on his back. When applying weathering, dirt and battledamage, I always force myself to vary the effect and apply it unevenly. We humans tend to make things symetrical, even and homogenous, and while this helps when trying to achieve neat and pleasing looks, it is something we have to work against when attempting to simulate dirt, damage, erosion and entropy.

59c66492b9378_CaptainTerro001.jpg.1cdeff

I hope you like the figure - tell me what you think. In the meantime I will think about which figure to tackle next.

Have fun!

Edited by Fourtytwo

I'll get my Jabba's Realm expansion today, so in anticipation I painted Jabba the Hutt yesterday. It went faster than I anticipated, and it was quite fun to paint this fat slug.

59c8bcc1437b4_JabbtheHutt001.jpg.3ecd11c

Edited by Fourtytwo

great work. wow

Excellent minis. You are the first person I have seen who correctly picked out Jabba's tattoo in a brownish color. I love it.

On 2.10.2017 at 3:33 PM, zwara81 said:

great work. wow

On 2.10.2017 at 4:42 PM, tomkat364 said:

Excellent minis. You are the first person I have seen who correctly picked out Jabba's tattoo in a brownish color. I love it.

Thanks a lot, guys! :) For details and colours, I always use movie stills and set photos as a reference where possible.

Last week, I finished the Rodian gunslinger from the Jabba's Realm Expansion:

59ce2f6c936bb_RodianGunslinger001.jpg.70

I'm currently working on the Aqualish from the same expansion, who is almost done. I've also started work on the next batch of bucketheads - those that come in the Villain Pack this time - the helmets of which I finished yesterday. I plan on finishing these as well as the Aqualish until the end of this week, and once these are done I will post pictures of the finished minis here, of course.

59d5395c74241_AqualishBodyguard002WIP.jp

59d5395f6e7b2_Stormtroopers002WIP.jpg.b9

Edited by Fourtytwo

Holy moly, you've got the touch!

How long do you spend on a unique figure? (sans drying time of course)

4 hours ago, Force Majeure said:

How long do you spend on a unique figure? (sans drying time of course)

This kind of question is hard to answer, because I rarely paint a mini in one go from start to finish, but I estimate an average time of 6-8 hours, including priming, pre-shading and varnishing. The more elaborate the detail is, the longer it takes to get it all right and nice, but it's not so much a matter of it being difficult once you have the experience and have a repertoire of techniques to choose from. Stormtroopers, despite them only requiring three colours to paint (white, grey and black) take almost as long, because to get the white neat and with smooth transitions from grey in shadow areas to almost white on areas exposed to light I apply several coats of transparent layers of white, which is not hard, but takes time. But I paint figures like stormies in batches of three (or one deployment card :D ), so the effective time spent on each individual buckethead comes down to roundabout 2-3 hours, I guess.

For minis like Ahsoka and Maul with their unique facial patterns - both of which I also want to give expressions typical for their respective character that hold up on close inspection - I will propably almost take twice as long.

I haven't tackled relatively easy figures like the Imperial Royal Guards, yet, but I'm confident one of those can be painted to the same level as the other figures for IA I've done so far in about 3-5 hours. Palpi will also be a lot easier with his flowing robes.

Edited by Fourtytwo

Maybe the best painted IA miniatures that I’ve ever seen!

Thanks, @Armandhammer !

I've painted up my good old AT-AT from WotC for their Star Wars Miniatures Game from a decade ago. It really came out very well, but I'm not sure if I am allowed to post images here, with it being a non-Imperial Assault product. What is the policy or culture here with regards to such things? If I were allowed to show images, though, it'd be a one-time exception, since the minis for Imperial Assault are hugely superior in sculpt and production quality to the stuff released for the Star Wars Miniatures Game, and I prefer the IA minis hands down. Can someone give me some advice?

7 minutes ago, Fourtytwo said:

Thanks, @Armandhammer !

I've painted up my good old AT-AT from WotC for their Star Wars Miniatures Game from a decade ago. It really came out very well, but I'm not sure if I am allowed to post images here, with it being a non-Imperial Assault product. What is the policy or culture here with regards to such things? If I were allowed to show images, though, it'd be a one-time exception, since the minis for Imperial Assault are hugely superior in sculpt and production quality to the stuff released for the Star Wars Miniatures Game, and I prefer the IA minis hands down. Can someone give me some advice?

Dude! Post it! We always love seeing great paint jobs... if it's IA, that's great. If not, meh.. :)

Just now, GyldenDamgaard said:

Dude! Post it! We always love seeing great paint jobs... if it's IA, that's great. If not, meh.. :)

I'd love to, but since it's not an IA-product, I want to make sure posting images does not go against any rules on this site.

How does it go? Ah yes:

Do, or do not. There is no try! Right?

I used this site's search function and looked for 'forum rules community rules' - didn't turn up any relevant result (which I find strange, because I'm sure there are rules).

Okay, so here's my AT-AT from Wizards of the Coast's Star Wars Miniatures Game from a decade or so ago. If these images violate any forum policy or rules for it being a non-Fantasy Flight product, I apologize and will comply with any requests for deletion. I plan on using this model in a custom scenario in the future, since it is perfectly in scale with IA's great minis.

599efd7927618_IAAT-AT01.jpg.a7a2b615fd5f

599efd8379648_IAAT-AT02.jpg.66ce2e954466

599efd8ba4404_IAAT-AT03.jpg.7ad840370c86

599efd92c3d14_IAAT-AT04.jpg.d6d7677147e8

Edited by Fourtytwo

Regarding the posting of non FFG product: over on the X-wing Painting & Mod forums, there was a similar question some time ago, (but it was about posting 3D printed ships). The short of it was that you can post your pictures as you see fit. We had an FFG person respond because there was a lot of agonizing--the painting & mod forum had been pulled once before and some of us were concerned with it happening again.

The part that crosses the line is when you start using the forum to try and sell things. That's the no-no. You are permitted to link to other sites however.

If anyone remembers better than me, or has contradictory information, please let us know.

Edited by Force Majeure