They look great
manoftomorrow's painting (Update: Phase II Clones, 322nd)
Finished Speeder Bikes!
Getting the foot pedals on was a massive annoyance. The yellow stripes will be present on all my Imperial troops.


nice basing and color schemes
Your speeder bikes look GREAT! They look like you may have boosted two props from ILM. I was extremely happy how mine came out as they are my favorite pieces painted so far. You've got great color, nice weathering on the bikes & scouts and nice basing.
Impressive, most impressive.
27 minutes ago, C3POFETT said:Your speeder bikes look GREAT! They look like you may have boosted two props from ILM. I was extremely happy how mine came out as they are my favorite pieces painted so far. You've got great color, nice weathering on the bikes & scouts and nice basing.
Impressive, most impressive.
Hey thanks! I'm going to put more work into weathering the 2nd AT-RT, and maybe go back to the first for more weathering before sealing it.
On 8/27/2018 at 11:57 AM, manoftomorrow010 said:I guess for anyone who checks this thread, I'm having trouble finding supplies to effectively attach each AT-RT weapon with the ability to detach them, so whichever upgrade is applied for a game, that weapon is physically present on the miniature. I just bought a 2nd Core set, so now with 2 AT-RTs, I'm trying to find something to enable the switching.
Could not find any circular magnets small enough to fit in the chassis space, nor on the end of the weapons.
Has anyone done this successfully? Or do you all just glue one of the weapons on permanently?
Late on the reply, but...
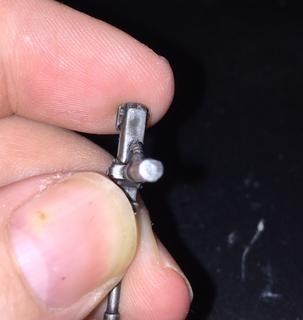
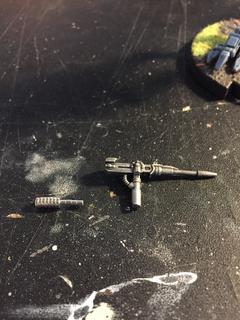
I used several that I purchased for 40K, and found that they worked well for the AT-RT. Each weapon stem is 7/64" diameter, so your best bet is to use a 1/8" drill bit to hollow it out a little more, and then use a 1/8" x 1/32" disc magnet for placement in the body of the vehicle (under the hood, so to speak - pic 1 below). For each weapon, I drilled out a 1/16" hole, and inserted a 1/16" x 1/16" magnet (pic 2, though it is hard to see it once it is painted over). You have to be careful of which direction the magnet goes in, or it will push the weapon out instead of holding it. I included a third picture for comparison of the sizes mentioned above.
You could also use the smaller magnets for the Airspeeder weapons (tow cable/ground buzzer), but those fit pretty tight to start.
You can pick these up online almost anywhere. I personally use KJ Magnetics, as their cost is reasonable. You will pay more for shipping than for the magnets themselves, however.

Let me know if you have any questions. Hope this helps!!
((Double post, sorry.))
Edited by Sentry71
Wow thanks!!
I used some blue tack for now, but I will check this out. Pretty sure I have bits small enough for the weapon points.
Been a while. Haven't had much time to paint, and we'll be going out of town again soon, but I did get to finish my Rebel Commandos!


Nice. The commando sniper is probably the coolest gun made so far, kinda wish they did it like gw with the ability to buy certain arms separate
Edited by JabbyZombie thread!!! Been painting some, but mostly troopers, which I've already shown pictures of above, but I finally nearly finished my AT-RT from the 2nd core box.


On 8/23/2018 at 11:58 PM, manoftomorrow010 said:Hi all,
Here's my AT-RT, sans weapons. I'm planning to hit the local retail establishments to find small enough magnets and see if i can actually make the AT-RT weapons switchable depending on which one I want to play in a game.


Also, here are 4 of my Rebel Troopers. Only had time to paint a few of them this week. I started with the unit leaders and the Z6 fellas. I spent less time on these than I did on Luke, which I think will be my SOP from here on, where the grunts I don't spend forever on, but the Commanders and Operatives get special treatment. I basically ended at the "wash" step and didn't do any highlighting or anything.


Good job all you need to add is little bit of flesh wash but all in all good job
My finished commando team (minus the saboteur, I keep forgetting that one).

@manoftomorrow010 all of your stuff looks fantastic. I’m a big fan of your Speeder bikes especially.
Your rebel commandos are great too. I have to say though, when people line up a squad like that and then turn them all to the side, and then all to face backwards and put the pictures in order it always leaves me with the impression that they are doing some kind of line dance, lol.
1 hour ago, BigBadAndy said:@manoftomorrow010 all of your stuff looks fantastic. I’m a big fan of your Speeder bikes especially.
Your rebel commandos are great too. I have to say though, when people line up a squad like that and then turn them all to the side, and then all to face backwards and put the pictures in order it always leaves me with the impression that they are doing some kind of line dance, lol.
Thanks!!
Haha they're doing the Cha Cha Slide 😉
...nice werk...
I've ruined 2 stormtroopers I thought were complete and dry so my contuing fight against white paint is still a losing battle.
But I'll post pics of my finished Rebel troopers and 2nd AT-RT soon.
Finished 2nd AT-RT


52 minutes ago, manoftomorrow010 said:Finished 2nd AT-RT
I like the subtle panel colouring
First squad.

Back to the rebel scum!
My other 2 core squads are coming together, but this time with a different paint scheme, inspired by some of the concept designs for Battlefront II

I applaud you on those stormtroopers. The idea of painting white + yellow is terrifying to say the least.
Also, if i may offer some advice - Give the rebel troopers a wash over their entire model with Agrax Earthshade (a brown wash.) Trust me, you won't regret it. It's pretty easy and will make your troopers look way nicer with a very small bit of effort.
However, if you're nervous about using a wash, you could always use the Ion Trooper as a test dummy to see if you like the finished result.
3 hours ago, Alino said:I applaud you on those stormtroopers. The idea of painting white + yellow is terrifying to say the least.
Also, if i may offer some advice - Give the rebel troopers a wash over their entire model with Agrax Earthshade (a brown wash.) Trust me, you won't regret it. It's pretty easy and will make your troopers look way nicer with a very small bit of effort.
However, if you're nervous about using a wash, you could always use the Ion Trooper as a test dummy to see if you like the finished result.
Thanks! Yeah the Stormtroopers are frustrating haha
The Rebels definitely aren't finished in that pic, I still have touch up then wash to do ![]()
Updates on my third Rebel squad. Duros not finished yet. And still some weapons highlighting needed on all.


My two Rebel squad leaders. Slightly altered their color scheme as well, brown duster, green undershirt and backpack, compared to the other two squad leaders.
They're just base coated and drying here. I'll get the arms and wash on tomorrow. Then highlight the guns and binoculars.
Only...one...squad...left...

Also my third squad finished up, except for basing.
