Sorastro's Painting

By Sorastro, in Imperial Assault Painting and Modification

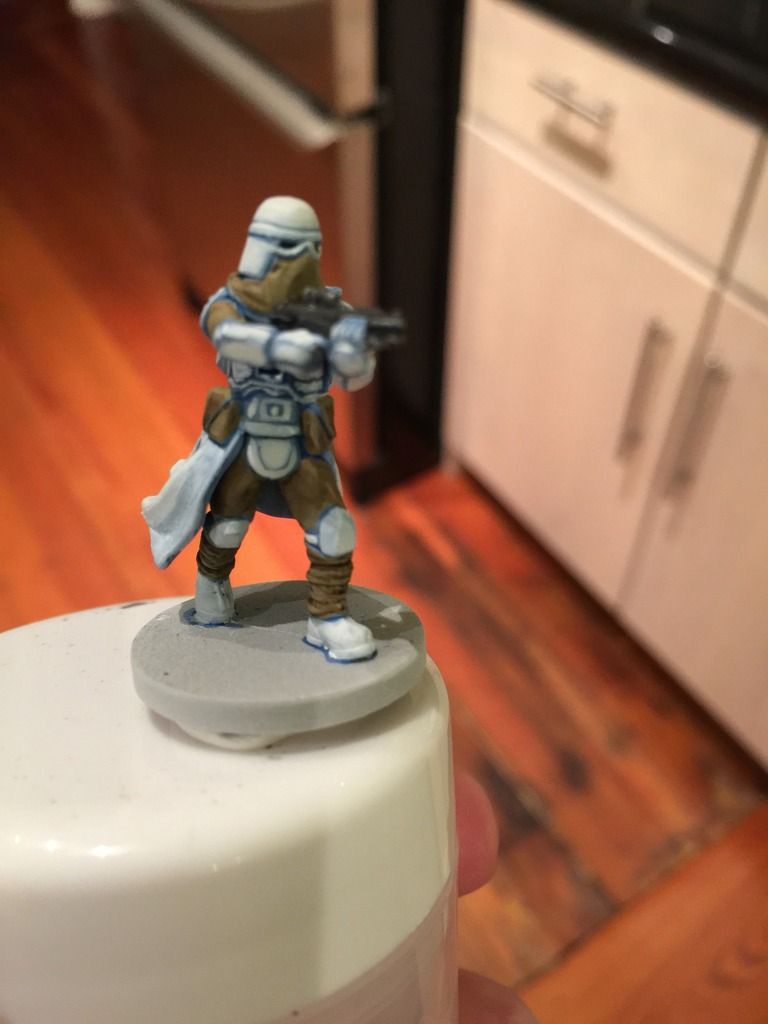
I know this goes against everything we have been taught, but personally, I like to start with an ink wash as the second step after priming. it really helps to the define the model, and in the case of the stormtrooper below. gets you to tabletop quality really quickly.

Total time on this model was 30 minutes, *including* clean-up of the model, priming, drying the primer, ink wash, then the ink wash drying. Total amount of "brush time" on this model was no more than 2 minutes

Did you lathered it all over or apply it selectively? Did you thin it down? What exact product is it? I know Vallejo Game Inks don't give those kinds of results unless I'm using them wrong.

Edited by Hipsu

I will tell you, I think thus far R2-D2 has been the hardest to paint!!

Leia has been the easiest...

~D

It;s interesting how you rate easy and hard, for me Leia was harder as I found it tough to make her interesting to look at. R2-D2 on the other hand has everyone picking him up and eye balling him :)

Perhaps desert skiff Leia will be more interesting to look at...

Ok finished off the second back of Stormies over the weekend, definitely improving.. funny how the flaws just jump out at you as you go though.

IMG_3141_1.jpg

IMG_3142.jpg

And here is a side by side comparison of what I would consider my weakest trooper from the second batch up against my strongest trooper from the first batch. Or as I like to call it, night and day as there really isn't much of a comparison :D

IMG_3144.jpg

IMG_3145.jpg

Thanks again to Sorastro of course for the great video and tips, and also to everyone else who was able to help me out with suggestions and advice. I am open to any constructive criticism of course, always looking to improve. I will now take what I have learned and apply it to the final batch and try adding some battle damage this time around. Baby steps :)

I am thinking that after I am done with all 9 I will go back to the first 3 and re apply some nuln oil and re high light where I can to try and upgrade their quality.

One question I did have, that ridge on the shoulder and then on the next piece of armor on the arm, bicep I suppose, that is a mold line? That is something I should be trying to take off with my knife? I couldn't really tell what was what and I didn't want to get to complicated to fast, but I want to try a few new things with this next group so I figured I would attempt to remove what I can.

Edited by FrogTrigger

I'm going with a different approach for my Snowies. I wanted a cel shaded look that used blue lines instead of black. With all the troopers / trooper looking guys, I was looking to get something different on the table.

snowtrooper_zpsulm2pkbl.jpg

I need to lighten up the beige parts a bit, but I like the way he came out. I'll have a clique of funky looking Snowtroopers, and I like that.

I've painted a bunch more since my last pic post... I suppose I could start my own thread. Hmm.

One question I did have, that ridge on the shoulder and then on the next piece of armor on the arm, bicep I suppose, that is a mold line? That is something I should be trying to take off with my knife? I couldn't really tell what was what and I didn't want to get to complicated to fast, but I want to try a few new things with this next group so I figured I would attempt to remove what I can.

I think the line that passes from the shoulder to the bicep is a moldline, but it also connects to an actual armor feature on the bicep piece. So removing it is going to be tricky. I'd leave it, nobody will notice it unless you point it out.

Your comparison pics shows unreal improvement considering you painted them back to back. :blink:

Edited by Hipsu

Ahh good point ok maybe I will leave it then, which mold lines do you generally target though? I took a quick look over each figure and nothing super obvious jumped out at me.

I think the improvement was just paying closer attention to detail. The first night I did them all in a matter of hours and I was just amped up to get in there and paint. The second time around after watching Sorastro's videos a few more times I realized how much detail I was painting over with my #3 brush during the 'highlight' stage (Key word highlight, not dip in white paint, lol).

I will tell you, I think thus far R2-D2 has been the hardest to paint!!

Try painting him twice!

I had my first R2D2 finished, and gave him a spray of dullcoat, and for some reason the dullcoat reacted with the paint and completely destroyed the paintjob. The metallic paint cracked like Agrellon Earth. Refusing to be beaten, I bought a second mini and started again.

Just a quick question, I am working through my final batch of Storm Troopers and getting ready to try out the probe droids. For the dry brushing part, what kind of brush should I pick up? I have a 0 and a 2 so far.. and a hand full of synthetic brushes of all types.

Just a quick question, I am working through my final batch of Storm Troopers and getting ready to try out the probe droids. For the dry brushing part, what kind of brush should I pick up? I have a 0 and a 2 so far.. and a hand full of synthetic brushes of all types.

I use an old, crappy brush that's about 1cm wide. If I'm dry brushing something small, I use a different one I also use for washes that's about half as wide.

Just a quick question, I am working through my final batch of Storm Troopers and getting ready to try out the probe droids. For the dry brushing part, what kind of brush should I pick up? I have a 0 and a 2 so far.. and a hand full of synthetic brushes of all types.

Hi FrogTrigger! A size 6 flat brush like one of these would be fine for most dry brushing (apart from really small areas): http://www.rosemaryandco.com/acrylic-brushes/red-sable-blend-acrylic/flat-brights-sable-mixture?filter_name=Series%20768 :)

image_zpsvpzsfjxf.jpeg

A Snowie that's 99% done. Still need to apply a clear coat to the helmet, but I used a bunch of water to thin out some White Scar to get a kind of white wash. I like the outcome... it's hard to tell with my crap photo, but the khaki part of the uniform kinda looks like it's been snowed on IRL.

I finished these a few weeks ago, but I forgot to post them. R2D2 and C3P0.

P1020653.jpg

P1020659.jpg

P1020690.jpg

P1020691.jpg

I've been trying to work on a custom paintjob for a while, experimenting a couple different ways of doing a R3 astromech clear dome with little success. Would anyone happen to have any tips or suggestions on how to accomplish this? I've included images of R3 astromechs below.

s-l225.jpgr3-m3-r3-o11.jpg

Very nice C-3PO and R2 there! And I liked the snow troopers above. Good work!

Sorastro has actually inspired me to paint. And that's something not easily achieved. I've had Warhammer 40k for years and only played casually with friends so never felt the need to paint. It always seemed tedious and like a drag, but watching Sorastro's videos has made me want to paint my IA minis. I've already done my Royal Guard and Nexu, with some Stormtroopers, thanks to him! They're nowhere near as beautiful, but from a foot or two away whilst playing, they beat plain, dull plastic. Thank you Sorastro!

Outstanding work on those droids Feltmonkey! (I love the muddy bases too!).

Thank you ElSee! I'm happy to year you're enjoying gettin back into this wonderful hobby..

I'm currently enjoying finishing up the Rebel Sabs :)

Thanks!

If anyone wants to do some muddy bases similar to the ones on my R2 and 3P0, they're really easy to do. I used a Citadel Technical paint called Agrellan Earth. You splodge it on really thick (REALLY thick) and leave it overnight. The paint cracks into that cracked earth look. Then what I did was liberally dob on some washes. I think I used Agrax Earthshade, Athonian Camoshade, and Seraphim Sepia. Don't cover the whole base in each of these washes, dab them into different areas to create some interesting different coloured areas. Don't worry if the washes overlap and mix together - that's half the fun! This colour mix also matches fairly well with Typhus Corrosion, which is why I chose the washes I did.

I'm looking forward to the Sabs, they should be fun to paint. I've only this week finally managed to finish off the zombies from Zombicide. That was a bit of an odyssey. Wouldn't you just know it, as I was putting them all onto a shelf, proud of myself for finishing them, I noticed on the floor one unpainted one that I had missed, as it had fallen off my painting table. So technically I still haven't finished the bloody zombies off! I would paint that last zombie, but I'm currently not talking to him.

Edited by feltmonkey

Thanks

Feltmonkey I imagined your avatar screaming thanks when I read your post and it cracked me up. Nice work.

I scream all my posts at the top of my voice like a warcry as I type them.

Hello!

This is my first time here, so Im posting a work in progress.

Started my wampas yesterday, and noticed some polar bears photos where the fur looks yellow. I researched a bit, and got a hold on the right look for it. SO I started experimenting with a sepia, yellow watered down shade, a first white drybrush, a secondary watered down nuln oil shade and another drybrush. So far these are the first shade layer and seond drybrush on these minis. Any thoughts?

13512008_10210412501771482_6246555577184

Nice! I love the yellowed-fur idea :)

Edited by Sorastro

Hi,

Today I finished painting my Probe Droids, this is my first Miniature Boardgame and the second type of Mini I've ever painted, like the tutorials, I started painting Storm Troopers.

Thank You for sharing your experience with us!

post-281118-0-55669100-1467614207_thumb.jpeg

Hi,

Today I finished painting my Probe Droids, this is my first Miniature Boardgame and the second type of Mini I've ever painted, like the tutorials, I started painting Storm Troopers.

Thank You for sharing your experience with us!

Nice work Charles! "you've taken your first step into a larger world" :)

Nice work Charles! "you've taken your first step into a larger world" :)

And a smaller wallet! The Force brings balance to all things. :P

Also, forgot to mention that my cheat sheet has been updated with the Rebel Saboteur paints!