WIP: A Proper Gaming Table, One Must Have.

By Ghost1, in Star Wars: Legion

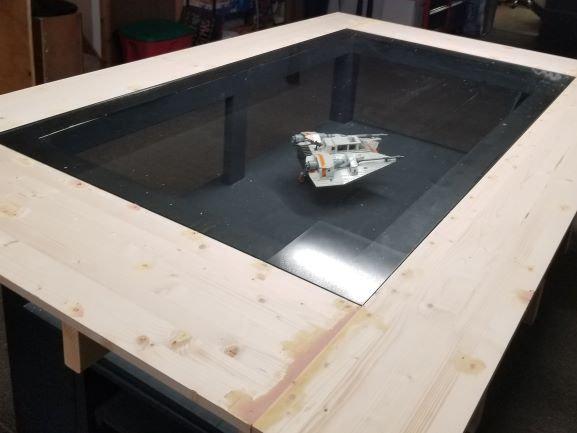
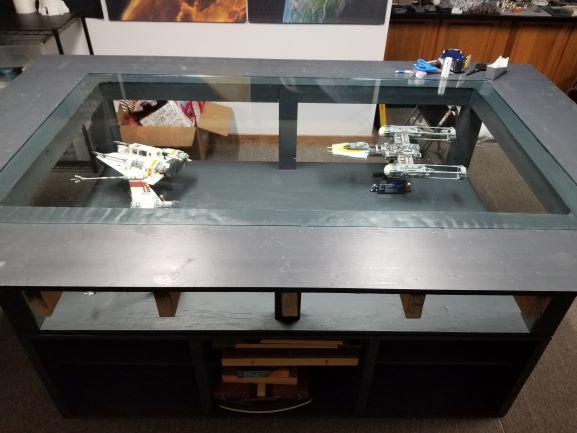
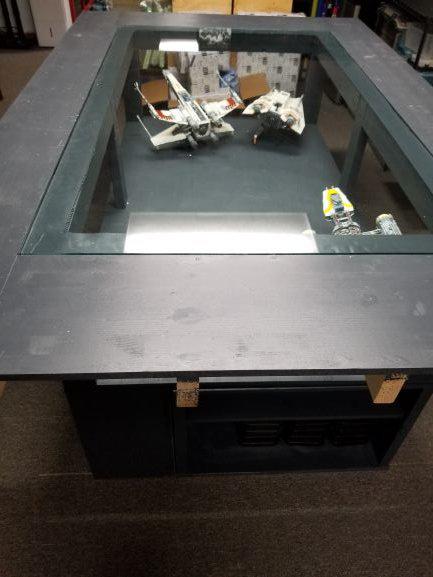
So, I had been playing X-wing on a 5ft Round Folding Table with "bed risers" placed under the legs to lift it to a nice height of 40ish inches, which reduced stress on my old disabled lower back for the past couple years. Once I got sucked into Legion this past year, I knew the round table wasn't going to work for my needs. I managed to convince my better half that I "Need a Dedicated" Gaming Table, by pointing out that it would also be a Display Case for my Lego UC Falcon that I haven't been able to put together. Once the green light was given, I began spit-balling designs for the Gaming/Display Table. I wanted Shelves under the Table, with a Large Display area that the top would serve as the Gaming Surface. Now, keep in mind that I am not a professional Carpenter by any stretch of the imagination. Not sure that I even qualify as an Amateur Carpenter to be honest. I consulted with my neighbor regarding the top surface, and after a long conversation between two old grizzled veterans that had little to do with the table, it was strongly suggested to go with Tempered glass for the top surface. I still hadn't decided the overall display area size when I lucked out in a HUGE way by finding a glass top table at a local 2nd hand type furniture store. 1/2 inch thick tempered glass, but it was bigger that I originally was looking for. After a little research on Tempered Glass, I knew that the Table was the best bet. At 42 inches by 72 inches, it was a little bigger than my original design, but for $200.00 US, I wasn't going to get a better deal. Let me tell you, that sucker is pretty heavy. Once that made it into the house it was time to start cutting and building. YEAH!!!!

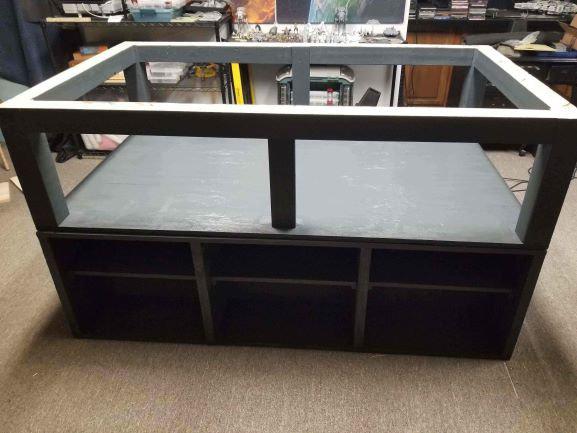
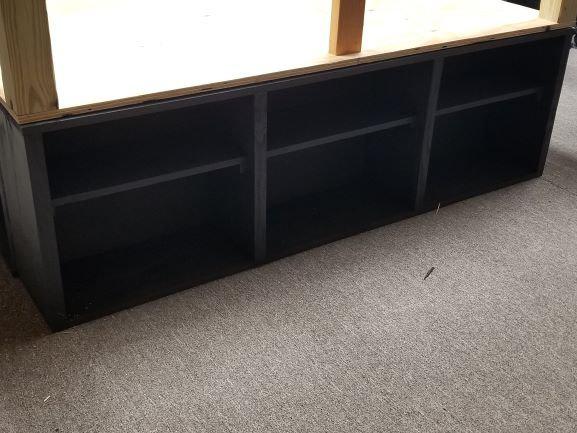
For the base my original intent was to use 3/4 in plywood to make four "boxes" similar to the "dorm style" shelving boxes, primarily for storage, and also strong enough to hold the weight of the display and gaming table. Well, that didn't work out the way I wanted it too, I got the first two done, and they looked horrible. Just Terrible! Apparently I couldn't cut a straight line to save my life, even with my table saw. Sheesh!!! Back to the drawing board, or more importantly, back to Lowes for materials. 2X12's, and Shelving boards did the trick. I went with 3 shelves, one on the long side of what has turned into a massive piece of awesomeness, and two on the short side. But, what about the other long side? I made a support table to set under the display, leaving it open for storage of boxes and what not. Works pretty good so far. The first picture here is the Long Shelf/Support with the Frame of the Display Case sitting in place.

Table-2A.jpg.8b63180bedafdd8796e830ecd5c9b669.jpg

Edited by Ghost1
Title Correction

Just how big is this Gaming Table/Display Case you may wonder?

Well, the Display Case is 42 inches X 72 inches X (I think either 17 or 18 inches high)

Pic is with Glass supports in place. I plan on having Acrylic for the sides, with both the long sides set in sliding bypass tracks to get into and out of the Display Case. The wood as been painted "Chimney Smoke" dark grey/blackish to go with the room that it is in, and it gives a pretty solid background for the Lego's that will be displayed as well.

Table-3A1A.jpg.3a11631683c98c357c1fe11e0e9373c1.jpg

The next part was for the Gaming Surface Extensions. The Overall Gaming Surface is 5ft x 8ft and sits at about 40 inches high, which for me is just perfect to keep that old busted back from screaming when I play my games.

I set the Glass, and built the extension supports with it in place to ensure I had a smooth surface. Nothing like playing a game where the mat is falling between the cracks or has it's own elevation changes as it rolls from one table to another. While I didn't get them perfect, they were good enough that a little wood filler smoothed out most of the flaws.

It is now that I must admit, I came close to dying at this point in the process. I needed to get the Glass back out of the table to finish painting, and at close to 200 lbs, it wasn't going to be easy. I grabbed my oldest, who is 6'2 300+ and had him help me get the monster out. I didn't flirt with the Grim Reaper due to strain or almost dropping anything, but from the fact that we now had to stretch to get the glass away from the sideboards. I thought Trav was going to kill me.

In the Picture you can see that I used Shelf Liner to pad the horizontal supports that the glass rests on, works pretty good!

And of course, I had to see how my Snow Speeder looked in the Display area. Some of us never truly grow up. Other than looking awful lonely I think it looks pretty sharp!

More to follow. I have been asked to help wrap Christmas Presents, and this nifty new table is where that process is taking place.

Table-5A.jpg.bc0988b0dec49f07c480c4e3fa028fb8.jpg

This looks awesome. The only thing i would have done differently is installed those heavy duty metal wheels. Just in case you ever wanted to move it (kind od depends on where you play and what flooring you have)

26 minutes ago, buckero0 said:

This looks awesome. The only thing i would have done differently is installed those heavy duty metal wheels. Just in case you ever wanted to move it (kind od depends on where you play and what flooring you have)

Thanks!!!

It did cross my mind, but that would have limited the storage capacity and size of the display case just a bit. Fortunately it is in a mutually agreed upon, dedicated gaming area, also known as my Star Wars side of the basement, so it doesn't have to relocate. I did give plenty of room around it for ease of access, and being able to use it this evening for Wrapping Christmas Presents also gave it bonus points in my wife's eyes.

Edited by Ghost1
wording

Once she was all painted up, it was time to put the glass back in place. We tried to be a little smarter and used three of us, which was a lot less painful. Of Course, the next step was to figure out the Lego configuration in the Display Case.

Table-6A.jpg.2b149392efddec98aefee2e8b9829f27.jpg

You can see that there is plenty of room for more to be displayed. The next step to be taken is for the Outer Trim to be cut and installed. I am going with 2x6 to give a slight lip on the surface. Maybe 1/2 inch or so, and I am wrapping it in 1 inch foam, with a black vinyl fabric to act as a cushion and to help keep items from flying off the table itself.

Table-7A.jpg.df834005b4c1cc3360103ae9c21839ab.jpg

I can see all kinds of little flaws, and things I would do a little differently if I did it again, but overall, I am very satisfied with how it is turning out.

I will hopefully be able to get some more work done on her tomorrow. Will post more updates as they get completed.

I really like the display area for my UC collection.....just saying

Thanks for going on this journey with me!

Table-8A.jpg.e457d5b62be017bfca11e3e9c7acd9ca.jpg

Well, not as much progress this past weekend as I had hoped. May get to work on it a little bit over the next couple evenings. Thank you for your patience!

Looking good!

Impressive, most impressive

Thanks to everyone for the positive support!

Not sure that I am going to get it finished before the forums get shut down.

Thanks again to everyone who took time to browse, offer suggestions and support!!!

May the Force be with you all!

On 12/27/2020 at 9:15 AM, Ghost1 said:

Thanks to everyone for the positive support!

Not sure that I am going to get it finished before the forums get shut down.

Thanks again to everyone who took time to browse, offer suggestions and support!!!

May the Force be with you all!

Be sure to share it on other spots as well then, everyone will really like to see where you take this project