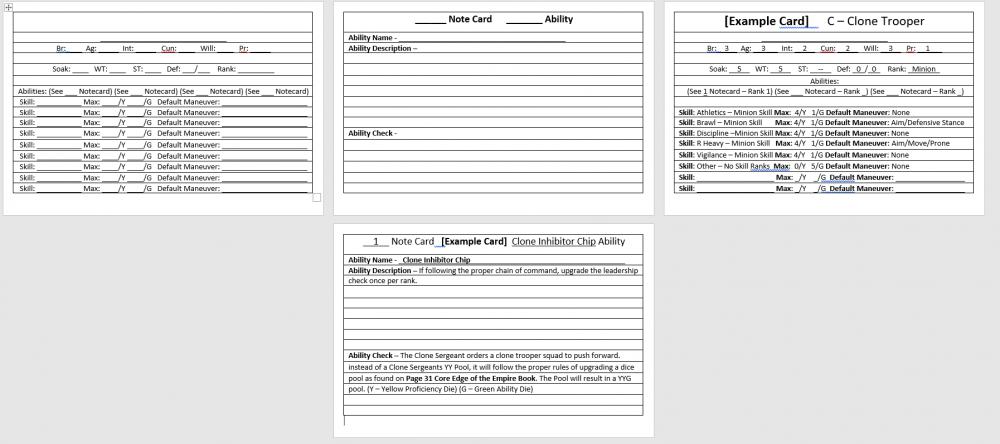
Here is a how to and example of a simple and easy Note-card layout for you to use at home. I will run through all the steps so that way you can follow along. Hopefully this will keep your organized. (Keep in mind this is more for a quick reference as to an NPC's abilities and statistics, not intended to keep track of WT/ST suffered. You can, of course, use these note-cards however you wish.)
Remember:
To follow the steps below to revert back to printing the normal size paper preferences.
What you Need:
- Note-cards that are 3.5" x 5" or 4" x 6" (89mm x 127mm or 102mm x 152 mm) The ones that I used are 4" x 6" (102mm x 152mm)
- Microsoft Word or some other Application that allows you to make tables and type (keep in mind different applications may show up different with formatting. This is why I didn't just share a document)
- A Printer
- A Laptop/Computer/Phone
Optional, But Helpful
- Note-card Organizer/Holder (I got a pair of 2 on Amazon for under $15.00, but more expensive and better ones are out there)
- Some Labels to help alphabetize your note-cards (Some Note-card Organizers will come with these, but they are usually more expensive - around $20.00 - $30.00)
How To (Using Windows 10)
-
Go to your Computer Settings
- Click on the search Feature
- Type in "Printers & Scanners"
- Click on your connected Printer. Mine is "Epson (XP-330 Series)" and it should be labeled "Default"
- Click "Manage"
- Click "Printer Properties"
- Click "Preferences"
- Click "Advanced"
- Click the drop-down box next to Paper Size to the appropriate setting you want to use
- Click "OK"
- Click "Apply"
- Click "OK"
- Click "OK" Again
-
Go to your printer and remove any paper
- Put your note-cards in Vertically (So the smallest sides are up and down) - I prefer to flip them over so the back is showing to me, that way I can write their weapon stats on the other side. Of course, you can make a layout for that too and print it out just as you would a double sided piece of paper (by manually flipping it after it is printed and returning it to the Que so it can print on the other side)
- Slide the Guide to the right (On my printer it is the gray thing that holds the paper properly in the printer). Mine is on the left, and I think most printers are set up this way. Move it so that it properly secures the note-cards in place
- Make sure the note-cards are all the way down. The printer may make some unusual noises as it tries to grab them. They are smaller paper and (usually) made of different material so that is OK. Let it do it's thing.
-
Go to Microsoft Word and make a new document
- Before you type anything, go to File --> Print
- Now go to Settings where you can change what pages you want printed and the orientation.
- Set the orientation to landscape.
- Change the paper setting under that to the appropriate note-card size.
- You may need to change the Margin Size. I would recommend printing out a few test note-cards to make sure you get it how you want it.
- Go to Insert --> Table
- Insert a 1x1 Table
- Change the first table row so that it should be 1.5 to 2 times as bigger than the default setting. (Unless you want nothing printed on top of the note-card.)
- Insert as many lines under that as needed
- Fill in however you wish
How does it look?
See below for an Example. The first card is designated for my future campaign to be the Republic and CIS stock NPC's and home-brewed NPC's. This lists all the important stat information. I don't have a layout for the weapons listed at the moment, but you can certainly add that on there to print on the other side of the note-card. The Second Card is an Ability/Talent Card for reference. The example cards show how they are used in conjunction with one another.
This has been extremely helpful to me in my test sessions. It allows quick and easy reference so that I can run my tests quickly and work on adding more ideas/content and less on making sure I don't accidentally TPK my group. When running large combat scenarios, these are very helpful and I highly recommend using them. These can also be used to fill in info on characters you make up on the spot as well.
The Default maneuvers column is one that I use personally because I keep forgetting that the NPC's want to use maneuvers, not just actions.
Any questions/suggestions/comments are welcome.


.jpg.afed48ed87d40e6e6240bc4ea4fde833.jpg)
.jpg.6d5744368a780df30615e339696c62ce.jpg)
.jpg.6c6c337f2470f62a1f5d75a35c738b3f.jpg)