1:2700 Star Destroyer

By Noosart, in X-Wing Painting and Modification

Hi all,
A new project to start with and probably my most longest cherished wish. The construction of the Imperial Star Destroyer from Star Wars. The model will get extra added detail AND... lighting!
I will not be doing a extensive kit review, as there are plenty of that on YouTube. Of course I will show 2 pictures of both the box and it's general contents.

326348f935f0cdd278a8aaf4fd9a7e94.jpg
ba121c1e88c7e1e3d00c03f16ac59979.jpg
Review:

Of course this will not be a playable miniature in the game as it will just be to big. But I do think I will set it offside the playarea as part of a mission story or objective marker.

The extra detail sets are from GreenStrawberry . They mainly make PE and resin detail sets for sci-fi models. Because I am going to build the Imperial Star Destroyer 2 (ISD2), I bought the stuff below.

General details
star-destroyer-.jpg
https://greenstrawberry.cz/star-wars/star-destroyer--86.html

Replacement hangar bay
star-destroyer-hangar-bay-.jpg
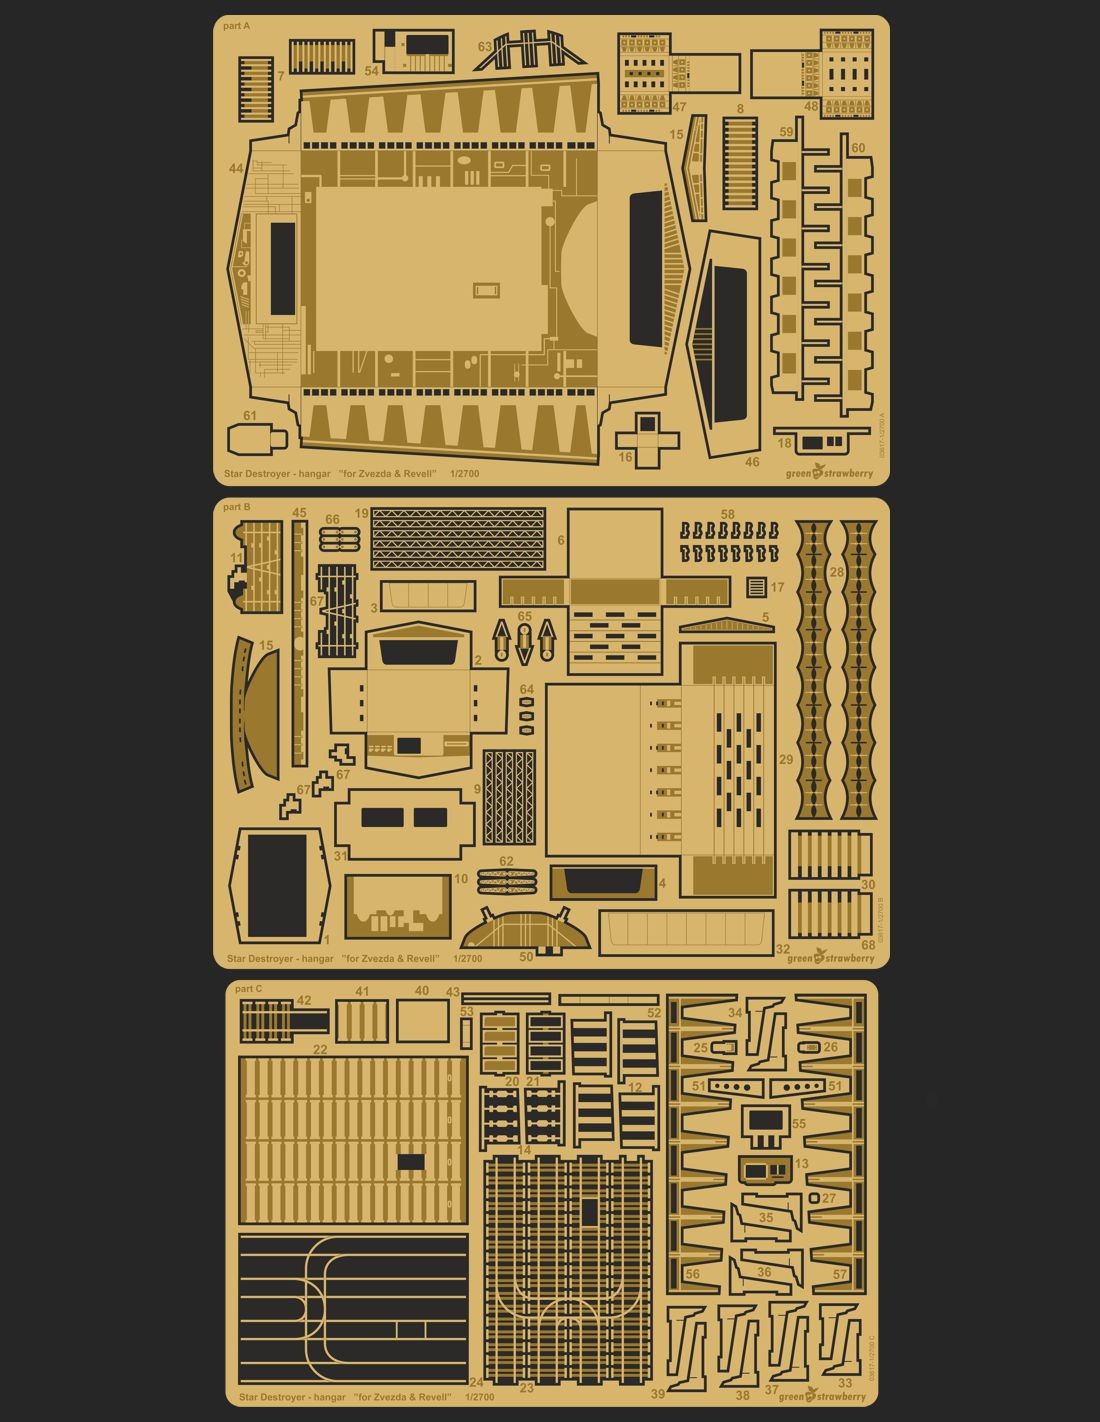
https://greenstrawberry.cz/star-wars/star-destroyer-hangar-bay--95.html

Screen accurate engine bells (please note that the flaps will not go on. They are for the ISD1)
star-destroyer-engines-bells-.jpg
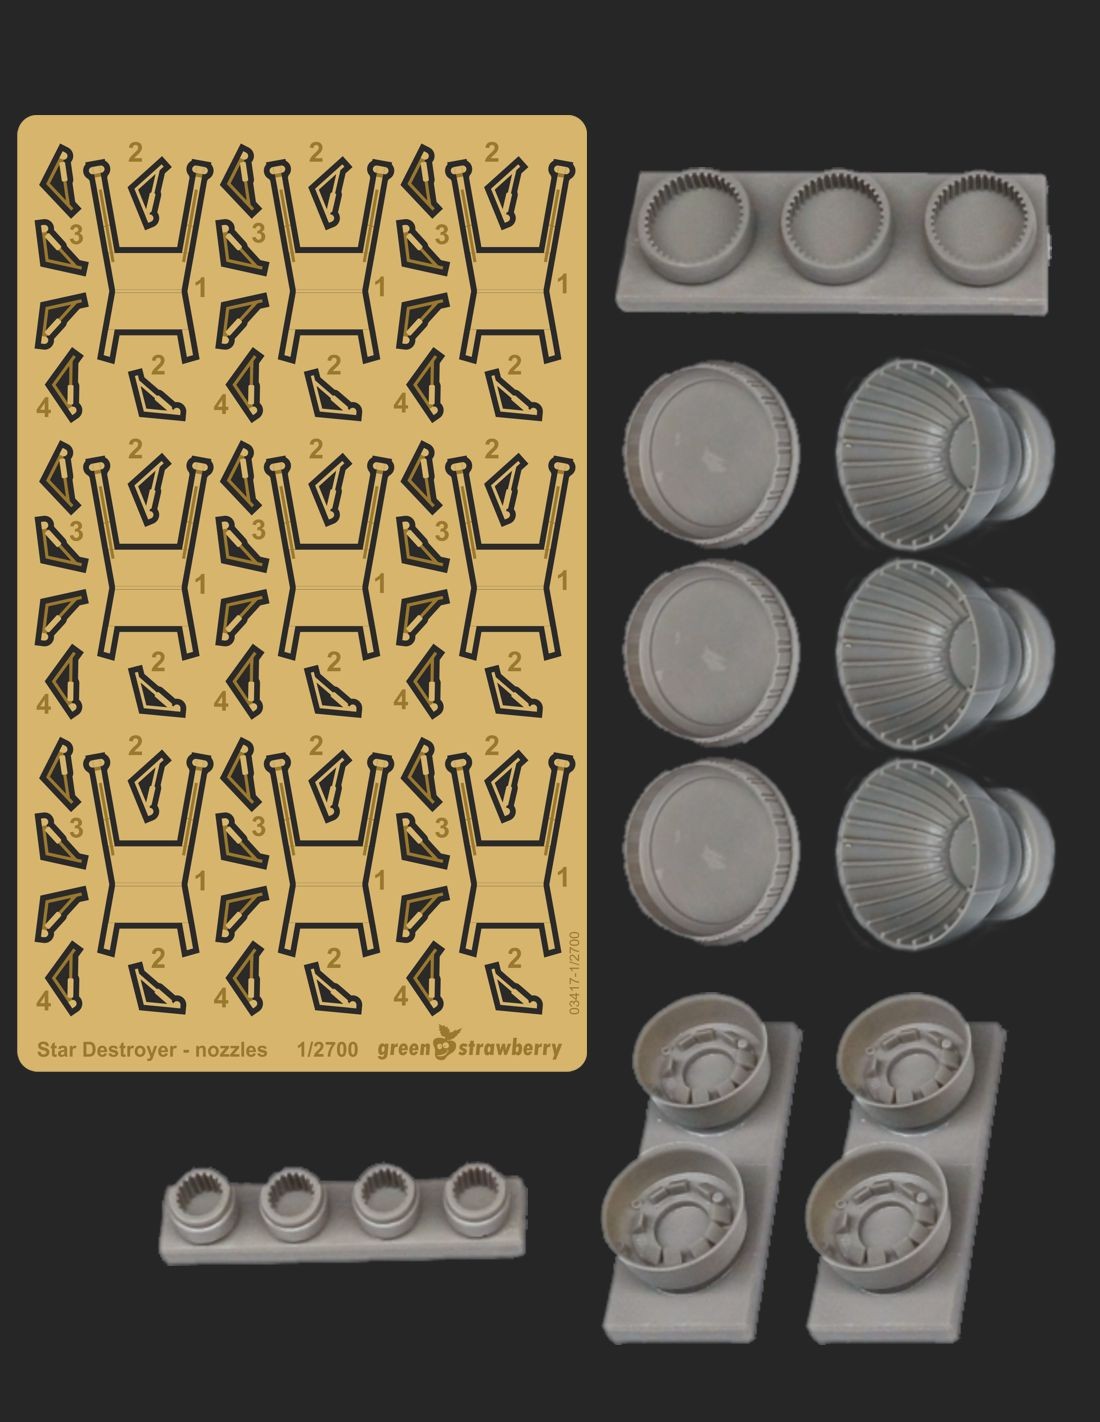
https://greenstrawberry.cz/star-wars/star-destroyer-engines-bells--89.html

Lighting set
star-destroyer-lighting-kit-.jpg
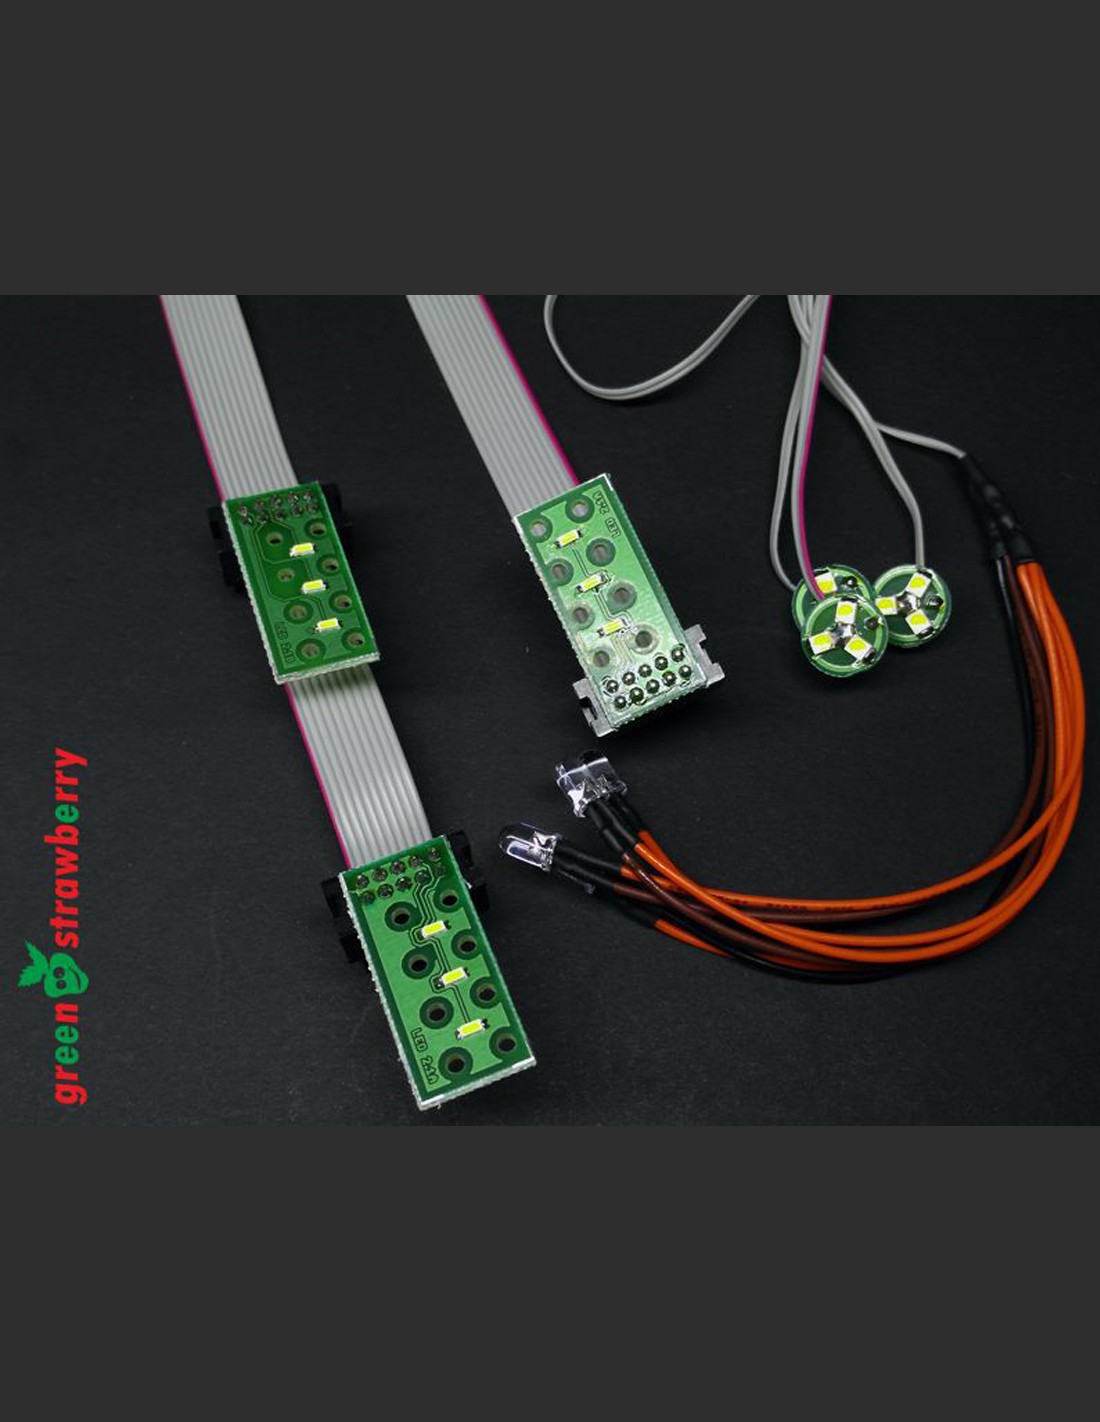
https://greenstrawberry.cz/lighting-kits/star-destroyer-lighting-kit--44.html

I'll probably going to remove/alter the 4 turbo laser turrets on each side and draw and print my own (or go shopping on ShapeWays), but that is something to decide on during the build.

Arno

Edited by Noosart

Really looking forward to see how this goes, especially with all the extra bits and lighting.

Unfortunately, now I want a Star Destroyer as well.......as if I don't have enough plastic to assemble and\or paint 😄 .

3 hours ago, Jiwestone said:

Unfortunately, now I want a Star Destroyer as well.......as if I don't have enough plastic to assemble and\or paint 😄 .

Sorry about that 😇

I found the best priced one on Amazone for 78,80 euro's and free shipping. Just to add a side note ;)

The details on the kit are already great OOB. So adding another 200,- euro's or so is not necessary for having a good looking model. But of course it will help in getting it more accurate. In my case it will become the eye-catcher in my glass cabinet.

Welcome to the club. This is a bit out of date (first addition). I’ll get around to updating it to second some day.

11 hours ago, Bullox said:

Welcome to the club. This is a bit out of date (first addition). I’ll get around to updating it to second some day.

Would be cool if you can update the rules... I always play casual games with friends, so it's easy to give it a try.

Alhough it will still be seriously out of scale of course...

The first 2 pages of the building manual have been completed. And it must be said, this kit fits perfectly up until this point. Although rated a difficulty level of 4, it is more likely to be a rating of 2, it's so easy.
515e1f5a16c1abade50c2f789dba738a.jpg
52d00c6a8f8708c03350acd3bda5c398.jpg

All parts a beautifully shaped, as in nicely crisp and fitting. When two parts need to join, the corners are angled towards eachother, minimizing seams. And often another part is placed over the seam afterwards
d247f2698acdbe4e106aed2748eaf94f.jpg

Although this last picture shows the worst fitting I've seen so far, it's hardly to be seen when de model is on my desk. Especially when a lot more greebles will be added during the build. I will determine a bit later if I need to resolve this.
4f90b827e3b7413a8bbdedcde233be8d.jpg

Edited by Noosart

All is fitting perfectly, making this an easy build. After just a few hours most of the top part is asembled. I left a few segments unglued so I have easy access for adding the fiber optics.

17016663fd65b692456557fb73db5ce8.jpg
43ac1e03328473598952988354c177b3.jpg
9d94ea99cc004a36f61d39a8da9ce826.jpg

While waiting on the upgrade sets to arrive, I've started marking all the holes that I need to drill (all small black dots). If I can dril all these holes nicely... I will be putting 116 of them on the bridge alone!
9184cc0a3b04d5d2434f2c5afb1e5ce4.jpg

I've made a start on the upper deck as well
eeb94f2cdf364b16666be4acb72311a2.jpg

Arno

Edited by Noosart

Yesterday I received the PE, resin and lighting detail sets. That stuff is beautiful. I carefully started on the first parts on the secondary hangar in front of the main hangar. The big door you can see on the photo can be build open or closed. I will leave it open :D showing the TIE fighter storage. Unfortunately the are no TIEs in the set. Probably because they would be about 2mm in size.

6dc2d47d031e1c3be89688f5ee006364.jpg
5464146571c16ee4a5505059e58dea55.jpg

A beautiful feature is that all room's are prepared with holes and slots where light can shine through from build in lighting.
62e3b58168e73261c00af713b8d516d4.jpg

Arno

The small hangar is glued in place. I left all the small additional rooms unglued to I can get my airbrush in them
6cd824bff1352b19d1db4a6d0688621c.jpg
0dc36ca34fd4a9b953b1eac900c11822.jpg

Then I started working on the main hangar bay. Main work was bending all walls upright and creating again some small rooms. As with the orthers, these will remain unglued until everything has been painted
53915ad59d27a34d5cce982fe42b003f.jpg
581d661db32e6d588d99671f8f1631e0.jpg

A lot of work done on the main hangar. First a start on the bidge that is looking out over the entire hangar bay. Because there is hardly any room on the bend metal edges to put glue, I've added a super thin ridge of styreen. That will make the bonding a lot stronger.
5ee453b4ebfadbf02e65c22acd6c0a48.jpg

Then I continued work on the ceiling. A lot of small greebles, but the main thing you can see is the rail from which they can launch and taxi shuttles and equipment.
9d9a21a2bd2fc9a09717faabbb8d495a.jpg
62dd38eb35f7026aeafbd1c3fb7df94e.jpg
0116b2d456960226e4a4d455408a026a.jpg

And finaly an existing kit part needed to be modified. This is the docking arm that, like a tug boot, can guide larges shuttles into position while docking.
8de08278d41f45083986879454f5a685.jpg
bf371ee16db39a0e5bbfd734ff766e5d.jpg

Arno

Nice. I'm anxious to see the final product.

@Noosart Do you know what the final dimensions will be?

Edited by 5050Saint

I don't know the exact measurements, but it's about an electric guitar 😂

c9ac10c485fbf21495e6e55a51fd3322.jpg

It will be 60cm long and about 30cm wide. I'm guessing the total height will be somewhere around 20cm.

If you need more exact measurements, please let me know

Now i want a Star Destroyer guitar ....

GreenStrawberry's update set is really beautiful, but I did spot a small mistake. So for the ones watching this meaning to build this set themselves, pay attention to the following.
The instruction is telling to stack part 10 and 11 onto eachother. You can already see a clear pattern on part 11.
019a6d12f540998926d3953d94c1f093.jpg

On the sprue there is a part 67 that matches that patern perfectly and needs to be stacked on top of part 11
d693e19221ae11abe6ed8996c5eed6ab.jpg

And there is another part called 67. However, I can't find these in the building instructions either
1f75329aa918e78ed086cd489e23b017.jpg

I have been in contact with GreenStrawberry about this and they are looking into it to see what is the best way to correct this

Then let's continue the build. I've put in all trusses into the big 'garage'
4483a15c446d0e5b1a02eac1a28d5434.jpg

Just above the main hangar door on the left, I glued in a strip of styreen. On the kit there was a bit a detailed plastic, but I prefer a smooth surface when applying the PE parts
10ac88ec57158ee15af161f58a57c38a.jpg
f183b6c85acdaf650a8a3ab202ea4c6c.jpg

Then the bulk heads were up next.
dbb5fb3ebaee0d6bbe278971a17bfbae.jpg

When all is done, a nice light will be emited from underneath, a bit like a flood light. This is were we now stand
f0ec4ffc5e9ef20434481b577bcff684.jpg

You are insane. I love it. You may continue.

:huh: :o :wub: :D

NICE work. Keep it up!

16 hours ago, CyCo said:

You are insane.

I am? 😅 Please don't tell my boss...

I am still working on this, but I don't have many pictures to show. I've been mostly drilling holes... During the grand prix of Silverstone I drilled 78 holes. Almost broke my drill in the last lap 😉 This is about as much as you can see from the progress
31be0e7df93a25cae499b3a25a547344.jpg

And then I was anxious to see how easy the fiber optics would go through the holes and how they would shine. As seen from the picture, on the right side the 5 dots light up.
ddfc84ed555b334572e61fc42c7f88fb.jpg

And finaly the famous 'garbage chute' that was shown in part V - The Empire Strikes Back when the Milenium Falcon escapes by drifting away with the rest of the garbage.
2f646a5cbd144ca4fee278dc3df2c4e5.jpg

Arno

I wonder what an Armada scale Millennium Falcon looks like on the back of the bridge? :)

LOL.. That would be awesome.

While I just keep on drilling all the holes, a small little something was in the mail today.
A couple of those TIE fighters I want to hang from the trusses in the hangar bays. For the rest, well perhaps I find some opportunities. 😉 The shuttle I want to park in the hangar... hopefully that will fit.
2bb38e4cc05194e3849dc7a038d913bb.jpg
7cf1736460fc9ae6bceb56517915789b.jpg

Everybody knows TIE fighters and the Lambda shuttle. Or at least the main shapes. But these are the de tractor beams that can be used to capture and guide ships into the main hangar.
5770e505f415e2fb3d567b4bb4dabfa0.jpg

Wow. You are seriously getting into detail in that hangar!

How will you paint those ties on that spruce?

One of the challenges to figure out, I guess. But the designer had a tip to leave the fighters on the sprue head rail and use that to glue the fighters in place. So I will probably go that way and paint the fighters one full row at the time.

Wow, this looks great so far, and all the extra detail really adds something to it. I`` m getting a headache just looking at all those tiny details :D . I j ust (re)watched the behind the scenes film from the original trilogy, some cool stuff there about the original ISD film models.