Let's make Arkham Horror look even cooler

By Perkele, in Arkham Horror Second Edition

Hi all, in this thread I'll be showing the process of my Arkham Horror project. A friend of mine has Arkham Horror and all of its expansions, and we have played the game a lot and we still haven't had enough of it. I'm very much into other mythos games (like Elder Sign and my favorite, Mansions of Madness) and especially the novels, so naturally it was only the matter of time when I got my own Arkham Horror.

Tuning board games has lately started to being my thing. I'm a miniature painter, but I think other aspects of board games have the same right to be loved as well. That's what this thread is about, I'm going to do my best to make the Arkham Horror look as badass as I possibly could. Since the picture limit, I'll be doing this in a blog style, updating when I get something done.

Hope you like following the tuning process and don't forget to comment if you have criticism, ideas or tips to share. :)

-Perkele

1. Painting of the markers

Like many other board games, I like to paint the edges of the markers black because it looks just so much better in my opinion than the boring old cardboard colour. After all markers are done, I'll varnish them so the paint won't fall off.

The 24 character markers. First some background of my future plans. I've ordered myself Arkham Horror investigator figures from FFG, so I'll be using these markers in my games rarely. Since Mansions of Madness and Elder Sign use the same characters as Arkham Horror, my plan is to keep all 48 investigators in a big bag. When we go and play one of these mythos games, I'll just take the bag with the game so there will always be the character models for the game and I won't need to buy duplicates of them. If for some reason we can't use the Arkham Horror models, we can just use the markers instead. I painted their edges black and glued them on the plastic stands.

SAM_7398_zpsc61981c0.jpg

The gate markers. Nothing special here, I'm going to order some gate stands for them tho so they'll get some more lovin' later.

SAM_7400_zpsb74842ad.jpg

Some other markers I started painting. For some reason the third explored marker didn't get to the picture, don't know why.

SAM_7401_zps72522dee.jpg ]

The black monster markers. I still don't know how should I paint the edges of the coloured monsters. Should they be black too or should I try to highlight their different types by painting the edges of the red monsters red etc? Black is probably the best idea, but I'm still undecided.

SAM_7402_zpse13076f2.jpg ]

2. Some painted investigators
Sister Mary, the nun.
Michael McGlen, the gangster.

Kate Winthrop, the scientist.

"Ashcan" Pete, the drifter.
Joe Diamond, the private eye.

Gloria Goldberg, the author.

Harvey Walters, the professor.

Jenny Barnes, the dilettante.

3. Some more painted investigators
Monterey Jack, the archaeologist.
Amanda Sharpe, the student.
Mandy Thompson, the researcher.
Bob Jenkins, the salesman.

Darrell Simmons, the photographer.
SAM_6868_zps48c5f9ea.jpg
Vincent Lee, the doctor.
SAM_6870_zps18b74182.jpg
Carolyn Fern, the psychologist.
SAM_6876_zps44666bfe.jpg
Dexter Drake, the magician aka master of tophats.
SAM_6873_zps97aed12a.jpg

That's all of the investigator figures I have at the moment, but my package from FFG will be here sooner of later with the 32 other investigators and 10 Arkham Horror dice.

Edited by Perkele

4. "Money makes it all good." -Bob Jenkins

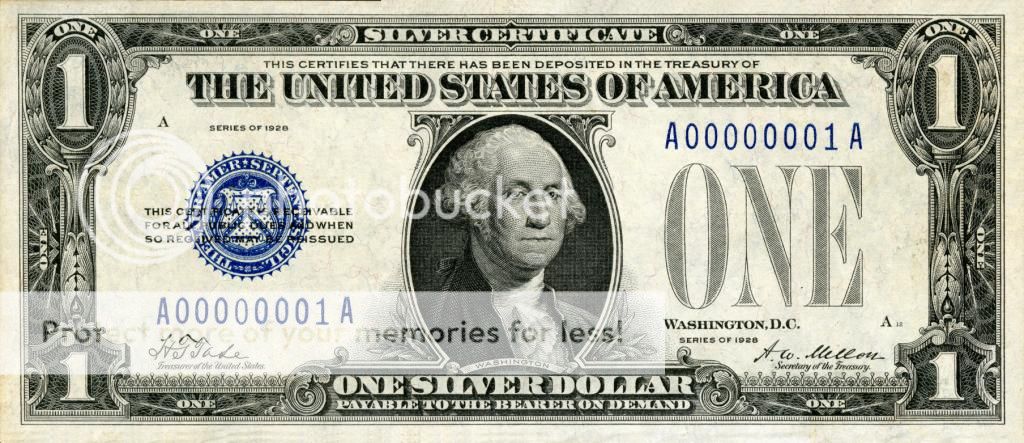
I have never liked the small money tokens that come in Arkham Horror. Instead, I'm going to dump those and get myself some real bills as currency in Arkham. I did some research on the money of the time and I decided to make my some bills that look like 1928s US dollars. In 1928 the dollars changed into smaller bills of $1, $5 and $10 dollars - how fitting for the game!

At the moment it looks like I'm going to make bills like this. Real dollars would be great, but they are very expensive nowadays so I have to make my own.

$10.

10dollari01_zps8179ef0b.jpg

10dollari02_zps9a2c3efe.jpg

$5.

5dollari01_zps15d96dec.jpg

5dollari02_zpsb62c5482.jpg

$1. Funny that this is the only bill that doesn't have a building on its back.

1dollari01_zps3dacde0c.jpg

1dollari02_zps291d8e7d.jpg

I have the correct measurements and pictures of the money, on Monday I'll go to the local photocopy building and try to find out if I could print these on a paper that feels bit more like bills. Back in those days the bills were actually made of paper (correct me if I'm wrong, that's what I found out), so it's a bit easier to make them look real.

Watched some inspirational pics of other people's Arkham Horrors and got some ideas for my own project as well. One of my favorite things I saw a couple of times is using envelopes as investigator sheet (and personal mission) holders. Also I ordered some gate stands and Elder Sign markers from Litko, those will be something to work on later.

One thing I did recently was clean up our rather beat-up looking monster tokens, if for nothing else to preserve them. I used paint pens to match the color of the border on the sides and cleaned up all the scuffs, then used Krylon Matte Finish 1311 to protect them a bit (we draw from a big bag for monsters and get some wear over time).

It's amazing how nicely the tokens clean up -- some of the oldest look brand spanking new. :)

Yeah, I'm going to matte varnish my monster and gate tokens as well when I get everything painted properly. We already had one game with the tokens, but we tried to be careful since the edges of the markers could get chipped.

I have another update here, some of the stuff I ordered from different companies arrived. First of all I want to show you the dollar bills again I got from the photocopy building just today - 9 $10 dollar bills, 9 $5 dollar bills and 27 $1 dollar bills, all for a bit less than $10. The bills are printed on a special paper that feels like a paper used in old bills, so very good value in my opinion. Now I've got to make the bills look older by a few different methods, I'll go in the details when I have some finished results.

SAM_7404_zps41ad7eb9.jpg

SAM_7406_zpsefff5da3.jpg

SAM_7407_zpsa8a4eca7.jpg

SAM_7408_zps122184a3.jpg

Then the gate stands that arrived from Litko. Nothing too special here, I had to build them by myself and I'm still undecided if I should paint them as well: if I do, the gates will be dark metal and the ground some greenish gray tentacles.

SAM_7411_zps0ec634a6.jpg

SAM_7415_zps6a689843.jpg

Also I got some elder sign tokens from Litko, these are easier to recognize on the table than the tiny elder sign tokens brought in the base game. I love the fact that you can actually see through the markers, so the artwork on the locations is still showing through the blue marker.

SAM_7413_zps566177e4.jpg

SAM_7416_zpscf771aa3.jpg

That's all from today. In addition I got my dice pouch, but I'l show pictures of that later because I want to make it look a bit more older than it is first. The investigator miniatures and the dice are here tomorrow, so they are in my next update before the weekend.

Edited by Perkele

Back once again, got my investigator miniatures and started even painting the first patch of 8.

Mark Harrigan, the soldier.

SAM_7425_zpsf88ed82d.jpg

Jim Culver, the musician. I find it very lovecraftianish that the only black man in the game is a jazz musician. Not saying it's either a good or a bad thing, but definitely the way Lovecraft thought of the people of the different races. The same thing applies to some other investigators as well.

SAM_7427_zpsf563666a.jpg

Ursula Downs, the explorer. Her eyes seem a bit messed up in the pic, in person everything looks fine tho. :huh:

SAM_7429_zps8616e98d.jpg

Lily Chen, the martial artist.

SAM_7431_zps128ca53a.jpg

Wilson Richards, the "mororcycleman" handyman. I love the fact that he is carrying his "mororcycle" instead of motorcycle in the reprint too - some other mistakes were taken care of, but Wilson's mororcycle apparently is a thing.

SAM_7423_zps5e67de84.jpg

"Skids" O'Toole, the ex-convict.

SAM_7421_zpse96eb983.jpg

Minh Thi Phan, the secretary.

SAM_7419_zps97b60780.jpg

Luke Robinson, the dreamer. I personally find this character fascinating, reminds me of the dreamer artist from Call of Cthulhu.

SAM_7417_zps893b85b7.jpg

The dice pouch and my new 10 Arkham Horror dice. I still haven't done anything for the pouch, but I will.

SAM_7439_zps5a0a8a39.jpg

That's all from today. For now I've got some LoL to play.

Yeah, in my last post I mentioned I've got some LoL to play, and sure I did. Now it's time to get back to my project.

Tonight I started working on the dollars again. I made some brown tea and poured it into the pint (no, that's not beer - I don't waste a pint of good brew!), after this I started dipping the dollar bills into it one by one. A couple of seconds per bill is enough, after that I wipe the excessive water out of them and hang them on this laundry sock track thingy.

SAM_7561_zps803689bd.jpg
SAM_7562_zps9e5497db.jpg
I left one bill into the pint, I want to see how it turns out after being in there for few more hours.
SAM_7568_zps61e2e877.jpg
After the bills are dry, I started burning some edges with my lighter. I like to think about a filthy rich guy lighting his cigar with a small bill, so I made a few of these. You can "color" the edges without burning them by dipping the bill into the water again and then keeping the fire under the wet bill.
SAM_7565_zps2a046813.jpg
SAM_7567_zps7d1358aa.jpg
SAM_7569_zps6ef21347.jpg SAM_7571_zps0b384df5.jpg

continues...

...continues (gah, I hate this image limit!)
Some cigarette holes are mandatory.
SAM_7573_zpsb2b61461.jpg
SAM_7574_zps3e3618b3.jpg
Some rich cultist leader has burnt Hamilton's face. That soulless bastard.
SAM_7575_zpsa900e3c3.jpg

And finally a monster cup for my monsters, I bumped into this small metal box on a flea store, this is perfect sized for the monsters, looks cool and picking a monster randomly is easy since the lid can be lowered to block the line of sight into the box.

SAM_7576_zps26dd8344.jpg
SAM_7577_zpsd79d58f8.jpg
That's all from today, next time some more working on the dollars. As always, let me know what you think, and tips & tricks would be appreciated.

Perkele,

Very nice, indeed! Keep up the great work and continue to make your Arkham Horror experience the best it can be...

Cheers,

Joe

Looks stunning. Any chance of uploading those Elder Sign tokens that cover the gates up to a image or file sharing site or boardgamegeek?

Thank you for the comments, I really appreciate that people are following this blog. :)

@ Jake yet again: Sure, I can take pictures of the Elder Sign markers and upload them somewhere they can be found. Since it'd be too hard to take the pics with my own toaster-like camera I'll be waiting till next Monday when I can take the pics with a systems camera at my work.

I have yet another update here. Nothing too special today, just wanting to share my Arkham Horror packaging system. At the moment I own all of the big expansions (which are, of course, Kingsport, Dunwich and Innsmouth) so I have a total of four boxes to work with. I'm going to buy the small expansions as well, but not before 2015 since I've got some bills to pay and I need a new laptop as soon as possible. But yeah, when I have the small expansions too I think I'll have to add one small box into the fray as well, to contain all this board game goodness.

SAM_7578_zps001d3e30.jpg

The first two boxes contain lots of cards, the big marker pool, the gate and seal markers and the Ancient One, investigator and herald sheets (which are not yet laminated). I removed the gate stands from the boxes because I found them being too unpractical... They just make it harder to see where the gates are leading to, especially when there's people around the table. I've got another marker idea, too. Maybe I should craft closed-in markers which are the same size as the gate and seal markers? They would look kinda like the regular closed-in markers, just bigger and more noticeable.

SAM_7580_zps0b1acd69.jpg

Third box, I cut the card tray from one of the plastic holder thingies and placed it in the box, this way I could fit more stuff in there. The big tin box is for the monsters, and the small one is where I keep all the dollar bills. The small one looks nice, although it's like 1cm too wide, hence the lid of the box won't fit tightly and therefore it always has to be on the top of the box pile, which is annoying. Also there's small plastic bags for the expansion cards and gate markers, to make it easier to setup the game - if I won't use the Kingsport expansion, for example, then I can just ignore the Kingsport bag. In addition there's a bag for the Ancient One special attacks cards and other cards that are rarely used. Last but not least there's the dice pouch!

SAM_7579_zps58b73435.jpg

In the fourth box are my all 48 investigator figures, nicely packed in the miniature carrying foam. There's room for another 8 figures, but I wanna keep that space so the foams won't move inside the box when travelling. Maybe I should put that extra room to work and start getting some more figures for the game, for example I could get like three policeman figures, magnetize their bases and use them as a patrol marker? Dunno, that could look cool. Also I'm gonna get some old-fashioned, flat cigarette cases for the players to keep their dollars in, gotta check EBay if I find something what I'm looking for.

SAM_7581_zps551aaa01.jpg

And finally all of the boxes in a pile. The Innsmouth box has to be the top one since the small box for the dollars, maybe I should go to the local flea stores, trying to find an even smaller box for the moneys.

SAM_7582_zpsc1a165d0.jpg

That's all from today, have a good one.

-P

Time for another update!

I started working on the investigator sheets yesterday. One thing I never understood about them is why on earth the pictures that are clearly trying to look like photos are in colour? Of course it's nice to see the characters in colour and all, but come on, don't make them look like photos then. To fix this, I scanned all 48 investigator sheets and started editing the pictures to look like photos from the 20s and 30s.

IMG_3877_zps054fb3e7.jpg
IMG_3878_zpsc7ddf4b7.jpg
I used different sepia and black and white tones to create more variance to the pictures, also I cut the photos off with different styles of frames around then (the pictures are obviously taken before I cut the photos off). The photos are printed on a real photo paper, too. I'm going to glue some note paper etc on the old pictures on the investigator sheets, then stick the new photos on them with a real paper clips.
IMG_3880_zpsd66a1736.jpg
IMG_3881_zpsa091d77d.jpg
IMG_3882_zps739bef24.jpg
IMG_3883_zps85f9f202.jpg
"Skids" O'Toole, the ex-convict has a unique story here. I never liked his picture and I was dying to get one old mugshot photo in, so I searched for a mugshot of mr Fred Barker, a bank robber and gang member of Barker-Karpis gang which was in action in the early 30s. If you are interested, find out more about Barker-Karpis gang, the story is fascinating and the stories of Fred and "Skids" are surprisingly similar. Like I mentioned before, I want to get me some brown envelopes and put the investigator sheets in them, along with their personal missions, starting stamina and sanity tokens and other roleplayish personal stuff like photos and such. I'm going to create a small web for the criminals and feds of the game, with photos of Barker-Karpis gang members, connections and stuff all over the place. It's gonna be neat, I hope so. :)
IMG_3884_zps71c3c754.jpg
I had to do some cropping and editing on some pictures, I wanted to make them look like photos as much as I could. The librarian picture needed lots of work, I wanted to blur the monster face away to make the photo look more realistic ("it's probably a fake, but there must be something in the photo"). The young cop and the gangster got brand new photos from the internet as well, since the cop's bike is really messed up in my opinion and the gangster shooting a Tommygun is a bit too action-packed image to be an old photo in my opinion. Also I had to edit the flying arrows away from the background of Monterey Jack's photo, seriously, who's gonna take a picture in 20s when there are arrows flying towards you?
IMG_3885_zps66519876.jpg

That's all from today, I'll keep on working the investigator sheets for a while now.

-P

Wow I wish I had the energy and time to do this type stuff, the pictures look awesome.

What did you use to paint the edges of the markers?

Are all the dollar bills (1, 5 and 10) the same size?

Edited by Jallis370

I find the markers kinda hard to paint. miss a little and it's very noticeable..

Thank you for the comments! I've been slacking with this project, but I'm slowly coming back here and getting the pictures done properly.

@ Jallis370: The bills are all the same size. I'm not 100% sure if they all were the same in the 1920's and 30's but I'm quite sure - it's a long time since I cut the bills so I honestly can't remember what I found out when researching the topic. I painted the edges of the markers with black acrylic paint, the same stuff I use to paint my miniatures with. Painting the edges is kinda tough early, but after a few markers it starts going well - just keep the paint watery enough so you can wipe the mistakes away right away when you make them.

On my next task I'm going to visit the local photocopy building again and get the ancient one/herald/guardian sheets laminated. Also I'll find out if they have any brown envelopes for the investigator sheets. Updates sooner or later, at the moment I've got lots of different projects going on so I honestly can't promise anything. :)

I'm a total copycat and I liked your ideas and hopped on them as soon as my game arrived in the mail. I was sick for a week and had nothing better to do :P

I thought I saw other colors on some of the markers so I tried finding matching colors for the monsters which I also used on the other ones. I ended up with both enamel and acrylic paints as I was a bit impatient when shopping for colors. I just wanted to run home after school and paint. I used a semi-glossy polymer varnish on all of it. I was told the polymer might ruin the enamel, but I had no issues with it. I'm very happy with the result. I didn't have patience enough to remove the naps as I found it kinda hard to do before I started painting. Now they're more stiff and easier to cut off with a scalpel and the paint has soaked through. I might do it later on if I'm bored.

auyuxe.jpg

I've replaced the stamina and sanity markers. The stamina are wooden hearts bought at a cheap store called Nille I painted red. I attempted to write on one side of some of them with a white marker. I'm not happy with the result, even after 3 coats of varnish.

The sanity are plastic brains from mmm...brains! I want to paint both the red and white brains with the same color, using the darker ones as 3. But the polymer paint won't stick to the brains properly. The paint suddenly stuck to the two in the picture after some fiddling, but I have no idea how or why. I have no issues when using enamel paint, but I don't have it in dark blue, like the acrylic I used. I'm going to paint over the enamel with the acrylic to see if the result looks any better than the other ones, but I want the red to shine through.

I have tried brainwashing before I painted, but the acrylic doesn't want to be friends with the plastic...

I got 200$ from my trusted print shop. He printed them on glossy paper which makes the bills look and feel wrong. I'm bathing them in black tea, bunches at different intervals for different shades of old. I'm trying to wear them a bit by carrying some in my wallet and it seems to work. I'll try rubbing one after soaking it for a bit to see if it is possible without removing the ink. My gf tried crunching the one to the left in the wallet. She likes the result, but the ink is gone in between the creases and doesn't look authentic. I also got some wallets for the players :D

6i9yqo.jpg

I'm looking to replace the clue markers with green glass pearls, like these, but green ones are hard to find nowadays. We got some other colors, but my mind is kinda set on green. Would it look good with blue and clear ones?

pic1542414_md.jpg

I've also ordered semi-transparent sealed gate tokens and gate stands. I wasn't sure about the stands, but they were too cheap to not get. I will not get the expensive miniatures though.

Update: Waddya know. I found red and green glass pearls on ebay. Whee!

Edited by Jallis370

These are AMAZING! I don't play Arkham all that much so I don't think I'd ever invest the time to trick out the pieces and stuff like all of you have, but by far my favorite thing has to be those glass beads that Jallis made for the clue tokes and stamina/sanity tokens. Just gotta say, using newspaper clippings with the clue tokens was genius.