My brother and I played a 200 pt battle this afternoon and I kept notes and took pictures…
Anyone interested in reading/seeing that?
My brother and I played a 200 pt battle this afternoon and I kept notes and took pictures…
Anyone interested in reading/seeing that?
Give it too us.
-jay
Yes, battle reports are fun. Please share!
I'm so excited, where is it? ![]()
Typing it up now…
The Forum ate my first attempt…I am going to type it up in Word first…then transfer it and add the photos at the same time…
Standard Tourney Style Battle from the Rulebook with minor changes to the Objective (once we got to that point)
Brother (David) has a 200 point Allies Combat Platoon
Consisting of
Ranger Command Squad
Ranger Weapon Squad upgraded with Air Drop
Heavy Ranger Attack Squad
Combat Ranger Squad
Recon Ranger Squad
Steel Rain
Pounder
I am playing a 200 point Axis Schwer Platoon
Consisting of
Heavy Kommandotrupp
Heavy Recon Grenadiers
Heavy Flak Grenadiers
Recon Grenadiers
Ludwig
Ludwig
Sniper Team
Mission Conditions: None
Deployment Type: Force Collision
Objectives: Key Positions (with 2 changes:
1)Objective terrain pieces must be outside of deployment zone
2)Each Objective terrain pieces picked by you must be at least 12" from the other.
Terrain before Deployment
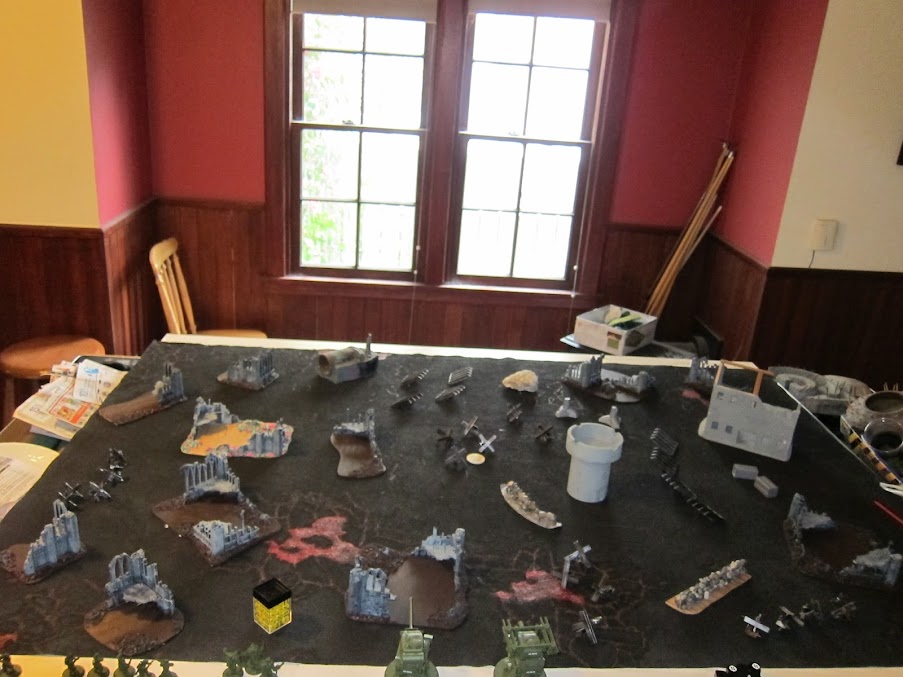
Notes on Terrain:
Tank traps prevent movement by vehicles if they cannot fit their base between the traps.
Ruined buildings are Rubble in the middle and Walls (for hard cover) where there are walls.
Since David had to pick first scenario point. He picks his deployment area and deploys his first unit.

Allies Deployment
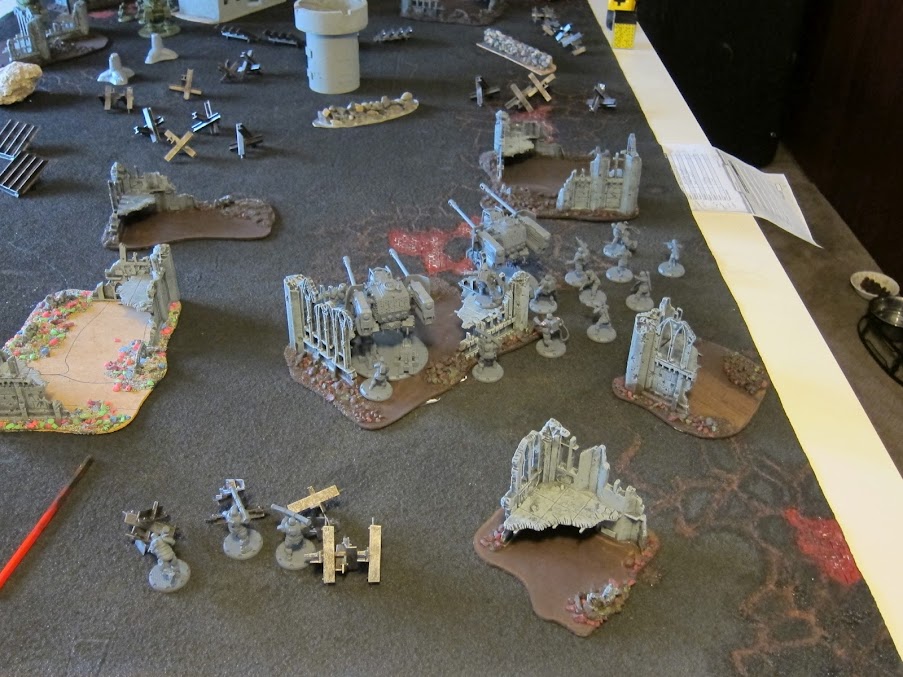
Axis Deployment

Birds Eye View of Deployment
Turn 1
David gets 2 orders I get 3 orders.
David initiates play.
His first Order is Fire for Effect. He successfully brings in the Arty strike, but does no damage to either of my 2 Lugwigs.
Second Order is to move his Recon Ranger Squad Out of the building.
My orders, I move up my Heavy Flak Grenadiers, my Ludwig, and my Heavy Recon Grenadiers.
Allies Unit phase 1,
He march moves his Heavy Assault Rangers from the ruined building they deployed in to the Top of the Tower.
David then moves up with his command, recon, and Combat ranger squads. Then he march moves his Ranger Weapon Squad with Airdrop, placing them in hard cover on the rock wall in front of the tower.
No shooting (nothing is in range for him)

I really like your Key Position house rules and I think I'll implement them in the future. When we tried a game on the weekend and ended up with "Key Positions", we tried to sort out a satisfactory way to do it and just ended up deciding for our first game we'd rather just do eliminate the enemy. But I think your 2 house rules would resolve some of the obvious issues.
Con't
Axis Unit Phase 1
I move Heavy Command and Heavy Recon up, and move Heavy Flak further into the unpainted building.
I fire on the Heavy Assault rangers with my sniper…Thank goodness for Spotter AND sustained attack…I manage to kill 1 Ranger…
Fire both Ludwigs at the heavy assault squad…One completely misses and the other manages to score only 2 hits (both negated by the heavy cover). But at least now the Heavy Assault squad is well and truly suppressed. 
End of Turn 1
Turn 2
David gets 2 orders I get 1
I use my order on my sniper to fire at the Heavy Assault Rangers in the tower…Another KILL; now the 1 remaining has 2 suppression markers and is technically retreating.
David uses his first order with his Radio Man to order the Ranger Weapon team that Air Dropped in to open fire;
They fire the Bazooka at the Ludwig and normal weapons and MG at the Recon Grenadiers in the building. The Bazooka finds a weak spot and manages to put 3 points of damage on the Ludwig, but no special damage. The heavy cover saves the day for the Recon Grenadiers in the building.
Axis Unit Phase 2
I attack again with the sniper…and manage to pick off the last Heavy Assault Ranger.
Heavy Flak Grenadiers March move from one building to the next…trying to get into range of the Ranger Weapon squad…
Heavy Recon Grenadiers move up and attack the Ranger Weapon squad (12 DICE!!!) Scoring 4 hits, he saves 1 and cover negates another 2, for one Ranger dead.
Recon Grenadiers activate, fail to remove suppression and so fire 1 time into the Ranger weapon squad…1 hit negated by cover, but adding another suppression marker to the unit.
Command squad attempts 2 repairs on the nearby damaged Ludwig… repairing 1 damage
Damaged Ludwig is PISSED now…He opens fires on the Steel Rain and manages to do 3 damage!!! No additional damage from the damage table…
Ludwig in cover does a sustained attack at the Ranger Weapon team, trying to avenge his team mate…but only manages to add to their suppression level.

End of Axis turn 2
con't
Allies Unit Phase 2
Pounder jumps out from behind the rock, moving into range of the damaged Ludwig and POUNDS it into the ground (4 damage…I failed to save any)
Attempts to activate the Rangers weapon team; they only manage to remove 1 suppression…so they are out of it for the turn.
Command squad attempts to repair some damage to the Steel Rain, but is unsuccessful.
Steel Rain attacks the Heavy Flak, only managing to suppress them. Launches rockets at the Heavy Recon in the open, they are undamaged but suppressed.
Turn 3
David gets 2 orders I get 1 again
I order my Heavy Recon Team to open up on the Ranger Weapon team at the wall, they manage to kill 2.
David attempts to call in another Arty strike but fails.
David uses his other order with the Radio man to issue a Regroup command on the Ranger Weapon team, removing all suppression.
Axis Unit Phase 3
March move sniper from one building to the unpainted building.
Heavy Flak Grenadiers fire on the Ranger Weapon squad. They kill 1.
My remaining Ludwig fires on the Steel Rain…delivering 5 points of damage… and destroying it.
Heavy Recon Squad opens up on Ranger weapon squad killing the remaining member.
Recon Grenadiers march move up to the Stone wall.

End of Axis Unit phase 3
Allies Unit Phase 3
Recon Ranger squad moves up and attacks recon grenadiers at the wall. This kills 3.
Combat Rangers move around building Attacking Recon Grenadiers killing the last 2.
Command Rangers move up to take cover at the Concrete Tank traps.
Pounder fires on my Ludwig, but the hard cover absorbs the hits.

End of Turn 3
Turn 4
David gets 2 orders, I get zero
David orders combat rangers into the tower.
Calls for arty strike and is successful. Heavy Recon and Command are attacked. Heavy Recon loses 1 team member.

End of Command Phase
Axis Unit Phase 4
Sniper takes out a Combat Ranger in the tower.
Command attempts to heal the Heavy Recon…No success but remove suppression marker
Heavy Recon moves up to range and attacks the Combat rangers in the tower, killing 1.
Ludwig fires on the Pounder… 2 points of damage, and I manage to knock out his main gun!
Allies Unit Phase 4
Pounder moves up and over and attacks the Heavy Flak with his 30 Cal. No damage, but they are suppressed.
Combat rangers in the tower are activated but to manage to remove only 1 suppression.
Recon rangers move up and attack the Heavy Recon in the open. They kill 1
Command is now in range of Pounder. They attempt repair…main gun is good, but still 2 points of damage.

End of Turn 4
Turn 5 (FINAL ROUND>>>FIGHT!!!)
David gets 3 orders I get 1.
I use my order to move my 1 Heavy Recon member left, into cover at the rock wall.

End of Axis Order Phase 5
Allies
Attempts Arty strike no luck
Fires newly repaired main gun of Pounder at the Ludwig in cover. He does 1 damage to the Ludwig and sets it on fire. Uses 30 cal. on Heavy Flak again, no damage but they are suppressed.

Allies Order Phase 5
Axis Unit Phase 5
Command Squad puts out fire and repairs the point of damage to the Ludwig.
I activate the Heavy Flak squad and they clear suppression (YES!) I move up and attack the Combat Rangers in the tower. I decide to use the special Burst weapon ability to cancel the cover of the Combat rangers. I score 3 hits… and he saves 2…so only 1 Combat Ranger is killed.
Heavy Recon near the base of the tower opens up on the Combat Rangers in the tower…but I am unable to even score a single hit…
Ludwig opens up on the Pounder and scores 2 more damage. Destroying it.
Allies Unit Phase 5
David Activates the Combat Rangers in the tower and successfully removes suppression. Moves down from tower to the rock wall of death…The heavy recon Reacts and kills one Combat Ranger…the Leader attacks back…and suppresses the Heavy Recon.
Activates the Recon Rangers, they move around the building to attack the Heavy Recon with UGLs and Rifle fire…they score 4 hits… no cover, and I only make 1 armor roll…3 wounds on one guy.

End of Game
Reveal Objectives.
I had picked the tower which I failed to reach, and the unpainted building ruins, that my Sniper was sitting in.
1 Point for me.

My remaining forces and my 1 held objective…the unpainted building.
David had picked the concrete Tank Traps that his command squad was hiding against, 1 point, and the ROCK WALL (I was certain he was going for the tower until round 4) and he had 1 guy…his Squad leader in contact with it…2nd point.

Objective 1 for the allies

Objective 2 for the Allies (the rock wall of death) and the Tower that was my second objective that I failed to get.
2 points for David.
I lost…
Lessons Learned
Cover is GOOD.
Even if you can’t actually damage the unit…fire on them…you may add suppression reducing the likelihood of them being able to act.
The Steel Rain is a difficult to use vehicle…the minimum 12” max of 24” on the Petard gives it a very narrow band where it is any good… The rockets are fine…but it is expensive just for the rockets…
Don’t forget your 2ndary weapons on walkers.
Ranges are Short…keep moving up…
Snipers are worth the points…
I really felt like there is a missing paragraph on Key Positions…
With Force Collision and Key Positions…(Which I think we are going to see a lot of), with the Rules as written, you could just pick 2 heavy cover terrain pieces in your deployment zone… There is no real way to (or incentive) to move across the board and take them from you…or for you to take them from your opponent. This means there is going to be a lot of ties, with Victory Points determining the winner.
Great battle report! Thanks for sharing.
Very interesting read. THanks for taking the trouble to write it up; much appreciated.
Can't wait for the next one.
Great battle report and some great ideas on how to make the objectives more balanced. I hope to see something similar add to it in the up coming FAQ.
Thanks for sharing.
-jay
Hmm. My thoughts after thinking about the game the day after.
Ranges are SHORT. I felt so when I first read the rules and the game pretty much hammered it home. It felt like units spent more time marching into position than firing.
The Force Collision deployment should have different deployment areas depending on the size of table. The description and book illustration imply a battle where forces start close together, but due to the size of our gaming mat we started fairly far apart. On a 4' by 5' table, the forces start over 28" apart at the closest, meaning they have to close 12" before the enemy is in range of most weapons. Maybe a triangular rather than arc shaped deployment zone for force collision would work better.
Snipers are a lot more valuable than I thought they would be. The "ignores armor" rule makes them one of the best choices for killing heavy troops.
Heavy troops are a lot tougher than I thought they'd be. I was sure suppression would send them scurrying, but the Soldier 3 chart combined with three to four armor dice keep them going. There's few weapon options for the Allies that roll a lot of dice against Soldier 3.
The Steel Rain isn't useless(Which was my first reaction during the game), but it's got some serious weaknesses that need to be compensated for. It's one of the few Ally vehicles that's good against both vehicles and heavy infantry, with the caveat that the two main weapons Reload. The main issue I see is that the Petard Mortar is still limited to 24" while artillery firing(and you can't move while firing indirect). Unless you can quickly move it into a position covering an important segment of the battlefield, the vehicle will waste valuable actions on 6" move and reloads. If you can get into a situation like one of my brother's Ludwigs, where you have a direct fire vantage point and hard cover, I can see it being quite strong. I should have deployed it near the gray house, and march moved it to cover close to the tower.
Rules that need to be clarifed are whether or not March Moves and Sustained Attacks can be given as orders during the Orders phase. I would think not, but the whole Double Action section isn't written well.
Edit: Also, I'd like to note that "Goes first" is MUCH more powerful than "gets more orders", which was unexpected. First person in a turn gets full actions and can still react afterwards, and only needs to deal one suppression to a unit to suppress it for its next activation. Second player gets less actions with the units that reacted to the first player's turn, and needs to deal two suppression to keep a unit suppressed for its next activation. The 12" command radius severely limits the usefulness of orders unless you're playing your units in a "Deathstar" blob around the command squad or took extra radiomen.
RogueRegault said:
Lead your platoon with a hero and join him with an observer squad and put in an extra radioman. Now you can make THREE orders anywhere on the board - not bad at all! :-)
Great report! Thank you.