Sorry, strange title is from a recent fleet build where I had a title change request from Muelmuel.
I took my son on in a typical Rebel vs Imperial game. As he’s only 9, we don’t play objectives, I try to add onto him about an extra 50 points, and always give him choice of first or second (invariably he goes first lol).
These are the lists, on the game, on a whim, I swapped out OE on my MC75 for C&S. This put me at 401, but hey, he was at 450 anyway. The action is as best as I can remember it.
ISD Kuat Refit (112)
• Admiral Screed (26)
• Ordnance Experts (4)
• Quad Laser Turrets (5)
• Electronic Countermeasures (7)
• Assault Concussion Missiles (7)
• Avenger (5)
= 166 Points
ISD Cymoon 1 Refit (112)
• Wulff Yularen (7)
• Intensify Firepower! (6)
• Gunnery Team (7)
• XI7 Turbolasers (6)
• Spinal Armament (9)
• Relentless (3)
= 150 Points
Raider I (44)
• Ordnance Experts (4)
• External Racks (3)
= 51 Points
Gozanti Cruisers (23)
• Comms Net (2)
• Vector (2)
= 27 Points
Squadrons:
• Howlrunner (16)
• 5 x TIE Fighter Squadron (40)
= 56 Points
Total Points: 450
MC75 Ordnance Cruiser (100)
• General Rieekan (30)
• Strategic Adviser (4)
• Ordnance Experts (4)
• Hardened Bulkheads (5)
• Electronic Countermeasures (7)
• Expanded Launchers (13)
• Assault Proton Torpedoes (5)
= 168 Points
Nebulon-B Support Refit (51)
• Auxiliary Shields Team (3)
• Quad Battery Turrets (5)
= 59 Points
Nebulon-B Support Refit (51)
• Auxiliary Shields Team (3)
• Quad Battery Turrets (5)
= 59 Points
Nebulon-B Support Refit (51)
• Projection Experts (6)
= 57 Points
GR-75 Medium Transports (18)
• Leia Organa (3)
• Comms Net (2)
= 23 Points
Squadrons:
• Shara Bey (17)
• Tycho Celchu (16)
= 33 Points
Total Points: 399
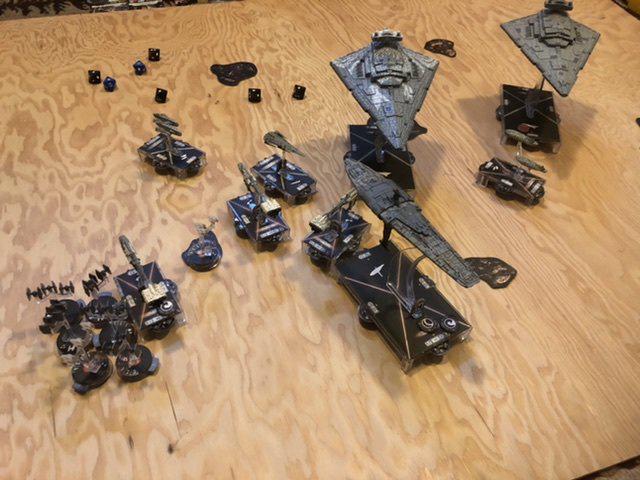
Below is a picture at the end of turn one: -
I forgot to take a photo at the start so got it after turn one. I had deployed from my left to right Neb B, Project Expert Neb B, Neb B. These where in a V formation all at speed 1. Then the MC75, Shara and Tycho in the debris field, and the GR75 both at speed 2. The plan was for everything to slow roll forward, lots of Conc fire from the two QBT Nebs, and lots of healing from the repair Neb. I had set the first dials on all three to Nav, and then intended to Repair virtually every turn after that with the Project Expert Neb. The MC75 was set to Nav, Nav, Conc Fire. The GR75 was set to Sqn command.
My sons ships from his left to right was the Kuat, Cymoon, Raider and Gozanti. He placed all his Ties clustered near the Gozanti.
Turn one was the Gozanti sending two Ties forward at speed 5 (Vector!) and move at speed 2. I then activated the GR75, and sent my A Wings from one rock to another, moving them over with plans to engage the Ties in the future. Next was the Raider, pushed up to speed 3.
I felt I’d messed up my deployment by having my Neb formation the wrong side of my MC75, so I activated my right hand Neb, and increased the speed to 2, and tried to orientate it to the ISD’s. This unfortunately put it in the possible path of my MC75.
The rest of the moves had me moving my other Nebs up, and then last my MC75 up, and rather than change speed to avoid the collision, I kept it at 2, as with hardened bulkheads it wouldn’t pick up a damage card. Amazingly it missed my Nebulon by less than 1mm! The ISD’s both increased to speed 3 and Moved up both out of range. The remaining Ties then moved up to join Howlrunner.
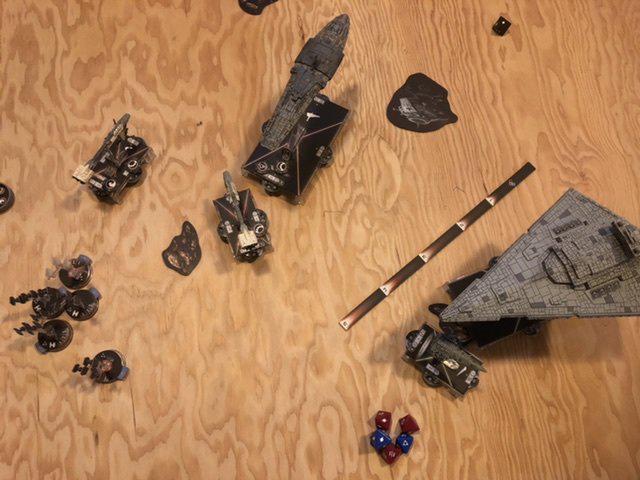
Turn 2 started with an increase in speed For the ISD’s and the Cymoon moved into red range of the Neb and the MC75. I think he made a mistake with his deployment and should have had the Kuat on the inside and rolled it forward at speed 1 to have them both hit me on turn 3 or 4, but he has two speeds in this game, top and stop lol. I fired my Neb at his Cymoon, this caused some shield damage which he redirected. My second shot whiffed against his Raider and he evaded the only hit. I then crashed into his Cymoon and stayed in place. He activated his Gozanti and moved Howlrunner and a support Tie up to the flank of my Nebs. I countered this in the squad phase with Shara to engage them. I then activated my Project Expert Neb, and fed 2 shields up to the injured Neb, and had a shot at the Gozanti scattered. The Kuat moved up, then I placed the GR75 in its path to block it getting to the MC75. His Raider then moved up, and I then fired my MC75 at his Cymoon with ineffective reds. I this time hit my Neb, just giving the Neb a damage card due to my hardened bulkheads. My last Nebulon did some flak and tried to hit the Gozanti but the only hit was evaded. The end of turn 2 looked like this: -
Turn 3 saw the Cymoon utterly destroy the Nebulon in front of it, and put some serious shield damage and I think a damage card onto the MC75. Due to Rieekan, much to my sons surprise (he isn’t up to speed on all the cards), the Nebulon was zombified and stayed in place. I activated the zombie Nebulon next as I wanted to catch the Raider before it scooted away, putting a red and two blue from the side with QBT’s. These where easily braced and reduced the front shield I think to 0. The next shot at the Cymoon was 3 red and two blue (Conc fire) which was redirected to the side. A cheeky damage card each followed with the ram (I hope I played that right). His Raider activated and (This is where it gets a bit hazy lol) he shot at my PE Neb from the side and caused some shield damage. He then fired an obstructed shot at my MC75 with his Ex Racks and piled on some damage cards so I had about 1 hull left! He then hopped over me into my right arc. As the damage cards where getting issued out, it was one of those jaw dropping moments when I was thinking, “ I wasn’t expecting that!”. Without further ado, I then activated my MC75. I used a banked token to increase the speed to 3. Then double arced the Cymoon with 2 blue and 6 black from the front, and 3 red 2 black from the side. The Cymoon I think may have been reduced down to 0 shields and 1 hull left as well when all was done. The MC75 now at speed 3 got out of dodge. During this turn, the GR75 was destroyed (I was hoping to use it as a speed bump for the Kuat but alas no), and also the Gozanti. I put some Flak into the Tie blob and scored some hits. During the Sqn phase, Shara managed to remove I think two Ties especially with her counter ability. She was at the end destroyed, but she was worth it with the rest of the Ties being on either 1 or 2 hull left. For my last move, I put Tycho in your replace Shara so the blob couldn’t move.
More to follow.
Edited by Herr Style
I double arced the Cymoon, not the Kuat.