Ok, so this is a bit of a battle report, but also a squad list post, general epic/huge chatter and maybe even a rules question or two. So didn't really know where to put it. I also added some interesting observations in the lessons learned at the end. So it might be interesting to some of you.
Big wall post.... but I'm excited about the game. ![]()
Played my first huge ship game last night, 500 points Scum vs. Empire. We opted for a simple head-to-head deathmatch because we already had to keep track of new rules for wings and huge ships we didn't want to keep track of scenario as well.
My List:
I went wing crazy. Mostly to get a good feel of how wings work, move and placement etc.
-
z-95 wing: - [99 total]
- N'dru Shulak, Veteran Wing Leader, Afterburners, Expert Handling [41]
- 2x Binayre Pirate, Cluster Missiles [29]
-
Y-wing wing: - [112 total]
- Drea Renthal, Veteran Wing Leader, Ion Cannon Turret, Veteran Turret Gunner, R4-Astromech [66]
- Crymorah Goon, Ion Cannon Turret, Veteran Turret Gunner, R4-Astromech [46]
-
Starviper wing: - [184 total]
- Guri, Veteran Wing Leader, Afterburners, Advanced Sensors, Predator [84]
- 2x Black Sun Assassin, Predator [50]
-
C-ROC - [105 total]
- Jamming Beam - 0
- Tibanna Reserves - 3
- Corsair Refit - 15
- 0-0-0 - 5
- IG-88D - 3
- Targeting Battery - 9
- Concussion Missiles - 6
- IG-RM Droids - 2
- Broken Horn - 4
- 500 points total
Choices: So Drea is in there because, guess what C-ROC pilot is non-limited. So rerolls on huge ship attacks. This lead me to take quite a number of non-limited wingmen.
N'dru is there purely for the initiative boost. With afterburners and a white barrel roll he can drag the pirates quite a bit making a target lock on them much more viable than on initiative 1.
Guri, well, she is one of the most maneuverable ships in the game, the wingmen adds additional firepower and health, even though the wing is a bit of a gamble because of the higher cost.
C-Roc loadout was the hardest. First game and all I wanted to test everything. 88D was there purely for the double calculate, but will see future play along with 88B in the fleet.
Jamming beam was a last moment addition, because 0 points and I have the slot. But keep reading.
Opponents List:
He went very light on the actual fleet, using mostly generics with minimum upgrades, and full blown on the raider.
- 2x Onyx Squadron Ace, Dreadnought Hunter. [85x2]
- 2x Storm Squadron Ace, Fire-Control System. [42x2]
- 1x Nu Squadron Pilot, Os-1, Diamon-Boron Missiles [38]
-
Fully loaded Raider [208]
- Boosted Scanner - 8
- Captain Needa - 8
- Turbolaser Battery - 15
- Ordnance Tubes - 2
- Concussion Missiles - 6
- Ordnance Team - 4
- Bombardment Specialists - 6
- Corvus - 3
- Adv. Proton Torpedoes - 6
- 500 points total
Deployment:
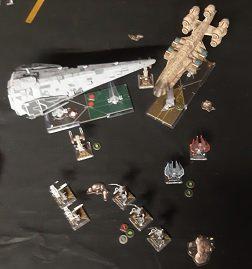
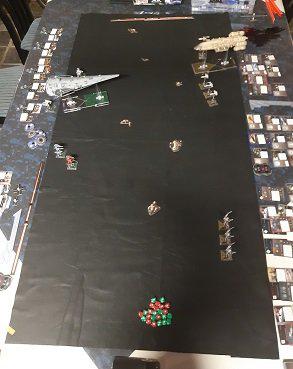
Opponent had initiative, so he deployed Nu-Squadron to his left, and then the Defenders together just right of centre. I put down the starvipers far on my left, with the rest of my force around the C-Roc. Opponent then put down the Raider (with the two tie advanced docked) facing my C-ROC. I was actually quite surprised how empty the table looked at this point.
Turn 1:
Nu-Squadron does a 3 left turn, followed by a 3 right turn slam trying to get to my flank. Defenders did a 3 bank turning towards my C-ROC.
I went in quite aggressive. Y-wings went 3 forward. Plan was to try and intercept the dreadnaught aggressors before they go full out on my C-ROC. Also to ignore the Raider turn 1 and kill support ships. So N'dru went 4 forward, followed by afterburner boost and then a roll to the left away from the raider. As planned this put the pirates in range for target locking. In the meantime Guri also dailed a 4 straight, but since the defenders had already turned away at this point I used advanced sensors to roll right-back first, then 4 fwd also followed by afterburner boost. [Edit. Doh! Couldn't have boosted after using advanced sensors. Thanks @Hiemfire for pointing it out]
C-ROC also went 3 fwd, wanting to make use of the extra evade gained and getting R3 of some ships.
Lastly Raider went 1 fwd. Opponent seemed quite stunned by how short a 1 fwd on a capital ship looks.
With my shooting I was able to take the shields of one defender. And the Y-Wings and C-ROC killed the Nu-Squadron pilot. Shooting the targeting battery first, then using a fully modded normal attack worked well. In return one Z-95 was taken down to 1 hull. Defenders were out of range 3 from the C-ROC, so no dreadnaught shots yet. (Dice was on fire for me. I rolled a lot of hits and opponent a lot of blanks).
Turn 2:
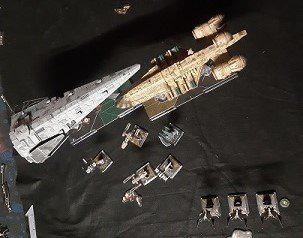
Both Tie Advanced deployed, one from fron and one from side of Raider, both turning towards Guri. Defenders moved closer to C-ROC. Z-95s overshot the defenders with right bank, afterburner boosted again to the right to get behind that nasty middle line of the Raider. Guri managed to pull her wing behind the defenders. Y-Wings banked towards the Raider, using the wing concept to jump my wingman over an asteroid.
C-ROC did a 0 move, not wanting to get too close too soon, because I doubted a huge ship can turn around in a game. At 45 degree banks a 180 will take 4 turns. I did double calculate (IG88) and reinforced front.
Raider did a unexpected left bank. It was now facing my y-wings head on, but had its back to most of my force. It target locked Drea (also gaining 2 calculate tokens as part of the same action, great economy), and Jammed one starviper.
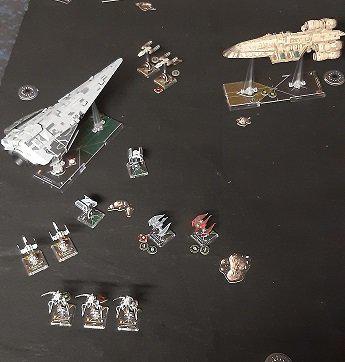
Because of my 0 move the defenders ended up still being out of range 3. One tie advanced also ended up out of R3 from anything. So my opponent only had 1 tie advanced and the Raider shooting, while all my ships had shots.
I managed to kill one Tie advanced, and strip off all the shields from the Raider. In return I lost one shield on Y-Wing and 1 on Starviper. Here we also had an interesting effect from Precision shot as discussed here:
The precision shot caused 2 jams on the raider AND flipped his ordnance hardpoint. Leaving him with only the normal shot, and turbolaser.
I also discovered how amazing Jamming beam can be at the right time. The C-ROC shoots before the Raider. And in this layout the raider had a ton of weapons that all depended on having a target lock. So strip the target lock, and no pain! It basically reduced the raider to taking its primary attack only. Now make no mistake, at R1 and bullseye that shot rolls a lot of dice, but its still just the one shot.
Edited by Bort