Hi everyone
I’ve written all the bits that are essential to the campaign rules in blue so that they are easy to find. All the other (non-blue) bits are my ramblings, either further teasing out the intent of a section or talking about what we ran into in our playthrough.
I’m posting this here because it is Armada related, isn’t a battle report, isn’t about organised play and there isn't a sub-forum for home made campaigns. Let me know if you still want it moved.
My 6 year old has started playing Armada with me. He has a good enough grasp of enough of the game concepts to make it enjoyable for both of us in casual games, but not enough (yet) to really play competitively (i.e. playing to try and beat me in a meaningful way).
Things he doesn’t have a (complete) handle on:
- List building
- Upgrades in general
- Most defence token effects
- Forward thinking/planning
- Obstacle effects
- Half the commands (he has navigate down pat)
- All of the squadron keywords
- Pretty much every part of the attack step
- Objectives
- etc.
Which sounds like he can’t play the game at all, but this isn’t true. He actually has a good grasp of most parts of movement and enough knowledge of the rest of the game to play it on reminders. In short, he needs me to tell him what his options are (and, sometimes, when he needs to do things at all) but he’s quite capable of carrying them out himself.
Of course, this means that trying to play a game where we are genuinely using all of our cunning and ability to beat each other to stardust isn’t going to happen for a little while (though he is learning quite fast).
So, I figured that in order to keep us both engaged and enjoying the experience in the meantime I was going about the whole thing in the wrong way.
Rather than try and play standard ‘tournament style’ games, what we should be doing is playing a story based campaign instead. I would set up the campaign and control all the NPC’s (every ship/squadron that isn’t his). This way it would feel more like we were playing together, rather than against one another. It would allow us to start simple (list wise) and stay simple while keeping everything fresh and exciting. It would give him an appreciation for the more powerful elements available to him in list building (upgrades, large ships and ace squadrons) by giving him experience of a base line to them measure against.
Plus, stories like this do wonders in getting people attached to their ships.
What follows is the Background and Chapter 1 of our campaign. I’ll fill out more chapters as the weeks go on. The current plan is that the whole campaign will have 6-8 chapters. But, as he will have to succeed (read here: not lose his flagship. See below) in order to proceed to the next chapter, he’ll no doubt repeat certain chapters many times. This is fine as it’ll allow him to get a grasp of the game in one of the best ways possible. By having fun failing. Many, many times.
Final note: I make no apologies for all the ways that the old X-Wing and TIE fighter computer games have influenced some of the chapters of this campaign. For any of you who used to enjoy those games, feel free to give a shout out if any of these scenarios have a familiar feel to them.
Background
Every good story based campaign has a story.
The question is, how much.
In this case, the answer is: not much.
Or more precisely, as much as you want. I largely let my son decide how much he wanted. I introduced the premise and then let his curiosity take him where it would go, giving it a nudge in the right direction every now and then. We did this over the course of a few nights before we actually played the first chapter, so as to give him some time to think things through properly and get immersed.
As we went along, there were places where I realised that he didn’t quite have the concept of what was going on, so we’d stop and use the internet to get some visuals to help out. I’ll talk about those when we get to them.
Here’s the premise.
Imagine you were living in the Star Wars universe during the Galactic Civil War on a planet in the rim.
And you discovered a secret underground base.
Nobody else knows about this base. You’re the only one.
At this point we try to let the player’s imagination dictate the course of things a little. What does this base have? How do you access it? How did you find it?
The short of it here is that they (the player) have some license to imagine what the base is like, but not complete license.
Here’s what is set:
- It’s pristine. It was evidently constructed for use, but never used. It has been maintained by maintenance droids.
- It is well stocked for all of its uses (more on those below).
- It has no exterior shields or exterior weapon emplacements. It survives on stealth alone.
- It has a mess hall, stocked kitchen/food stores, communications array, sensor array and sleeping quarters.
- It has a stocked armoury, but only with personal weapons and explosives.
- It has nothing to indicate who built it or why. No insignia. No records on its computers. Except…….
- …..it has an underground hanger. And 13 ships. And 12 of them do give a massive clue as to who built the place. X-Wings. While once the X-Wing was in general use as a ship, over the years they have become solely affiliated with the Alliance. The other ship is a CR90. All of them are brand shiny new.
- Stocks and ability to rearm, repair, resupply and refuel all of its ships.
- The base isn’t big. But (obviously) isn’t tiny either. Perhaps the best way to describe it is that it’s ‘the minimum needed to operate the 13 ships plus a little bit extra’
So, let them use their imagination, but don’t let them go overboard. For example, how does the hanger launch the ships while remaining hidden? Does the hanger entrance raise above ground during launch/landing? Is there a hologram disguising the hanger entrance? (we ended up going for the old ‘hanger entrance behind the waterfall’ setup) Or, what kind of internal defences are there? Are there rec rooms? A med bay? Etc.
Given that the player is (in this case) 6, give them the chance to go into what the base might be like in other ways. Let them draw pictures. If you have the skills, make a scale model of it. Feel free to go and play the original X-Com (I haven’t played the more recent version of it) and play a few base defence missions to get a feel for underground bases. Get one of the Star Wars cut away/cross section books for pictures of Echo base and Base one for inspiration.
In other words, let them get attached.
Or, you know, skip all of these suggestions if you find they aren’t working for you at all.
Now, at this point it became evident to me that my son didn’t understand the significance of this premise, so we had to do a detour to discuss the Star Wars universe and in what ways it went beyond simple good guys and bad guys.
We pulled up a picture of the Star Wars galaxy, pointing out the core and the rim.
We talked about the way that the Empire ruled pretty much everything. They had a navy that had thousands of ISD’s and Millions of TIE fighters versus the Rebel Alliance which had, I don't know, less than a hundred capital ships and maybe a hundred small craft (completely guessing here). This gave him the context of how powerful the Empire really is.
We talked about how the Empire is strongest in the core worlds but in the rim it finds it harder to maintain its dominance.
We talked about some of the brutality of the Empire, giving him the emotional context for why so many people choose to fight against the Empire, even though it is so strong.
Which leads to why this base is so important. It has the two things *(see appendix A) that are needed to fight the Empire in any real sense:
1) Ships. While there is something to be said for ground resistance against the Empire, without ships the ability to fight the Empire is so limited as to be laughable. In short, ground resistance is only really effective when it’s assisted by, or in assistance of, ship action.
2) Secrecy. The Empire is so powerful that if you give it the opportunity to hunt down the player’s fleet, it’ll be only a matter of time till it succeeds. Unless the player has somewhere safe to retreat to. As there’s nowhere fortified enough to withstand the Imperial navy, the only other option is secrecy. While deep space is an option, it’s extremely limited. Especially for 12 poor X-Wing pilots with only a CR90 to dock to.
So, the short of it is that the Empire is enormous, but the ability to strike at it that this secret base provides is too good to pass up.
At this point I also told my son the two ‘rules’ that this campaign would be governed by:
1) He must never let the Empire discover where his base is. Otherwise they will come and destroy it. Actually, what he doesn’t know is that this campaign provides no way for him to (accidentally. See the final chapter when it arrives!) let the Empire discover his base. But this ‘rule’ sets the feel for the campaign, that he’s playing guerrilla warfare against a vastly superior opponent.
2) He must never lose his flagship. Because he’s on it. And if he dies, then he can’t fight any longer.
It should also be noted here that just because the player is becoming a rebel, using Alliance material, doesn’t mean that they are:
- part of the Rebel Alliance
- have any contact with them
- would know where to find them or how to get into contact with them.
The player is on their own. Nobody will come to help them or rescue them.
Now, as said above, I let my player decide which parts of the story he’s interested in and didn’t bother with details that didn’t bother him.
For instance, things he wasn't curious about were:
- The base and everything in it isn’t locked. Leading one to wonder if the person who built it knew they weren’t coming back but gambled that someone else would find it and would use the opportunity to fight the Empire in their stead.
- As well as this, the CR90’s computer is dormant but comes online when the player enters the ship’s bridge. It immediately designates him as its captain. It contains all the tutorials required to teach a crew how to operate the ship as well as some basic training simulations. Which is yet more evidence that there was some intention that the base be found and used against the Empire.
- Where does the player find the manpower to operate the ship and fighters? In our play through we simply designated them as his ‘friends’ and don't go any further into it.
- What happens in the weeks/months between finding the base and the first chapter?
Once again, fill in only as much story as the player wants.
** (see appendix B)
Final/ note: the player has to name their CR90. My son named his Commander Boom
He is 6.
And, well, actually the name is kinda growing on me.
Chapter 1 - Hide and Seek
The player is about to take their CR90 out on their first major exploration of their solar system. At this point they have an option. Do they want to take their X-Wings along with them?
My son (wisely) decided that he would, though it will actually make no difference to the outcome of this chapter (the player doesn’t know this).
As they explore the solar system, they have run into 2 things.
An asteroid belt, that they had decided to take a closer look at.
And a Victory class Star destroyer, named ‘Icon’, which has detected them and is closing in.
At this point it became apparent to me that my son didn’t have an adequate concept of a CR90 and how big it is (I think he was thinking of it being just a bit bigger than an X-Wing). So, we googled up a picture of the cutaway of one. I kinda wish we had the actual book, but uncle google it was. We pointed out the people in the bridge as well as how many levels the ship has. We talked about its length (150m) and what that means in real terms (about the length of our driveway 😊). He asked how people got on board, but my phone wasn’t good enough quality that we could make out any of the doors (he had to take my word for it).
We tried to find a cutaway for a VSD. For some reason there wasn’t one. Can’t imagine why.
We could still talk about its length in real terms (900m). About the distance to the far side of our valley.
Extra story elements (if the player asks any of these things):
- The player can’t hyperspace out as their ship is too close to the asteroids.
- They can’t turn around and out-pace the VSD. It’s too close and will catch them as they come about.
- They won’t be able to pass themselves off as civilians. Even if they didn’t bring their X-Wings on this mission, the VSD is requesting to board them for inspection. As they don’t have the proper papers for running a legal ship of this class they’ll very likely be detained as probable smugglers. And things would only go downhill from there.
- Luckily for the player, the VSD has no TIEs, either in escort or on board.
There is a plan for survival, but it’s risky. Escape into the asteroid field. Use the CR90’s superior speed and manoeuvrability to dodge the VSD (and asteroids!), let the field hide them from the VSD’s sensors and escape out of it, back to their base (and safety)!
It is worth emphasising to the player that if they attempt to destroy the VSD things aren’t likely to go well.
The scenario is as follows. (you will need access to pieces from the Corellian Conflict campaign to play this scenario)
Rebel fleet:
- CR90 Corvette A
- 4 x X-Wing squadrons (optional)
Imperial fleet
- Victory I-class Star Destroyer
There are no upgrades (including commanders) or objectives in either fleet.
Set up and play as usual with the following exceptions.
The Rebel player is the first player.
Play area is 3’x3’.
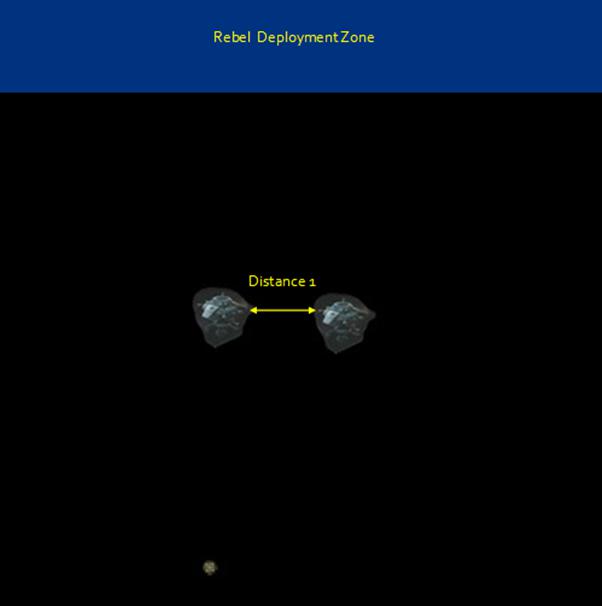
Place obstacles as normal, removing the station and adding the extra set of asteroids and both dust fields from the Corellian Conflict campaign box (this should total 10 obstacles). Place obstacles anywhere in the play area, beyond distance 2 of the edges of the play area and beyond distance 2 of each other.
Deploy
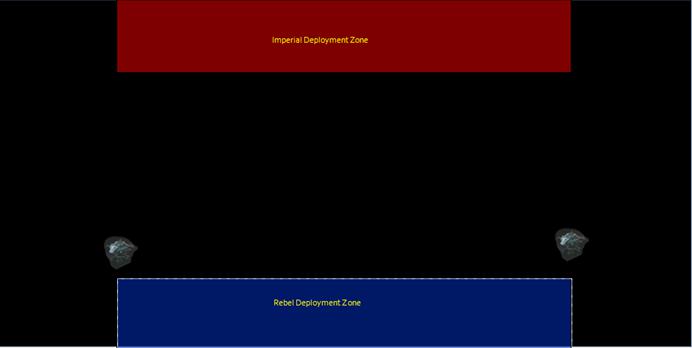
Rather than players having an edge, choose one corner to be the Rebel corner and one of the adjacent (not opposite) corners to be the Imperial corner.
Deploy as usual. But, deployment zones are within distance 1-3 of that player’s corner. Players may not deploy ships overlapping an obstacle.

Player Objective
The game lasts 6 turns.
If the CR90 is still alive at the end of the 6th turn, the player wins.
Any other outcome is a loss and the scenario will have to be replayed until a win is achieved.
Take note of any X-Wing squadrons that are destroyed in this scenario as they won’t be available for the next chapter.
Notes:
Take this opportunity to further set the tone of the campaign. In this case they are being hunted, dancing with life or death levels of danger, so play into that a little bit.
This scenario teaches the player many things.
1) It establishes how badly the odds are against them. Even if they brought their 4 squads of fighters, this was still not enough firepower to take down the VSD. And if they try, the VSD will more than likely blow away large portions of the rebel fleet as well. And this is only a VSD, one of the Empire’s weaker vessels. Even with all the player’s ships and firepower combined, they still aren’t a match even for one of these.
2) They can, however, take another path to victory. Namely, they can dodge and weave. They can outmanoeuvre. This scenario teaches both how to navigate obstacles, as well as how to effectively disengage from and avoid an enemy that's chasing you.
3) I took the opportunity with this one to teach my son about relative firepower. I introduced to him how to read weapon batteries and what ranges each of the dice work at so he could begin to assess where he wanted to avoid landing his ship. I also taught him how to use a Navigate dial + token to approach a ship slowly (speed 2) then speed up to dodge past the ship (speed 4)
4) That different ships behave very differently and have different strengths and weaknesses.
5) The importance of the Nav command.
6) The fickleness of red dice.
7) And a whole stack more besides that.
Chapter story conclusion
The player’s ship successfully escapes.
First into the asteroid field.
Then, later, when the Icon has well and truly lost them, back home to your base.
Except…
…while you were in the field, your ship’s sensors picked up something.
Something that isn’t normally in an asteroid field.
Your ship doesn’t know what it is or even where it is, but it picked up enough data to figure it out.
Once it finishes processing that data, that is.
Pentiums.
You should have bought a Mac.
Oh well...
5 more hours.
Then it’ll have your answer.
Anyway, feedback appreciated, as are any questions.
Chapter 2 to follow soon.
Edited by FlenginDeployment picture!!!!