Rebels at 800 pts

By Garrett17, in Star Wars: Armada

Ok so am looking for a bit of advice.

Am exclusively a rebel player and a friend and I have recently been hitting 800 pt games and I need help from a strategy perspective. Rebel strategy for me is entrapping and then trying to move off and continue doing so from outside the Imperials main arc. Bombers are sometimes used as softeners though Squall and her threat range have made this a very tough proposition recently.

To me the rebels typically can't match the Empire shot-for-shot and need to focus a lot more on flanking and clever maneuvering by multiple ships but flanking requires room and at 800 the number of ships on the board makes the number of fire zones much larger than a 400 point game. My opponent came at me with 2 VSDs (packing dcaps), an ISD, A raider, a Demolisher, squall and 3 gozantis along with Howlrunner, Mithel, Dengar, Cienna, Valen and a few generics supported by five reserve hangar decks. Jerjerrod in command along with TEA on a chimaera build and he still had a bid of about 9 points.

His triangles project this wall of forward firepower and are close enough to each other that going in between wasn't an option. His fleet was highly maneuverable due to TEA and Jerjerrod. Demolisher and the raider could basically pull 180's while Squall's squadron threat range was enough to disrupt the bomber and interceptor group I had (he could jump me from anywhere really). Flanking on one side meant facing off against the ISD while flanking on the other brought me up against the gravity rift which completely destroyed my attempts to get behind him while his entire group simply pivoted to come at me. (This is partially my fault due to misunderstanding how the gravity well works under Rift Assault).

At higher point counts it seems to be the Imperial's game to lose because of the sheer amount of space they start to occupy on the table which reduces traditionally safe approach options (which the more maneuverability-focused rebel really need). and guns that already start largely pointed in the 'right' direction allowing them to close and fire at their leisure while covering one another. Add that to massive squadron range and Jerjerrod maneuverability and....well I could use a hand. How should I play rebels at 800 points?

Edited by Garrett17
Spelling

At 800 points, as you've seen, the board can become very cluttered in a hurry, especially when you throw in the waves of fighters that each side can deploy.

If he is denying you the option to flank, try running a slow-rolling gunline. Try to force him to over-extend himself and seize the opportunity if it presents itself. Otherwise you can try to stay at range and strafe from a distance.

Bring generic squadrons and use them to tie up his aces, and support your fighters with E-Wing snipers or a flak ship like a Nebulon-B with Tallyn Farr. Force him to choose between committing all his fighters or letting them sit there while accomplishing nothing.

At 800 points you can equip your ships with more upgrades to try to keep them alive and hitting harder. Use every tool at your disposal.

Also practice maneuvering your fleet. How many ships can you comfortably maneuver in a tight formation? I normally keep my fast-movers (MC-30's, CR-90's or even MC-80L's) together so i can make slashing attacks. Larger ships (MC-80's and MC-75's) work well together, screening Pelta's or Nebulon-B's.

Hope this advice helps. Us Rebels gotta stick together 🙂

I routinely play 500 pt battles, so my experience is different to yours but 500pts is definitely different to 400, so this is how I might try to play it (and probably lose but anyway).

The first is that game rules say a maximum of 2 flotillas per side at 400pts. The rules may be different at 800, I don't know, but I would check that.

I would use a pair of large base ships such as MC80 assault cruisers as the core of the fleet and load them up with enhanced armament, leading shots, ECM, reinforced blast doors and engine techs. That gives them 11 hull (so equivalent to an ISD). With a maneuver dial and engine techs these guys can keep their side arcs facing the way you want them to. Stick an Intel Officer on one, and a Strategic Advisor on the other (to give you a 'free' activation)

To provide fighter control I would take an AF2B with Flight Controllers and Boosted Comms . This ship's job is to support your interceptors and your anti-fighter wing.

Then a Pelta, with Shields to Maximum and Projection Experts. The Pelta's job will be to stay behind your MC80s and throw shields to them each turn, as well as to provide fighter activations.

A couple of transports, one with Bomber Command Centre and the other with either Repair Crews or Slicer Tools, pads out your activations.

With your remaining points, perhaps a couple of CR90Bs with Reinforced Blast Doors and Engine Techs. You can double ram with them, then the next turn (if you survive) repair your hull and do it all again.

Your remaining points (about 160) in to fighters, specifically X wings and A wings and aces, which will serve perfectly well for attacking the ships if and when you win the squadron battle, and with a fleet like this I would use Garm bel Iblis. The huge pile of tokens he hands out to your command 3 ships lets them do loads of different commands which is what your ships want to be doing - maneuver token for engine techs, squadron tokens for fighter command, engineering tokens for extra shields. Ashoka Tano also belongs on one of these ships to provide you with magic token swappage once per turn.

I've been running this fleet with some success. Deploy everything at an angle and let them come to you. The MC75's take things APART rolling 2 7 dice attacks out of the side arc, or an 8 dice attack if the target is going quicker/you spend a concentrate fire command, or even up to 9 dice in one attack. No ship likes potentially 21-27 dice (1 attack from each ship at 7-9 dice depending on bonuses) a round. I deploy the assault frigates "behind" the first and last MC75 and use them as a "you want to get close/in front/behind me? Please do!" warning that I'll mob your fleet with a bunch of fighters if you do.

These things are workhorses, and do some seriously damage. However, they also get eaten if their tokens are gone, so I usually go engineering (bank) round 1, navigate (use it or bank) round 2, and con fire round 3, then navigate (get that speed up and get out of there), engineering, navigate to keep myself alive.

Name: Untitled Fleet
Faction: Rebel
Commander: Admiral Ackbar

Assault: Surprise Attack
Defense: Fire Lanes
Navigation: Solar Corona

MC75 Armored Cruiser (104)
• Admiral Ackbar (38)
• Gunnery Team (7)
• Early Warning System (7)
• External Racks (3)
• Leading Shots (4)
• Quad Battery Turrets (5)
• Aspiration (3)
= 172 Points

MC75 Armored Cruiser (104)
• Gunnery Team (7)
• Early Warning System (7)
• External Racks (3)
• Leading Shots (4)
• Quad Battery Turrets (5)
= 131 Points

MC75 Armored Cruiser (104)
• Gunnery Team (7)
• Early Warning System (7)
• External Racks (3)
• Leading Shots (4)
• Quad Battery Turrets (5)
= 131 Points

Assault Frigate Mk2 B (72)
• Flight Controllers (6)
• Expanded Hangar Bay (5)
• Early Warning System (7)
• Quad Battery Turrets (5)
• Gallant Haven (8)
= 103 Points

Assault Frigate Mk2 B (72)
• Flight Controllers (6)
• Expanded Hangar Bay (5)
• Early Warning System (7)
• Quad Battery Turrets (5)
= 95 Points

GR-75 Medium Transports (18)
= 18 Points

Squadrons:
• Jan Ors (19)
• Wedge Antilles (19)
• 4 x X-wing Squadron (52)
• 6 x Y-wing Squadron (60)
= 150 Points

Total Points: 797

I used this fleet last week to chew up and spit out my opponents 2 ISD, 1 Interdoctor, 2 gladiators, qaesar, Sloane, and fighters. I lost no capital ships, but my entire fighter wing. 2 of my MC75's had 1 HP left each, with the third having 2, but I tabled my opponent by the end of round 5 so it didn't matter.

Edited by erikwm

Thanks for the suggestions all. I'll definitely give this stuff a try.

Yikes. 3 MC-75s? I'll probably have to substitute with Home One and maybe some MC30s. I've never been able to justify getting more than one of those.

Anyone else here think that at higher point count, the game belongs more the Empire? I could be wrong. I just feel that typically the rebels need more room to operate so the less safe space, the worse off they are (and don't even get me started on Demolisher)...

Normally, at 800 points, you have the activation advantage over Imperial forces, unless they're using a dedicated MSU fleet. Also, unless they're using Jerry, they're not the most maneuverable either at high speed. I wouldn't say either side has an advantage over the other, even at 800 points.

Funny you should say that. I brought 9 activations and he brought 10 and Jerry and still had 3 large/medium to his name to my two.

For one, more table space helps. I did 600pts on 4x8 rather than 3x6. This helps add some room on either side and inbetween for a little more manuevering. Its also key to start to break things into squadrons, 3-4 ships designated to a single role.

3 MC30s may be a quick "chariot" style attack squadron (charge in, past, turning to a side and broadsiding into the rear). Which I have done to a triple ISD fleet with Arquitens.

2 Libertys and 2 Hammerheads might be a slow rolling gunline, dedicated to one side before turning into the flank.

At larger scales, it becomes less about individual ships, and more about mass actions.

1 hour ago, Ling27 said:

For one, more table space helps. I did 600pts on 4x8 rather than 3x6. This helps add some room on either side and inbetween for a little more manuevering. Its also key to start to break things into squadrons, 3-4 ships designated to a single role.

3 MC30s may be a quick "chariot" style attack squadron (charge in, past, turning to a side and broadsiding into the rear). Which I have done to a triple ISD fleet with Arquitens.

2 Libertys and 2 Hammerheads might be a slow rolling gunline, dedicated to one side before turning into the flank.

At larger scales, it becomes less about individual ships, and more about mass actions.

I 100% agree with that. I'm thinking about rolling mostly smalls (hammerheads, corvettes and MC30s and maybe nebulons next time). I'll outactivate him, entrap with the excess activations and try to pummel a target to death on the next round.

God help me if he fields the SSD though. Gunnery team triple shotting my smalls will make for a miserable matchup.

With regards to triple b-wings vs. Demolisher I have to admit I've never run it but does it actually work? They could theoretically roll 9 but between but are more likely to roll something like 5.25. Add say a double red shot with TRC from the carrier craft at .75 each and you work your way up 6.75. But demolisher packs 5 hull and 3 shields on it's front and can brace redirect. Will three b-wings really cut it? Not saying it won't I'm just saying the math makes me a bit hesitant. I'm looking to kill it BEFORE it can get it's shot off. Also maybe scurggs would be better? Farther interception range? Unless you're advocating b-wings as a close range guard but then of course, that won't prevent Demo from getting a shot off.

2 hours ago, Garrett17 said:

God help me if he fields the SSD though. Gunnery team triple shotting my smalls will make for a miserable matchup.

26hwdb.jpg?a436080

7 hours ago, Garrett17 said:

Funny you should say that. I brought 9 activations and he brought 10 and Jerry and still had 3 large/medium to his name to my two.

He must have been running REALLY light on upgrades then. You can make him pay for that.

So I knocked up the Imperial fleet you describe to see what its weaknesses and strengths are. Obviously I can't see your deployment, and I don't know how Rift Assault works (but I will read about it and if you can explain what you did wrong that would help).

If that's your opponent's "standard fleet" I can see the problem, it's pretty daunting, but it's definitely not hopeless because there's plenty you can still do, particularly around choosing the right objectives but also turning up with some surprises.

The fleet I knocked up doesn't seem to have an awful lot of fighters. Could you out-deploy him by bringing a larger fighter wing?

I would check the sector fleet rules on the maximum number of flotillas because that would take 1 activation off him.

Have you considered a Raddus drop? Drop in an Ordnance Cruiser with all the black dice in the world, carrying a hammerhead with external racks. Then double arc the rear quarter of one of his triangles of doom, and then use the hammerhead to ram him for a face-up crit.

An 800pt battle is a crowded place. Why not turn up with ships equipped with lots of proximity mines and lay them all over his intended routes? You can bring squadrons who do that very same sort of evil trick, like Mart Mattin.

The all-new officer Ezra Bridger can drag obstacles around the board. See how his beautiful tidy formation looks after you've dragged asteroid fields with mines on them in to its path.

Re: B-Wings - you might not get to one-shot Demolisher, it's true. If you bring Norra Wexley, she turns your bomber crits in to extra shield damage, so a B-wing could do a maximum of 5 damage in one attack (happy to be corrected if I'm wrong, it might 'only' be 4).

My Friend's full build (8 or 12 point bid)

1. Kuat (Chimaera)

All fleet commands, Jerjerrod, Strat Adv, Reserve Hangar Deck, Leading Shots, APts, Ordnance Experts

2/3. VSD2 (two identical builds)

Gunnery Teams, Dcaps, Quad Battery Turrets, Leading shots

4. Quasar (Squall)

Flight Commander, Boosted Comms, Expanded Hangar Bay, Flight Controllers

5. Gladiator (Demo)

Captain Brunson, Ordnance Experts, APTs, Engine Techs

6. Raider I (Corvus)

Iden Versio, Reserve Hangar Deck, Ordnance Experts, External Racks

7./8./9. Gozanti I

Comms Net on all, Reserve Hangar Deck on all, one with Vader (officer)

Squads:

Howlrunner, Mauler, Ciena Ree, Valen Rudor, two generic interceptors, one or two generic ties, one jumpmaster

My Build (799)

1. Liberty Star Cruiser (Mon Karren)

Madine, Bail, Caitken and Shollan, Engine Techs, SW-7s, Spinal, XI7s

2. MC-75 Ordnance

Strategic Adviser, Flight Controllers, Boosted Comms, ECM

3. MC30 Torpedo (Admonition)

Major Derlin, Ordnance Experts, External Racks, H9s

4. Pelta Assault Ship

Projection Experts, Entrapment Formation

5. CR90A (Liberator)

Engine Techs, ECM, TRCs, Take Evasive Action

6. GR-75 Medium

Leia, Comms Net

7. GR-75 Medium

Toryn Farr, BCC

8. GR-&5 Medium

Comms Net

Squadrons:

Interceptor Group (Tycho, Shara, 1 x A-wing)

Cover Group (Lando, Biggs, 2 x X-wings)

Bomber Group (Norra, Gold, 2 x Scruggs, 2 x Y-wings)

The Breakdown

Sceanario: Rift Ambush (Surprise Attack and Doomed Station were the others)

My friend picked first and so got the last-first position which put me on the back foot going in desperately seeking a chance to lower his activation count before Demolisher could get into range.

My friend's group is meant to be a shoulder-to-shoulder wall of forward firepower with the ability to turn on a dime thanks to JJ and TEA. Demolisher and Chimaera ran side-by-side as a flanking group coming in hot on my right. All others moved forward with the Quasar tucked into the back with fighters ready to pounce on any bomber group.

My fleet was designed according to the following:

Rebels typically need bombers and positioning power to make up for usually coming up a little shorter on the ship-to-ship front when trading fire.

Since the Imperials can jump my fighters with Squall and he got first player my squadron think was thus.

Hold the bombers back until a large Imperial ship gets close then plant them in it's way and let them just keep getting run over so they can manage themselves. I want my carriers on interceptor/cover group control instead. To this end I put my interceptors forward far enough to be struck but also positioned them to cover the flight path between them and the first major target the bombers would travel towards. The cover group would stay out of range of Squall's fighters but close enough to cover the interceptors. This offers my opponent a choice which was intended to negate his range advantage somewhat:

Attack the interceptors and be jumped by the cover group or attack the bombers and be jumped by the flight controller enabled interceptors and cover group.

The MC-75 was largely given carrier duty as it would necessitate the imperials coming after it in force whereas the Pelta would simply be chased off and out of range of the fighters. I gave it projection experts to try and help the MC75 from afar.

Mon Karren, Admonition and Liberator ran up the side opposite the Chimaera and Demolisher forcing the Imperials to wheel his line to face me but hopefully get in each other's way. Entrapment formation would hopefully help the flanking group position itself as necessary to entrap the left side of the Imperial line turning to face me.

Note: The gravity rift COMPLETELY ruined my flanking attempt by forcing Liberty badly out of position and unfortunately really ended up mucking with my MC-75 as well when I gambled to try and keep it close to command the interceptor/cover group and ended up overlapping it by only the tinniest sliver of my base thus dropping it to 0 speed and rendering it a sitting duck during turns 5 and 6. In hindsight I placed it really badly given what I was facing but my real screw-up was not realizing it would completely cancel engine techs until my friend pointed it out (AFTER I tried to engine techs near it). Originally, I read the card to mean that the normal movement rules for the rift wouldn't apply in this scenario. I do think the way the card is worded is a bit redundant (like saying the rift will force you into a move that the rift will not automatically cancel) and thus a bit easy to misread but whatever.

My major problem to me is the fact that I'm outactivated and thus can't entrap anyone without first taking a major punch on the nose since the VSDs have long range shots. Kuat and Demolisher are moving up at full speed on my right and I can't turn anyone to face them without getting speared by the VSDs. I did manage to outdeploy him but his formation was pretty set from the get go. VSDs would come across straight and he only had to pick the side he wanted to flank from. He picked the side without the rift which left me to navigate it unfortunately. Since the Pelta in a last-first situation doesn't have a prayer against a demolisher it started to hightail out of there from the get go. MC-75 slow-rolled it to try and maintain fighter communications and to wait for a target to catchup but the nearby rift would make this tricky and ultimately fatal.

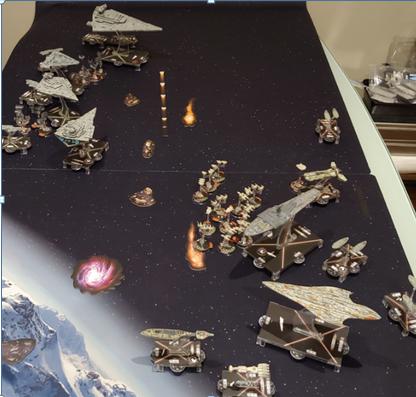
Putting aside the rift however, what do people think of my build vs. my friend's? There are two mistakes in it from the get go. The MC-75 should've been the armored cruiser and the Pelta should've been the command version. The shot below is end of turn 1 2b.PNG.6723a1c51747c0e131364928b687a2f1.PNG

Thanks for posting the lists and that useful picture.

A couple of thoughts if that's OK.


I think you were mistaken to make your MC75 in to a carrier. It's well suited to throwing huge numbers of black dice as close range, and it can work as a carrier but it isn't what it's great at. The Pelta with Boosted Comms and the 3 transport flotillas will give you all the squadron commanding you need.

I think your Pelta should have run Shields to Maximum, and your Liberator a single use of All Fighters Follow Me.

I don't think your interceptor screen was anywhere near tough enough to take on your opponent's. He had 9 anti-fighter fighters (with more coming out of the reserve hangar decks). You had 4 1/2. I don't think you would have broken through his fighter screen. If you can't do that by turn 3 you won't get value out of your bombers. More X-Wings and A-Wings, Jan Ors for Intel to allow your bombers to bomb, and no Scurrgs. You know he's first player so bring Wedge Antilles, and then you know that when Wedge activates he will get +2 blue dice on his attack.

Your opponent does get to attack first with his fighers which is a pain but by using plenty of X Wings, Biggs and Jan Ors (to spread the damage around) you can absorb enough damage to avoid losing any fighters, and then on your attack you can be sure he'll lose plenty of his fighters.

You could use the free maneuver and speed alteration which come as part of the Rift Ambush objective. on his ISD to slow it down so that it has to work harder to get back in to the battle. If you're attacking his rightmost VSD first then his ISD has to come all the way around the outside of the battle.

I also think you deployed and maneuvered badly. I'm not an expert, in fact I'm a really REALLY long way from being an expert. But looking at the picture you have put in my first move would have been to move like a stabbed rat on turn 1, at speed 3 with your big ships and 3 or 4 with your small ones, using the gravity rift to slingshot you round in to his starboard arc. On turn 2, take maneuver dials, use Madine to help you turn and to put the MC75 and MC80 alongside each other and heading straight towards one of his VSDs. No matter how fast his ships can turn thanks to Jerjerrod, they can't go any FASTER. You can get the jump on him with your speed+maneuver. And if you are forcing him to turn hard right he's going from Line Abreast (which is what he wants) to Line Astern.

This does two things. Firstly, it obstructs his attacks from the rearmost ships. Secondly it FORCES him to activate and maneuver his ships in a particular order. Can't move the middle VSD until you move the front one or it'll crash in to it. He can't activate the Quasar because IT will ram, so he has to activate the Quasar after, so he doesn't get his Alpha Strike. So then you know what order he's going to activate in, because he's got no choice unless he wants to ram his own ships. You're inside his OODA loop, making him play your game rather than the other way around. His extra activations are devalued. He also now has to spend command dials maneuvering instead of engineering, and because his fleet is mostly command 3, if he hasn't already put plenty of maneuver dials in place, he'll be waiting until turn 4 to reorient his fleet. With this plan you already know where you're going to be on turn 3, he doesn't know where you're going to be so you can plan your dials and he has to hedge his bets.

I have fiddled with your fleet a bit. Key changes:

CR90A becomes a CR90B, also known as a CRAMBO. It's designed to attack and double ram on one turn, then use its reinforced blast doors to repair the next turn, shoot and double ram again, and maybe get another attack in the turn after if your opponent is too busy or silly to deal with it. A cheap way to make big slow ships (like the VSD) which can't maneuver past it very sad.

MC80 now has Gunnery Team and Intel Officer. Gunnery team gives you 2 shots out the front which is your only good arc. Intel Officer combines with Mon Karren to ruin your opponent's chance of doing anything with his tokens. It has Leading Shots for rerolls.

MC75 now has Ordnance Experts and extra black dice damage. The OE give you a chance to reroll the blank black dice that will always turn up.

Squadrons are now interceptor heavy - 5 generic A Wings plus Green Squadron (which gets the Bomber trait). A Wings can usefully tie up his TIEs and are even capable of doing some anti-ship damage. 6 X Wings, 3 of which are unique. Biggs and Wedge to work on enemy squadrons. Rogue Squadron to save you having to command it. Jan Ors to give you Intel and stop his fighters tying up your bombing attacks. Norra to make sure those attacks do extra damage.

Pelta is a proper carrier, but also has projection experts. The Pelta should trail the MC80 and MC75 in to battle, throwing shields where necessary and commanding squadrons as often as possible.

During setup you have 8 ships, plus 14 squadrons for a further 7 deployments to make 15 deployments. That should mean you out-deploy him.

Name: Rift Racer
Faction: Rebel
Commander: General Madine

Assault: Suprise Attack
Defense: Rift Ambush
Navigation:

MC80 Star Cruiser (96)
• General Madine (30)
• Intel Officer (7)
• Gunnery Team (7)
• Auxiliary Shields Team (3)
• Leading Shots (4)
• XI7 Turbolasers (6)
• Spinal Armament (9)
• Mon Karren (8)
= 170 Points

MC75 Ordnance Cruiser (100)
• Strategic Adviser (4)
• Ordnance Experts (4)
• Electronic Countermeasures (7)
• Assault Concussion Missiles (7)
• External Racks (3)
= 125 Points

MC30c Torpedo Frigate (63)
• Major Derlin (7)
• Ordnance Experts (4)
• External Racks (3)
• Foresight (8)
= 85 Points

Pelta Command Ship (60)
• Ray Antilles (7)
• Projection Experts (6)
• Shields to Maximum! (6)
• Boosted Comms (4)
• Phoenix Home (3)
• Sabine Wren (4)
= 90 Points

CR90 Corvette B (39)
• Engine Techs (8)
• Reinforced Blast Doors (5)
• Liberator (2)
• All fighters, Follow Me! (5)
= 59 Points

GR-75 Medium Transports (18)
• Leia Organa (3)
• Comms Net (2)
= 23 Points

GR-75 Medium Transports (18)
• Toryn Farr (7)
= 25 Points

GR-75 Medium Transports (18)
• Comms Net (2)
• Boosted Comms (4)
= 24 Points

Squadrons:
• 5 x A-wing Squadron (55)
• Biggs Darklighter (19)
• 3 x X-wing Squadron (39)
• Green Squadron (12)
• Norra Wexley (17)
• Wedge Antilles (19)
• Jan Ors (19)
• Rogue Squadron (14)
= 194 Points

Total Points: 795

Edited by flatpackhamster

If you want some bombers, a good activation count, and some strong fighters to knock out the opposing fighter screen....well, I put together a list...

Name: Untitled Fleet
Faction: Rebel
Commander: General Dodonna

Assault: Advanced Gunnery
Defense: Asteroid Tactics
Navigation: Superior Positions

Assault Frigate Mk2 B (72)
• Flight Controllers (6)
• Boosted Comms (4)
• Electronic Countermeasures (7)
• Linked Turbolaser Towers (7)
= 96 Points

Assault Frigate Mk2 B (72)
• Flight Controllers (6)
• Boosted Comms (4)
• Electronic Countermeasures (7)
• Linked Turbolaser Towers (7)
= 96 Points

MC80 Command Cruiser (106)
• General Dodonna (20)
• Strategic Adviser (4)
• Boosted Comms (4)
• Electronic Countermeasures (7)
• SW-7 Ion Batteries (5)
• Linked Turbolaser Towers (7)
• Independence (8)
= 161 Points

GR-75 Medium Transports (18)
• Bomber Command Center (8)
• Boosted Comms (4)
= 30 Points

GR-75 Medium Transports (18)
• Leia Organa (3)
• Comms Net (2)
= 23 Points

GR-75 Medium Transports (18)
• Toryn Farr (7)
= 25 Points

MC75 Ordnance Cruiser (100)
• Ordnance Experts (4)
• Electronic Countermeasures (7)
• Assault Proton Torpedoes (5)
• External Racks (3)
= 119 Points

Hammerhead Torpedo Corvette (36)
• Cham Syndulla (5)
• External Racks (3)
• Garel's Honor (4)
= 48 Points

Squadrons:
• Jan Ors (19)
• Biggs Darklighter (19)
• 3 x X-wing Squadron (39)
• Wedge Antilles (19)
• Dutch Vander (16)
• Norra Wexley (17)
• Y-wing Squadron (10)
• Ten Numb (19)
• Dagger Squadron (15)
• B-wing Squadron (14)
• Green Squadron (12)
= 199 Points

Total Points: 797

9 activations, a broadside gunline with the AFMK2s and the MC80 CC, while also activating squadrons.

The Xwings (minus Wedge), Jan and Ten Numb were the ones I would activate from the AFmk2 to capitalize on Flight controllers. Dutch and Wedge roll into the mix later in the round to mess up a priority squadron.

Leia's GR75 supports the capital ships, and provides some command fixing ability, Toryn support the fighter engagement, and BCC holds back and moves with the gunline/bombers.

Garel's Honor and the MC75 are designed to close with the enemy (ie late activations in round 2), then mess with targeting priority in round 3, or push out major damage and command dial manipulation. I would try to hold off on their deployment until later in the phase to see where I wanted them to go (ie in front of or behind the gunlines projected path), and also maneuver them late in turn 1 and attack when ideal (probably later) in turn 2.

Funnily enough my friend managed 10 activations. Impressive considering the heavy firepower and he still had a bigger bid.