X-Wing Tactics Central

By Boom Owl, in X-Wing

55 minutes ago, SavouryRain said:

My tactics get worse when I'm flying fewer ships.

I beat the best player at my FLGS the first time I flew a TIE swarm, but I'm incredibly bad at flying 3 ship lists. Anyone have any pointers? I think some of it is that I have  a hard time figuring out target priority, while I'm also a little bit too aggressive.

Target priority. For me it can change during the game. But the main rules. I fly 3 ship lists alot.

1. Try and line up a single target for all three ships to shoot at.

2. Initiative. If the ship has already shot at me, why shoot. I tend to try and eliminate an opponent ship before it shoots.

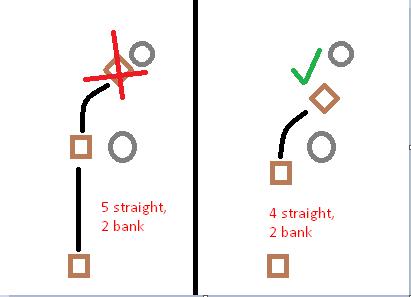
3. Try and set up the shots where I want them. If I can slow roll and make them come through obsticles and break up formation, I will.

4. Targets of opportunity. Sometimes so.ething just lines up that is a good target.

How to effectively drain or neutralize your Force using opponent's charges. That's a good one.

13 hours ago, Biophysical said:

Alexander the Great's whole strategy was "I'm going to joust your king".

The thing is, if it works, it works.

Jousting - meaning forming up into a close-packed wedge and flying directly at your victim of choice, focusing, and shooting them till they go away, is the 'basic' choice. It's the simplest and the one you should take unless you have a reason it won't work - normally because the other squad does it better than you. One of the worst things you can do is fall in love with a million shiny options because most of them are worse than (or at least no better than) "point your nose in the rough direction of enemy and focus" except in specific cases.

Creating those cases is where tactics comes in.

Much the same can be said for blocking; yes, blocking is great, but - assuming it works - your target loses their action and you lose one shot on that target. Which means that if you think that that that shot would have at least made them burn their token, you've not actually gained anything . If you can leave a ship unable to complete a talon roll or segnor's loop, stressed and facing the wrong way, by comparison, that's huge.

One area that I've been working on a lot has been "when going slower is going faster, or how to think three turns ahead".

When I'm not on just a phone I'll elaborate, but despite the meme topic it's quite relevant.

2 hours ago, Magnus Grendel said:

The thing is, if it works, it works.

Jousting - meaning forming up into a close-packed wedge and flying directly at your victim of choice, focusing, and shooting them till they go away, is the 'basic' choice. It's the simplest and the one you should take unless you have a reason it won't work - normally because the other squad does it better than you. One of the worst things you can do is fall in love with a million shiny options because most of them are worse than (or at least no better than) "point your nose in the rough direction of enemy and focus" except in specific cases.

Creating those cases is where tactics comes in.

Much the same can be said for blocking; yes, blocking is great, but - assuming it works - your target loses their action and you lose one shot on that target. Which means that if you think that that that shot would have at least made them burn their token, you've not actually gained anything . If you can leave a ship unable to complete a talon roll or segnor's loop, stressed and facing the wrong way, by comparison, that's huge.

Oh, absolutely. It's the Gordian Knot idea. Don't make it more complex than it has to be.

Obstacle Selection:

When you want to take Asteroids:

-You're flying highly maneuverable ships that can navigate the asteroid field better than your opponent and you want to lure his ships onto rocks or break up his formations.

-You're flying Mining Guild Tie Fighters that ignore Asteroids when moving.

-You're flying Vulture Droids with grappling struts (Also applies to Debris Clouds)

When to take Gas Clouds:

-You're flying fragile ships and want to exploit the defensive benefit of the automatic evade (Jedi especially).

-You're flying ships with low maneuverability or large bases and don't want to lose shots or suffer damage when you hit an obstacle (With certain ships this can happen even with good flying, think YV-666).

-You want to deny Separatist opponents the use of Grappling Struts.

-You're flying unshielded ships in formation (Tie Swarm), and don't want to risk damage on an overlap.

When you want to take Debris Clouds:

-You don't want to lose shots when you overlap an obstacle, but would rather take a stress than give your opponent an automatic evade (certain Trick Shot builds, maybe? I feel like most players will want to take Gas Clouds instead).

-Again, Vulture Droids with Grappling Struts.

When to take large obstacles:

-Han Solo (Rebel & Scum)

-Dash Rendar

-Qi'ra Crew

-Vulture Droids

-Seismic Charges

-Trick Shot

-Any other list where you think you can exploit the obstacles better than your opponent.

When to take the smallest obstacles possible:

-The inverse of above. You want to deny these abilities to your opponent.

Edited by Spartan556
  • How to Recycle & Disengage 

I see people in my local group making this mistake with Vader (occasionally I'll make it myself): being too aggressive with him, usually coupled with taking and using FCS to maximize time on target and action economy.

The problem is that Vader isn't really a brawler (no token stacking+low health) or an arch dodging ace (no native boost), so he can become predictable if you use him to focus down a ship. Vader needs to be a bully ( @jagsba 's words) in order to be effective.

Bullies don't pick fights they can't win, and Vader needs to be flown the same way to maximize his efficiency. Roll up with focus+TL, smash someone's teeth in, then find another target, and so on and so forth. Careful management of your force tokens and your positioning means that you should always be able to get >1 action a turn average. Keep him out of arc so he doesn't lose his force taking shots, slap Hate and/or AB on him to save you in bad situations (a personal preference), and FCS if you have the points.

But don't be afraid to "waste" your lock by not staying on target. A predictable Vader is a dead Vader. Run away. Disengage then use AB to get out of arc even if stressed. Vader can and will blank out on defense and he has no way to change blank greens so limit the amount of shots he takes and maximize your green dice to mitigate it.

Edited by impspy

When going slow is going fast - how to think three turns ahead.

This applies anytime that you need to maneuver a ship around obstacles, and usually when you are preparing for an engagement. Most times this is only at the very start of the game. During setup, you should, as you place obstacles and ships, be figuring out what your possible first two to three turns of maneuvers are going to be. There really aren't a lot of places on the board for the engagement to start, and the more clear your plan to get to each of them at the start of the game the better off you are.

Many times, this means even though you have a flank ship set far off to the left (in this example) and you will likely be engaging on the right side of the board sometimes you'll need to go a little slower in order to find the proper lanes with the proper maneuvers, which will ultimately lead to getting to the spot you need to be faster. A terrible illustration:

image.png.54c9a06834682d21c16b0b1d020510e3.png

The 5 straight means you'll have to turn in, cutting off your flank. The 4 straight opens up the bank maneuver (and if the drawing wasn't terrible, probably also leaving the turn in if you needed it). This happens far more often in every game than you might imagine.

Edited by Micanthropyre
fat finger enter
2 hours ago, Spartan556 said:

Obstacle Selection:

When you want to take Asteroids:

-You're flying highly maneuverable ships that can navigate the asteroid field better than your opponent and you want to lure his ships onto rocks or break up his formations.

-You're flying Mining Guild Tie Fighters that ignore Asteroids when moving.

-You're flying Vulture Droids with grappling struts (Also applies to Debris Clouds)

When to take Gas Clouds:

-You're flying fragile ships and want to exploit the defensive benefit of the automatic evade (Jedi especially).

-You're flying ships with low maneuverability or large bases and don't want to lose shots or suffer damage when you hit an obstacle (With certain ships this can happen even with good flying, think YV-666).

-You want to deny Separatist opponents the use of Grappling Struts.

-You're flying unshielded ships in formation (Tie Swarm), and don't want to risk dam  age on an overlap.

When you want to take Debris Clouds:

-You don't want to lose shots when you overlap an obstacle, but would rather take a stress than give your opponent an automatic evade (certain Trick Shot builds, maybe? I feel like most players will want to take Gas Clouds instead).

-Again, Vulture Droids with Grappling Struts.

When to take large obstacles:

-Han Solo (Rebel & Scum)

-Dash Rendar

-Qi'ra Crew

-Vulture Droids

-Seismic Charges

-Trick Shot

-Any other list where you think you can exploit the obstacles better than your opponent.

When to take the smallest obstacles possible:

-The inverse of above. You want to deny the  se abilities to your opponent.

You can also use Debris if you have an easy way to remove stress (good blues) of if having stress is convenient to you (Ten Numb)

Quote

How to avoid having to K-Turn Sloop or Talon in the first place

1) Approach the enemy from angles. Attacking from 9 o'clock and 3 o'clock leaves you open to hard turn/bank the following round.

Star%20Wars%20X-Wing.JPG?itok=rIoNS98S

Tie Fighter is flanking the xwing. Next round he can just 1 or 2 hard turn while the xwing would have to kturn/sloop.

2) Use reposition. On approach, you can b-roll away and backwards from enemy ships to create space. This in turns takes away their turn around options if they have the advantage over you with something like Leia crew, or Defenders. This will open up the area to bank/turn inwards towards the enemy rather than over them with a red maneuver (kturn,sloop, etc).

3) Self Bump. This is essentially a white stop maneuver for a ship without a stop maneuver. It can catch your opponent off-guard. There are two ways to pull this off. First, your lower initiative ship in the rear (or at same initiative) moves first and overlaps a ship in front of it (yours or opponents). Your ship will stop moving. This is useful to slow down fast moving ships like tie fighters, or large base ships. The second way to self bump is to maneuver a lower initiative ship, either with its ship maneuver or with repositioning like a barrel roll, in front of your higher initiative ship. Then when your higher initiative ship moves, it will overlap the lower initiative, stopping it in its space-tracks. Self bumping is a great way to keep time on target without having to pull a red maneuver.

4)

7 minutes ago, Boom Owl said:

Also alot of the times simply Hard Turn + Boost still gets you arc on a thing without having to stress. 

5)

2 minutes ago, Biophysical said:

Another option is to bank bank or turn to somewhere they can't put good attacks toward and use your action to lock. The following turn you can often reengage with a non-red move for a Focus/Lock shot.

Edited by wurms
1 hour ago, wurms said:

Also alot of the times simply Hard Turn + Boost still gets you arc on a thing without having to stress.

Another option is to bank bank or turn to somewhere they can't put good attacks toward and use your action to lock. The following turn you can often reengage with a non-red move for a Focus/Lock shot.

7 minutes ago, Boom Owl said:

Also alot of the times simply Hard Turn + Boost still gets you arc on a thing without having to stress. 

2 minutes ago, Biophysical said:

Another option is to bank bank or turn to somewhere they can't put good attacks toward and use your action to lock. The following turn you can often reengage with a non-red move for a Focus/Lock shot.

good advice! added to my post

13 hours ago, Cloaker said:

How to effectively drain or neutralize your Force using opponent's charges. That's a good one.

Juke. If it's Luke, then its nearly impossible (but edge cases do exist). If they have Hate, then at least you're putting in damage whilst you watch them recharge all that force.

Flying-wise: Against Jedi, go really fast or really close. True, they're interceptors that don't stress themselves, but when they are forced to double repo, that stash depletes rather quickly. Against Maul: don't shoot him and pose him with tempting shots that really are bad (i.e., through gas clouds), naturally he'll drop his force really quickly unless a very restrained player is fielding him. Against SNR pilots, try to force that premaneuver action, as it effectively drops its force capacity by 1.

Otherwise, not much. You could try to get them to force their abilities, fly Luminara, or perhaps get them to use their force talents.

2 hours ago, gjnido said:

You can also use Debris if you have an easy way to remove stress (good blues) of if having stress is convenient to you (Ten Numb)

Or when the opponent having stress is advantageous to you

Sloane

Landos Falcon

Death Troopers

4-Lom even

Some Fenn specific advice:

- When fighting at range 2 or 3, for that round, Fenn is simply a Zealous recruit that you paid too much for. Any round where Fenn is not engaging while the opponent fires most of his fleet is a waste.

- When fighting other initiative 6 pilot and you are stuck with the initiative, you can be even more daring with Fenn (ex: facing Vader). Playing defensively will only ensure that you cannot leverage his ability.

- Whenever you fight at range 1, you leverage his ability. Every attack at range 1 is the equivalent of successfully firing your ordnance on an ordnance carrier.

- Fenn does a lot more damage at range 1 if he is free to spend his focus token. His focus token also helps him a lot at defense.

- When arc dodging is not possible, the other best scenario that Fenn can hope for is to have another ship (a zealous recruit) bump the opponent to deny them tokens while he moves to a nice spot at range 1. A tokenless ennemy cannot (on average) output as much hits, which means his natural defense + title is often enough to protect him. This therefore frees his focus to be used offensively if need be.

- When in a duel with a lower initiative with limited health at range 1 (A-Wing), it is often worth it to spend the focus to increase the damage of an attack as this will often force the opponent to burn his focus on defense.

1 hour ago, player3010587 said:

Juke. If it's Luke, then its nearly impossible (but edge cases do exist). If they have Hate, then at least you're putting in damage whilst you watch them recharge all that force.

Flying-wise: Against Jedi, go really fast or really close. True, they're interceptors that don't stress themselves, but when they are forced to double repo, that stash depletes rather quickly. Against Maul: don't shoot him and pose him with tempting shots that really are bad (i.e., through gas clouds), naturally he'll drop his force really quickly unless a very restrained player is fielding him. Against SNR pilots, try to force that premaneuver action, as it effectively drops its force capacity by 1.

Otherwise, not much. You could try to get them to force their abilities, fly Luminara, or perhaps get them to use their force talents.

Or one could just fly Wedge or Blackout, or a pilot with Outmanuever. Force users despise not having defensive dice to modify.

See, now I gotta go build a list with these principles. Sigh.