2 hours ago, xero989 said:All i will say is if that is the paint job it comes with mine will be getting redone.
I want to offer that service, but it totally doesn’t fit my Business format 😞
2 hours ago, xero989 said:All i will say is if that is the paint job it comes with mine will be getting redone.
I want to offer that service, but it totally doesn’t fit my Business format 😞
https://cannotgetyourshipout.blogspot.com/2019/04/worlds-2019-data-and-analysis.html
Lots and lots of tables and chattering about Worlds data analysis.
And the discord is already on fire haha.
What if Pryce were medium ship only and Rieekan only affected ships or squadrons? Probably unintended consequences (when aren't there,) but just a thought.
I would so be down for all 3 of those cards (Bail, Pryce, and SAD) only being for medium ships.
Yeah, you would see a lot of pryce squall. But by this point, its a thing most people should know how to play around by now.
Slight errata to pryce at the end just add you may not be the first ship to activate next round, she would still be a good option just used differently. I think we need some sort of ace cap preferablely a soft cap, like one ace for each ship in your fleet or something.
14 hours ago, Karneck said:I would so be down for all 3 of those cards (Bail, Pryce, and SAD) only being for medium ships.
Yeah, you would see a lot of pryce squall. But by this point, its a thing most people should know how to play around by now.
SAD Interdictors...
10 minutes ago, BiggsIRL said:SAD Interdictors...
No Brunson, though.
10 hours ago, The Jabbawookie said:No Brunson, though.
Yup but two SAD activations since the title can unexhaust it.
If "Ace Spam" were not a thing, would Pryce still be a problem?
"Ace Spam" has been sort of an issue for a number of waves now. Maybe addressing that issue alleviates the need for other adjustments. Aces are probably too cheap.
6 hours ago, RobertK said:If "Ace Spam" were not a thing, would Pryce still be a problem?
"Ace Spam" has been sort of an issue for a number of waves now. Maybe addressing that issue alleviates the need for other adjustments. Aces are probably too cheap.
It's a multifaceted problem, similar to the old Rieekan Aceholes fleets (...which are still doing all right, overall, but nothing like they were). Aces are too good for their cost but it doesn't help that Imperial generic squadrons are probably more overcosted than their Rebel counterparts due to how specialized they are and thus prone to bad matchups (if your opponent invested too much or too little into the squadron minigame, your generics can suck, depending), which makes leaning on the few strong multi-role options Imperials have even more appealing. Pryce is still an issue given you get the last and then usually first (or second) activation with 4 compact powerful self-sufficient squadrons (due to aces) plus the ISD (usually) attacking at least one of those activations, sometimes twice, and getting a speed 6 total move as well.
There's also the issue of Thrawn denying the options for non-squadron-based counter-play by removing the threat of Slicer Tools, Brunson providing very cheap extra damage prevention to keep the fleet on the table, and Squall keeping the slower clutch squadrons (Jendon and Morna, but others as well as necessary) consistently relevant and opens up round-one attack possibilities. The most reliable defense against it is to go heavy squadrons yourself and/or find a way to get an "in-between" activation so you're not last+firsted (with a bid and/or a Pryce of your own, Bail can work too but he's tricky to fit into Rebel fleets). Those aren't the only options but they're the definitely the most reliable and the data bears that out.
https://cannotgetyourshipout.blogspot.com/2019/04/johns-regionals-and-worlds-write-up.html

|
| I got bored of like the same 5 Leia pics, so, here, Carrie Fisher! |

|
| Marley was dead, to begin with... |

|
| Close enough |

|
| "...and everything ended happily and not ominously for everyone, THE END." |

|
| I'll let you choose which Beatle he was most like. But he was DEFINITELY dressed like this |

|
| He was just like this |

|
| Kallus Flechette Raiders HURT and stop me from doing my crap! |

|
| I stress YET AGAIN, not affiliated with FFG or any FFG-based product! |

|
| Armada's like a box of chocolates... |

|
| 1970s Musical jokes are ALWAYS popular! |
|
| Yes, I bought another Assault Frigate recently. I have painting plans... |
https://cannotgetyourshipout.blogspot.com/2019/04/tips-and-tricks-running-away.html
Unlike many miniature games, your success in a game of Armada isn't defined purely by win-loss but by the severity of that win or loss. It's not uncommon in casual games for players to concede when it's clear who will win or lose but they're robbing themselves of valuable practice in the fine art of running away. That's what we're going to talk about now with another entry in the smaller-article "tips and tricks" format.

|
| With your shield or on it, you cowards! |
Trouble is on the way
Now clearly your default response to combat in Armada shouldn't be "run away from it." Everyone's here to roll dice at one another and watch plastic spaceships get removed from the table. That said, it's not uncommon to find that some of your fleet is in a position where if left to continue on in its present state, it will be destroyed for minimal gains, whether that be mid-combat or prior to combat. If you are on the way to destruction, you should endeavor to change that. If it's a choice between saving your ship and destroying enemy resources, it will depend on the situation, but I've definitely seen players focus more on destroying enemy ships than they probably should have when saving their own ships would've been better for their points differential.
|
| Make your time. Think of a new plan, I guess. |
It should be noted that this a different matter than setting up a piece trade, where you sacrifice some of your fleet in return for some of your opponent's fleet. Piece trades are generally favorable to you in terms of points swapped or favorable to you in terms of board state but can also be a matter of simply trying to get maximum value out of models that are otherwise doomed before they go. There's a good case to be made for piece trading in the right circumstances (which may get its own tips and tricks article eventually), but we're here to talk about running away.
Estimating your chances of success
This is effectively the first step in the running-away process if you want to enable the possibility of fleeing later. You need to examine the situation and estimate your models' chances against whatever your opponent has in their neighborhood. There is no easy calculation for this - the variables are so numerous that it's going to differ on a case-by-case basis and be informed largely from experience and some quick mental math. The earlier this consideration is made seriously, the better your chances of avoiding a mistake. There's also something to be said for hedging your bets if the situation is still fluid - outright booking it away from everything if your opponent decided not to commit much to that part of the game is a big waste of your combat potential. For an easy example, let's use a big bruiser ship with a "point front towards enemy" design philosophy - an ISD. Depending on the situation, maybe the ISD wants to be...
Confident. Here we see an ISD setting up to go head-on with the opposing enemy ships. It has good shots lined up on them and will present difficulties for either of them escaping due to possibly ramming. That said, it will have its own problems if things get hairy when it comes to running away.
Uncertain. Here we see the same ISD set up more conservatively. It can get an attack on both ships, but the Assault Frigate will be fairly capable of getting away. The ISD itself can choose to attack and then zoom away to the left if it needs to. This kind of setup leaves your options open but if things go better than you were expecting, the enemy will have openings to escape you as well.
Fleeing. Here we see the ISD setting up to run away from trouble. Its good arc isn't on target to anything, but nothing in its vicinity can stop it from getting away.

|
| Run away like you just got to a news article's comments section! |
Candidates for cowardice
There are a few things that recommend ships that have a chance to successfully run away from trouble. Higher speed is an obvious necessity, with a minimum of 3 (or fake 3, with 2 plus Engine Techs) being recommended. Speed 2 ships can slowly dodge the occasional ship-on-ship fight, but you'll want 3 and preferably 4 to book it away from angry squadrons.
Broadsides ships have an edge in the advancing-away-from-the-enemy-bravely game given that even while maneuvering for combat, they want to keep enemy units out of their front arc and to rotate around the fight rather than heading right in. If and when it comes time to disengage, it's a matter of turning away from the enemy rather than turning inwards and then letting inertia take care of the rest. Assault Frigates and Arquitens are particularly good at this in my experience, as are cowardly carriers with Boosted Comms who weren't planning on contributing much to combat anyways.
Otherwise, nav dials help substantially. Being able to step on the gas while also improving your yaw can allow you to get to a crucial location you otherwise couldn't have even with a nav token. Obviously lower-Command ships are best able to time these commands correctly, and lower-Command ships also tend to be higher-speed with better maneuverability, so running away is a small ship's game. Don't discount large ships, though - even though it may be a bit more difficult to get running with something like an MC75, the increased durability can make it tough to put down a large ship that beat feet early enough to retain a modest number of shields and remaining hull.
General circumstances in which to run away
Now I mentioned earlier that each individual situation will vary significantly but in my mind there are three basic reasons to run away and they all require slightly different considerations:
You're about to die
This is the classic GTFO situation: your beat-up ship is trying to conserve its points and not get pushed over the edge into destroyed. In this situation, you want to focus on running directly away from anything that can kill you. Bonus points for hiding behind obstacles or other ships to get obstruction and hiding in bad arcs of enemy ships and/or out of each of enemy squadrons. Also please consider your ending position (especially if you're resolving a repair command at the start of your activation!) so far as what hull zones will be exposed to fire - flipping around so your no-shields arc is wide open for punishment isn't doing yourself any favors.
The goal is to hit necessary (usually maximum) speed and keep sailing away from trouble. Queue up at least one repair dial to dissuade cheeky Hail Mary attempts to kill a wounded ship later in the game; be mindful in particular of hull zones with no shields (which squadrons and long-ranged skirmishers will seek to exploit) and being one or two hull damage from death (which ramming ships will try to exploit). Also be careful of accidentally sailing off the board - this typically won't be a problem for ships traversing the width of the board, but if your best option is jumping past enemy ships towards your opponent's side of the board, you can run into space issues fairly quickly if you're reckless.
Typically your first round of attempting to disengage is the most dangerous one as the enemy may still be close enough to dedicate decent resources to destroying you. If you can't get obstruction or out of range like I recommended earlier, your best bet is to disincentivize attacking your wounded ship however you can. Typically this means identifying the serious threats to your life and parking yourself somewhere so they'd rather be doing something else - if your opponent's combat ship needs to decide between using his good arc to take down your crippled ship or going after one of your bigger more important ships, he can't do both (...unless Gunnery Teams). An example against bomber squadrons would be sending your ship away from the rest of your fleet - the bombers can chase it down and destroy it, but they may not be able to get back into bombing range of the rest of your fleet next round. Is that worth it? Maybe, maybe not.

|
| Good thing AT-ATs can't take Gunnery Teams or it would've been more than that one dude. |
You're avoiding trouble before it starts
This one is a bit more straightforward but if you expect proceeding as normal will result in your destruction for little to no gain... don't. This sounds very silly and a little insulting but it's honestly one of those things I see even intermediate-level players fail to do because they assume in a plastic spaceships game the point is to get the ships throwing the most dice at each other, so they may as well consent to being blown up. Don't do this.
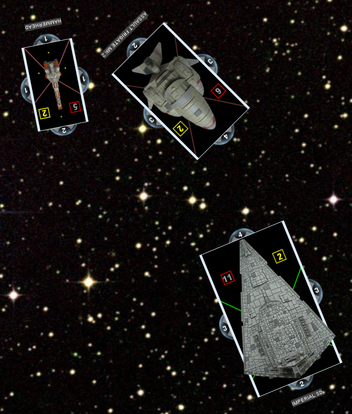
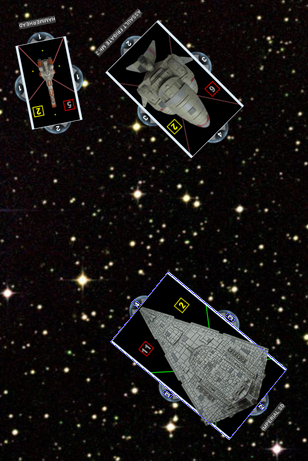
I'll give an example of what I mean from John and my recent team game at the end of Worlds, where I even took a picture:
This picture is taken fairly early into the round 2. I deployed my mob of small ships just a bit to the left of that central debris field with John's forces on the right. The opposing Hammerhead swarm deployed solidly in the middle. If my CR90s had continued straight on ahead, they would have gotten chewed to pieces by those Hammerheads for little gain. So as you can see, they all booked it for the left. This leaves the enemy team with the decision of whether and how much to pursue them. If the central Hammerheads pursue, they run the risk of being left behind without much to do fairly quickly. If they don't and head off to my right (chasing after John's ships), the remaining elements on the left flank will be outgunned once the CR90s form up. The opposing team chose the latter option (probably the right call), I was able to chew through a few ships on the left side rounds 3 and 4 and the CR90s whipped around to ride in and cause trouble in the middle by round 6.
When you're running to avoid trouble, it's important to keep your options open. Just because you're avoiding combat right now doesn't mean you can't still make contributions later on if the opportunity presents itself. Therefore it's important to not flee any harder than necessary for fear of effectively leaving the game altogether. The goal is to make your opponent commit to chasing you out of the game, which will likely require their own ship(s) to sail off to Nowheresville to force you to do the same, which is a net win over "my ship sails into the meat grinder and dies for no reason." If your opponent is hesitant about committing the kind of resources required to make your feigned retreat stick and directs his resources towards other parts of your fleet, you can turn back in to contribute later on, hopefully putting some pressure on the flanks or the rear and at least temporarily pulling your opponent's ship(s) out of formation just as yours was.
It's extremely important to focus on navigate dials when you're fleeing to preemptively avoid trouble due to how fluid the situation is. You may need to whole-heartedly commit to the retreat, in which case you'll need to step on the gas much like when you're running away because you're at risk of destruction. You may need to find the quickest way to bring your ship back into game relevance if your opponent gives up the chase, which will value the extra yaw as well. Either way, I recommend spamming the nav dials as much as you can in this kind of situation.
You've done your job and it's time to leave
This is somewhere in between the two circumstances I already brought up, but in short: your ship did everything it reasonably could expect to do this game and now it's best to get out of the game before you accidentally end up doing something stupid. I think we've all seen a game where a ship wasn't really in range to do much after other enemy ships nearby got destroyed or ran away but "felt" like it needed to keep contributing and so wandered over towards other enemy models and late game they had nothing better to do so picked up the easy kill. Don't do that.
Deciding when it's time to just bug out after a job well done takes some experience and a sense for where the game will go in the next few rounds. If you're too eager to leave, you might have squandered a resource that could've been useful at corralling enemy models later on. If you're too eager to keep chasing after the enemy, you present an opportunity for your opponent to pick up easy points if you're reckless. It's a judgment call. Make an honest assessment of your chances of meaningfully contributing, how much more damage your ship can take versus what you expect might get thrown at it, and what the rest of your fleet is up to and then react accordingly. There's nothing wrong with destroying enemy models and then comfortably zooming away to a sparsely-inhabited corner of the board to enjoy some much-needed R&R time while preserving your points and providing a puff activation if necessary.
Strategic-scale running away
I want to briefly touch on "everybody started running away round 1" as a strategy. Sometimes you hit a matchup that is terrible for you and committing your fleet at all is probably a bad idea. In these types of situations, especially at a tournament, it behooves you to "stay alive and take the 5," meaning just book it and hope for a tie or minimal loss, take your 5 tournament points, and hope to do better next round.
This is a somewhat controversial topic as generally people don't show up to play a game of Armada only to have their opponent commit to not playing a game of Armada. I generally consider it's rude to do in a casual game, and playing that bad matchup more directly can help you learn what to do to minimize the worst parts of it. That said, in tournament practice or an actual tournament, it's fair game - a good fleet should be able to bring the fight to the enemy even if the enemy doesn't want to fight, and if it can't do that then that's on that player for hoping his opponents would be dumb enough to sail into the meat grinder.
If you're determined to run away starting round one, it's important to deploy like it; it helps to be second player so you can deploy away from the first player's first deployment and so if the game is a tie you will get 6 tournament points. In short, deploy generally parallel to and towards the back edge, fly away from your opponent, and try to get far away from their fleet as early as you can and then slow down if/when you put enough distance between you so you don't have to start looping back towards your opponent when you get close to a table edge. It's important to control the retreat as best as you can; if your opponent's faster ships and squadrons catch you, you want them to hit the united resistance of your whole fleet rather than being able to pick off stragglers going too slow or fast ships that raced out ahead without support.
I realize this can be an unsatisfactory and anti-climactic way to play Armada (and as I said, I consider it rude in a casual game) but narratively, imagine the retreating fleet is being pursued by a superior enemy force and the commander is doing his best to save his men's lives until their hyperdrives are charged up to jump away. I find that helps. If your own fleet doesn't know what to do against an opponent that doesn't want to fight it, I'd consider rethinking your fleet.
Final thoughts
Given many miniature and computer wargames emphasize winning or losing without regard to the scale of that win or loss I've noticed a lot of newer players in particular have a tendency to just throw everything that can at the enemy - if they're winning, they want to win more; if they're losing, they're hoping for one big desperate last stand to turn the tide. In Armada, practicing the fine art of running away can pay off handsomely and allows you to use more of the big map a game of Armada takes place on.
Some Real McCoy goes well with this artcile...
https://cannotgetyourshipout.blogspot.com/2019/04/nathan-coda-worlds-2019-worlds-aar.html
Editor's note: we're happy to have Nate back to talk to us about his experiences at Worlds this year!
This year was the fourth Worlds tournament I have attended, and was yet again a memorable experience. I got to play eight games of Armada with a group of excellent players from around the world, discuss my favorite game with people who are just as passionate about it as I am, and managed to earn my fourth top-four Worlds placement. What’s not to enjoy?
Here’s my list:
Assault: Most Wanted
Defense: Capture the VIP
Navigation: Salvage Run
MC30c Torpedo Frigate (63)
• General Rieekan (30)
• Lando Calrissian (4)
• Ordnance Experts (4)
• External Racks (3)
• Admonition (8)
= 112 Points
CR90 Corvette A (44)
• Turbolaser Reroute Circuits (7)
• Jaina's Light (2)
= 53 Points
CR90 Corvette B (39)
• Engine Techs (8)
• Heavy Ion Emplacements (9)
= 56 Points
GR-75 Medium Transports (18)
• Toryn Farr (7)
• Bright Hope (2)
= 27 Points
GR-75 Medium Transports (18)
• Slicer Tools (7)
• Quantum Storm (1)
= 26 Points
Squadrons:
• Hera Syndulla (28)
• Dash Rendar (24)
• Ketsu Onyo (22)
• Wedge Antilles (19)
• Dutch Vander (16)
• Gold Squadron (12)
= 121 Points
Total Points: 395
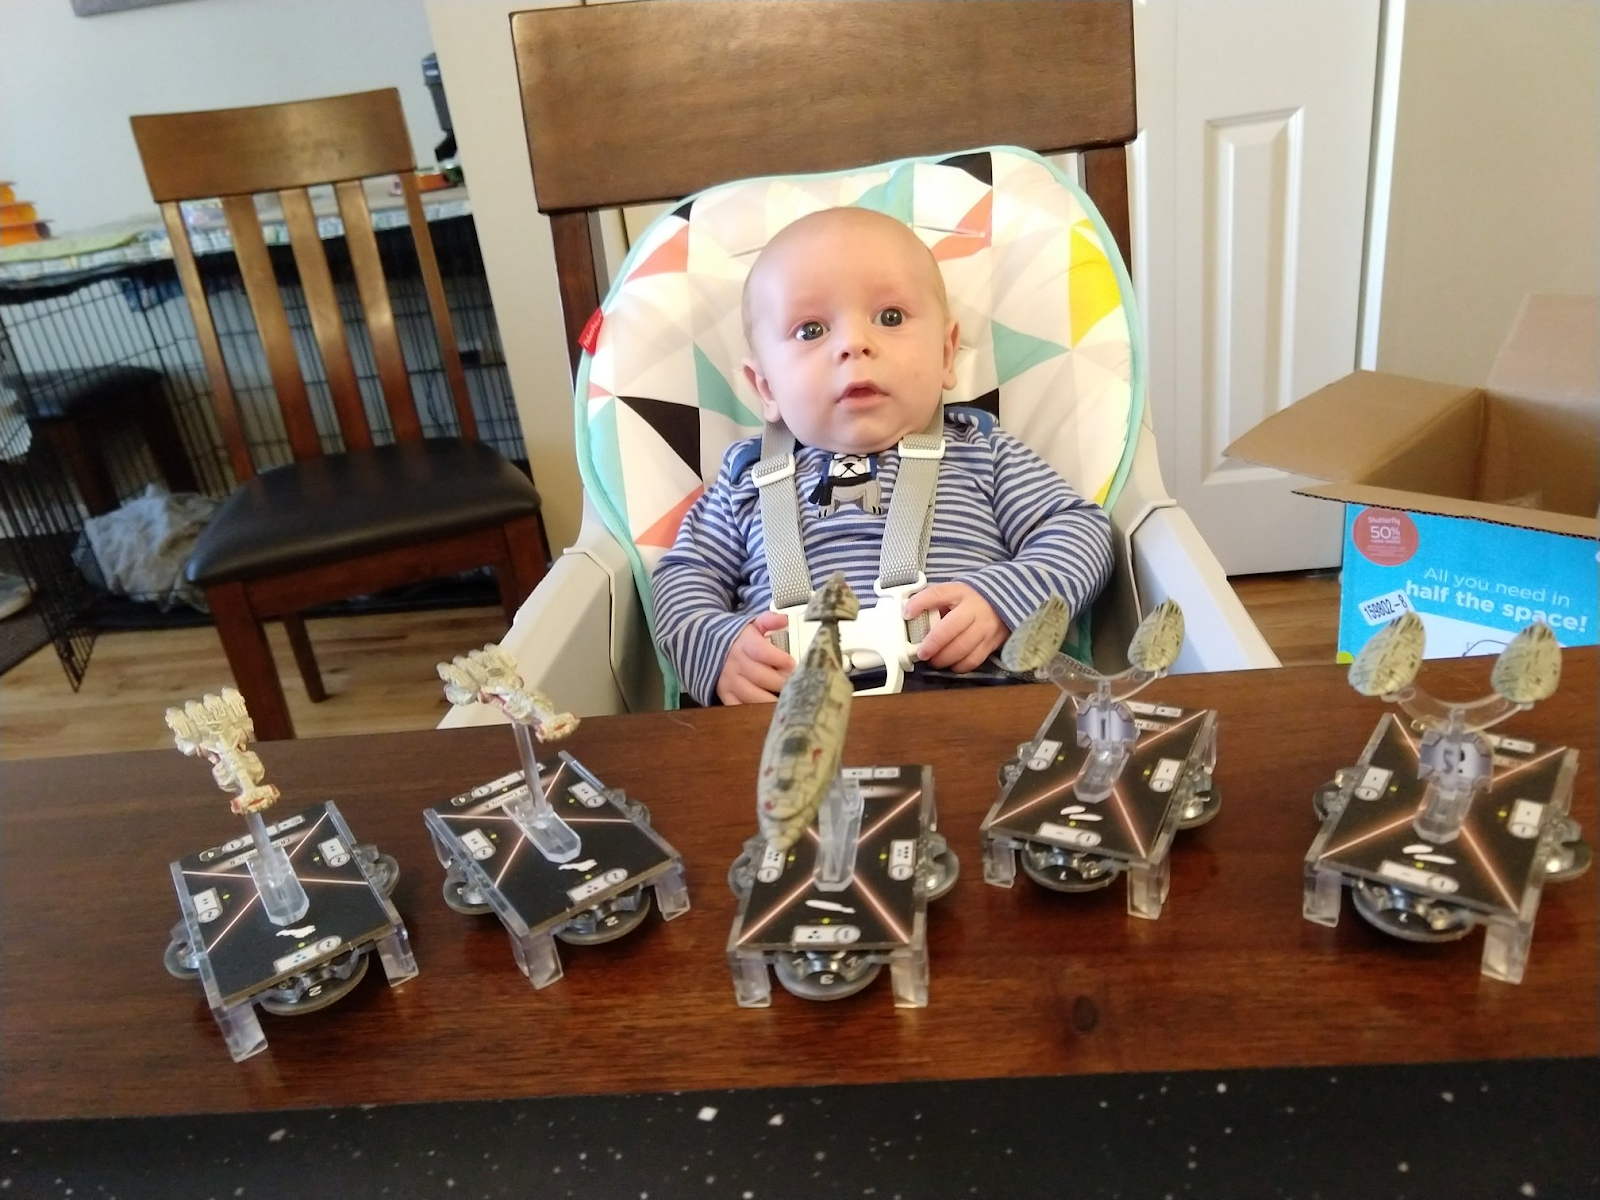 |
| Space baby not included. |
This list has a strong ship and squadron threats, is flexible, and a lot of fun to fly. I’m banking that if an opponent can overwhelm my squadrons, I should be able to win the ship battle. And if an opponent overwhelms my ships, I can win the squadron battle… then have my rogue bombers even the odds of the ship battle.
For ships, I really enjoy flying MC30s and CR90s. They are maneuverable enough to let me control engagements, while still packing a punch. I haven’t flown a CR90B in a long time, and was surprised how much I enjoyed it. That little guy consistently punched above his weight class while managing to slip away afterwards.
For squadrons, I’ve found this group of pilots to be pretty fantastic generalists. I went with rogues because I wanted to limit my investment in squadron support. No carrier needed for this fleet. I enjoy all these squadrons, but I really like Dash for his consistency and Ketsu for her fantastic ability to harass. Two blue dice bomber with speed four, grit, and rogue is just a really good combination.
Why did I select Rieekan for Worlds again this year? Besides being an admiral I enjoy playing, there are a few things about Rieekan that make him my top choice for competitive play:
 |
| The face of a man who has nothing to prove. |
So while I know people are generally unhappy to see Rieekan in the finals again, I have a hard time flying the type of competitive lists I enjoy without Rieekan on the bridge. And honestly, that’s what’s most important - flying something you enjoy.
That’s enough of that - let’s talk about some games:
These are going to be pretty short and sweet - just a high level overview and a highlight or two from each game. My summaries are focused on games and not players, so let me just say here that all seven of my opponents played a tight game and were a pleasure to play against. I’m always impressed by the caliber of people in our community, and it makes a tournament like this a truly enjoyable event.
Game 1: 6-5
This game was against a Thrawn list flying a Kuat, Quasar, Gozanti, and the usual mess of squadrons. This ended up being a close grind, where our squadrons battled it out and we traded some support ships. My favorite part of this game was dropping Admonition to speed 0 for a few turns so the Kuat could not sneak around behind it and run away. I ended up only getting one close range shot off on the last turn, though, and the Kuat succeeded in sneaking away at half health.
Game 2: 10-1
This game was against a Madine list flying a Liberty, MC30, GR-75, and some squadrons. This is the only game of the tournament where I took first player, as it gave me the ability to last/first effectively. I did a last/first with my CR90B to ram his MC30 to death, then did a last/first with my MC30 to finish off his Liberty (with help from CR90A and squadron friends). My favorite part of this game was watching a Liberty kill my slicer flotilla with his side arc, using a double shot from advanced gunnery at medium range. Poor guy thought he was safe in that weak side arc, then got pummeled.
Game 3: 10-1
This game was against a Raddus list flying a Liberty, CR90B, 2 GR-75s, and 8 YT-2400s. I won the squadron battle then ganged up on the Liberty, which wasn’t able to line up an effective shot on my nimble ships. His CR90B was behind his Liberty, and ended up getting picked off by my two CR90s on the last turn. My favorite part of this game was my CR90A doing a front arc shot into Raddus at close range, adding a Most Wanted die to roll a massive 6 damage, which was just enough to finish him off.
Game 4: 8-3
This game was against a Thrawn list flying an ISD-II, Quasar, and the usual mess of squadrons. Our squadrons ground each other down, and I managed to kill the ISD with focused bomber and ship fire. My favorite part of this game was in the last turn, where I had Ketsu engage Maarek so he could not go fast enough to catch my crippled CR90B and finish it off. This is the first time I have ever used Ketsu ability to any meaningful effect, so it was a bit of a historic moment.
Game 5: 6-5
This game was against Dennis, who went on to win the whole tournament. This ended up being a squadron grind, with only a few ships being destroyed. I only won due to holding onto the VIP token. My favorite thing in this game was a move Dennis made where he squalled some squadrons up to my slicer flotilla, then activated them all to kill the flotilla and move away. End result was a dead flotilla and all his squadrons moved safely away. A very clever move.
Game 6: 8-3
This game was against Yik, who went on to get ninth in the tournament. He was flying Rieekan with an MC80C, Hammerhead, two GR75s, and a mess of squadrons. He threw his MC80C right in, where my CR90A, MC30, and bombers tried to take it out. They ended up barely succeeding, and Admonition got away with only 1 health left. He won the squadron fight due to my focus on the MC80C, but my CR90B caught up with his Hammerhead and finished it off to table him. My favorite part of this game was where my CR90B shot at his 1 health hammerhead and rolled 3 accuracies. Then, instead of fleeing to avoid reprisal, it had to hang around and ram him to kill him, guaranteeing the gruesome death of the CR90B in retalitary fire.
Game 7: 6-5
This game was against Norm, who went on to get third in the tournament. He was running Thrawn with an ISD-II, Gladiator, and a fun squadron list. This game was weird, where he didn’t want to engage my squadrons and I didn’t want to engage his ISD. We compromised and traded some ship kills, then finished with a quick squadron battle. I came out a little ahead due to killing off his Most Wanted Gladiator. My favorite part of this game was where Norm parked his ISD on a rock and kept it there by ramming his gladiator. This was an excellent tactical move, as it kept his ISD at a relevant range for several turns. However, it did result in his ISD acquiring around six damage cards. So he ended the game with an ISD missing half its hull, even though it was never shot once.
Game 8 : Loss
This was the final game which was against Dennis. After playing Dennis once already, I knew he had me in the squadron game and I knew I had him in the ship game. So it would come down to whether I could catch and kill his ships. Spoiler alert - I couldn’t. My favorite part of this game was when Dennis managed to use engine techs on Centicore to avoid a close range MC30 shot, slipping away to victory.
 |
| Congratulations to Dennis, the 2019 Armada World Champion! Hope you were able to get that giant trophy through airport security! |
Thank you to the Armada community for making 2019 another fun year, and I look forward to pushing around more plastic spaceships with you all in the future!
On 4/10/2019 at 4:06 PM, Snipafist said:[...] The most reliable defense against it is to go heavy squadrons yourself and/or find a way to get an "in-between" activation so you're not last+firsted (with a bid and/or a Pryce of your own, Bail can work too but he's tricky to fit into Rebel fleets). [...]
A word about Pryce and Bail: They seem to be equal, but they are not at all. There are two main differences that make Pryce exceptionally strong and Bail only nice: The first one is first/second player asymmetry. If you are second, Pryce saves your ***. If you are first, she grills your opponent's ***. Bail? If you are second, he saves your ***. If you are first...yes, nuttin, Jon Snow!
Second, after the Bail activation your opponent can activate his entire fleet once PLUS one of his ships (most likely his biggest hitter) a second time. This results quite often in the destruction of the Bail ship. The reliable way to avoid this is having Bail on a liberty, because she can run so fast, that there is a good chance that even with all his activations your opponent cannot get her. Considering how difficult liberties are to fly competitively, it is not suprising that Pryce outperforms Bail a lot.
23 minutes ago, Darth Veggie said:A word about Pryce and Bail: They seem to be equal, but they are not at all. There are two main differences that make Pryce exceptionally strong and Bail only nice: The first one is first/second player asymmetry. If you are second, Pryce saves your ***. If you are first, she grills your opponent's ***. Bail? If you are second, he saves your ***. If you are first...yes, nuttin, Jon Snow!
Second, after the Bail activation your opponent can activate his entire fleet once PLUS one of his ships (most likely his biggest hitter) a second time. This results quite often in the destruction of the Bail ship. The reliable way to avoid this is having Bail on a liberty, because she can run so fast, that there is a good chance that even with all his activations your opponent cannot get her. Considering how difficult liberties are to fly competitively, it is not suprising that Pryce outperforms Bail a lot.
I kinda disagree. Bail as first player gets me tokens and if I built right, a 400 point list that SHOULDN'T mind going first. I spent nothing, but you may have spent potentially 20-30 points on a bid to.... Go second. Great.
And it's LIKE a Pryce turn. If I CAN flip the activation game and nail a ship to the wall on the Bail turn, I should be fine even though I can't activate again until later. I don't claim to be a Bail master, but he does a LOT of interesting things there. I do like him on the Liberty though, I definitely agree there.
4 hours ago, Darth Veggie said:A word about Pryce and Bail: They seem to be equal, but they are not at all. There are two main differences that make Pryce exceptionally strong and Bail only nice: The first one is first/second player asymmetry. If you are second, Pryce saves your ***. If you are first, she grills your opponent's ***. Bail? If you are second, he saves your ***. If you are first...yes, nuttin, Jon Snow!
Second, after the Bail activation your opponent can activate his entire fleet once PLUS one of his ships (most likely his biggest hitter) a second time. This results quite often in the destruction of the Bail ship. The reliable way to avoid this is having Bail on a liberty, because she can run so fast, that there is a good chance that even with all his activations your opponent cannot get her. Considering how difficult liberties are to fly competitively, it is not suprising that Pryce outperforms Bail a lot.
I don't disagree that Pryce is much stronger than Bail overall. Bail is something of a Pryce soft counter but he's not nearly as strong on his own merits.
4 hours ago, Darth Veggie said:A word about Pryce and Bail: They seem to be equal, but they are not at all. There are two main differences that make Pryce exceptionally strong and Bail only nice: The first one is first/second player asymmetry. If you are second, Pryce saves your ***. If you are first, she grills your opponent's ***. Bail? If you are second, he saves your ***. If you are first...yes, nuttin, Jon Snow!
Second, after the Bail activation your opponent can activate his entire fleet once PLUS one of his ships (most likely his biggest hitter) a second time. This results quite often in the destruction of the Bail ship. The reliable way to avoid this is having Bail on a liberty, because she can run so fast, that there is a good chance that even with all his activations your opponent cannot get her. Considering how difficult liberties are to fly competitively, it is not suprising that Pryce outperforms Bail a lot.
Yup, rereading it again and Eric's post, I'm inclined to agree with you more than I did this morning. I still like Bail and think he's decent, but definitely missed the "nice" part earlier. Somehow I processed it as "bad." My ACTUAL bad, man.
4/23 updates!
I hit some more updates on the SFC article (I removed the squadron bits I suggested AGAINST using as I cover them in bits later, and I also removed the parts about deploying squads when I can just quote Eric and the deployment article), and Eric and I significantly updated the MFC article. Next plans are an ACTUAL article I'm working on and updates to (what else?) the LFC. Which is going to be a big chunk for sure. Stay tuned, as usual guys!