Sato Firing Line

By TheSoberPug, in Star Wars: Armada Battle Reports

Hi guys! I love sato so here's a fleet with him. Just some notes, my bid is so big so that I can immediately get advanced gunnery and I didn't really think anymore upgrades were needed. I only put in 5 Z-95's because with expanded hangar bays, the MC-80 can carry all of them.

Commander- Commander Sato

Objectives-

Assault- Advaned Gunnery

Navigation- Minefield

Defense- Contested Outpost

MC-80 Command Cruiser (106)-

Commander Sato (32)

Weapons Liaison (3)

Expanded Hangar Bays (5)

Enhanced Armanment (10)

Electronic Countermeasures (7)

Home One (7)

CR90 Corvette A (44)

Lando Calrissian (4)

Slaved Turrets (6)

Fighter Coordination Team (3)

Electronic Countermeasures (7)

CR90 Corvette A (44)

Walex Blissex (5)

Slaved Turrets (6)

Fighter Coordination Team (3)

Electronic Countermeasures (7)

CR90 Corvette A (44)

Slaved Turrets (6)

Electronic Countermeasures (7)

Squadrons-

5x Headhunters (35)

Total Point Cost- 391

Edit- Sorry, I'm just realizing now that this is in battle reports

Edited by TheSoberPug
Two small points:

  1. This is probably better fit for the Fleet Builds forum.
  2. If you win the bid, you get to pick first or second. The first player picks from the second player's objectives. So there is absolutely no guarantee that you'll get Advanced Gunnery. Either you're first and you have to hope your opponent has it in their objectives, or your second and you have to hope that your opponent picks Advanced Gunnery from your objectives.
1 hour ago, Astrodar said:

Two small points:

  1. This is probably better fit for the Fleet Builds forum.
  2. If you win the bid, you get to pick first or second. The first player picks from the second player's objectives. So there is absolutely no guarantee that you'll get Advanced Gunnery. Either you're first and you have to hope your opponent has it in their objectives, or your second and you have to hope that your opponent picks Advanced Gunnery from your objectives.

Sorry, I read the rules wrong 😊

I note several problems, which I'll go through. Feel free to disagree though and some of it is just nit-picking;

1. Sato himself is severely limited by needing to have squadrons near the enemy ships;

  • Headhunters are only speed 3. You can't just sling them half way across the board. Generally A-Wings are good. Tycho in particular as he can't be pinned down.
  • 5 Headhunters have only 15 HP and no defense tokens. They will be melted against even a moderate fighter screen.
  • If your squads are too slow or dead then Sato is actually a liability offering nothing for yourself, but offering 32 points to your opponent if he destroys your flagship.

2.a Your chosen ships have no specific synergy with Sato. To understand Sato, you need to understand the Math;

  • In general the base effect of Sato uses this Math; expected damage from an unmodified Red dice is 0.75, Blue is 0.75, Black is 1.0. Therefore the base effect of Sato when changing 2 Red/Blue dice to 2 Black dice provides an expected damage boost of 0.5 ([1.0 - 0.75] *2).
  • If you have access to re-rolls the expected damage improvement changes slightly; When re-rolling non-damage results expected damage is: Red 1.1 (0.75 + 3/7*0.75 ), Blue 0.94 (0.75 + 2/8 * 0.75), Black 1.25. Therefore now changing 2 blue to 2 black yields a 0.62 damage increase. Changing 2 red to 2 black only 0.3 extra damage. Obviously in practice you won't usually be able to re-roll every dice.
  • You can use Sato to increase your odds of rolling an accuracy, usually quite significantly.
  • Now assuming you double arc, you may double the bonus by affecting a further 2 dice in the second attack.
  • Despite this, if all you are gunning for with Sato is this basic dice upgrade, honestly he isn't very good at all. He is very expensive for what he does. I.E per the math above he gains approximately 1 damage per ship activation IF you double arc or have 2 targets (AND have a squadron/s in the correct position/s).

2.b Add synergy to Sato to get the most out of him. Understanding advanced Sato Math;

  • Blue and Black crit effects! If your MC80 have 3 modifiable Blue dice, and you want to trigger a crit effect, you have a 58% (1 - [0.75*0.75*0.75]) chance of rolling 1 Blue critical. By converting 2 Red dice to Blue you now roll 5 Blue dice, improving your odds to 76% (1 - [0.75*0.75*0.75*0.75*0.75]).
  • As above, this bonus applies to your second attack too.
  • If your opponent has an evade, you have a much better change of rolling at least 2 critical dice!
  • Furthermore still, you have the ability to convert Red dice to Blue/Black dice to potentially be able to trigger critical effects at long range.

Other notable upgrades follow;

  • Leading Shots; now being able to trigger long range re-rolls.
  • SW-7 means you can change 2 Red Dice to 2 Blue for guaranteed 2.0 damage (damage boost of 0.5). Notably this is the same expected damage as changing to a Black, but you do gain higher accuracy generation and therefore flexibility.
  • Ordnance experts only re-rolls Black dice. Changing 2 Red dice to 2 re-roll-able Black dice yields a 1.0 damage boost ([1.25 - 0.75] *2). Don'f forget the second attack to double this. That means a double arc'ing MC30 with concentrate fire and Spinal Armament rolls 10 Black dice at 1.25 expected damage each.
  • Caitken and Shollan only re-roll dice of 1 colour type, Sato helps unify your dice pool to one colour.
  • Wide area barrage scales with more Black dice. The above MC30 can do stupidly high damage under ideal conditions.
  • Spinal Armament/Enhanced armament may add a second red dice that you may change to Blue/Black that you otherwise wouldn't get. For example on Command Cruiser MC80 and Scout MC30's front arc (and rear).

Back to your list;

3. Slaved turrets is anti-synergistic

  • If you are halving your number of attacks, you are halving Sato's potential.
  • The sad irony of the Sato Slaved CR90A is that non-Sato Turbolaser reroute circuits out-damages it.
  • Turbolaser reroute circuits don't go well with Sato. If you want CR90s, leave then un-upgraded.
  • I could agree with Slaved turrets on a Hammerhead as their side attack is rather poor, the ship is cheap enough to fit more in a list to compensate, and they have access to re-rolls. Specifically Ordnance experts, or better still Task Force Organa (due to cheapness).

4. Too many upgrades;

  • Lando on CR90: if the CR90 is facing a large enough dice pool to justify Lando, it is probably going to die. Maybe for a flagship CR90 for some extra resilience.
  • Blissex on CR90: CR90s generally don't chew through their defense tokens. You have a spare evade, and don't even have Turbolaser reroute circuits to increase your demand on the evades.
  • Electronic counter measures on CR90: As above, you have redundant evades, which also lose effectiveness at Medium range, where your opponent will more likely be getting double accuracy. Therefore this is only useful to ensure that redirect, which I am not sure is worth 7 points.
  • Fighter Coordination     Team  on CR90: Too expensive for too little effect. Just invest in some faster squadrons instead.
  • Expanded Hanger Bays with only 5 Headhunters: You'll probably only use this upgrade once. Even if you are spamming squadron dials, as soon a one Headhunter dies, you literally have no use for the extra squadron point.
  • Weapons Liaison: is fine I guess, but you have no token generation on your list, thus it's pretty inefficient.
  • Home One: Other lists make better use out of this upgrade. A great use of Home One is when you are throwing several Red dice, which have a fair chance of rolling a black, which Home One changes to something at least useful. You may sometimes elect to change a Red (or Blue) damage result to an accuracy, but generally that is under more specific circumstances (flotilla hunting for example). With Sato, I'd expect you'd be actively reducing your Red dice pools and increasing Black dice. Less Red dice means less Red blanks. Black dice don't have accuracy sides, thus con't use Home One.

5. General tips;

  • Objectives are fine. A bid of 9 actually is pretty average IMO if specifically wanting to go 1st or last. Thus don't rely on winning your bid if that is the case.
  • A flotilla is almost always worth the points when providing tokens to big ships.
  • Tycho is nearly mandatory, YT-1300s are good for not dying, but slower to get into the action. Han is nice if you have to points. Combine all 3 into the list and you have Tycho for activating Sato early, Han for flexibility and YT-1300s to stick around mid-late game.
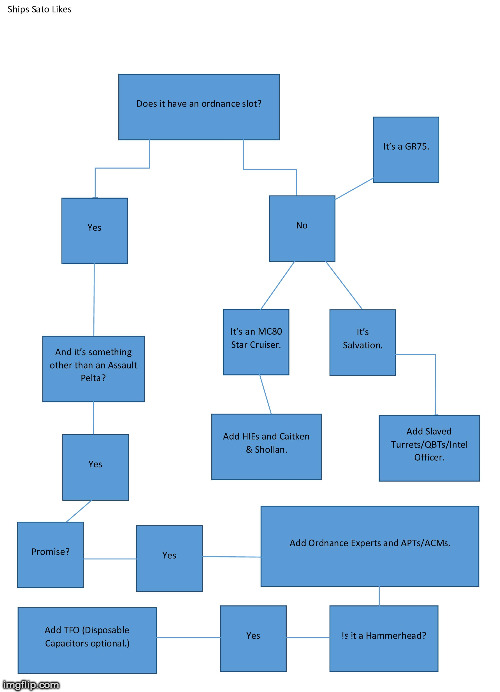
  • Sato likes MC75s, MC30s and Hammerheads above other ships.

I didn't understand any of that math, but I think I get what you're saying. Thanks!

TLDR: you need to cut off upgrades like ECMs on cr90s, trade dice for black dice. Then, with black dice, use crit effects. Your fighter screen will get obliterated, so fix it with Tycho and shara bey. Also you need to think about how these ships complement sato. I’ll save you the time. To be blunt, they don’t. I would much more recommend using hammerheads and nebulons, especially salvation.

Good luck!

Sorry it's so grainy, one day I'll find a better way to do this.

2nltuh.jpg

On 11/28/2018 at 2:25 AM, The Jabbawookie said:

Sorry it's so grainy, one day I'll find a better way to do this.

Use Microsoft Word flow charts and then copy and paste special as a picture.