29 minutes ago, Hawkstrike said:vee (inverted wedge)
Vee/Vic IS “wedge formation.” An inverted Vic/Vee is called Inverted Vic/Vee
29 minutes ago, Hawkstrike said:vee (inverted wedge)
Vee/Vic IS “wedge formation.” An inverted Vic/Vee is called Inverted Vic/Vee
1 hour ago, Hawkstrike said:Wedge, actually (though in my units we often referred to what is shown as a "heavy right" wedge vs a "heavy left" wedge, but those two terms are not in the doctrine).
Echelon right is:
X
X
X
X
Some real formations can work in X-wing, but there are two problems with X-wing mechanics that make real world formations less effective:
(1) Initiative movement. Leaders go to the front of most of our real world tactical formations, but initiative rules in X-wing has you move the leader last and if you want to minimize the risk of collisions you put the leader at the back. This makes box, diamond, or vee (inverted wedge) formations work better for X-wing.
(2) Ships don't obstruct each other's fire or sensor view. The reason real world formations like the wedge are so effective is that every element of the formation has a large field of fire with minimal risk of being obstructed by a platoon- or wing-mate, and often while maintaining 360 degree security. In X-wing that's irrelevant.
I stand corrected. ![]()
5 hours ago, Ambaryerno said:Vee/Vic IS “wedge formation.” An inverted Vic/Vee is called Inverted Vic/Vee
Not in the armor community. In the armor community this is a wedge:
1
2 4
3
and this is a Vee:
2 3
1 4
Ok, here's my first set of new diagrams, showing the Beam Defense Formation updated with X-wing's range marker.

The first is showing combat spread at Range 2.

Here is combat spread at Range 3.

And finally, here is combat spread at Range 1.
Obviously, each of the three has significant differences in how much the fields of fire overlap, with Range 1 creating the largest "Kill Zone" and Range 3 the smallest. Range 1 would certainly facilitate greater alpha potential against a single target, especially if you have two high-Initiative pilots against a lower-Initiative target. However Range 3 would allow the formation to create a larger field of fire overall, perhaps drawing in more targets.
So the next question is, how would the formation be affected defensively?
Edited by AmbaryernoHere's a quick look at how the three distances can affect the combat spread from a defensive perspective:

The first is at Range 3.

Second, at Range 2.

And finally, at Range 1.
Once again, the spread has a quite significant effect. In this case, the closer the formation is, the easier it would be for a single opponent to keep both ships in its field of fire. This is actually going to be quite important later on when it comes to maneuvering the formation defensively.
That's also just a quick survey. We'll also need to see about actually maneuvering.
Edited by AmbaryernoNow, let's look at one of our major navigation maneuvers, the Tac Turn.
As I noted earlier, the Tac turn is a 90 degree change of heading. During a Tac, the outside ship begins its turn first to the inside of the formation. The inside ship then follows. When executed properly, the formation should be heading at a right angle to its original line of flight while maintaining distance. So let's see how range in X-Wing will affect the Tac Turn.
In the following examples, Red One begins on the left, Red Two begins on the right.

In this first example at Range 1, the player intends to make a 2 Turn to the right. Red One begins it's turn, only to run into a problem: We have an overlap! If Red Two makes a 2 Straight maneuver, he'll bump his wingman. The bump will occur no matter which ship has higher initiative.

So, let's try again. This time, the Red Two executes a 3-straight. This allows him to clear his wingman and avoid a bump. On the next turn, Red Two now executes a 2 Turn, while Red One completes his movement with a 2 Straight. However we now have another problem: Red Two is trailing his leader slightly, and is too far from Red One. He could correct with a Barrel Roll inside and forward, but this will now put him too close.

So let's look at another alternative to avoiding the bump: This time, Red One executes a 3 Turn, and Red Two a 3 Straight. They clear successfully without bumping. Red Two then follows with a 3 Turn, and Red One executes a 1 Straight. As before, Red Two is now too far from Red One, and this time slightly forward. Once again, he could reposition to the inside, but that will then put him too close.
We've got one more thing we can try at Range 1:

In this example, Red One executes a 3 Turn, and Red Two a 3 Straight as before. However Red Two then follows with a 2 Turn, and Red One a 1 Straight. Red Two is trailing slightly behind, and is just a little further away, but otherwise fairly close.
That's quite a lot of trouble to make one turn, right? So what about Range 2 and 3?

Turning at Range 2 is frankly no problem at all. There's no longer a risk of bumping, and with each ship executing a 2 Turn they end up quite close to their original spread, with Red Two only slightly behind.

A Range 3 spread introduces a new problem: The ships are far enough away from one another that you need an extra turn to regain your formation after both ships complete their maneuver.
Now another consideration with the Tac Turn is that you can take advantage of the problems I noted in the Range 1 examples to adjust your spread on the fly; adjusting Red Two's initial straight maneuver, or either of the turns, can allow you to tighten or loosen up as desired during the turn.
Edited by AmbaryernoHrm.. Looks interesting, though I'm having an issue translating it over to the Kihraxz:
| 4 | ||||||||
| 3 | ||||||||
| 2 | ||||||||
| 1 |
Grrr… The dial didn't copy over...
Lets try this:
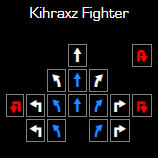
The Khiraxz is an interesting ship to fly as a mob - it's one of the only medium-weight ships (3 attacks and enough health to be functionally immune to one-hit-kills from any attacker) you can field in a mob of 5.
Its dial isn't amazing for flying in a swarm, but it's not bad.
Ultimately, your 'threat zone' is the arc-of-fire 'cones', and your tactics need to cover a balance between:
Echelon is a good case in point. IF you have a big enough 'gap' then it's a worthwhile formation to consider a heavy swarm dropping into. You have to deploy in a box or line abreast, or some sort of 'starter formation' because your deployment zone isn't very 'deep'
Imagine deploying 5 Khiraxz against your left board edge:
K_K_K
__K_K
A sequential acceleration - outer ship doing [á4], then the next two [á3] and finally, the last [á2] gives a formation:
K
__K
__K_K
_____K
which gives a nice 'leading edge' at a 45' angle for you to bank in and engage with everyone more or less at the same range of a target.
Choosing to split into two groups - the Thatch Weave as mentioned is a thing, but it's best with stuff like wookie gunships, which lack 180' "end-around" moves, because they must have a plan for one wingman shooting a trailer off a second; someone on your tail for any prolonged period of time is a death sentence. It's not bad with less manoeuvrable ships too. I'd agree range 1-2 is about the right distance (rather than being within range 1 or range 3) - spread out too much and it risks someone coming into range of one unit and not the others.
Splitting up is especially useful against manoeuvrable opponents. The key there tends to be in coming in at different angles. My striker swarm tends to try and do this - spread out and come in not in a line but in a firing 'arc', such that the centre of the 'pocket' is covered from multiple different directions, and boosting or rolling out of arc on one side tends to put you into range 1 on another.
One last thing is 'dragnet' deployment. When you're facing someone fast and squirrelly (Dash, Miranda, etc) it's often worth breaking up your formation outside mutual support range. This is relevant to ensure that when your formation closes on the target, someone is coming in from ahead and someone from behind. If your squad ends up entirely chasing an opponent where they can take potshots backward with a turret and keep the range open, it's going to end badly for you, because heavy swarms thrive on massed close range fire where 5 ships generate 5 bonus red dice for their separate offensive bonuses
Losing the 1 Straight and 3 Turn is also going to cause some problems with maneuvers like the Tac Turn. And it goes without saying that these formations and tactics are going to work best if both wingmen are the same type of ship (IE 2 X-wings or 2 Y-wings, etc.)
As for distance, I think Range 1 is going to be too close of a formation for anything but maximizing your alpha potential. We've already seen in the Tac Turn that it presents crowding problems when maneuvering, and as I get into the other maneuvers we're probably going to see it get even worse.
I have nothing interesting to contribute, but I had to give this thread a shout out. This is great reading.
problem with using real world tactics is this:

The reason Xwing Tactics is to fly in a tight box/pinwheel formation is to fit between asteroids that are guaranteed to be range 1 apart.
Great thread, and really interesting @Ambaryerno
As you and others mentioned, taking inspiration from air combat has some problems. The same had to be said for tanks/mechanized land forces because their formations largely work with efficient assignment of firing sectors - which is the opposite of what we want in xwing. Plus they really have to take care not to be in each others way.
Has anyone looked into navies and how their ships fought? It is the branch that I personally know least about. Crossing the T is an obvious one that might work with mobile arcs, but otherwise?
And a general question: Even if a Thach weave works - wouldn't the opponent ship ignore you unless your trailing ship has much more firepower? And if it does, why is it in the back? The same problem and questions arise IMO for the defensive beam.
26 minutes ago, GreenDragoon said:And a general question: Even if a Thach weave works - wouldn't the opponent ship ignore you unless your trailing ship has much more firepower? And if it does, why is it in the back? The same problem and questions arise IMO for the defensive beam.
I covered this briefly in my last post, but this is something that would work best with pairs of like fighters, IE two X-wings.
38 minutes ago, wurms said:problem with using real world tactics is this:
The reason Xwing Tactics is to fly in a tight box/pinwheel formation is to fit between asteroids that are guaranteed to be range 1 apart.
I've already laid the groundwork for addressing this, starting with the fact that for maneuvering purposes Range 1 is much too close. I'll be looking at obstacles as well.
Perhaps this type of maneuvering would work okay for a pair or quad of k-wings. The overlapping arcs could be positioned to cover each other's range 1 forward gap (because I'm assuming Barrage Rockets). I suppose same thought might apply to the gunboats- both ships without a k-turn or s-loop.
We've looked at the Tac Turn and how this can be used to turn the formation 90 degrees while maintaining spacing. So now let's look at how to turn with the bank.

We'll begin at Range 1. In this example, we have both ships executing the bank at the same speed. If you start in Beam Defense and bank both ships at the same speed, you'll notice two things:
* The outside ship in the turn ends up stepped back by 45 degrees.
* Both ships end up much closer together.
This isn't really a problem that can be fixed with a repositioning move; you can't move far enough forward, and it will put the outside wingman too far to the outside. Now, this result will still be useful later, but let's move on.

In this example, the outside ship in the turn is using a 2 Bank. As you can see our spacing is better, and the trailing ship isn't stepped as far back, but we're still not quite right.

Much better! the outside fighter is a TOUCH closer than our starting spread, but still tolerable. We're also no longer stepped back.
The important factor when making a banked turn and keeping the formation is to make sure the outside ship is making a faster turn than the inside ship. Let's look at this at Range 2 and 3.

Surprisingly, Range 1 is probably the easiest time to use a banked turn, since it can be done in one maneuver. As we see here, in order to maintain position from Range 2 we need to follow up the bank with a straight maneuver.

And the case is much the same here: The formation must execute a second maneuver after the turn to maintain the Beam formation.
Next up: What to do if your formation is out of whack!
An important point when considering formations: with the exception of range limited abilities (Biggs, Selfless, etc) your strategy should always be to mass arcs, not ships.
You're rally maneuvering a firing arc. You want all your arcs to converge on a target to mass fire. But you don't want all your ships in a mass because that means your opponent has an easier time maintaining focus of fire.
This is the advantage of a well-spaced beam formation -- if you can get your opponent to select one of widely spaced ships, you can converge your formation to mass your fires without your opponent being able to do the same. The critical points in the dogfight then become the point of commitment (he who telegraphs their commitment first loses) and the merge (because he who can get past their merge and more quickly mass their guns on the priority target wins).
I flew my Saber Flight (Fel w/swarm, shield, hull plus 3 Sabers w swarm) tonight and used the wedge formation. I kinda screwed up - putting Fel up front, as it should be, but meant to put him in back to make up for initiative based movement. It messed things up from the get-go, but I was able to quickly correct with some boosts and some boost restraint. This put me in a better formation for later, but messed with my closure rate. I kept my 4 ships in pairs, with the left end of my wedge breaking into the enemy and my lead element following behind. Swarm tactics with Fel meant I was shooting first in all cases, as long as I maintained rng 1, which I did throughout. Fel's element consistently trailed the other element, which meant I nearly always had some, if not all, guns on target. All in all, the real world tactics worked with agile, but fragile ships.
I actually lost the game, but not by much - we called it, as I had to go, but we'd gone over standard time anyway. It was down to points and some great green dice from my opponent saved the day for him on the last turn (I had Boba pegged for dropping to half points which would have put me on top, but alas, dice are the true enemy). I was able to put pressure on the enemy and make them pay for facing me as guns were always covering. This is especially telling considering what I was facing: Boba with the usual Han gunner, Marauder, perceptive copilot, Lando Falcon with Dengar, 000, Trick Shot, Shield Upgrade and a Gunrunner. I really should have smoked the Gunrunner early - he caused problems throughout. I forgot about target priority for a while. Oops.
Overall, a great game and proved that you CAN use real world tactics.
locally, we've found that infantry battle lines work really well, especially with a swarm.
I like what's going into this thread, but I caution against making much out of formation shifts that require 2+ turns to get where you want to go. So much can change in one turn that the part of a formation that really matters is how it can shift in a single turn of movement.
It's one of the reasons that I like Interceptors for loose formations so much. Autothrusters gives so much movement flexibility that a single turn can dramatically shift a formation both in direction and location. They're also cheap so you can get a weight of useful firing arcs.
2 minutes ago, Biophysical said:I like what's going into this thread, but I caution against making much out of formation shifts that require 2+ turns to get where you want to go. So much can change in one turn that the part of a formation that really matters is how it can shift in a single turn of movement.
It's one of the reasons that I like Interceptors for loose formations so much. Autothrusters gives so much movement flexibility that a single turn can dramatically shift a formation both in direction and location. They're also cheap so you can get a weight of useful firing arcs.
Interceptors are fantastic in this regard. Super interested to see how the Silencer prices out, got my three big ol' death demons that I'm itching to put back on the table together!
2 minutes ago, Biophysical said:I like what's going into this thread, but I caution against making much out of formation shifts that require 2+ turns to get where you want to go. So much can change in one turn that the part of a formation that really matters is how it can shift in a single turn of movement.
It's one of the reasons that I like Interceptors for loose formations so much. Autothrusters gives so much movement flexibility that a single turn can dramatically shift a formation both in direction and location. They're also cheap so you can get a weight of useful firing arcs.
All aboard the GUNBOAT!!!!!!
My opponent will be so amazewowed by my sweet formation tricks that he will forget to shoot at me.
3 hours ago, Biophysical said:I like what's going into this thread, but I caution against making much out of formation shifts that require 2+ turns to get where you want to go. So much can change in one turn that the part of a formation that really matters is how it can shift in a single turn of movement.
It's one of the reasons that I like Interceptors for loose formations so much. Autothrusters gives so much movement flexibility that a single turn can dramatically shift a formation both in direction and location. They're also cheap so you can get a weight of useful firing arcs.
Only my opening moves used a 2 turn set-up in my sample game. My turn 0 played a large part as well, setting up as many large rocks as possible on the enemy end of the board to disrupt his initial movement and set up kill zones for my squints. I found squints had several advantages (A-wings would have the same): speed, especially having a blue 4 (A-wing has a blue 5!), double reposition (used a few times) and focus+boost was massively important for outmaneuvering my opponent and either hitting hard or staying alive. I kept them pretty tight, but I'm used to flying them that way. I was also maximizing Swarm Tactics so keeping all my ships within range 1 was key (everyone was shooting at IN6 - probably would have been far more devastating versus small based ships).
Basically, flying squints in pairs is like flying one large based ship that throws 6 dice (or 8 dice at range 1). This is the one way that squints are far superior to A-wings. One thing also worth mentioning was that once I engaged, I was constantly thinking 2 moves ahead, but making certain my next move was still effective. This was actually easier using the initial wedge formation and maintaining lead and follow elements. Those roles made planning almost simple.
23 hours ago, Ambaryerno said:I covered this briefly in my last post, but this is something that would work best with pairs of like fighters, IE two X-wings.
Sorry, I was unclear.
My point is that the tailing ship needs to be more threatening to the opponent than the opponent is to the leading ship. He has to care more about saving himself than about trying to destroy the leading ship. In actual aircombat that is quite quickly the case, but not in Xwing.
If e.g. Luke in an Xwing is the opponent and you have two xwings yourself in a defensive beam, then he should stay right in there and not really care about the formation.
So the only time when a defensive beam actually works as far as I understand it is when you can catch a rather fragile ace in between offensively strong ships. For example Soontir between two Xwings.
43 minutes ago, GreenDragoon said:So the only time when a defensive beam actually works as far as I understand it is when you can catch a rather fragile ace in between offensively strong ships. For example Soontir between two Xwings.
Considering Thach developed Beam Defense to answer the problem of F4F Wildcats dealing with the more agile but fragile Zero... 😉
This is just one particular set of tactics centering around one particular formation.
1 hour ago, Bad Idea Comics said:Only my opening moves used a 2 turn set-up in my sample game.
Trust me that I'm already thinking a turn or two (ba-dum) ahead on this. The tac turn definitely isn't a maneuver you would use in active combat but as part of your opening maneuvering.
3 hours ago, Ambaryerno said:Considering Thach developed Beam Defense to answer the problem of F4F Wildcats dealing with the more agile but fragile Zero... 😉
This is just one particular set of tactics centering around one particular formation.
Huh, cool. Today I learned something, thanks!