So I've played a lot of air-combat simulators, especially Aces High (my handle was Saxman for any other AHers out there). A lot of real-world air-combat tactics find their way into those games for obvious reasons (because they work, and because there's more than a few real-world pilots who play). So I was thinking: Can some of the real-life tactics actually work in the game?
Obviously, there's a number of departures from real-world combat in X-Wing even before you account for the differences between air combat and space combat:
1) The Initiative system
2) Abstraction of complex maneuvering
3) Lack of altitude, etc. meaning all combat occurs on one plane
BUT I was curious if certain elements, particularly wing-pair tactics, could be translated (don't mind the art, I made these graphics a while back for Aces High).
For example:
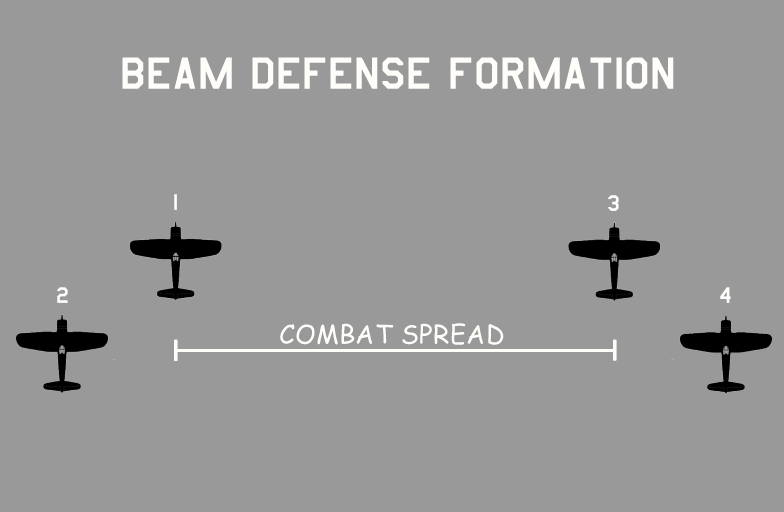
It starts with the formation called the Beam Defense Formation. Now, this example shows it with a four-ship flight, but it can also be done with two (simply shift craft #2 into the #3 spot). The idea is that if an enemy attacks either end of the formation from behind, the unengaged party can turn in and put the attacker under their guns (more on that in a bit). Additionally, it provides mutually supporting fire for any target in front of the formation. As the formation allows for less individual maneuverability, it would most benefit craft that are tougher, but less maneuverable.
I would say that combat spread in X-Wing should be at Range 2. Range 1 would be too close, as turning to counter an attack from behind might risk putting you at Range 0 and preventing you from getting a shot. Range 3 may be too far may be unwieldy depending on the layout of the obstacles. Beyond Range 3 the attacker may be out of range.
A paired Beam Defense would most likely benefit pilots with good self-benefitting abilities, such as Wedge. In a four-ship formation, you would want those individual pilots in the the #1 and #3 positions. Whereas a support pilot like Biggs or Gavin would work well in the 2 and 4 slots (put these guys within Range 1, stepped back and to the outside like in this diagram here). That way they can provide support for their section leader.
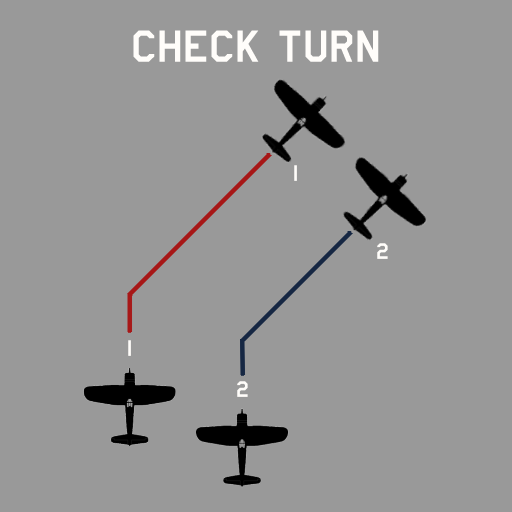
The Check Turn is a formation-keeping maneuver, usually performed if one pilot is lagging behind. Simply have both pilots perform the same bank maneuver in the direction of the trailing pilot (if the pilot on the right is stepped back, then execute a bank to the right). This could also be done if both ships are in the proper formation by having the inside pilot execute a shorter turn (say to bank right, the inside pilot makes a 1-speed bank, while the outside pilot makes a 2-speed bank).
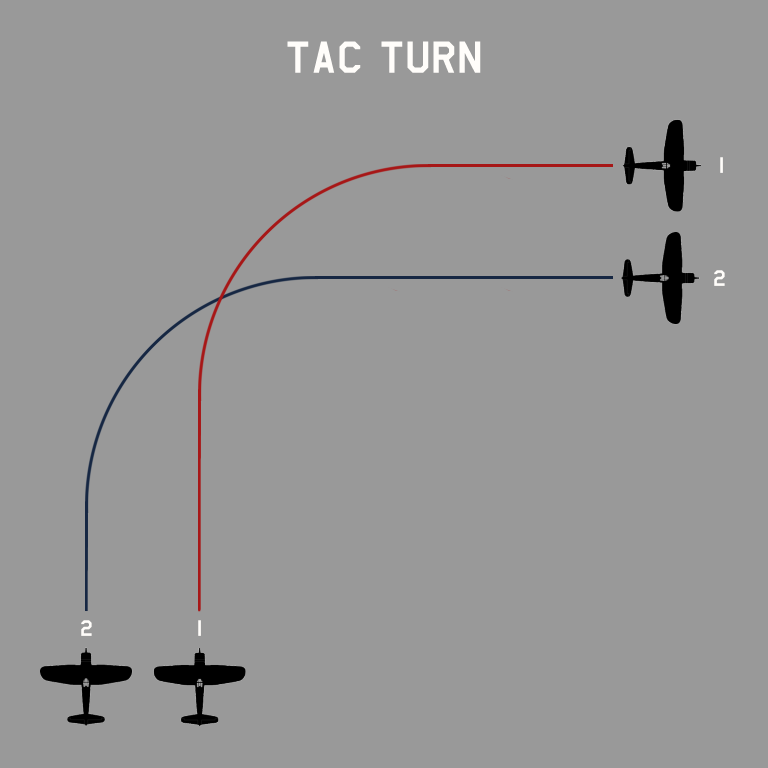
The Tac Turn is another method of turning and keeping formation. This one would be a bit more complicated as it would have to be carried out in two movement phases:
* In Phase 1, the outside pilot executes a Turn at a given speed (say, Speed 2). The inside pilot performs a straight maneuver of the same speed.
* In Phase 2, the outside pilot performs a straight maneuver of 1 speed HIGHER than his turn (so in this case, Speed 3). The inside pilot then performs a turn of the original speed (Speed 2).
This SHOULD end with both ships still in Beam Defense Formation.

Now here's how the Beam Defense actually works. It's called the Defensive Break:
Let's say you have an enemy approaching from astern. You determine which of the ships in the formation he intends to attack, and then both ships execute a full turn of the same speed and same direction. What you should end up with if you predict opponent intent correctly, is both of your ships at the same distance in Line Astern, with the bandit caught under the guns of the second ship. Once the phase ends, you can use a second turn to return to your Beam formation.
There's quite a few other means of maneuvering a formation, that I won't bring into this thread, but I'm curious what you all think. Could this approach actually work in the game?
Edited by Ambaryerno