UK Nationals 2018 Champion report

By Vae, in Star Wars: Armada Battle Reports

First of all if one of my opponents is missing a Contested Outpost objective card (Lee?) I think I have it as I just found a second one while looking through my objective cards and trying to jog my memory for objectives. So get in touch and I can return it.

As I would be interested in reading this type of report from the other side I felt kind of obligated to write this. Apologies in advance as it has turned out to be rather lengthy!

TLDR – I was lucky and the Armada community and meta is great!

Faction: Galactic Empire
Points: 394/400

Commander: Admiral Motti

Assault Objective: Most Wanted
Defense Objective: Contested Outpost
Navigation Objective: Solar Corona

Imperial II-Class Star Destroyer (120 points)
- Strategic Adviser ( 4 points)
- Gunnery Team ( 7 points)
- Quad Laser Turrets ( 5 points)
- Early Warning System ( 7 points)
- X17 Turbolasers ( 6 points)
- Leading Shots ( 4 points)
= 153 total ship cost

[ flagship ] Imperial II-Class Star Destroyer (120 points)
- Admiral Motti ( 24 points)
- Agent Kallus ( 3 points)
- Gunnery Team ( 7 points)
- Quad Laser Turrets ( 5 points)
- Early Warning System ( 7 points)
- X17 Turbolasers ( 6 points)
- Leading Shots ( 4 points)
= 176 total ship cost

Gozanti-class Cruisers (23 points)
- Comms Net ( 2 points)
= 25 total ship cost

Gozanti-class Cruisers (23 points)
- Comms Net ( 2 points)
= 25 total ship cost

1 "Mauler" Mithel ( 15 points)
= 15 total squadron cost

The 6 point bid is very low given the current bids in the UK/Europe (and I entirely lay the blame for this on Marcus ( @Lord Preyer )) and was only really there to give me the choice over those players close to 400 (and also because I had all the upgrades I really wanted (I could have added a title for an ISD I guess). The objectives are fairly standard: Most Wanted won’t be picked. Solar Corona is probably the best blue choice for me (Dangerous Territory being the only other feasible choice) and gets me the deployment advantage to be able to use speed 3 on the ISD’s to hopefully sideline some of my opponents ships and so opponents likely won’t pick it so I fully expected to play Contested Outpost most of the day (which I did).

I’ve been playing Armada for about 2.5 years. I’ve won 1 or 2 store championships and a couple of kits then in March won the Dark Sphere regional in London running a small variant to @Ginkapo ’s Pryce Avenger/Vader Devastator Cymoon list (ironically beating him in round 3 as I had the bid). I placed 14 th at UK Nationals last year running a high activation Dodonna Defiance list. I mainly play at Eagle gaming in Wandsworth (with a very friendly bunch - regularly @Lord Preyer , @AdmiralRyan , @TheCallum , @SmurfWedge (now in South Africa), Sam – who I played in the cut – and a few others).

Prior to this years Nationals I’ve only played a few times (4 games since the regional) so planned to use Dark Sphere’s store championship last weekend as practice. I usually have more of a preference for MC30 MSU’s but I think that large ships are much better for tournaments than an MSU as you don’t give away points so easily (especially in a world with Cymoons) and they aren’t anywhere near as stressful to play which can make a huge difference when you have up to 5 games in a day. You can read about my disastrous experience with Triple Cymoons vs squadrons in the Triple Cymoon thread so I had a hefty fear of squadrons heading into this years nationals which influenced my list choice. With no more practice available I decided it was safer to revert to a previous tournament list which I knew how to fly rather than trying out a new one. I narrowed it down to either the list I took to regionals or, my eventual choice, a list I ran at London Masters last year (which itself is a small variant on one run by @TheCallum in wave 3/4).

My reasoning for this pick was purely that it is good vs squadrons (great decision considering I fought no squadrons until the cut!) and can use incremental attrition damage (2 Blue flak from each ISD with leading shots, Kallus, QLT, and then Mauler for 1 splash also with black flak from the transports) to either kill squadrons or force them to run away while at the same time using Gunnery Teams to attack the carriers. Rikki Porter can vouch to this as the QLT (especially) caught him and his last year Nationals winning Yavaris list by surprise at last years London Masters in round 1. Since then EWS has been released to also help me control the engagement area for squadrons. The more recent flotilla nerf has also helped vs carrier lists making it easier to table them.

I’ll try and give a run down of each game but forgive me if I’ve forgotten some details or got them wrong – It was a long tough day! I took very few pics as I kept forgetting and wasn’t planning any write up!

Edited by Vae
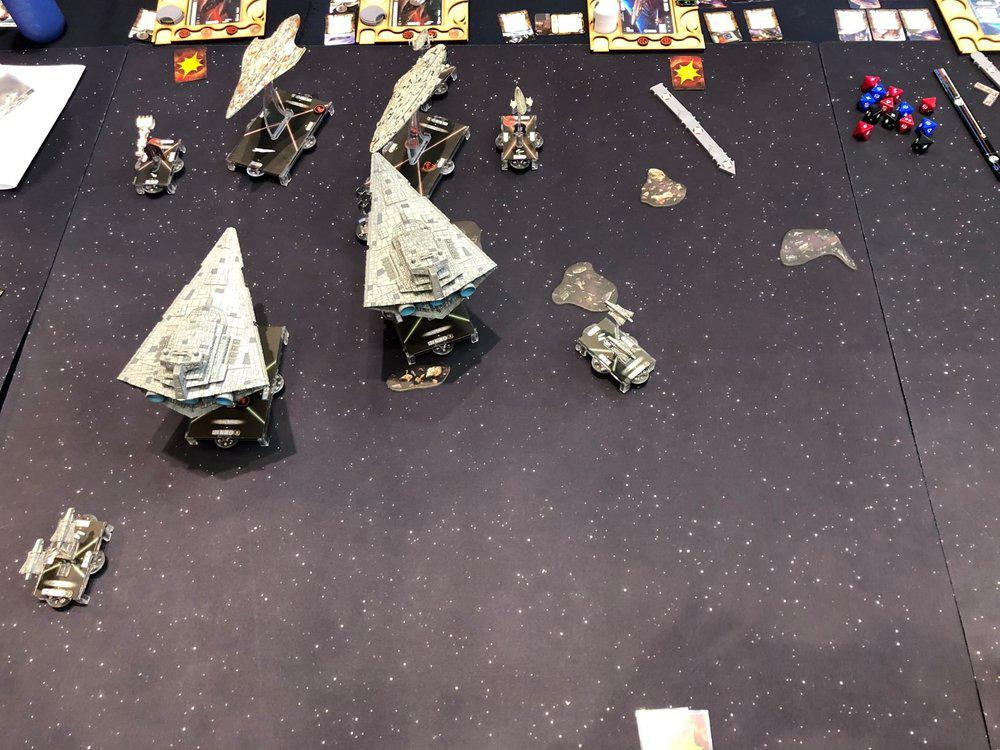
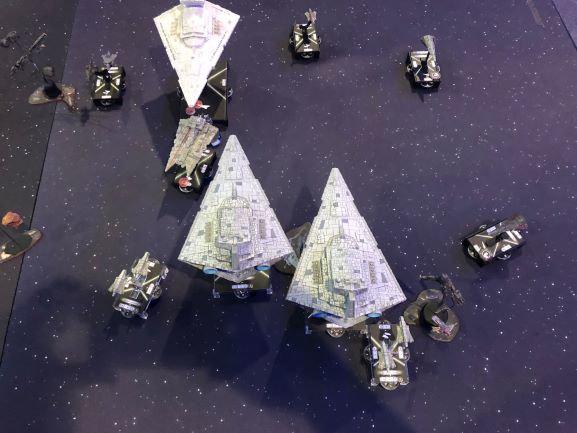
Round 1 – Regional bye –I did play a warm up game vs Alistair though who had the odd number player bye (and is also a sometime Eagle player). He had a Dodonna MC80A, a MC80BC, CR90 (with projection experts and Leia), GR75. (As an aside about the great Armada community he had forgotten his Liberty baseplate and was expecting to cobble together a reserve fleet but found someone able to lend him one). This practice didn’t go too well for me (EWS is not as good as ECM vs large ships!) so didn’t bode well for the day. I think I lost the non flagship ISD and couldn’t quite finish off either of his large ships.

Edited by Vae

Round 2 – Lee Wotton flying a very similar list to my round 1 practice game: Dodonna MC80A, MC80BC, CR90, 2 GR75. The practice match came in handy as I was better prepared. This is the match I remember least about (due to it being earlier in the day) but I believe I took first player as I couldn’t allow him to first-last me and I think we played his Contested Outpost. We set up more or less opposite each other and I was counting on gunnery teams making the difference in the fight between our large ships although he had ECM on the MC80A which I didn’t. I remember catching his Corvette with a front arc of my left most ISD but not with enough damage to 1 shot it. I was able to finish it with a side shot on the next turn though while blocking both his large ships with mine and then gunnery teaming them to death. My non flagship was on very low hull but I had queued up repair commands from about turn 3 or 4 onwards which helped it survive and get me the table for a 10-1.

<Edit - I remembered that I sped my right hand transport up to speed 3 and jumped in front of his transport thereby making sure that I kept getting the tokens for control of the station and denying them to Lee. The transports rammed each other and, after the liberty died, I was able to kill the rebel transport with the ISD's spare gunnery team shot to ensure both transports didn't die from ramming each other and mine was able to fly away>

Round 2.JPG

Edited by Vae

Round 3 – Tom MacArthur ( @Dreadnowt ) with a 6 (+SA) activation Jejerrod Kuat BTA, Demo, 2 Raider1, 2 Gozanti list. He had the bid with 389 points so we played my Contested Outpost. With first activation and the last 2 activations after me there was only one way this match was going to go and all I could try to do was limit the damage. I was resigned to losing 1 ISD so would aim to keep the flagship alive and see if I could catch a couple of raiders or Gozantis by forking them while hopefully claiming more contested outpost tokens than Tom. I set up contested outpost on the centre right, distance 5 from my board edge so that I could get it turn 1 by going speed 1. He kept out of red range. I sped my left non-flagship ISD up to 2 to try to make it the target (and hopefully run away at speed 3 if it lived). He hit it with a first/last Demo which, unsurprisingly, hurt. I had also sped up the Gozanti to its left to speed 3 with the aim of using it as a blocker vs the Kuat. I was able to get it in the way of the Kuat and then rammed it with my non-flagship ISD to keep it out of close range of the Kuat. The Gozanti made the Kuat’s attack approach more difficult but, with Jejerrod and a Nav, he was able to leap over the Gozanti and land precisely between it and his own Gozanti while still double-arcing me. The Kuat BTA activated first on the next turn and did just enough damage to kill my ISD otherwise I would have had a chance to fly away. Most likely he would have been able to commit a Raider (which was hanging back) to finish it with a first/last, however that would have meant coming through the front of my flagship ISD so I might have had a chance. I managed to kill a Gozanti and hurt a raider enough for it to run away from me but that was it. The score came in at a high 4-7. Tom was a friendly fun guy from the Scottish contingent who was driving back to Edinburgh overnight so we had a good game despite the inevitability of the result.

Round 3a.JPG

Edited by Vae

Round 4 (The first of 2 very tight tough games which could have gone either way) - Callum Buchanen with Ackbar Twin MC80A (Defiance, Home One), 2 GR75. I had the bid as he was at 400 points. Given his likely objectives (AG, CO, SC – which actually turned out to be Dangerous Territory) and the fact that if he brought the fight to me I would hopefully win due to having Gunnery Teams on my ships, I decided to let him be first player and, following a trend, we played my contested outpost. I didn’t take any pics of this but @Lord Preyer linked me to a twitter post by Callum which has some pictures:

I set up the station as usual at distance 5 and was planning to have 1 ISD come along either side of it and then the Gozantis follow behind them to try and keep control on the later turns (I’d learnt this during the day as opposed to having the Gozanti’s flank the ISD’s and then have my opponent come in behind me to grab tokens for turns 4-6). As I had last deployment I was able to see his full deployment before making the decision for my flagships deployment. As you can see in the pictures he had his Defiance (yellow) pointing diagonally towards my left and Home One (red) heading left to right (from my point of view) to fly behind it. I figured that this deployment would probably mean that I could engage them one at a time so I changed the planned position of my flagship and placed it on my left instead planning to speed up and swing to pin him against the right hand edge of the board if I could (knowing how slippery MC80’s with Engine Techs can be! In hindsight I might have been better deploying it to the right and trying to get in Defiance’s front arc to pin it in place but it would have exposed my flagship more. This kind of worked with my non flagship and Defiance exchanging blue range volleys but again this is where I was regretting up choice of EWS (and facing no squadrons) over ECM as I got to use virtually no braces in this match. He certainly hurt me more than I was able to hurt him despite adding long range fire from my flagship. With the benefit of first player and engine techs Defiance managed to swing past my ISD’s on, I think, 2-3 hull with 1-2 shields and a nasty crit (think it was take damage when changing speed). When he came to do his next move he thought he would fly off the table so dropped speed and lost 1 damage to the crit. I took off 1 hull and 1 shield with a long range side arc and had both Gozanti’s (1 with CF) and Mauler ready to try and do the last couple of damage but had failed to factor in EWS so couldn’t shoot it at all. I did move Mauler to the other side of him and Mauler took hm down to 1 hull but then on the last turn he killed a Gozanti and then dropped to speed 0 to remain on the battlefield.

What happened with Home One led to one of the most bizarre situations I’ve experienced in Armada and caused great hilarity to the observers. My non-flagship ISD was hurting badly and was pretty certain to die so I started looking at options to try and kill Home One with my flagship. The moves available to my flagship meant that I could let Home One go past my front (or intentionally ram me and stay in my side arc only), pin it but again only in my side arc or turn perpendicular to the table edge (at speed 3!) and have a double arc on him but I would then rely on rams to keep me on the table as there was only space to make one speed 1 move without going off the table. I decided to gamble with this last one knowing that I had a nav token and a nav command lined up for turn 5 so could drop to speed 1. However for turn 5 I was going to need to allow him to shoot, ram me and then still be alive through my shooting in order for me to ram him to stay where I was and not go off the table on turn 6.

He started turn 5 by finishing off my other ISD with his side arc and ramming my flagship. I shot with my front arc and ended up with a great roll which he could have allowed to kill him by not using defence tokens and would have resulted in me flying off the table and being tabled while he would have still had Defiance alive. Therefore I had to use leading shots to reroll my die hoping for a worse result and fortunately got a low enough result that he couldn’t kill himself. (@AdmiralRyan sent me a 3 min video of Callum and I going over this dilemma which is quite amusing to watch in hindsight).

Turn 6 he shot me and rammed me dropping himself to 1 hull. For safety I was able to comms net a nav token to the flagship but as he was on 1 hull I destroyed him with the ram instead of shooting therefore staying on the table and not moving.

End result was a 7-4 to me from killing his flagship and getting most of the contested outpost tokens but losing 1 ISD and a Gozanti. It was a very tense tight game but also very enjoyable and Callum was a great opponent.

Edited by Vae

Round 5 – Laurence Evans with Raddus MC80SC, MC75, Cham HH, 2 GR75. He had the bid so we played my contested outpost yet again. I don’t have any photos of this so bear with me. I did the now familiar station at distance 1 centre right to claim it at speed 1 setup. 1 ISD either side of the station with my flagship on the left and the 2 Gozanti’s ready to either follow the ISD’s or come alongside them to be blockers. He kept the MC75 in hyperspace but without the HH in Profundity, presumably to help with deployment and activation count. Instead he deployed 1 transport and the HH slightly to my left and the other transport and Liberty slightly to my right all at speed 2.

Turn 1 we all moved forward, his Liberty went to speed 3 possibly with ET to set up a turn 2 Raddus drop of the MC75.

Turn 2 he deployed the MC75 in front of the Liberty and in close range of my non flagship ISD with a double arc into its right hand side which also gave me a double arc into his side. He then went to activate it as first player until I pointed out that he can’t due to the card text on Raddus. I think the long day had got to him and he also mentioned that he had been activating the HH first all day so had forgotten the restriction. This was potentially a turning point for the game and meant that I shot the MC75 with both arcs before moving forward into just his side arc. This hurt the MC75 which spent the next couple of turns broadsiding me while taking side arcs from my 2 ISD’s and the right hand Gozanti. Even Mauler got in on the action and the MC75 eventually died.

Meanwhile the Liberty opened up on that same ISD and did quite a lot of damage such that I think I fled with it past him and instead turned my flagship to the right to engage the Liberty. His Liberty also turned to face my flagship and jammed itself against me into a slugging match. My dice weren’t very good and neither of us had ECM so the Lib held its own. His HH also got into my rear, used Cham to give me 2 squadron commands rather than repair (!) and got 3 turns of shooting into my rear before my rear arc shots, other Gozanti and Mauler finished it off. Fortunately, his black dice were very poor otherwise it would have ended very differently.

My memory gets a little hazy at this point but I think the slugging match ended when his nav command came up so he could try to leap over me. I believe he had activated the HH first (before it died) and had just taken a structural damage crit from my ISD leaving him on 1 hull so he couldn’t ram me again without dying so had to try for the leap over. If he had had 1 more hull he would have been able to stay in position, ram me and then activate first on the next turn and finish me off as I was only on 2-3 hull myself. Instead the Liberty died (I can’t remember if it was due to ramming me or to a Gozanti shot) for a 10-1 which pushed me from 29 points (I checked and I was on 28 points at the same point last year) and 7 th going into round 5 to 39 points and 1 st .

An incredibly close game that would have ended with a lot closer result if I had lost my flagship and he had kept his. Probably a 7-4 instead.

Edited by Vae

End of Day 1

The final standings at the end of day 1 were:

Top 8: 39,38,37,37,37,36,34,34 showing how close it was at the top. If my final round had been a 7-4 rather than 10-1 I would have probably ended 5 th instead and the final would have been Sam vs Tom McArthur (who actually drove back to Edinburgh after round 5 so not sure what would have happened then!). We agreed with the judge (Liam) that we could start the cut earlier the next day in order to be able to fit in a Capture the Station pod and/or Xwing for Sam.

Finding out that I had made the cut in 1 st was astounding news as my aim had been to better last years position. The news that I was to play Sam in the cut was a pleasant surprise and meant that there was some fraternising with the enemy over a late night curry and beers that night with the other members of Eagle squadron and a couple of other Armada players who joined us – One thing that’s great about the Armada community is how friendly everyone is.

Top 2 Cut – vs Sam Ledwich

As I knew Sam had the bid there was little thinking I could do in advance. I thought it likely that I would be second player given Sam’s activation disadvantage and I was determined that this wouldn’t be one of the very cagey 6-5 finals you read about. That doesn’t make for an interesting game, I don’t think it’s really Armada (I think a top 4 or 8 swiss cut makes more sense) and wouldn’t be something I would do to a mate. To be honest I was happy with my achievement already so would have been just as happy for Sam to be the one who won overall and got to go to Worlds.

I’ve been playing Sam since I began playing Armada and he was one of the first opponents I played (and lost dreadfully against when he demonstrated the power of 6 attack, 4 counter interceptors…). He’s a very strong player, especially when I would consider him to be more of an X-wing player who doesn’t play Armada so often. He won a Regional in 2017 and had a bye into last years Nationals where he finished 6 th which demonstrates his pedigree.

There is a blow by blow account of the game from the reporter on the scene (@TheCallum) in this thread

so I won’t go into the match in much detail other than to add my thoughts. Sam’s list was one I would have been happy to see during the swiss as my anti-fighter upgrades meant that his squadrons didn’t worry me that much. I knew I would take some damage from them but equally would probably be able to make them disengage within a couple of rounds (and demonstrated this late in the game by using flak/counter to get Mauler to 1 health, Morna to 3 and Maarek to 2 when he started to try and take down my flagship after the main engagement). Equally I thought my ISD’s could handle his as I had Gunnery Teams and he didn’t have ECM (unlike virtually every large ship I faced during the swiss)!

Even then the game was closer than it seemed and my flagship took quite a pounding and could have potentially been finished off by his squadrons. We both made a couple of mistakes (he shot the side of my flagship with Morna meaning I could redirect the 3 damage to my front using the shields there, whereas I activated my ISD’s in the wrong order after the Kuat hit which deprived me of an extra rear arc shot on his Kuat which might have killed it earlier and given his squadrons less chance to go after my flagship). I think the game was probably decided at the point when his ISD’s both confronted mine head on at the station as it meant that I was then getting contested outpost tokens. I then proceeded to have 4 great shots from the ISD’s – each with 1-2 accuracies to block the brace and about 7 damage. My dice during the swiss had been rather cold but they became rather hot during this match! I think that even if I had lost my flagship as well as the Gozanti and his Kuat had survived, that the Contested outpost tokens would have given me a very small victory anyway. I would say that it was a very tough match-up for Sam whereas it was probably my ideal match-up.

Conclusion

While my match-ups in the swiss were not ideal (no squadrons at all!) and my dice a bit cool, I still think I had a fair amount of luck during the swiss to end up where I did. In 3 of the games I had an ISD limp away on very little hull but I guess that is the whole point of large ships in a tournament – they gave away no points, which helped make the victories larger than they otherwise would have been.

The Armada meta in the UK appears to be quite varied as evidenced by the admiral distribution on the day. I would also say that I believe there are quite a few better Armada players than myself out there in the UK. There were also some regular Armada players I would have expected to have seen at Nationals who weren’t there and I would guess that there are probably at least 20 or so players who could have been National champion with the right match-ups and a little bit of luck. You combine that with the fact that the Armada community is, in my experience, a very friendly, welcoming and, for the most parts, a relaxed one, and it shows that the state of the game is in a great position. Now if only FFG would give us a little more regular news and releases!

Edited by Vae

Thanks for taking the time to write up this excellent report, and well done on your achievement!

Once again, congratulations James! And thank you for this AAR. You did very well and you don't need to be modest. It takes skill and endurance to survive 5 rounds of swiss and then to preform well in the cut.

Now, beware, as with bounty on your head I'm going to hunt you down during London Masters!

1 hour ago, noggin said:

Once again, congratulations James! And thank you for this AAR. You did very well and you don't need to be modest. It takes skill and endurance to survive 5 rounds of swiss and then to preform well in the cut.

Now, beware, as with bounty on your head I'm going to hunt you down during London Masters!

Not if I get him first :)

13 hours ago, Vae said:

Round 4 (The first of 2 very tight tough games which could have gone either way) - Callum Buchanen with Ackbar Twin MC80A (Defiance, Home One), 2 GR75. I had the bid as he was at 400 points. Given his likely objectives (AG, CO, SC – which actually turned out to be Dangerous Territory) and the fact that if he brought the fight to me I would hopefully win due to having Gunnery Teams on my ships, I decided to let him be first player and, following a trend, we played my contested outpost. I didn’t take any pics of this but @Lord Preyer linked me to a twitter post by Callum which has some pictures:

Great game there, spent the entire time you were contemplating that speed 3 jump ahead of my Home One hoping that you'd play it safe and slow down instead, you'd done a fantastic job of pinning me against the edge of the board and left me nowhere to go.

Beating @Dreadnowt and me back-to-back? Tartan Tuskens are going to be out for revenge now!

Congratulations on winning Nationals, that final looked like a good brutal brawl, none of this measly 6-5 Rieekan Aces nonsense for you guys!