3 minutes ago, cynanbloodbane said:Somebody had to.
Never tell him the odds.
But I can change the odds of survival to 100%.
Forget admiral Fishface and take instead.....
3 minutes ago, cynanbloodbane said:Somebody had to.
Never tell him the odds.
But I can change the odds of survival to 100%.
Forget admiral Fishface and take instead.....
That's not survival, that's just delayed death so you can take them with you!
10 minutes ago, cynanbloodbane said:That's not survival, that's just delayed death so you can take them with you!

1 minute ago, Karneck said:
Well played sir, well played.
I have been runnin an MC 80 Star Cruiser as my Raddus ship and it does hit hard, but in a chase it needs 1st player to really do the work it needs to. Without first player the alternating activation mechanic can allow a slower ship to avoid black and even blue range even if the other ship is much faster. I try and come in at a 90 degree angle out of hyperspace and then turn in hard to pursue, starting in the back arc is harder to manage if the activations start to drop/ things get off tempt.
1 hour ago, cynanbloodbane said:That's not survival, that's just delayed death so you can take them with you!
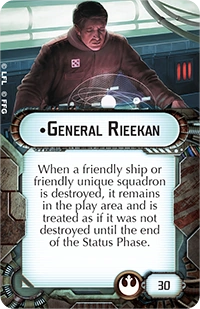
That isn't too dissimilar to an MC75 that has Raddus'ed in and just been thwacked by BT Avenger and only has 2 hull left and all red defence tokens. At least with Rieekan you can keep the odds at 100% even if you took some fighter damage or long-range softening up on a previous turn.
Edited by Mad Cat1 hour ago, Space_Cowboy17 said:I have been runnin an MC 80 Star Cruiser as my Raddus ship and it does hit hard, but in a chase it needs 1st player to really do the work it needs to. Without first player the alternating activation mechanic can allow a slower ship to avoid black and even blue range even if the other ship is much faster. I try and come in at a 90 degree angle out of hyperspace and then turn in hard to pursue, starting in the back arc is harder to manage if the activations start to drop/ things get off tempt.
For the MC80L, I too like the Star Cruiser for head-on and side-on attacks (especially for the more stable dice and lower cost).
However, if you are going to chase as 2nd player, the Battle Cruiser with Caitken & Shollan and Spinals (+Ion/Turbo's to taste) has not disappointed me. I hated losing Gunnery Teams, but once you are safely behind the battle lines, nothing at speed 3 can clear your red range (even without using ETechs). I felt terrible for a newer tournament player that ended up in that situation with me because he was utterly powerless to stop the damage. Also, you can wait on that MC80L activation until it is convenient for you, but they need to move their prey ASAP to avoid the extra blue dice.
For the record, I still like to hyper in to make a crossed-T and turn hard into the pursuit, but it just keeps hitting afterward even when they are speed 3.
Okay, well let's think through this logically. First, BTVenger is going to be a requirement, otherwise you could just ECM brace and live through pretty much anything. From there, you'll want either the Kuat or the ISD1, as they have the best distribution of base dice at 3Red, 2Blue, 3Black, yet as you pointed out, this can be increased via upgrades. The Kuat can add External Racks or Expanded Launchers for extra dice, or APTs for an extra damage, though ER/EL granting 2 extra dice (capable of 4 damage) will outweigh the APTs in deadliness in this situation. The ISD1 could add Spinals, Slaved Turrets, TRC (with Needa), or QLT, but aggain, the best option for raw damage would be spinals, though they fall short compared to the Kuats ER. The Officer and Defensive Retrofit don't add to the potential damage, but the Ion can have Heavy Ion Emplacements, which can effectively be an extra damage via a blue crit.For offensive, the best commander would be Vader, but that would just add consistency to the attack, not increase its potential. Obviously we want a CF dial for an extra die, call it black for reasons. So he's now throwing 3 Red / 2 Blue / 3 + 2 + 1 Black for 11 dice. 9 of them are capable of double damage, and the blue crit can do yet another double damage (though I guess if he didn't have HIE you could just say he could do a face up double damage crit). This means that a perfect roll with do 21 damage, plus the ram for a 22nd. You have a total of 13 health normally, or 15 if we assume aspiration moves 6 shields to the two sides that are in the ISDs front arc.
So he needs to get 11 damage through with his 11 dice (and then rely on the ram for the kill shot). With no modifiers at all, the standard roll averages 9.75 damage. If we add Vader rerolls on blanks and accuracies, that goes up to 12.47 average damage excluding any crit effects. Ouch. But there's a few things you can do to help out. First, you can take the Aspiration title, moving the damage required up to 14. But even then, you're barely hanging on. Thankfully, you can also add Lando. Having him reroll only the "can't get worse" dice drops the average damage down to 10.44, which is mathematically the best case scenario for you. In the way you're showing your setup, you can add EWS to remove a blue die, pulling it down to 9.57 damage. EWS w/o Lando yields 11.53.
So your best case scenario would be Lando, Aspiration, EWS, which would combine to only average 9.57 damage plus a ram for ... call it 12 damage on average (if we assume it's a double damage crit). In return, you can shoot him withe your MC75O equipped with APTs, ER, OE and your own CF dial (if we're going for all out offense) for a 3/0/3 side arc (I figure start with the side so you can spend the ER/CF as needed to get a crit for APT) for 6 damage plus APT, braced to 3, all redirected, and a face up card. Then your front shot of 0/2/5 for 7.75 and an APT, braced down to 4 (burning the brace), redirecting 3 to the side (potentially burning the redirect to do so), doing 1 front shield and a second face up. This is assuming of course that you don't roll accuracies on both attacks (a single attack accuracy would trigger ECMs and not prevent the brace usage), and that he's willing to burn the brace. He actually will likely not burn it, so in a perfect world, you'd be able to get the front shields down and then do another face down card. With the ram, he would have 2 face down and 2 face up cards, leaving him at worst with 5 hull remaining, at best, 7. Though if you're player one, you should be able to go again the following turn first and get another round of shooting... With another CF dial, your 3/0/3 side shot yields 6 damage, braced to 3, and an APT, leaving him at 4 hull remaining, and your front shot deals 5.25, braced down to 3 and an APT for the kill. Note 3 black dice with OE rerolling hits/blanks yields an 82% chance of a crit, so with 3 shots like that, you only have a 55% chance of triggering all 3 APTs (the 4th is pretty much a guarantee with the ER). But if you miss one, you can ram for the final damage. The question becomes if it's worth it. Yes, you can kill his ISD in a one-on-one duel if you're player one and if you set it all up perfectly... but why would you do that to yourself? In reality, he shouldn't have *any* problem killing off the 2 hull or so remaining on your MC75. So as others have said, you'd be better off dropping into his side arc or right outside of close range and not eating so much unnecessary damage. You also hold all risk - if he gets lucky on his dice rolls, he can legitimately kill your 130+pt ship in a single shot. You almost need to get lucky to kill his 160pt ship in 4 shots.