Cannot Get Your Ship Out March 2018

By Snipafist, in Star Wars: Armada

http://cannotgetyourshipout.blogspot.com/2018/03/ordnance-article-overhauled-wide-area.html

The ordnance article has been reworked from the top down, given we have 2 more options now in wave 7 and the old "brackets" system would, over time, become ponderous and unhelpful. I also streamlined it a bit to keep it from getting too long given the extra upgrades. Of relevance to wave 7, I added sections on Ordnance Pods and Wide-Area Barrage:

ordnance-pods.png
...and nine months later, a baby squadron is born!
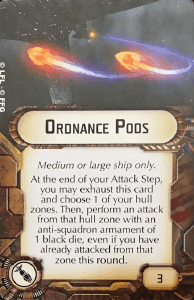
Ordnance Pods

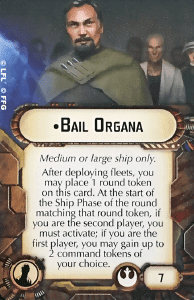
  • Medium or large ships only (yes, I realize it says so right there , but people ask about putting this on Raiders or Peltas way more frequently than I would've thought).
  • Your extra black anti-squadron flak attack is in all respects a regular ol' black die flak attack, which means it can target every enemy squadron in that hull zone and only attacks at close range.
  • Ordnance Pods exhausts to use, so if it's preemptively exhausted, it can't be used.
I really wish I could recommend Ordnance Pods, but it's difficult. The first problem is that similar to Flechette Torpedoes, Ordnance Pods is an anti-squadron upgrade that can be useful in the right situations, but otherwise won't do anything. Unlike Flechette Torpedoes, Ordnance Pods can only go on medium or large ships, which are a large investment and even more risk-averse than smaller, cheaper ships to using upgrades that may or may not be very effective, depending on the matchup. In most cases, even ships that aren't likely to be aggressively using black dice or don't have great black dice coverage (like the Armored MC75) are still better off using External Racks for the same cost but with much more flexibility.

If Ordnance Pods didn't have the size limitation, I could see using them on Raider-Is or Torpedo Hammerheads , but unfortunately they are tough to justify as-is.
Swm30_card_wide-area-barrage.png
"In light of recent events, vaping is no longer allowed on Imperial naval vessels."
Wide-Area Barrage
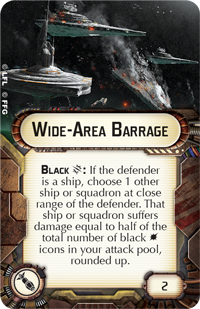
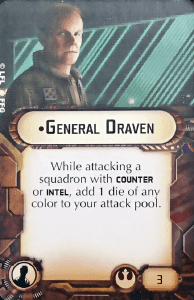
  • Wide-Area Barrage is a black crit effect, which we covered earlier.
  • The ship or squadron chosen must be at close range of the defender , which means the extra damage can be applied to something quite far from the attacker in the right circumstances.
  • It's important to note that the WAB damage is half of the black die hit icons in the pool, not half the black dice damage total .
    • Because all black crit icons are accompanied by a hit, that means all non-blank black dice count towards this.
  • The damage dealt by WAB is not an attack in and of itself and doesn't specify a hull zone. This has a few ramifications:
    • Defense tokens can't be used against this damage.
    • When a ship takes the damage, its owner chooses which hull zone the damage goes to and then resolves the damage, with shields absorbing damage first like usual.
    • No critical effect can be applied to non-attack damage sources, so any cards that hit the hull will be facedown.
  • WAB does not specify an enemy target, so you could use it against your own ship or squadrons if for some reason you wanted to.

The main requirement of getting Wide-Area Barrage to really work for you is being able to throw a lot of black dice at a problem, preferably from two arcs. Something like a Torpedo Hammerhead is under normal circumstances going to at best do two instances of 1 damage: that's fine for plinking at a scatter ace, but it's not worth giving up something like External Racks to do. Larger damage amounts are also much better at destroying ships: if you can produce 4 damage in one go, you can destroy a flotilla (1 to a shield and then 3 to the hull and dead). If you get 4 packets of 1 damage each, you can wipe all of a flotilla's shields (1 to each different hull zone): the difference is pretty substantial.


In most cases, WAB just won't produce quite enough value to merit giving up more direct and effective black critical upgrades to use it instead, but there's one major exception and his name is Commander Sato . Commander Sato can use his ability to get an awful lot of black dice in a pool, which can create large bursts of WAB damage, especially on a big ordnance ship like an Ordnance MC75. Because opponents are clearly not keen on Sato's ability triggering easily, it means there will usually be squadron dogfighting going on near their ships, which means the WABs will usually at the very least have squadron targets if you don't have ship targets. It all comes together very nicely.
Edited by Snipafist

Reworking the entire ordnance article took a long time, but reposting that entire thing felt unnecessary. I don't feel like I had anything particularly novel to say about Ordnance Pods (meh?/if only smalls could take them) and Wide-Area Barrage (Sato!), but if the rules explanation helps anyone, then mission accomplished.

Strategic Adviser is in the generic officers section! Text below!

strategic-adviser.png

I advise you to take me!

Strategic Adviser (note the spelling, kids!) is really great in that he's a "fake" activation. You just need to exhaust him instead of activating a ship. Right NOW, we need clarification on whether or not the ship he's currently on is allowed to be activated to understand if he can be exhausted as such or not. The current understanding is that the ship CAN already have been activated, and he can then be tapped if you need him to, even if the ship has already gone this round.

Anyways, he's really great, allowing you to take out a flotilla in order to use those points for other upgrades or squadrons. The one issue is that he sits in that highly coveted officer's chair, where all of these guys and your Rebel / Imperial friends would also like to sit. Hooray, controversy!

The best use right now that I can see of him is if you need one more activation to be "competitive" (to bring you up to 4-5 activations, not to bring you from 2 to 3 or from 7 to 8). If you're going from 2 to 3 or 7 to 8, use Pryce or Bail instead. You'll get better usage out of them there in my opinion. Also note that your opponent will get to activate 2 ships in a row. If you think you can weather the 2 attacks coming at you, go for it. Just don't let an ISD and Demolisher both attack you in order to get them "after" they've gone (maaaaaaaaybe on a Rieekan Defiance , but that's still iffy as heck in my opinion.) If many of your opponent's ships are just out of range of you or just on the tip of red range, and (can't stress this enough) you can weather the storm of attacks coming at you, then exhaust that adviser, let them come closer to you! Strategic Adviser is really good turns 1 and 2, and then arguably not as useful turns 3 onwards. That's a solid use of 4 points in my opinion.

Do Ordnance Pods make it worth rethinking Point Defense Reroute?

Edited by elbmc1969
In the category of, "Duh."
4 minutes ago, elbmc1969 said:

Do Ordnance Pods make it worth rethinking Point Defense Reroute?

Wasnt that reroll crits and blacks have a hit on the crit?

Quasar2 makes me rethink it actually, with the red die. If it wasnt close range.

When will you be covering the Gauntlet Fighter?

1 hour ago, elbmc1969 said:

Do Ordnance Pods make it worth rethinking Point Defense Reroute?

No, because black crits are also hits. Rerolling them is a bad thing.

Edited by The Jabbawookie
18 minutes ago, The Jabbawookie said:

No, because black crits also have a hit. Rerolling them is a bad thing.

Fixed

Edited by TallGiraffe
11 hours ago, Indy_com said:

When will you be covering the Gauntlet Fighter?

When I get around to trying them a bit more. So a while from now, basically. I personally feel like Raid is a bit of a jank mechanic, but maybe I'll be proven wrong by personal experience. I can't imagine why you'd ever not take Gar Saxon, though, and then I have a hard time understanding why you'd then consider spending 20 points on another Gauntlet (43 points total) just for a second but worse helping of Assault, so it's effectively going to be a Gar Saxon article I expect.

11 hours ago, elbmc1969 said:

Do Ordnance Pods make it worth rethinking Point Defense Reroute?

As already mentioned, PDR is pointless on black dice.

I've also had some responses to the article that came down to "oh yeah well I put Ordnance Pods on a ship because I know my friend always uses a lot of squadrons and then it was good." I'm not arguing it's not good against squadrons. I'm arguing that unless you're up against heavier squadrons it's usually better to put something on that ship that you know will help it kill ships (something it generally needs to do, especially in our heavier ship meta currently) rather than something that's occasionally great but occasionally useless. That's all.

I still feel like I'd be much more enthusiastic about Ordnance Pods as an offensive retrofit. I'd be pretty jazzed about it. I don't exactly know how you'd do it, but something that allowed for spot-inclusion of a limited number of alternative upgrades would make cards like Ordnance Pods and Flechette Torpedoes (as well as other similar anti-X upgrades, although the anti-squad ones are particularly win-big lose-big) a lot more appealing. How in the world they could pull that off without it being awful I haven't the first clue.

Edited by Snipafist

http://cannotgetyourshipout.blogspot.com/2018/03/intensify-firepower-update.html

Updated the fleet commands with Intensify Firepower! (text below, Pelta updates later....)

swm29-intensify-firepower.png
Upwards, not forwards! And always twirling, twirling towards freedom!

And our newest entrant, Intensify Firepower! (IF!) lets you turn any dice you roll to a side with ONE (and only one, no wishing for more wishes, as Robin Williams would say) hit on it. It's a nice way to steady out some of the bad rolls that you may get throughout the game, especially with Red dice (where 3 of the 8 sides don't technically DO damage).

Our newest, as mentioned, Intensify Firepower gets better the more attacks you can do. It fixes Arquitens , it helps Cymoons, it makes CR90 swarms TERRIFYING. The more attacks you can make, the better you can do. THEORETICALLY.... you COULD run CR90A's naked. No TRCs , no DTTs , nothing. If you can cram in one extra CR90 ? That's gold. The other thing I've thought about doing with it as a Rebel is Gunnery Team Hammerhead Scouts , casting dice all over the place. They also help with the dice on Assault Frigates and Nebulons , too. My one issue with repeated Nebulons with them is just that Nebulons can't take Gunnery Teams . Assault Frigates with them are very solid, though, as is theoretically the LMC80 . Generally, though, you SHOULD already be taking some sort of dice modification ( Leading Shots , Caitken and Sholtan ) on the LMC80 already.

Defensive Retrofit Updates (wherein I realize Advanced Projectors is pretty much DOA NOW)

Added in EWS, updated AP and Cluster Bombs. Hit the jump for the relevant portions:

http://cannotgetyourshipout.blogspot.com/2017/06/the-best-defensive-retrofits.html


EWS.png
Mark, have you tried NOT cheating on your girlfriend?
Our wave 7 entrant, Early Warning System (EWS) is exactly the same cost as ECM (above). EWS makes one hull zone of your choice obstructed. This doesn't stack with other obstruction effects ( Cracken , obstacles), but it does mean EVERYTHING (not Jaina's Light ) rolls one less dice against you with it. It's REALLY good on the front arcs of ISDs or the side arcs of HMC80s (those big arcs that multiple fighters and ships want to fire dice into). It softly shuts down a LOT of squadron attacks, and can potentially ruin any chance Yavaris had of getting to double-attack with the squadrons it activates. It's more fun combined with your own SFC in order to ensure that you've neutered a squadron heavy fleet flying right at you.

So how do you pick which one to use, EWS or ECM? If you fear a squadron heavy fleet or a bunch of tiny attacks from CR90 or Raider swarms coming right for you, EWS (when the hull zone is picked correctly) will counter them. If you fear fighting other ships that would lock down your defense tokens, preventing their usage while they fire large attacks into you, well then I suggest ECM. Both have their uses, and while EWS just showed up, it's definitely a good card already, that I can tell.

AP update:
What's going to happen to AP now that EWS exists? Well, damage PREVENTION beats damage MOVING, so I don't predict much of a life for AP now outside of a few specific builds. I am happy to be proven wrong, of course, but EWS seems stronger to me (and doesn't have the XI7 restriction, for that matter).

Cluster Bombs update:
For you rebels (not Rebels, haha) who want to make this card your THING, well let me say that you're going to need to bring these in multiples and you'll want to make sure that any squadron you hit goes DOWN and doesn't get to stick around at half health to finish you off. Make sure you're flakking heavily, and you should still (just like Raiders !) bring in a SFC to deal with squadrons. I've seen people take 1 of these on their big ship and expect it to solve all their squadron problems. Don't do that; this card (and all these retrofits for that matter) are attempts at damage prevention. It won't solve all your problems but it should help you out in some fashion. If you go up against a squadron presence, flak heavily, flak often, and move fast towards taking out their carriers. MC30s and CR90s are where I've seen this used well, I leave any other attempts as an exercise to the reader.

http://cannotgetyourshipout.blogspot.com/2018/03/imperial-officers-updated-to-wave-7.html

This is a more substantial update, this time to the Imperial officers article , and here are the four new contestants:

captain_brunson.png
"I spy with my little eye, something..."
"An obstacle of some kind?"
"You're no fun."

Captain Brunson 's rules don't really require a lot of clarification other than to note that due to the timing window , the die in question is removed before crits are chosen so you can use her to remove a choice crit-icon die and shut down a special crit before the attacker can resolve it, potentially saving you an awful lot of damage.

Captain Brunson is somewhat similar to Admiral Needa and Minister Tua in that she's an Imperial officer that improves the defenses of your ship, but unlike those two, she's a bit trickier to get working due to the ship needing a nearby obstacle to pawn objectionable dice off on. The upside is her effect can be extremely strong, especially when layered with other defensive tech. You can use her on high-importance small ships like Gladiators that like to lurk near obstacles before launching an attack, allowing you to evade normally and use Brunson to cancel two dice total, keeping Brunson's ship safe(r) so long as you can rely on stacking her effect with other defense tokens.

Where Brunson really shines is larger ships, as they have the base sizes to frequently be at distance 1-2 of obstacles and several of them can stack defensive tech - the easiest example would be ISD-IIs or Kuat ISDs that come with a defensive retrofit slot that can pair a defensive retrofit upgrade with Brunson to keep your ship healthy. The strongest but more complex example that comes to mind is the oft-maligned Interdictor Cruiser - Brunson can be combined with Targeting Scrambler to tear apart previously-potent dice pools after a reroll and one-die removal. The combo gets stronger if the Interdictor is also using Grav Shift Reroute to position obstacles fortuitously for the Interdictor (both for using Brunson as well as potentially providing obstruction) and with the Interdictor title, which can allow it to unexhaust either the Targeting Scrambler or Brunson to be used again later in the round against a different activation.

swm29-governor-pryce.png
This is the pose you'll have too when you consider which round to choose.

Governor Pryce can single-handedly win or lose games, depending on how well she's used. Let's cover some of the rule elements first:

  • Governor Pryce's initial effect (choosing a round token for her) is optional, so if you decide you'd rather not use her, you can choose to do that after both fleets are deployed .
    • Honestly, even if you're in a game where you consider Pryce to be a liability (we'll cover that in a bit), choosing round 1 at the very least gives you the small benefit of seeing how your opponent moved his fleet before you commit to her ship's course and it's extremely safe, with some extremely limited Fleet-Ambush -style exceptions.
  • Governor Pryce's in-game effect, however, is not optional . If you choose a round, you must activate her ship last on that round whether you like it or not.
  • Because the first player's effects trigger first when both players have effects with the same trigger/timing window, games with both players using Pryce have some interesting ramifications:
    • The first player will choose whether to use his Pryce and what round first, and then the second player will choose the same for his Pryce with full knowledge of the first player's decision.
    • If both players' Pryces have chosen the same round, then the first player's Pryce ship will active first "last" and then the second player's Pryce ship will go second "last."

Pryce is often compared to Strategic Adviser as they're both Imperial-available activation-shenanigans officers, and there's a case for taking one over the other. Obviously, Pryce is the only option for medium ships, but otherwise in general the Strategic Adviser is superior if your fleet already has a decent number of activations (I'd say at least 4), and bumping that number up by 1 gets you to a moderate or high number of activations in your community. Pryce is superior if you expect your fleet to get consistently out-activated regardless (usually with 3 or less activations, but also worth considering at 4 - amusingly enough, Pryce can be something of a counter to other fleets with large ships running Strategic Adviser for this reason) and you have a ship that would really benefit from Pryce.

Speaking of ships that benefit from Pryce, the easiest way to use Pryce is on a longer-ranged ship, like an ISD-II , Cymoon ISD, or VSD-II with Disposable Capacitors , that would really prefer to have enemies get into range so it can go last and blast away without opposition instead of being forced to activate earlier and doing little to nothing, which generally translates into "your big expensive ship gets to make at least one more good attack during the game," which can easily be worth 7 points and an officer slot. In those sorts of applications, Pryce is usually best choosing round 2 or 3, depending on her ship's speed and the ships across the way from her artillery platform. You can be a bit sneakier by using Pryce on a carrier like a Quasar to launch a mob of squadrons as the final activation, which can be even more devastating in some circumstances than a heavier ship's regular attack.

A more nuanced way to use Pryce is using her to go last with her ship in one round and then first in the subsequent round because you made a large enough bid to grab first player. It's easy to understand how a back-to-back savaging from one of the ships mentioned in the above paragraph could get pretty ugly, but Pryce can also open up options for a nasty attack run from a short-ranged brawler like an Avenger Boarding Troopers ISD (-I or Kuat) that is able to activate last to line up a double arc and then explode its prey in short order at the top of the next round. The main issue with using Pryce in this fashion (especially with a close-ranged ship) is it can be very reliant on bidding hard enough for first player to exploit this tactic and it can run into some issues if Avenger 's ideal target is using Pryce as well (as evil-clone Pryce will probably choose the same round as your Pryce so the ship can attack and then get away from your Pryce super ship) or Bail (as the Rebel player will choose the round after Pryce to guaranteed go first, attack you, and then hopefully run away).

Finally, Pryce can occasionally be a liability (I told you we'd get here!) if you're not careful. Being forced to activate last if mis-timed can be rough. If Pryce goes off a round before her ideal timing, it's not too bad - you mostly lost out on the potential to line up a strong attack and wasted 7 points and a very competitive officer slot. However if Pryce goes off a round too late, you're going to be in for a world of pain as your opponent lines up attackers against your Pryce ship guilt-free in the preceding round, safe in the knowledge that Pryce's ship can't do anything about it until the end of the next round. There are some fleet types that are better able to exploit this issue with Pryce and they generally feature a lot of speed control - perennial underdog commanders that are loved by Cannot Get Your Ship Out authors like Admiral Ozzel or Commander Leia can prove troublesome for this reason, but in general the more maneuverable/small ships and/or speed control you're facing, the more likely Pryce may be a liability. Conversely, fleets with less speed control and less forgiving maneuverability (the most extreme example being an opposing fleet also using big ships ) are less likely to give you trouble. Just keep that in mind when choosing Pryce's super-round and when in doubt, shoot for earlier rather than later as it's less likely to explosively backfire on you.

instructor_goran.png
Stop watching Youtube and go instruct someone, you slacker!

Instructor Goran is unfortunately not very good. Sorry. Let's cover the rules before we get to why I'm not fond of him:

  • Goran doesn't work on Heavy squadrons, which means if an enemy Intel squadron comes around to hand out Heavy to your squadrons, they no longer benefit from Goran.
  • Goran otherwise works a lot like Dengar (and he stacks with Dengar, too) by either adding Counter 1 or improving it by 1 if the squadron already had Counter (like TIE Interceptors or Aggressors ).

Goran is an expensive officer at 7 points and unlike other officers in a similar points bracket (like Pryce, for example, or Intel Officer ), his effect is fairly limited and reactive. For him to pay off, you need to entice enemy squadrons to attack your squadrons within range of his buff bubble, for the squadrons in that bubble to not get turned Heavy by Intel, and for that extra Counter 1 to meaningfully affect the game in a way that's more valuable than using those 7 points and/or officer slot some other way. In general, I tend to have issues with reactive upgrades and squadron-defense-based upgrades (as it's hard to tell if your opponent will be bringing enough squadrons for them to be useful) and Goran is both.

If you insist on using Goran regardless, two uses come to mind: you can use him on a Stronghold Quasar with TIE Interceptors to get obstructed Counter 3 Interceptors at distance 1-2 of his ship. Add in Howlrunner and Dengar to get your Counter value up to 5 (with Swarm!), mostly for bragging rights (anyone willing to send their fighters into this obvious death trap has it coming even worse than people rushing a Gallant Haven bunker). Second, you could use him on a Jamming Field Gozanti near Counter squadrons to effectively cancel out the Jamming Field (which also extends to at distance 1-2) when it comes to your Counter attacks (feel free to add Dengar or Howlrunner too, just be careful of overinvesting). It's not as much of a deathtrap as the Stronghold example, but it's also far cheaper and the benefit to you isn't as extreme, which can encourage some opponents to take the bait.

Before I move on, it should be noted that Darth Vader in a TIE Advanced loves being Counter 2 (Dengar+Goran), as his crits count as damage on all his attacks, but it's another one of those "do it for the bragging rights" situations and the cost of the apparatus to get it set up is overall not very appealing.

swm29_grint_card.png
The Empire created an evil clone of **** Tracy and then promoted him to Taskmaster.

Taskmaster Grint is a discount specialized Imperial version of Raymus Antilles , basically. As always, let's cover some rule interactions:

  • Remember to set his favorite command after deploying fleets . It can be easy to forget.
    • This can also influence your choice of command, depending on what ends up in Grint's neighborhood.
  • Grint only triggers when you reveal a command matching his favorite token, so effects where you gain command dials (like Thrawn) or count as resolving a command (like the Pursuant title) don't work with him.
    • If you have any other uncertainties about the command structure of Armada relating to Grint and revealing commands, please see my article about it .

Grint's immediate comparison is Wulff Yularen (he's coming up soon due to alphabetical order). When is it better to spend 5 points on an officer who generates an extra command token when you reveal one specific command compared to 7 points on an officer who exhausts to retain any one spent command token? In general, I find I prefer to spring for the extra 2 points on Wulff if I need to keep reusing tokens, but Grint has some definite uses:

  • On a ship that intends to keep using the same command the majority of the game, such as a Quasar that intends to command squadrons nearly all the time.
    • This is especially appealing if you have a way to get your other incidental commands (usually navigate, sometimes repair) met with tokens provided by a Comms Net Gozanti or Tarkin or you've got spare command dials coming in from Thrawn, etc.
  • On a Comms Net Gozanti that intends to keep feeding tokens to a fleet command upgrade on a nearby ISD and that Gozanti can make full use of the command dial for itself.
    • The easiest example of this would be an Assault Carrier (red die) Gozanti using concentrate fire dials while feeding concentrate fire tokens to an Intensify Firepower! ISD - the Intensify Firepower!(exclamation point!) effect will even out the Gozanti's own dice and with two red dice at long range, the Gozanti can still contribute to combat reasonably for its cost.
    • This is another benefit over Wulff in that Wulff can't save tokens that are discarded or removed, only those that are spent . Grint doesn't care.
  • Grint can be a discount Wulff on ships that mostly want to recycle command tokens to trigger upgrades linked to specific commands, like a Gladiator using Engine Techs .
    • To continue that example, Grint would allow navigate dials to either function as a 2-speed change ( fake Ozzel ) kind of effect or you could spend the dial one round and the token the next to keep using Engine Techs back-to-back rounds while freeing up your command dial stack for some other commands.
    • The Gladiator example is also relevant in that faster Imperial black dice ships can often outrun the token-passing range of supporting Comms Net Gozantis, the easiest "default" Imperial method of getting tokens to ships that need them.
12 minutes ago, Snipafist said:
The Empire created an evil clone of **** Tracy and then promoted him to Taskmaster.

and now I can't unsee it. Thanks. lmao

http://cannotgetyourshipout.blogspot.com/2018/03/caitken-and-shollan-added-to-weapon.html

Continuing to update the blog to wave 7 by adding the Caitken and Shollan to the weapon team article :

swm30_card_caitken-and-shollan.png
"Seriously, Caitken, clear your browser history before sharing this thing. I've seen things that can't be unseen."

Caitken and Shollan , also known as "the twins" or as I prefer to call them, "the Mon Calbinos," or as John prefers to call them, "Statler and Waldorf"...

giphy.gif
Oh come on, if John's involved, you know Muppets are happening soon!

Anyways, they are the only weapon team added in wave 7 and also the first faction-specific weapon team, being limited to Rebels only. Their rules require nearly no clarifying except to make a special note that they exhaust upon use. I've seen some people think they can be used on both attacks, and that's incorrect. Sorry.

The main issue for Caitken and Shollan is finding a ship that wants them more than other weapon team upgrades - shorter-ranged ordnance ships like MC30s generally prefer Ordnance Experts, because they work on both attacks (and you're trying to line up a double arc) and are cheaper. Longer-ranged ships like LMC80s usually prefer Gunnery Teams, as they're hoping to get extra use from their best arc at long range. Carriers obviously prefer Flight Controllers. So where exactly do these fish friends go?

The general answer is Caitken and Shollan should be considered on ships designed to funnel a single strong attack into an enemy ship with extreme prejudice, often from range and featuring a decent number of red dice. The reason for that is blue dice are not as frequently in need of rerolls (as all faces have something on them and any ship with a decent number of blue dice can usually use Leading Shots if it wants the reroll option) and black dice can get rerolled by Caitken and Shollan's competition, Ordnance Experts. Red dice, however, are the most fickle color of dice in Armada and greatly benefit from rerolls , and rerolls on red dice are not something Rebels normally have easy access to.

Okay, let's get back to the "single strong attack" qualifier to explain that, too: if you're taking Caitken and Shollan, they work once per activation due to exhausting to use. Their primary competition on combat ships, as mentioned earlier, is generally Gunnery Team (which wants to make two attacks out of the best arc usually) and Ordnance Experts (which wants to make two attacks from different hull zones on the same target), and Caitken and Shollan will generally come out poorly when used as straight-up substitutes for those two weapon team upgrades because they can only work the once. The solution is simple: use them as a critical component of a ship that is designed to get one serious wallop in against heavier targets.

For example, let's take an Ackbar Assault Frigate . It's common to give these Gunnery Team so they can spray-and-pray with 5 red dice at two targets out the side arc. With Caitken and Shollan, you can configure one differently with Slaved Turrets (one of the few times I'd recommend their use) and an Intel Officer for a rerollable 6 red dice broadside (7 with a concentrate fire dial , potentially more if the unfortunate victim is the Most Wanted target) with the Intel Officer giving the stink eye to the heavy target's brace. That will add up quickly. You can do something similar with an LMC80 Battle Cruiser using Spinal Armament and XI7 Turbolasers with an Intel Officer too. Ships outfitted in this fashion will get serious damage to stick to heavier targets even at range and can gobble up small ships quickly and should almost never fail to one-shot corvettes and the like at medium range, similar to full-on premium large ships like ISDs but at a lower cost (and admittedly a narrower focus).

Bail and Draven in the Rebel Officers section!

http://cannotgetyourshipout.blogspot.com/2017/06/rebel-officers.html

bail-organa.png
Matt Santos, leading Rebellions all over the place.

Bail Organa , one of the 2 Rebel officers in Wave 7, is GREAT. He's a potential counter to Governor Pryce and HER ability. He ALSO is just a good choice for when your list is perfectly happy going second but wants to go first on ONE turn. You get all the benefits of your objectives (Advanced Gunnery or Fire Lanes on your MC80! Precision Strike with your bomber list!) and the ability to go first on the one turn you need to claw your way out of trouble.

Bail, much like Pryce , is optional FOR CHOOSING THE ROUND, so you don't need to choose the ability if you don't want to (I don't know why you WOULDN'T, but....). If you end up going first (thanks to your opponent outbidding you and him choosing you to go first), you can choose whatever round you want to gain the tokens, BUT it doesn't have to be the first ship you activate that turn. Very worst case, 2 free tokens round 1 isn't bad. I personally feel that panicking and choosing to Bail round 1 because you don't like the list across from you only works in very limited circumstances (your opponent selected your Fleet Ambush AND deployed badly somehow. Don't... don't do this). Try not to panic that way.

muppet.gif
Panic this way, instead!

If you do choose to use Bail, he's bailing you out of trouble anyways, (a yuk yuk yuk), whether you like it or not. Make sure whatever ship you're on is either in range to concentrate fire HARD (navigate the turn before to end in a double arc of your opponent's ship) or run out of trouble from whatever ISD you're near (so, navigate THAT turn that you're Bail-ing?). There's also the worry that whatever ship you activate first with him is going to wander into trouble (Avenger waiting to trigger its Boarding Troopers, several small ships with a bunch of black dice that want to fire on you) that ended their previous turn out of range of your large ship (this is especially a potential worry with Pryce and choosing the turns. Be careful, and you're potentially going to need to wander INTO trouble early to punch your way OUT OF IT the turn you use Bail.

If you somehow BOTH have Bail, the triggers seem to work out pretty simply. Whoever is first player gets the tokens on the round they choose, and whoever is (normally) second gets to go first that round instead. As for whether Bail or Strategic Adviser ? Bail is a nice "Get Out of Scarif Free" card when you're not as concerned about needing one more activation that the Politeness Officer gives you. I've personally been running Bail a lot more than Strategic Adviser, but he's also helpful in that way I don't have to bid like 30 points to be competitive to go first these days (on the ONE turn I need it!). I'm also much less concerned with having a "set" number of activations that I "need," so YMMV.

General advice I've been using for mild success with him (so, you know, grain of salt): pick the turn you think you're going to need to Bail. Then add 1 to it and choose that turn. (And that's how I ended up choosing turn 7). I usually end up in trouble later than I figure with it, so that's my (again) mild success with it. Keep in mind, that if Bail is in hyperspace from Admiral Raddus or Hyperspace Assault, you don't get to use his ability. Bail occurs upon deployment, and if his ship isn't deployed.... womp womp.

general-draven.png
I was totally important in the movie!

General Draven is the Rebel Agent Kallus . Adding an extra dice against squadrons with counter or Intel means that he naturally hates on Jan/HWKs and Dengar/Jumpmasters , along with A-wings , Interceptors , YT-1300s , Aggressors/IG-88 , Black Squadron , and Decimators. The OTHER fun fact is that because of the way Dengar works, Draven targets EVERYTHING he's helping out by giving Counter to. So, if there's a chance he's going to die, target Dengar last so you can wail on everyone else with more dice.

Draven usually ends up riding a Combat GR-75 or something with 2 dice of flak. The Combat GR for the cheap option that helps extend range, and the 2 dice of flak because a potential 3 dice of flak is REALLY GOOD, surprising no one. Once again, of course, Draven occupies that officer's chair, the eternal problem. I've debated trying him on a Gunnery Teams Assault Frigate .... but that also means that I'm not putting Caitken and Sholtan on there. Advanced Gunnery is always an option there, too.... hmmmm, decisions, decisions. I haven't run Draven much, but he's a solid anti-squad option if you can fit the points and officer's chair.

Stealing that gif I used. :P

8 minutes ago, TallGiraffe said:

Stealing that gif I used. :P

I think it's important to note that if it's Muppet-related and on the internet, @geek19 most likely got there first in some form or another. The amount of Muppets-related gifs I have from him in various emails is truly impressive.

Wokka wokka!

The new ISD article retains some elements of the previous one, but it's pretty much been reworked from the ground up to include the new titles, Kuat, and Cymoon but keep the total length about the same due to some streamlining. Normally I post the new bits in these update articles, but I'd just be reposting the entire article, so go give it a look!

Thanks a ton . You have no idea how long I’ve been waiting for this (my little, green friend.) :D

http://cannotgetyourshipout.blogspot.com/2018/03/adepticon-2018.html

John and I (and many of our Armada friends) are hitting up Adepticon tomorrow for the first of two 3-round tournaments (the second being on Saturday). At this point, I've played over a dozen games using wave 7 and I still feel like there are a lot of things I want to try and that the meta hasn't come close to settling just yet as the community processes everything, reacts to currently-hot builds and then counter-builds, etc. Suffice it to say that is cause for some concern but also excitement, as I'm very curious to see what everyone brings. John and I will be updating once we've recuperated with some tournament reports and the like, I'm sure. Keep your eyes peeled!

If anyone is there looking for us, the plan for Thursday (and Saturday for me, provided I can get laundry done on Friday) is to wear our Chicagoland Armada t-shirts. They're blue with the Chicago flag, but Armada-style. Most of the guys in our group will be wearing theirs, but just ask for John or Eric and either you'll have found us or you'll find someone who can point you our way!

http://cannotgetyourshipout.blogspot.com/2018/03/boarding-teams-article-updated.html

Darth Vader and Jyn Erso have been added to the boarding teams article :

darth-vader-boarding.png
I'm in ur ship, killin ur doodz lol

Darth Vader seems to keep popping up in new places in the game, and in this case that place is aboard the enemy ship, discarding one of their upgrades that isn't a commander. Fierce! The only rule reminder is that Vader can only be used once in a fleet in any capacity, so no using him when he's already your commander or on a TIE Advanced , for example.

Some enemy fleets are relying on ships with specific upgrades to really go nuts (for example, the Home One and Yavaris titles can define entire fleets) and Vader can punish them. However, some fleets just... aren't. Going out of your way to include Vader on a ship where the sacrifices in upgrade slots makes it otherwise pretty bad (like on either Raider chassis , for example) isn't a reliable gamble for that reason. Vader does have a home, however, on ships that were planning on getting to close range anyways and can do fine without otherwise filling an offensive retrofit and weapon team slot, most notably the Kuat ISD (and to a lesser extent, the VSD-I ). Vader is also used pretty flexibly in this regard as he can definitely try to use his lightsaber sharpie to graffiti titles ( Home One? More like Home None , amirite?) and other fleet-buff upgrades like fleet commands and the like, but is also quite useful at stripping off defensive upgrades like Electronic Countermeasures , Lando or the Adomonition title prior to your Kuat opening fire.

For extra fun times, see if you can get Vader to trash some Rapid Launch Bays or the Profundity title before the equipped ship can put the models inside on the table ?.

swm30_card_jyn-erso.png
Hey whatever happened to her, anyways?

Jyn Erso can be used in two ways: either she can hit a ship to give it 2 raid tokens or she can gain you a victory token when boarding an objective ship. Let's talk about the raid tokens first. In short, when used this way Jyn Erso is a worse Cham Syndulla. Both raid tokens can be cleared by discarding a command dial or if the ship in question has good token coverage, they can be removed individually by discarding the corresponding tokens. It's an annoyance no doubt and in the right circumstances it could be a clutch annoyance, but Cham in general is superior at those kinds of command-screwage tricks and his sabotage can persist through multiple rounds. Jyn at the very least is likely superior against Command 1 ships, but they have the weakest command resolutions overall, so that's not really a lot to brag about.

Where Jyn gets particularly interesting is her victory-token use. There are plenty of objectives with ships that have objective tokens, but what she needs is an objective like that that also has meaningful victory tokens. At the moment, that list is rather short: Blockade Run (when you are first player only), Intel Sweep , and Capture the VIP .

Intel Sweep in particular can be an interesting objective to include with Jyn because she allows you to harvest 2 victory tokens in one round - one from her boarding the enemy objective ship and one from your own objective ship grabbing a token. That can create an almost-insurmountable lead in an objective that normally tops out at 5 possible victory tokens where each side can only grab one per round. It also means that Jyn's ship might be able to destroy the enemy objective ship after boarding it, which should have Intel Sweep wrapped up nicely for you. Capture the VIP is a bit weirder - you need to board whichever ship currently has the VIP, at which point you'll get a victory token worth 50 points. If your enemy keeps the VIP, it's a wash. If you take the VIP back, you'll end up with a 100 point gain. This is another circumstance where if you can not only board the objective ship but then destroy it, you're nearly certain to get a big windfall of points.

Because of how the objectives work, Jyn seems best when used by the first player in Capture the VIP or Blockade Run and works fine on either side with Intel Sweep. Therefore she's not really the kind of thing you can really build your objective suite around (besides Intel Sweep, and she can kind of be a failsafe for screwing up Capture the VIP I suppose), but she can be helpful for picking opposing objectives.

http://cannotgetyourshipout.blogspot.com/2018/03/interdictor-article-updated.html

I'll be posting up synopses of Adepticon eventually, but the short version is: I got second place on Thursday and took first on Saturday. Both times I had an Interdictor in my fleet and I loved the thing. Interdictors are a legit thing in competitive play now and so I rewarded the oft-maligned triangle with an updated article to reflect that . In particular, the "Tanky Tech Triangle" build and some of the discussion on upgrades (Brunson and Heavy Ion Emplacements) has been added.

Edited by Snipafist

Can confirm, Interdictor is a pain to kill. Will not die, ugggggggggggggggggggggggggggggggggggh.

7 minutes ago, geek19 said:

Can confirm, Interdictor is a pain to kill. Will not die, ugggggggggggggggggggggggggggggggggggh.

My favorite wave 7 Interdictor story is still my game with Mike when Admonition rolled up on it with a close-ranged side-arc blast and it went from crit-enabled accuracy-the-brace 6 damage to zero damage after Scramblers and Brunson had their way with the dice :D .

Only lost the Interdictor once each day at Adepticon (so once Thursday and once Saturday). I had some opponents just stop even trying to kill the **** thing when it became clear how tanky it could be. It only died on Saturday after the fifth Vader Cymoon front arc finally brought it down, having not gotten to brace against any of those five attacks.