My Failed Painting / A Cry For Help on Shadowing and Washes

By jscott991, in Star Wars: Armada Painting and Modification

I've been buying miniatures from Shapeways (particularly Mel's) for years but I've never really painted them. I thought I would give it a try after being semi-successful at painting Imperial Assault minis.

The results have been very mixed. Basically my technique is to prime the ships, paint in engine glow, and then put a wash over them to bring out the details in the paneling.

This works amazing for the most part. But when there is smudging or too much wash, I simply don't know how to fix it.

And on the big ship that I tried (the Praetor from Ferlin Pomfrett), it was a bigger failure.

I'll post pictures of each ship set. I've painted two 1/7000 Vindicators from Mel, two 1/7000 Arquitens from Mel, one 1/7000 Nebulon-B from Mel, one 1/7000 Dreadnought from Mel, one Vexatus from Ferlin, and one Praetor from Ferlin.

To start, here are the Vindicators. One of them is excellent, but one features the panel smudging and imperfect correct I referred to.

IMG_1394.jpg
IMG_1395.jpg
IMG_1396.jpg
IMG_1397.jpg
IMG_1398.jpg

Here are the Arquitens.

IMG_1401.jpg
IMG_1402.jpg

Here is the Nebulon B and the Dreadnought.

IMG_1399.jpg
IMG_1400.jpg
IMG_1403.jpg
IMG_1404.jpg

Here is the first big "failure," the Vexatus Imperial light cruiser from Ferlin Pomfrett.

The paint job was perfect except for two panels in the front, center. I tried to re-highlight them and then re-wash them but it failed.

IMG_1392.jpg
IMG_1393.jpg

Edited by jscott991

And the biggest failure, but an awesome ship. This is the Praetor Battlecruiser from Ferlin Pomfrett.

I'd love some advice on how to apply a wash to a ship this size. Basically, all I want to do is fill in the lines and shadow around the turrets and ridges. It smears quite a big on the smoother part of the ships, and rehighlighting is a disaster.

As well as some parts of the ship turned out, I am very tempted to strip it and start again. :(

IMG_1390.jpg
IMG_1391.jpg

Break the tension of the wash. Make sure that the wash itself is not only thinner, with say, medium or water, but add s drop of dish soap so it doesn’t maintain anywhere as much surface tension... it won’t pool and will flow - which will avoid a lot of the issues you have at the end there, which looks like the result of surface tension pulling it across a panel....

That is a tip I'd never heard. I will try that!

I'm using Nuln Oil in about a 50/50 mix with matt medium, so I'm trying to thin the wash a lot (much more and it comes out too grey to really show the paneling).

Someone elsewhere suggested that I wasn't using a large enough brush (I'm basically using the same brush on every ship) for something as big at the Praetor.

I'm not relishing stripping that Praetor.

Yeah, try a little tension breaker then, especially with Nuln.

medium is great for reducing its intensity, but it does absolutely nothing for its flow properties...

The only other advice I have is to not have a wash as a final stage... I only ever wash pre-highlight (unless I’m doing a basic zenithal) so I can fix pooling issues in post, so to speak ?

That being said, the vast majority of what you have shown is fantastic...

the colour coats are solid, which gives another option for you - hitting them with a light gloss coat before washing the gloss coat then making the surfaces less likely to hold a pool because there’s nothing for it to grip... it can sometimes require a dull coat seal afterwards to Matt it down in the most extreme circumstances though.

I can't highlight very well at all -- at least not for ships. My attempts to have a highlight step for these ships result in mismatched panels and covered up groove lines. So I need the wash as the last step.

I will try a gloss coating next time too.

I'm really stunned at the painting I see from some people, which makes it seem like getting those panel lines filled in is very easy.

If anyone has any tips on how to fix the Praetor without stripping, I'd love to hear them. I think it's a lost cause. The lines under some of the highlighted areas are already filled in completely so putting more paint on there is probably a bad idea.

Edited by jscott991

Dras is right, your models look really good. He’s also right in that washes should be an intermediate step, not the final. Base, wash, drybrush, details, seal is my progression.

If you’re going for washes of specific areas, try pin washing. I use an a old detail brush (tiny point) dab it in the wash then touch it to a panel line. Tilt the model slightly and gravity does the rest. It’s a bit tedious. If you get wash where you don’t want it, quickly clean that brush and dry it with a paper towel then touch it to the puddle of wash you need to get rid of. You can also grab another brush. If the brush doesn’t get it all the first time, quickly clean, dry and touch again. Having a paper towel handy is another option but you loose a lot of control as the towel will soak ALL of it up quickly.

Hope that helps.

18 hours ago, jscott991 said:

I can't highlight very well at all -- at least not for ships. My attempts to have a highlight step for these ships result in mismatched panels and covered up groove lines. So I need the wash as the last step.

I will try a gloss coating next time too.

I'm really stunned at the painting I see from some people, which makes it seem like getting those panel lines filled in is very easy.

If anyone has any tips on how to fix the Praetor without stripping, I'd love to hear them. I think it's a lost cause. The lines under some of the highlighted areas are already filled in completely so putting more paint on there is probably a bad idea.

First thing first. If you need to strip the Praetor, get half a gallon of simple green from your local cleaning supplies isle. A sturdy Ziploc bag works for an air free soak so you don't need to flip it. 4 hours will do. Rinse well, then soak in water for at least an hour to make sure you remove all residue. Good news, this is the perfect time to clean your paint brushes.

I have one of the Praetor models, while beautiful, the details for the panels is very thin. Too much paint will absolutely obscure them. Stripping may be your best option.

That said, if you can get a high humidity day, I would suggest trying to dry brush from bow to stern, so the leading edge of each panel get just a hint of the prewash color. Sometimes the panel line is still raised enough to take the paint more than the surrounding area, even though it is not visible to the naked eye. High humidity helps keep a minimal amount of paint from drying on the brush too quickly. You can cheat by, venting your clothes dryer into the house, running a vaporizer in your painting area, or even leaving a tea kettle on to boil. Winter sucks for painting. That may be why you are having difficulty with the washes as well.

Personal tip, I wash everything while on the flight arm, so I never have to touch the model. If the keyhole is too lose for holding it upside down, try a small piece of electrical tape.

Thanks for the tips!

I've also found that a dollar store product called Awesome (or Simply Awesome) works very well for stripping in a very easy way.

I actually have to paint indoors during the winter (except for the spray priming, which I tend to try to get in during these rare but increasingly common 60 degree F days we keep having).

Indoors the humidity is usually quite a bit lower in the winter. Try a humidifier in your painting area. You may still see better results with both washes and dry brushing.

I like those I think your doing a good job. You could do a shade lighter highlight next to the nooks n crannies to make it really pop, also to hide the extra wash...... But I would try it first on a smaller ship to see if you like the effect, try for dry brush levels of paint.

Thanks!

Just an update, my attempt to strip the Praetor produced a strange result. It only stripped some of the paint, and none of the primer (I guess Testor's primer comes off easier with Totally Awesome than Tamiya)

However, the ship now looks pretty good. I will post pictures if I decide not to go back and try shading and highlighting again. I think I can live with it.

I would love to somehow lighten those two panels on the Vexatus. I love that ship but I don't want to have to strip it so I might just stick with what I've done.

Edited by jscott991
On 2/18/2018 at 11:48 AM, cynanbloodbane said:

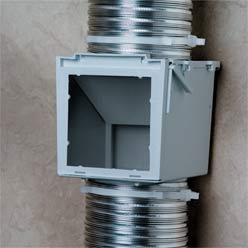
You can cheat by, venting your clothes dryer into the house

If you have a gas dryer, this is an excellent way to kill yourself through carbon monoxide poisoning.

Do it no more than 15 minutes. You need to have wet clothes in it.

24 minutes ago, elbmc1969 said:

If you have a gas dryer, this is an excellent way to kill yourself through carbon monoxide poisoning.

Do it no more than 15 minutes. You need to have wet clothes in it.

Yes, you need to have wet clothes in it.

No, it is not a carbon monoxide danger. I had mine set up that way for years, less than 10 feet from my carbon monoxide detector. Natural gas dryers are vented out to remove the moisture and lint, not for dangerous exhaust. They burn natural gas at the same efficiency level as ventless gas fireplaces. While I would still suggest doing it with a carbon monoxide detector in the area, just for added safety and piece of mind, I have never had an issue.

I would suggest installing a vent flap, that has a screen filter to reduce the amount of lint.

This is what I have used. dryer-heat-saver.jpg

It is intended as a cost savings, to allow your dryer heat to help heat your home instead of just being pumped outside. It also does a great job of humidifing in the process. Just be sure to clean the lint screen regularly.

hi,

I'm going to give some advice , even if what I paint is bad, but then again I had some fun trying everything I could try, and got some astonishing results with almost no effort (sometimes!)

-why not trying what I call "water brushing"? Once you have a mini that has a clear coat of paint, well dried, you put over it a darker one (barbarian style!) and without pausing to have it dry, take a clean, big brush (n°14 or 16 is ok) that you charge with clean water. then with long big strokes, you brush your mini from front to back. It will thin your previous coat, strip your dark paint from most of the mini, except the recesses and before any raised plate, where it will pool and make a strong tone gradient. You'll just have to put some details somewhere over it to break the uniformity of the painting, but it's a 20 minutes trick to have a decent looking mini.

my two first MkII were done that way, with a pair of spare hours (or two) of work afterwards, but most of it was there. brushes were one 14 and one 16 schoolboy brushes that I now use for basing/prime/seal

disclaimer: I only use Prince August paint (with Army Painter washes), don't know what it will do with your GW paint...

Thanks for the tip.

Just a quick question, though. By mixing paint and water, aren't you just creating a wash? Isn't that what nuln oil (GW's black wash) already is -- thinned out paint?

Kind of.

I mean, Paint is Pigment suspended in a Medium.

Wash is Pigment suspended in a Medium.

It basically boils down to the ratio of the mix...

Washes have a much higher water based ratio than paint...

Also, actual actual washes, like Nuln Oil aren't actually thinned out with water - they're thinned out with a wash medium which is basically a thinner paint medium.

On 23/02/2018 at 5:16 PM, jscott991 said:

Just a quick question, though. By mixing paint and water, aren't you just creating a wash? Isn't that what nuln oil (GW's black wash) already is -- thinned out paint?

as dras says, kind of; but what is important is the way you put it on your mini.

-as a wash, your brush takes the whole of the paint and leaves very little you have swept.

-with waterbrushing, your paint has a little time to settle before being brushed away, so it has a more "structured" aspect, as oil painting can be, and acrylics aren't. the coat you brush stays more around the recesses,and scales automatically from recesses to bumps, easier than with washes

On 2/23/2018 at 11:44 AM, Drasnighta said:

Kind of.

I mean, Paint is Pigment suspended in a Medium.

Wash is Pigment suspended in a Medium.

It basically boils down to the ratio of the mix...

Washes have a much higher water based ratio than paint...

Also, actual actual washes, like Nuln Oil aren't actually thinned out with water - they're thinned out with a wash medium which is basically a thinner paint medium.

There's actually an ASTM international spec that governs these paints. And it should tell you roughly what kind of medium they use. GW paints used to have the spec they were conplaiant to. You can probably find an older copy free on the internet.( Should be good enough)

On 2/17/2018 at 4:26 PM, jscott991 said:

And the biggest failure, but an awesome ship. This is the Praetor Battlecruiser from Ferlin Pomfrett.

I'd love some advice on how to apply a wash to a ship this size. Basically, all I want to do is fill in the lines and shadow around the turrets and ridges. It smears quite a big on the smoother part of the ships, and rehighlighting is a disaster.

As well as some parts of the ship turned out, I am very tempted to strip it and start again. :(

IMG_1390.jpg
IMG_1391.jpg

Where did you get this model?

On 2/17/2018 at 5:22 PM, jscott991 said:

Here is the first big "failure," the Vexatus Imperial light cruiser from Ferlin Pomfrett.

The paint job was perfect except for two panels in the front, center. I tried to re-highlight them and then re-wash them but it failed.

IMG_1392.jpg
IMG_1393.jpg

Oh its a failure? I will gladly take the failure :D