https://cannotgetyourshipout.blogspot.com/2018/01/mc75-hot-takes.html
Hot, fishy takes on the MC75.
https://cannotgetyourshipout.blogspot.com/2018/01/mc75-hot-takes.html
Hot, fishy takes on the MC75.
I quite like Wide-Area Barrage. Cheap and fun upgrades provide great opportunities in games like these. Like Terror Bombing Sato always into that darn Collateral Damage.
http://cannotgetyourshipout.blogspot.com/2018/01/fighting-fleets-annulling-avenger.html
|
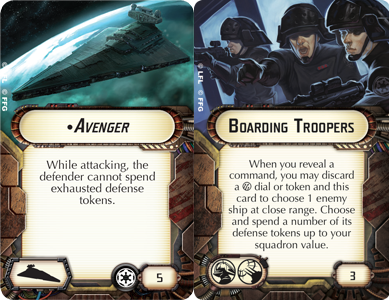
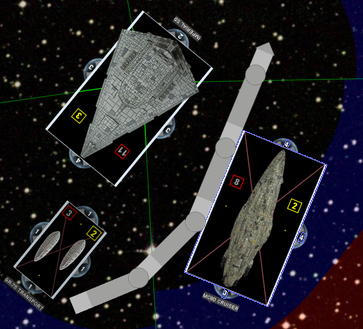
| Obvious combo is obvious, but also pretty mean. |
|
| The slippery fish nobly flops away! |
Had a lot of fun with BTA right after the card was spoiled (Vassal), but it became very clear, very quickly that it's a one-trick pony.
And not only is it a on-trick pony - it needs to be at close range to do the trick.
Also no Gunnery Teams.
So while certainly powerful, it's also far too limited IMO.
So great writeup.
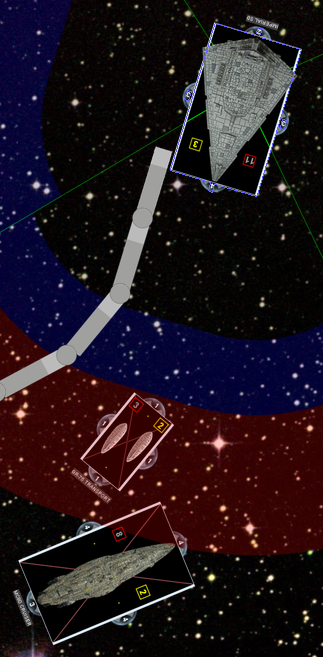
Thank you for a great article, very thoughtful and well-written as usual. ![]() Not to be "that guy," but couldn't BTAvenger have tried turning to the flotilla's right in that example, to get in front of the HMC80?
Not to be "that guy," but couldn't BTAvenger have tried turning to the flotilla's right in that example, to get in front of the HMC80?
1 minute ago, The Jabbawookie said:Thank you for a great article, very thoughtful and well-written as usual.
Not to be "that guy," but couldn't BTAvenger have tried turning to the flotilla's right in that example, to get in front of the HMC80?
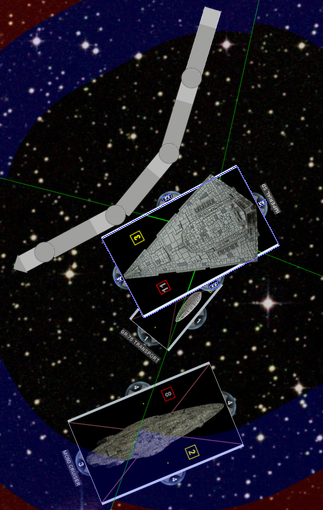
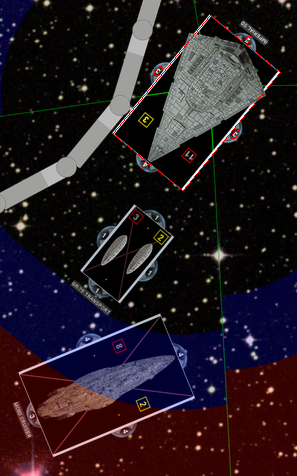
It could certainly try, although it was already pointed slightly to its left, so the end positioning would make it easy for the HMC80 to position itself in only a single arc and also usually with obstruction (from the flotilla). The resulting attack would be sufficient to cause problems for the HMC80, but it would still be able to limp away.
I freely admit the example is fairly simple and straightforward, but the basic premise still will usually work when done well.
20 minutes ago, The Jabbawookie said:Thank you for a great article, very thoughtful and well-written as usual.
Added:
I'll add that it would be smarter for the ABT, realizing it won't get its attack run in by going to our left to position itself to our right to try to catch the HMC80 in its front arc at the bottom of the next turn. That would likely succeed, but the HMC80 would be able to position itself to only be in one arc and the ABT would be unable to subsequently set up a double arc. The end result would be a front arc at the bottom of the next turn (likely at medium range) followed by another front arc likely at the top of the following turn, only one of which benefits from Avenger and Boarding Troopers (likely the second attack at close range). That's intimidating, but not likely to destroy the HMC80, which can then make a getaway into/past the side arcs of the ABT.
No need to be picky about it as the concept doesnt change. A single yaw at right at the first two notches and a single yaw left at the third with a nav token dodges the flotilla and catches a double close range arc.
Flotilla makes it harder. Navigation dials are powerful. Practice makes perfect.
Similarly I can find a spot for the flotilla that is unbeatable except by Jerrod power.
I just use Konstantine to keep them at long range while I stay at 0.
Ion cannon batteries brah
4 minutes ago, Ginkapo said:Ion cannon batteries brah
It’s Weird having someone other than me championing them for once...
1 hour ago, Ginkapo said:Ion cannon batteries brah
Main issue I have with that is it's not common to get a medium-close range shot on BTA prior to it jumping its prey and by then it's too late.
Also, lists that are dedicated to getting the trick off will have Hondo, who can always supply the token prior to the activation.
Disposable capacitors brah
3 minutes ago, The Jabbawookie said:Disposable capacitors brah
Perhaps, but I don't think I've ever seen an ABT fleet that lacks a Comms Net Gozanti and/or Hondo to replace a zapped squadron token from a Hail-Mary pass of an ion cannon upgrade.
Showing the opponent a bra, brah
Great articles as always. PS, JJ would have had that mc80 dead to rights ha ha ![]()
3 hours ago, geek19 said:Showing the opponent a bra, brah

It looks nice but kind of uncomfortable, brah
18 minutes ago, Snipafist said:
It looks nice but kind of uncomfortable, brah
That bra killed Carrie Fisher. Harshing my mellow, brah!
22 minutes ago, geek19 said:That bra killed Carrie Fisher. Harshing my mellow, brah!
I thought that bra killed Jabbra.
7 hours ago, Alzer said:I thought that bra killed Jabbra.
A chain killed Jabba, Carrie Fisher wanted it reported she was strangled by her own bra.
Very nice article. While harder to do a ABT player could still succeed at 2nd player if they have last activation and force incomping ships into a particular area via objectives. You use ABT as a big area denial tool.
Alright, its been a bit, but I wrote a thing! Because I apparently hate @Ardaedhel and myself, how to fight Admonition:
http://cannotgetyourshipout.blogspot.com/2018/01/fighting-fleets-admonishing-admonition.html
29 minutes ago, geek19 said:Alright, its been a bit, but I wrote a thing! Because I apparently hate @Ardaedhel and myself, how to fight Admonition:
http://cannotgetyourshipout.blogspot.com/2018/01/fighting-fleets-admonishing-admonition.html
This is everything in one list: Admontion loves abusing its shields and tokens. Ram the fecker and shoot with luke multiple times. Why waste time on shields?
Luke, I am your father
Author: Ginkapo
Faction: Rebel Alliance
Points: 381/400
Commander: General Dodonna
Assault Objective: Precision Strike
Defense Objective: Fire Lanes
Navigation Objective: Sensor Net
GR-75 Medium Transports (18 points)
- Bright Hope ( 2 points)
- Toryn Farr ( 7 points)
- Bomber Command Center ( 8 points)
= 35 total ship cost
GR-75 Combat Retrofits (24 points)
- Hondo Ohnaka ( 2 points)
- Comms Net ( 2 points)
= 28 total ship cost
CR90 Corvette B (39 points)
- Engine Techs ( 8 points)
- Reinforced Blast Doors ( 5 points)
= 52 total ship cost
[ flagship ] Modified Pelta-class Command Ship (60 points)
- General Dodonna ( 20 points)
- Phoenix Home ( 3 points)
- Flight Commander ( 3 points)
- Adar Tallon ( 10 points)
- Fighter Coordination Team ( 3 points)
- All Fighters, Follow Me! ( 5 points)
= 104 total ship cost
Hammerhead Torpedo Corvette (36 points)
- Garel's Honor ( 4 points)
= 40 total ship cost
3 VCX-100 Freighters ( 45 points)
2 YT-1300s ( 26 points)
1 Biggs Darklighter ( 19 points)
1 HWK-290 ( 12 points)
1 Luke Skywalker ( 20 points)
Card view link
Just now, Ginkapo said:This is everything in one list: Admontion loves abusing its shields and tokens. Ram the fecker and shoot with luke multiple times. Why waste time on shields?
Luke, I am your father
Author: GinkapoFaction: Rebel Alliance
Points: 381/400Commander: General Dodonna
Assault Objective: Precision Strike
Defense Objective: Fire Lanes
Navigation Objective: Sensor Net
GR-75 Medium Transports (18 points)
- Bright Hope ( 2 points)
- Toryn Farr ( 7 points)
- Bomber Command Center ( 8 points)
= 35 total ship cost
GR-75 Combat Retrofits (24 points)
- Hondo Ohnaka ( 2 points)
- Comms Net ( 2 points)
= 28 total ship cost
CR90 Corvette B (39 points)
- Engine Techs ( 8 points)
- Reinforced Blast Doors ( 5 points)
= 52 total ship cost
[ flagship ] Modified Pelta-class Command Ship (60 points)
- General Dodonna ( 20 points)
- Phoenix Home ( 3 points)
- Flight Commander ( 3 points)
- Adar Tallon ( 10 points)
- Fighter Coordination Team ( 3 points)
- All Fighters, Follow Me! ( 5 points)
= 104 total ship cost
Hammerhead Torpedo Corvette (36 points)
- Garel's Honor ( 4 points)
= 40 total ship cost
3 VCX-100 Freighters ( 45 points)
2 YT-1300s ( 26 points)
1 Biggs Darklighter ( 19 points)
1 HWK-290 ( 12 points)
1 Luke Skywalker ( 20 points)Card view link
There's a not insignificant part of me that wants to try this list out.... Unfortunately I'm pot-committed to the list I'm bringing to Indianapolis Saturday right now, but NEXT week? Hmmmmm
Fun and informative article. Thanks!
P.S. - 2 attacks from turns 2-5 is 8 attacks total, not 10. ![]()