X-Wing: Arena

By RufusDaMan, in X-Wing

So this is a new game mode that wants to get out of my head so hard, it won't let me sleep. So here you go mister, if you really wanna do this right now, I'm going to illustrate you with my advanced microsoft paint skills. That'll teach you.... damned idea won't let me sleep. grump grump.

So. This is a bit different. We play on a 3x6 mat, but we are setting up on the shorter sides, following normal set up rules. BUT

Each player has an Epic ship with them. This ship serves as their "base", and they need to protect it. It serves as a fancy obstacle basically. Yaay. Will discuss this later.

Obstacles are also a bit different. We set them up in clusters like in epic, and each player has 4, so at the end there will be 4 pairs of obstacles. You set them up Range 3 from the middle of the board. But you can go all the way to the edges. See the beautiful image attached.
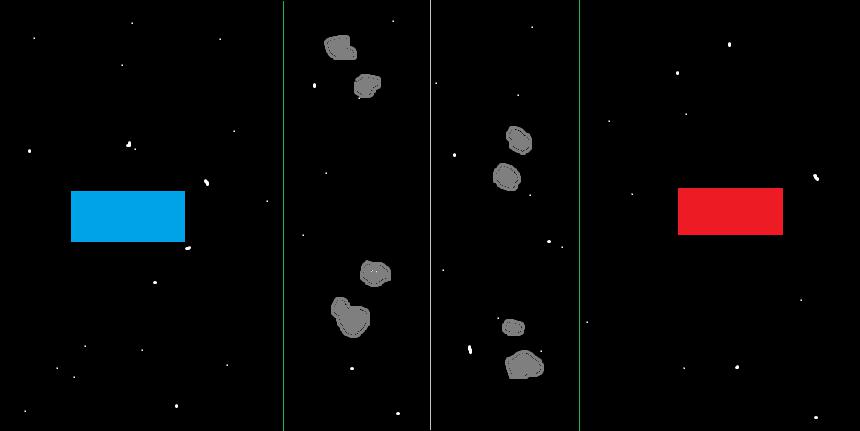
5a221d0f64c38_X-WingArena.png.968d7e5b4d2907aec73a499a8f3a3d0a.png

(Asteroid belt in the Outer Rim. Colored, 2017)

You have 125 points to bring your squad. Anything goes. No restrictions in this game mode. Oh yeah.

You also have 45 points worth of defenses you may set up anywhere on your half of the map, outside the asteroid belt. "But what am I gonna spend it on, you insane lunatic?" I hear you ask. Well on DEFENSE PLATFORMS of course.

A5901w8.jpg AGvfrfI.jpg S0ZgGEl.jpg

These babies don't move, and luckily they take up exactly the same amount of space as reveal bombs. Really handy when you think about it. You can just use your useless bomb tokens. What fun. Anyway, you set them up during the place forces step, on your half of the asteroid belt. (pro tip: You want to equip some turret upgrades on them)

But your nagging voice I still hear "Oh Rufus, you crazy fool, but what is the goal of this game mode?"

Funny you should say. I was just going to mention it.

One of your goals is to destroy the "Base" of the enemy. They are nasty big things, they pretend they have not one but TWO reinforce tokens on EACH of their sections. So be sure to pack some Ordnance or something. They also have 20 Hull points. Crits don't really do much with them. Oh yeah, and bombs deal no damage to them, because honestly, **** bombs. ( that is until the Punisher is fixed, takes her rightful place as the ruler of all bombers )

Ahha! You were going to ask. I knew it. I can read your mind. "Is that really all, Rufus, you deranged maniac?"

OF COURSE NOT. I haven'T told you about the waves!

On the 3rd, 5th, and 7th turn you get Reinforcments, in the delightful form of generic pilots. You get to spend 25 points on any combination of non-unique upgrades and pilots to create a reinforcement wave. You can even bring two ships if you want, But only small ships. Sorry Jumpmaster fans, this aint your day!

Here comes the "other goal". If you manage to destroy ALL original enemy ships (reinforcements don't count) you also win . How fun?

So that's it. What I like to call, X-Wing Arena, a really fun casual experience, hoping to bring some diversity into the game. I really hope you do give this a try and as alway, enjoyyyyyyyyyy (coz Chef John is awesome)

Rufus... You da man.

3 minutes ago, HammerGibbens said:

Rufus... You da man.

**** right I am.

Yep. Gonna have to throw this at my Wednesday group. Sweeeeeeet.

Fun idea, but I got a thought for another satellite type:

Sensor Array(action: you may give a friendly ship a target lock on an enemy within range 3? of this platform)

maybe give it the sensor slot. Would give a fun tactical angle being much cheaper but no offensive capability

Pleasant presentation, fun read.

But.

Have you had a chance to play this against an opponent or two, once or twice? If yes (and I’m guessing yes), what did you learn while playing it?

I’d feel bad throwing this on the table with my buddies only to find out it sounds cool but doesn’t work.

This seems interesting, I just see one glaring potential flaw- By 2 Reinforce tokens, are you applying the Once-Per-Opportunity rule here, or are they just flatly immune to 2-attack dice shots? If it's just the 1 automatic evade, it seems a lot more fair.

Reinforcements could also probably be streamlined a little bit, but not currently a major problem.

20 Hull on each section with 2 Reinforce Tokens per section means you're looking at needing to score 40 3-Hit attacks, or 20 4-Hit attacks to take out a base. That's a pretty tall order, especially with the enemy ships and turrets attacking you relentlessly. This will likely make for a VERY long game mode.

9 hours ago, J1mBob said:

Pleasant presentation, fun read.

But.

Have you had a chance to play this against an opponent or two, once or twice? If yes (and I’m guessing yes), what did you learn while playing it?

I’d feel bad throwing this on the table with my buddies only to find out it sounds cool but doesn’t work.

That I did not. I can barely remember making the post, but I already arranged it with my buddies I will get back to you, hopefully with pictures and everything.

9 hours ago, Kaptin Krunch said:

This seems interesting, I just see one glaring potential flaw- By 2 Reinforce tokens, are you applying the Once-Per-Opportunity rule here, or are they just flatly immune to 2-attack dice shots? If it's just the 1 automatic evade, it seems a lot more fair.

Reinforcements could also probably be streamlined a little bit, but not currently a major problem.

8 hours ago, AllWingsStandyingBy said:

20 Hull on each section with 2 Reinforce Tokens per section means you're looking at needing to score 40 3-Hit attacks, or 20 4-Hit attacks to take out a base. That's a pretty tall order, especially with the enemy ships and turrets attacking you relentlessly. This will likely make for a VERY long game mode.

You are right of course, upon reviewing the math, 1 reinforce token seems enough.

21 hours ago, J1mBob said:

But.

Have you had a chance to play this against an opponent or two, once or twice? If yes (and I’m guessing yes), what did you learn while playing it?

Well, he said he wrote it cuz he couldn't sleep. So, I doubt he was hanging out with his X-Wing buddies.

Now he says he doesn't even remember posting. Whew.

Personally, I would rename this scenario X-Wing: Revenge of Somnambulist Squadron.

So, we tested it. These are findings in the form of a recap.

AO2V6Ma.jpg

This was the initial set-up of the board. We used small bases to represent turrets instead of reveal bomb tokens. Me and my partner in crime both decided that we might need to increase the number of obstacles, but more on that later.

TAwseLQ.jpg

Sorry for not being able to handle a mobile camera :/ The Imperial side (Yours truly), Quickdraw (with the shoddy imperial repaint) Backdraft (as of yet untouched) with identical builds, FCS, Predator, Threat tracker, LWF, Cruise Missiles and a TIE/D Ryad with Ions, Expertise and TIE MK II.

6vgBYzv.jpg 7Kl3OoL.jpg

The Rebel side, two generic T70-s, I have no idea how they were built. Heff Tobber on the U-wing, had Jyn crew. Sabine in the Phantom, Autoblaster turret I believe.

For turrets, for the sake of less markers and **** we decided all of them were going to be Ion, 3 on each side. I tried placing them to provide a large coverage, my friend focused 2 on one side.

scRZxVs.jpg IRKJs8i.jpg

The early turns were a bit boring, it's a bit too long of a distance to cover. The first reinforcements came in, Stealth Device, Snap shot and something else A-wing, and the Imperial MVP, Black Squadron Scout, Predator, LWF, AA. I should seriously get more Strikers.. I don't care too much for the heroes, but the generics are awesome.

UZor3gp.jpg It even has an okay paint job. Yaay.

k5Ao5XL.jpg BonijRJ.jpg

The first engagement didn't go as well as expected on either side. Ryad got blocked, and both X-wings sat on rocks. One of them had the drood that makes it okay, so at least that. Ryad and the A-wing missed each other, Backdraft traded a bit. Quickdraw missed. Sabine took a shield from Ryad.

YibCyiX.jpg "Look at me ****!"

The next turn Ryad and Backdraft both flaunted their impressive ability to turn

08OPNt7.jpg LLRevYZ.jpg

Second reinforcement wave. A B-wing (first of two), I think they had plasmas and chimps, the Gamma Sq. Veteran had Deadey, EM, Cruise M. and Chimps.

lxhMB0i.jpg YllPTHB.jpg

Then we missed a round of pictures. Lame, I know. What happened was, the Striker, Backdraft, the Ion Turret Defensive platform and the just arriving Gamma Vet destroyed the two T70-s in a combined effort, with the Ion turret and Backdraft taking some casualties. BD is out of shields.

On the other side, Ryad and Quickdraw were in trouble. Cold green dice resulted in Quickdraw losing all of her shields by now, and Ryad is starting to question her choice of flying a TIE/D this time. Sabine is being a little *****, as usual.

LHlDno1.jpg RBnxiPL.jpg

The final wave of reinforcements is coming in, a second (identical) B-wing and a Baron of the Empire with Juke, Title, Chimps and Cruise M.

Backdraft is chilling out behind the rocks with no shields, Ryad is in trouble, Quickdraw is just about to die. However...

ymIdIUN.jpg XOPRivA.jpg

...the Striker did some fancy fancy moves, and laid down some PAIN.

JIH2oyT.jpg

The Imperial reinforcements are closing in, bringing the alpha strike. Too late for Ryad. She manages to hurt the Capital ship before her dying moments though.

CmR2LZx.jpg XOPRivA.jpg

More fancy moving from the Striker, but he is quite deep in the mud with all of his buddies dying quickly.

7fvbyzx.jpg

The ordnance strike arrived, but a little too late to save the striker. Now, both of us only had 1 ship of the original 125 point squadrons, and their destruction would spell the end of the game, by the victory conditions. Backdraft had no shields, but he was only chased by a lone A-wing, and he was protected by imperial turrets. Sabine is also out of shields, but obviously in a worse situation. The bomber is out of missiles, but the TAP still has his. The B-Wings are virtually unscathed. The question is, can the TAP and the bomber defeat Sabine, before the B-wings rip them apart? Sabine and Gamma Sq. Vet are PS 5, TAP PS4, B-wings are PS 2.

Targetlock > Evade to trigger juke from TAP, but Sabine closed in, denying the missile shot. He ends up dealing 1 damage, but loses his shields in the process.

4OMCWqr.jpg S8Lmd2E.jpg

Final round, after some mutual K-turning, the TAP finally manages to get a shot in by rolling some n a t t i e s . Because dice understand that good players should naturally do better at the game.

MRnIfBN.jpg sltpdrW.jpg

So, how was it? Fun. But it wasn't perfect, in fact, we will run a second test this week to iron out some of the flaws.

Problem 1.

- 3 rounds of nothing in the beginning, and the huge delay between reinforcements coming in, and actually arriving.

Solutions

- Deploy zone changed to Range 1 of the capital ship. This will speed up things at least by 1 turn, possibly 2.

- Create 2 reinforcement zones on the middle of the map (shown by the ugly green rectangly things)

- Obstacles cannot be placed within range 1 of the board edge.

1o9dtyu.png

Reinforcement zones are represented by a marker (placed on the board edge) and the Range 1 area surrounding it.

All ships within range 1 of the marker can perform a free "capture" action if there are no enemy ships at range 1 from the marker. The capture action prevents enemy ships from deploying there, and allows your own reinforcements to deploy.

Once a zone is captured, reinforcements can appear there on the appropriate turns (3rd, 5th, 7th).

Problem 2.

There aren't enough roids.

Solution

Add +1 for each player (so 5 per player)

Problem 3.

The reinforcement ships aren't very strong (that's good), but enemies have no incentives in targeting them, since they do not contribute to the victory conditions too much.

Solution

Change victory conditions to: Destroy the enemy base OR all enemy ships currently on board (reinforcement and original squad)

***

Conculsion

The game was exciting and fun. It was very thematic, and quite interesting. I will report back how well the changes worked, but I think we are on the right track here.

If you have epic ships, but you don't really care for their mechanics, this is a great way to play around with them. And they look cool as ****

Cheers.

I love the concept and I've thought up an alternate ruleset.

SETUP

  • Set up a 3x6 play area. Asteroids are set up with Range 0 to 3 of the dividing line between each 3x3 half of the map. Each player sets up one huge ship within their half of the map. No part of the base can be within Range 1 to 2 of any board edge. This is their Command Ship. Place 10 shield tokens on the base of each Command Ship: these are its hit points. Assign 3 Warhead tokens to the ship's base.
  • Each player builds a 150 pt list. They must designate each ship as either a Bomber or an Escort . Mark Bombers with the dark grey side of the number tokens and Escorts with the light grey side.
  • Dock all Bombers to your Command Ship.
  • Set up your remaining large and small ships as normal. You may place them anywhere provided no part of their base is beyond the frontmost part of your Command Ship's base.

SPECIAL GAMEPLAY RULES

Victory Condition

  • Destroy the enemy Command Ship by reducing its shield tokens to 0.

Initiative

  • At the end of each round pass the initiative token to your opponent. This is to allow escorts of both sides to intercept bombers of equal pilot skill every other round.

Command Ships

  • Command Ships do not count as ships: they cannot be attacked (except by Warhead Strike) and abilities such as Black One cannot target them.
  • The aft section of a Command Ship can be Targeted Locked as if it were a ship. Apply normal Huge Ship targeting rules including the blue centre line when attacking with Warhead Strike.
  • Point Defences: When an enemy ship overlaps a Command Ship resolve its maneuver as a normal ship collision. Then assign that ship one stress token and one faceup damage card.
  • Resupply and Repair: When a friendly ship overlaps a Command Ship immediately dock it to the Command Ship. Whenever a ship is docked to a Command Ship remove all damage cards and restore shields up to the ship's shield value. Discarded cards are not flipped faceup.
  • Hangar Bays: At the start of the Activation Phase you may deploy any number of docked ships from your rear guides. You may transfer any number of Warhead tokens from your Command Ship's base to bombers as they are deployed. Each bomber can carry one ordnance token for every two unused missile, bomb or torpedo slots it has.
  • Ammunition Stores: Whenever a Warhead token is spent on Warhead Strike return that token to the Command Ship's base.

Escorts

  • Protection: All Escorts gain the Protect action. It reads "Action: Assign one Evade token to a friendly Bomber at Range 1." Treat this action as if it were added by an upgrade card.
  • Interception: When an Escort deals damage to a Bomber also assign that many tracking tokens to the bomber. Treat this ability as if it were a pilot ability.

Bombers

  • Warhead Strike: All Bombers gain the Warhead Strike action. It reads "Attack (Target Lock): Spend one Warhead token and your Target Lock to remove 4 shield tokens from an enemy Command Ship inside your primary firing arc. Reduce the number of tokens removed by 1 for each tracking token assigned to you, for each range increment beyond Range 1 and for each enemy ship you are touching." Treat this action as if it were added by an upgrade card.
  • Heavy Payload: Reduce the pilot skill of all bombers by 2 (to a minimum of 0).
  • At the end of each round remove all tracking tokens from all Bombers.

Destroyed Ships

  • When a small base ship would be destroyed you may immediately dock it to your Command Ship. Resolve Resupply and Repair and return all Warhead tokens to the Command Ship's base.
  • If a ship is destroyed due to flying off the map and it was assigned a maneuver dial this round and the opponent did not adjust its maneuver dial it is destroyed as normal.

STRATEGY NOTES

  • The goal is to fly up to the aft section of the enemy command ship and warhead strike it to death. Judging when to take the shot can be difficult: close range shots do significantly more damage but Interception'll ruin your day so it's often more important to get a good window.
  • Pilot skill is very important for both escorts and bombers: if a bomber fires before you you can't proc Interception against it. Lower PS ships have a limited option to hamper Warhead Strikes in the form of blocking but it's very difficult to reduce their damage by more than one that way.
  • You'll likely want some cheap Escorts to protect your bombers and high PS escorts to stack damage on enemy bombers.
  • Making your shots count matters: to reload your warheads you have to fly all the way back to your command ship, dock with it and then undock to load back up and if your opponent defends well you're unlucky to kill the Command Ship in one attack run.
  • Ships that can carry multiple warheads can make multiple attack runs without having to reload
  • The TIE punisher is the only ship in the game that can carry all three warheads at once which when combined with Fire Control System makes it a very high priority target.
  • Large ships can make very powerful bombers but they also can't respawn, making them a risky strategy.

Edited by Firespray-32