7 hours ago, geek19 said:Now where's my turkey?
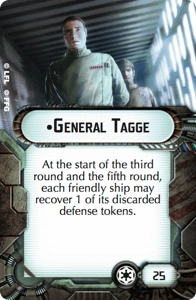
/slide whistle sad trombone
(sorry, bad joke, please don't start a big conversation about whether Tagge is so bad he's a "turkey")
7 hours ago, geek19 said:Now where's my turkey?
/slide whistle sad trombone
(sorry, bad joke, please don't start a big conversation about whether Tagge is so bad he's a "turkey")
1 hour ago, Snipafist said:
/slide whistle sad trombone
(sorry, bad joke, please don't start a big conversation about whether Tagge is so bad he's a "turkey")
Turkeys generally don't have faces quite that smug, save maybe whichever one the White House saves. (Also apparently they're put up in the Intercontinental Hotel. Talk about pampering the birds.)
1 hour ago, Snipafist said:
/slide whistle sad trombone
(sorry, bad joke, please don't start a big conversation about whether Tagge is so bad he's a "turkey")
I'd wonder why you didn't use Konstantine, then i remembered:
His goose already got cooked by Commander Sato.
http://cannotgetyourshipout.blogspot.com/2017/11/grand-admiral-thrawn-article-hot-take.html
So FFG finally dropped a new Armada article (it only took nearly 3 months ?) and while it's a bit light on new content, it was still a good read because the design process is always interesting and JJ gave us a peek behind the curtain.
We did get two new upgrade cards spoiled from the upcoming Chimaera ISD box, however, so let's talk about those!
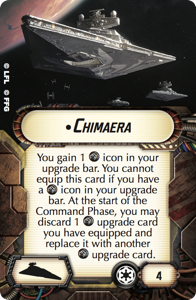
|
| Perpetual winner of the most-frequently-misspelled-Armada-card award starting right now |
So the Chimaera title gives your non-fleet-command (read: non-Cymoon) ISD a fleet command icon, but that's not all. It also allows you to discard its current fleet command card to replace it with another, so you could cycle through all kinds of fleet command cards during the game. Some thoughts, in no particular order:
|
| Art direction: I want ships and lasers. Lots of lasers. Green lasers, red lasers, exploding lasers. |
All right, we're finally getting our missing concentrate fire-associated fleet command! And the poor Rebel-only players are going to need to find some way to get ahold of them without dropping $50 on a Chimaera expansion pack...
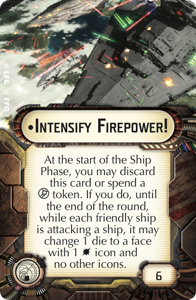
This one is a bit more straightforward than the Chimaera, and it's got some pretty exciting implications for both Rebel and Imperial fleets. First, let's cover how it works: once Intensify Firepower!(exclamation point!1!!1!) triggers during a turn, all friendly ships when attacking enemy ships may flip one of their attack die to a side with a single hit icon (and no other icons, no sneaky double-hits or hits+crits for you). It can be used on each attack against a ship, so it could be used twice per activation in ideal circumstances.
The obvious use for this fleet command is with red-dice ships, especially those that can't use dice-fixing upgrades for red dice (the Pelta can take this to fix its own dice reliability problem, fortuitously), but also for those that want to use their turbolaser slots otherwise, whether that be for other upgrades or simply leaving them empty to save points while leaning on Intensify Firepower! for their dice-fixing. This can allow you to hypothetically run all kinds of small red-dice ships (like CR90As, Nebulon-Bs, Arquitens, Scout Hammerheads, etc.) with no turbolaser upgrades at all to keep them cheap and cheerful if you wish, or you can pile on the turbolaser upgrades to make them hit harder than expected (at a higher cost).
I don't foresee a lot of utility from stacking dice-fixing upgrades, though. It sounds appealing to consider a CR90A with Turbolaser Reroute Circuits and Intensify Firepower! for a guaranteed 3 damage out the front arc, but both of those dice-fix upgrade effects are most effective when used on a blank die or unnecessary accuracy result and the odds of 2 such results appearing on 2 (or 3 with concentrate fire) dice is fairly slim. You'll be giving up one to use the other pretty regularly.
The main issue with Intensify Firepower and heavier red-dice ships is finding a cost-effective use for it, given smaller ships can potentially get more triggers of it for less points. The problem isn't as severe as it may first seem: larger dice pools will on average produce a blank more frequently than smaller dice pools, making Intensify Firepower! trigger more frequently in practice on ships with 3+ dice batteries. Furthermore, many of the more expensive platforms can equip Gunnery Teams, which help substantially in getting big batteries of red dice thrown out multiple times a turn, allowing your heavier ships their two potential uses of Intensify Firepower! pretty regularly each turn. You'll have a few considerations, there, though, such as:
So in short, it depends on your fleet build when it comes to red dice and heavier ships. There's some definite potential there, but it needs to be carefully considered. It seems to be an easy pick for cheapo Gunnery Team Assault Frigates and VSD-Is, though, if you just want some inexpensive "spray and pray" red dice for a reasonable cost but would like more reliability and you can fit a fleet command ISD or Pelta into your fleet.
Other weird red dice uses would be with effects that rely on hit icons like H9 Turbolasers (for a guaranteed accuracy/most likely an extra hit result when paired with the guaranteed accuracy) as well as single-die "plink" attackers like Torpedo Hammerhead Corvettes and Assault Carrier Gozantis. With a single red die you normally average out to a 3/8 chance of doing nothing (2/8 sides being blank, and 1/8 being an accuracy on its own for a harmless "heat-seeking fluffy pillow" as it's known around here), and being able to guarantee a damage from every plink (and potentially 2 total with a concentrate fire dial thrown in there, assuming at least one of those dice behaves itself intrinsically) is pretty dang good for low-cost "plink" attackers.

|
| Hey can someone check that box to make sure the white powder is actually baking soda? |
There's some definite utility there for blue dice ships, such as Raider-IIs, Interdictors, or CR90Bs. Intensify Firepower can function for most purposes as a discount SW-7 Ion Batteries by allowing you to flip your usually-not-that-great-in-small-batteries blue accuracy results over to hit results instead. This isn't nearly as strong a use as it is on red dice, but if you're bringing Intensify Firepower for other reasons, your blue-dice ships can enjoy its benefits as well. It's actually pretty amazing when you can get a double-arcing Gozanti Cruisers set up, because it guarantees two one-damage attacks, which are annoying to use defense tokens against (extra funny but probably not actually good with Disposable Capacitors to do it from long range one time)
There is some utility for black dice, particularly on ships that can't equip Ordnance Experts (the Assault Pelta; hello again Pelta mention in this article!), but in general I would recommend Ordnance Experts instead, as the effect is just amazing. Intensify Firepower can help there if you need it, especially if you're going nuts on your rerolls (rerolling everything not a hit+crit), but it's not really strong enough to want to specifically combine with a black-dice-based fleet.
In short, this is a neat fleet command upgrade and I'm excited to see how it changes the meta once it arrives. The sort of ships it seems to benefit the most are those that I don't see an awful lot, and that's pretty cool.
I think the most likely place IF will see early success is builds focused on ship to ship firepower using moderate to large red dice pools. Cymoons are the obvious candidate, as are Arqs. The trick will be fitting it into an Ackbar list provided the MC75 doesn't come with it. (I'm not expecting it will, that would make the Pelta fully obsolete, but it's possible if the 75 has some other Achilles heel.) As a side note, JJ, an IF Cymoon and four Spinal Arquitens leaves you with twenty-ish points to fiddle with, if you are so inclined/crazy.
SUPER MEGA IMPORTANT RADDUS ARTICLE THAT I'M NOT MENTIONING/TYPING IN ALL CAPS JUST TO GENERATE PAGE VIEWS!
https://cannotgetyourshipout.blogspot.com/2017/11/theme-music-and-you-how-to-properly.html
My most controversial article yet, I've already subtitled this "How to PROPERLY Play Admiral Raddus." Yeah. He's not even released yet, but we're doing this. GET THOSE HOT TAKES WHILE THEY'RE HOT!
Well, I'm either going to have to turn in my rank badge and join the Rebellion or play Hyperspace Assault a whole lot more often... because now I know what's been missing from this game. Thanks for two great articles!
Edited by The Jabbawookie12 hours ago, geek19 said:SUPER MEGA IMPORTANT RADDUS ARTICLE THAT I'M NOT MENTIONING/TYPING IN ALL CAPS JUST TO GENERATE PAGE VIEWS!
https://cannotgetyourshipout.blogspot.com/2017/11/theme-music-and-you-how-to-properly.html
My most controversial article yet, I've already subtitled this "How to PROPERLY Play Admiral Raddus." Yeah. He's not even released yet, but we're doing this. GET THOSE HOT TAKES WHILE THEY'RE HOT!
Ok, so, that was good and all (it was, I promise), but you skipped the gimme: cinematic music. You can go with action movies, explosions with Megan Fox in the background, thrillers, some of the world's better video games, or even, dare I suggest it, cinematic music from people too good to write music for movies. All of these are valid choices. C'mon, you're letting me down here.
13 minutes ago, GiledPallaeon said:Ok, so, that was good and all (it was, I promise), but you skipped the gimme: cinematic music. You can go with action movies, explosions with Megan Fox in the background, thrillers, some of the world's better video games, or even, dare I suggest it, cinematic music from people too good to write music for movies. All of these are valid choices. C'mon, you're letting me down here.
When I die, I'm going to have Michael Bay carry my casket so he can let me down one last time.
4 minutes ago, geek19 said:When I die, I'm going to have Michael Bay carry my casket so he can let me down one last time.
I hope your family is okay with your casket exploding as soon as he drops it.
It occurs to me I think I wanted Jump Drive or End Run from ME2 over Suicide Mission, but any are good.* Half of Hans Zimmer and 3/4 of Steve Jablonsky work here.
I must also turn in my nerd card for skipping the Battle of Pelennor Fields.
* I make no promises how much of that is nostalgia, because ME2 remains my standard for execution in a finale. I have added links
Edited by GiledPallaeon1 minute ago, Snipafist said:I hope your family is okay with your casket exploding as soon as he drops it.
I was figuring it'd be dropped out of a B-1 while bad reused footage of a not-Predator played on the projector that doubled as a flame thrower.
*Chimera
1 minute ago, GiledPallaeon said:I was figuring it'd be dropped out of a B-1 while bad reused footage of a not-Predator played on the projector that doubled as a flame thrower.

And in my google image search for Michael Bay explosions, I found this amazing Lion-King-as-directed-by-Michael-Bay gif I am now going to share with you.

2 minutes ago, Snipafist said:And in my google image search for Michael Bay explosions, I found this amazing Lion-King-as-directed-by-Michael-Bay gif I am now going to share with you.
Where's the A-10 lighting up the hyenas and a B-52 nuking Pride Rock? NEEDS MOAH EXPLOSIONS
If there aren't at least three camera jumps to show off how much gasoline he's wasting, is it really Michael Bay?
Edited by GiledPallaeonJust now, GiledPallaeon said:Where's the A-10 lighting up the hyenas and a B-52 nuking Pride Rock? NEEDS MOAH EXPLOSIONS
It's also missing slow-motion women and casual racism played for laughs, but Michael Bay's gotta start somewhere!
16 hours ago, Snipafist said:You're best off starting with a cheapo 5-point fleet command with Chimaera, as you can sub it out on the first round for a more expensive one if you like. You should never be spending more than 9 points for the title and your starting fleet command.
This depends on what you plan to use it for and the eventual clarification of re-equipping a previously-discarded upgrade. If you're planning use AFFM/EF (the 5's) early, you're right--and I suspect these are the most useful ones early on anyway. On the other hand, if you plan to use Jerry early to reposition your whole fleet fast and want to regen those shields back up quick, and the eventual ruling is that you can't re-equip a previously discarded FC, then you have a use case for taking STM in the base build.
The other approach you could take is to build planning never to use AFFM, then put that as your base FC and burn it immediately.
17 hours ago, Snipafist said:
Perpetual winner of the most-frequently-misspelled-Armada-card award starting right now
Rouge squadron might disagree.
Or Rouges and villains.
http://cannotgetyourshipout.blogspot.com/2017/11/fighting-fleets-flushing-flotillas.html
First off, I'm back and thanks to all the folks who wished me and the missus well on the birth of my son! He was born November 13th in the early morning and we're super glad to have him. Mom and baby are both doing great and the lack of any serious complications has been wonderful.
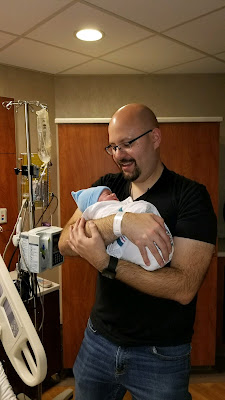 |
| Look at this big bald doof holding this weird thing with a blue hat. |
Speaking of small things and awkward transitions, it's time to talk about flotillas. Specifically, how to get rid of them (wow, this transition is weird and kind of sinister if you think about it too hard). Let's get to the plastic spaceships part!
Why do flotillas need to die?
Flotillas are a common feature in many Armada fleets nowadays, and for good reason. They provide a cheap activation and are surprisingly resilient under the right circumstances. They're cost-effective at commanding squadrons (even if the individual squadron command isn't terribly impressive) and their support/debuff upgrades can be helpful, especially when used at the right time and place.
Although dropping a flotilla won't be as consequential in most cases as dropping a combat ship, it's still denying the enemy fleet a ship on the board (and thus an activation) and depriving the opponent squadron commands and/or support abilities they may have been relying on. Provided you attack "right" to overcome the flotilla's defenses (we'll get there, I promise), it's often much easier to destroy a flotilla than a combat ship as well, even light combat ships like corvettes.
Okay, but why do we need an article about it?
"Need" is a bit of a strong word here, but the short version is that flotillas can be frustratingly difficult to destroy without the right tools (strategic planning) or in-game approach (tactical planning). This article will be a bit on the short side because of its limited focus, but hopefully it helps!
How are flotillas generally used?
It will vary depending on the fleet and your opponent, of course, but as a general rule, you're not going to find flotillas in the thick of it. Flotillas, being support ships with little anti-ship firepower(and in the case of the unarmed GR-75, none at all), don't want to be on the front line. You can usually find them on the flanks and/or lurking behind combat ships - anywhere they're more difficult to get at while still supporting their fleet. Flotillas in general need to walk a fine line between their desire to be able to impact the game and their desire to be safely away from danger. Too much one way or the other and they run the risk of easy destruction or near-complete irrelevance.
Let's talk about defense tokens and flotilla survivability
Before we get any further, it's important to briefly cover the defenses we're looking to surmount on a flotilla: one scatter token, one evade token, 1 shield in every hull zone, and 3 total hull.
Anything that intends to stick damage to a flotilla needs to reckon with the scatter token in one way or another. You could throw a 10-damage attack at a flotilla and, without an accuracy to lock down the scatter, all that you succeeded at doing is making your opponent flip over a piece of cardboard. It can be annoying to say the least. We'll cover different approaches to deal with the flotilla defensive suite below, but it's important to start with a baseline.
Strategic tools for dealing with flotillas
Fast combat corvettes
Speedy combat ships offer you one way to get to where flotillas don't want you to be by engaging them on the flanks or coming after them the turn after you take some shots at your opponent's combat ships and jump behind them, where the flotillas are hiding.
Accuracy-generating tech
This comes in a lot of possible forms (Captain Jonus, the Home One title, H9 Turbolasers), but anything that can guarantee you an accuracy result is golden against flotillas and the kind of thing it's generally handy to have on a ship or two regardless. Being able to make the scatter a surefire non-factor pays off handsomely against flotillas.
Defense token hate
Specifically Intel Officer and, in a more passive sense, effects like the Suppressor title or the Planetary Ion Cannon objective that allow you to exhaust defense tokens as an additional effect, sometimes outside of combat. These types of effects are not as effective as accuracy-generating tech, but they're a solid second place because they allow you to overheat flotilla defense tokens much more quickly if you just have to brute force your way through them. In a roundabout way, the Avenger ISD title also qualifies, provided you can force the defense token spending earlier.
A quick note on Gunnery Team
Gunnery Team deserves a special mention because flotillas are often found hiding under the skirts of friendly ships, which gives your combat ship a conundrum about whether it's worth wasting its good arc attack on a serious enemy ship or a support ship that might just scatter everything away anyways. Usually the correct choice is to go after the serious combat ship, but it can give the flotilla a chance to slip away for good, which is frustrating. Gunnery Team simply says "porque no los dos?"

|
| You're gonna need other players to lift you up though, your opponent probably won't. |
In short, you can slap the enemy combat ship and then take a pot shot at the flotilla as well without too much extra trouble, and that can really pay off when executed well.
Objectives
Flotillas are combat-shy support ships that aren't keen on a frontal charge against enemy ships. For that reason, if your meta sees a lot of flotillas, objectives that punish more defensive enemy fleets (like Contested Outpost or Intel Sweep) and/or punish fleets with fewer gunships (like Fire Lanes or Opening Salvo) can put the screws to the flotilla spam.
Tactical considerations against flotillas
Let's talk about Relay
I want to get to this first, because it's effectively a possible sub-specialization of a fleet running a decent number of flotillas. What a Relay-dependent flotilla fleet tends to (try to) do is run its flotillas away from possible combat (often very far on the flanks or moving perpendicular to the enemy fleet on the far back edge of the board) while issuing squadron commands through a Relay squadron (usually a Lambda in that case) or squadrons (usually 2 VCX-100s in that case). The idea being to preserve the benefits of the flotillas, especially as squadron commanders as well as activation padding, while exposing them to minimal danger from enemy combat ships.
What's important to do against a fleet relying so strongly on a Relay squadron (or squadrons) is to identify where the weak link is relative to your fleet. The whole machine depends on:
If you can knock out one of those elements, the whole thing falls apart. For example, if you've got enough speedy fast headhunter ships, apply them against the flotillas themselves to knock out the carriers. If you've got decent squadron coverage and the enemy Relay source isn't well-protected, gun for the Relay squadron over anything else; even if the enemy fighters tear yours up afterward, they'll be effectively out of command range for the next few rounds once they can't be Relay-commanded any more. If the Relay source is well-protected (usually with enough layers of Escort to make the prospect fairly daunting), then you should identify which enemy squadrons are the workhorse squadrons that pose a serious threat to your ships and use your own fighters to single them out and destroy them to the best of your ability. If you take out the heavy bombers and then your opponent is left with his Relay source(s) and a few okay-but-not-great-against-ships Escort squadrons, you've effectively defanged the worst of it; the enemy flotillas will be trying to get decent anti-ship results from the surviving TIE Advanced, X-Wings, and/or YT-1300s and having predictably "meh" results.
Identifying when it's a waste of time to attack flotillas
You only get so many attacks in a game of Armada and each ship only gets the two each round, so it's important to identify when it's worth spending one of those attacks on a flotilla. Throwing away attacks on flotillas that could've been spent productively is a frustrating experience - seeing an enemy flotilla with an exhausted scatter and evade and no damage on it at the end of a round is a clear indication something went wrong with attack allocation. I'd like to offer a pair of dos and don'ts as general-purpose guidelines below.
Don't: attack a flotilla only once with smaller attacks or attacks that are unlikely to have an accuracy result
For example, sending a single Y-Wing after a flotilla that you don't have any other attacks lined up against is a fool's errand - the flotilla will scatter the Y-Wing attack and simply not care. Even with a heavier bomber like a B-Wing you're relying on generating an accuracy (25% chance) plus damage on the black die (75% chance), which will only happen 18.8% of the time - it's not worth it if that's the only attack you're sending that round. This can also be applied to all-black dice attacks (like a Gladiator-I's side arc) that can't generate accuracy results and attacks with very few blue or red dice overall.
Do: attack a flotilla multiple times in one round
If the example Y-Wings and B-Wings had friends dog piling on the same flotilla, the math changes very quickly, as the scatter would overheat rapidly and be discarded, making it easy prey. If the example Gladiator-I was double-arcing the flotilla, the flotilla would need to pop its scatter for good on the second attack to stay alive. It's not a great use of a Gladiator spending its entire activation just to eat one scatter token, but if circumstances dictate that's the best use of your Gladiator that round, then make it count.
Don't: attack a flotilla at long range when you have better options
Time for a bit more probability (I'll be doing an article on this sooner or later!): an ISD-II attacking at long range with 4 red dice has a 33.5% chance of generating an accuracy result naturally. Normally, you can get a few damage to stick to most anything with that kind of long-ranged salvo, but a flotilla is going to be particularly durable against it. 2/3 of the time, it will simply scatter the attack. When you manage to generate an accuracy result, it will still use its evade to remove the best damage die of the attack and will frequently walk away with only one or two damage having been inflicted (and in some particularly bad-luck instances, none at all!).
Do: attack other ships at long range, save your anti-flotilla attacks for medium range
Of course this advice can be overridden if you're able to get several long-range attacks in on a flotilla in one round and it's the best target for that (often it is not), but in general you're better off focusing on non-scatter ships at long range. Once you get to medium range, attacks on flotillas become a lot more potent - you get to add in your blue dice now, which will usually create a larger attack pool and blue dice are twice as likely to produce accuracy results as red dice (to lock down the scatter) and evade becomes worse at stopping damage the closer in you get. Medium and close range are where it's at for shutting down flotillas, particularly with beefier attacks.
Those are the basics, but it obviously helps substantially to have some of the anti-flotilla tools I covered earlier at your disposal to make these calculations easier and diminish your chances of "wasted" attacks. Accuracy guarantees, for example, make a number of attacks against flotillas much less risky and more likely to draw at least some blood.
Ramming
Remember that when a flotilla is overlapped by or overlaps any other ship, the other ship involved in the collision only takes damage if it is also a flotilla. This makes flotillas ideal ramming targets as it can be done without damaging the rammer, each face-up damage card is 1/3 of the flotilla's hull value, and scatter defense tokens do nothing to stop the ram damage.
To get full value from ramming flotillas, you can manipulate the order of activation sequence to destroy them without firing a shot. It will take one or two rounds total to pay off, but can be done. Here's the ideal method for doing it:
You can shorten this process to a much more appealing one-round KO with a few different methods:
Don't needlessly throw dice away
It should be noted that this is different from the earlier advice which came down to "don't throw attacks away." Specifically what I'm referring to is two similar things:
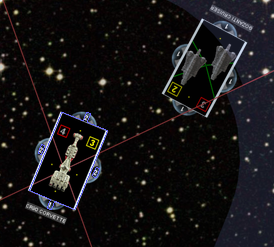
In the example above, the CR90B has the Gozanti double-arced and has a concentrate fire dial to spend. Let's assume it rolls no accuracy results with its front salvo of 3 blue dice. If it fishes for an accuracy by adding another blue die, it has a 25% chance of getting what it wants. Conversely, the side arc attack of 2 blue dice has a 37.5% chance of generating exactly 1 accuracy result, which is higher. It's generally better to go with the concentrate fire dial on that one. Worst case, you get two attacks that need to be scattered or else the flotilla is in big trouble and the scatter is discarded for good. All the CR90 needs to do in this example is stick 2 hull damage to the Gozanti and then it can finish it off with a ram, and the side arc with a concentrate fire dial offers reasonable odds at doing that.
The value of flotilla hunting
The last thing I want to touch on is when to send your cheaper combat ships chasing off after flotillas. In some cases, the decision is very easy: say, for example, that your CR90 or Raider already made an attack run on juicier prey and has now worked its way behind enemy lines where enemy flotillas are currently screaming while running for the exits. There's nothing better to do, so why not chase down a flotilla or two instead of simply fading away? Easy peasy.
What gets more uncertain is situations where flotillas are deployed and used in such a way (usually with Relay) where they'll be difficult to attack except by a ship that devotes itself from the get-go to chasing after them (either way off away from the battle or buried deep towards the back table edge). Sending a 39+ point corvette after an 18+ point flotilla feels like wasted points. Is it? The unsatisfying answer is "it depends." If that corvette would make a more important contribution elsewhere, then obviously that's a better place for it to be. Failing that, however, flotillas are pretty harmless and so the corvette is likely to score an easy kill on at least one flotilla. If you can realistically bag two or more of them, then it makes the decision even easier, but even getting just the one and being effectively safe-ish all game is in some ways trading up because you keep your corvette investment intact while destroying your opponent's flotilla investment. Or to put it another way: if your 400 point fleet was able to attack 200 points of your opponent's fleet and then sail away, would you do it? Of course you would. So when your corvette that's twice the cost of its prey chases after a flotilla, it's a decent deal so long as the rest of your fleet can handle its absence from the "main" fight.
Final thoughts
Because the scatter token is so instrumental to a flotilla's survivability, attacks against flotillas can be very binary - either the flotilla takes a pounding (often being one-shot at medium or close range) or nothing happens except a piece of cardboard gets flipped upside down on the sidelines. A lot of this article, both the strategic and tactical elements, comes down to "so how exactly are you handling that scatter token?" Provided you have a plan for taking care of the scatter token, using your attacks wisely, and have a plan for getting attacks into flotillas, they can be handled. If you don't, you're going to struggle. Hopefully I was able to help!