Alright, as I switch my focus from Imps to Rebels, I wanted to ask if anyone has opened up the MC80s before. I know I've seen pictures of someone who lit them up, but my google-fu is failing me on finding any pictures of them deconstructed. If not, oh well, I'll figure it out as I go, but I figured it's worth a shout out since it's always easier to learn from those who've already done it :).
Opening up the MC80s
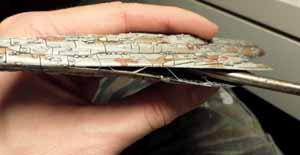
Okay, well my shout out for help went unheard. But in case anyone in the future is looking for the same information, here are the two halves of the Home One.
Yieks... You actually have to break the model to take it apart? I would never dare to do anything like that...
20 minutes ago, Norell said:Yieks... You actually have to break the model to take it apart? I would never dare to do anything like that...
Meh, just some of the supporting columns/tabs. Those are getting dremeled out anyways. I did have to actually slice the front two pegs in half in order to gain any entry at all. And I do mean slice, there wasn't enough clearance to use a saw. That was a PITA.
I only ever opened up my Assult Frigates, because I hated the ship, and wanted to modify them. Looking at the seams on mine, and the internal supports on yours, I am glad I never felt the need to open up an MC80. Looks like nice clean knife work though. Well done!
32 minutes ago, Norell said:Yieks... You actually have to break the model to take it apart? I would never dare to do anything like that...
He puts them back together better than new though. You should check out some of his X-Wing stuff too. Absolutely beautiful lighting jobs.
thank you for showing us the result, it seems it would be easier to open from the rear, only one peg and 2 clips
4 hours ago, gounour said:thank you for showing us the result, it seems it would be easier to open from the rear, only one peg and 2 clips
Perhaps. I was more concerned though with all of the external details on the rear of the ship. The front is pretty simple by comparison. I will say the second peg at the front was unexpected. I'm really not liking the tabs that Armada uses that X Wing really doesn't. They're much more difficult to work through (which I'm sure is why they're used).
On 2017-10-16 at 5:13 PM, Khyros said:Alright, as I switch my focus from Imps to Rebels, I wanted to ask if anyone has opened up the MC80s before. I know I've seen pictures of someone who lit them up, but my google-fu is failing me on finding any pictures of them deconstructed. If not, oh well, I'll figure it out as I go, but I figured it's worth a shout out since it's always easier to learn from those who've already done it :).
Do you still need some assistance or have you already dragged the pig to the table? I opened a MC80 Liberty a while ago and took some pictures.
10 minutes ago, Gold6 said:Do you still need some assistance or have you already dragged the pig to the table? I opened a MC80 Liberty a while ago and took some pictures.
I'll always take pictures and advice if there's any to be had. I'm not too arrogant to turn it away ![]()
9 hours ago, Khyros said:I'll always take pictures and advice if there's any to be had. I'm not too arrogant to turn it away
Ok…
-Read all before attempting.-
And no, I don’t take any responsibility for what you guys/girls do with your ships. All though described as an instruction/guide one should interpret it more as a proposal.
The two hull sides, at least with the lot this ship came from, had a very soft (glass/window) silicone like glue, like transparent rubber and not the plastic cement one that “melts” pieces together. Hence much of the friction comes only from separating the “fastening pins/pegs” that keeps the parts together. So being sturdy on hand and with resolute moves you separate the halves with screwdriver twisting movement (at first).
Start doing all this from the rear of the ship somewhere. I did it from the out most auxiliary engines Marked A (that is grey on the miniature but should have be painted in black metal, its missed out by the manufacturer). On my miniature there was a small gap. Work your self forward along the wings and hull around the nose until you reach the other side.
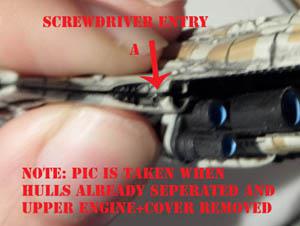
You have to twist the screwdriver around the ship maybe two times or more, little by little, to make sure that the pegs is separated evenly inside the ship so you don’t break anything. Remember that the fit is really tight so you'll have to use some controlled strength. When the spring is big enough to get a coin through (metaphor) you can opt to start slowly to bend “open” the front 3/4ths of the ship. Now STOP here. Don’t break the ship apart yet as the engine cluster is holding the ship halves together in the rear with a bulkhead Marked B (bottom) and an “engine roof” Marked C (top).


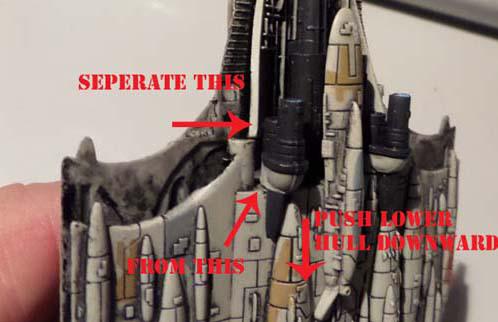
If one force it open now the entire tail of the ship might break apart. Thing is that the Bulkhead (B) must first be separated from the top shell. It’s tricky and the plastic will give away some chilling noises so be careful. I attacked it from the front of the ship with the screwdriver, and from the sides. Once loosened the second barrier (C) should be easier.
The engine roof (C) is "railed in" on to the lower hull next to the auxiliary engines so technically, pending on which parts that gives away first one have to slide the lower hull forward to “un-rail” the engine roof from the bottom hull, thus separating the pieces.
As said, be very careful with the screwdriver and use small moves. "Listen" and "feel" the miniature. The plastic is hard as **** but do not take chances. This worked for me but I cant guarantee it will work for you.
Why did I do it? Am I sick? Well I’m working on an original wingless MC80 after some prolonged studies (it has to be screen accurate and not based on web fan material) and either I’m killing my Liberator or make a resin cast of it to modify parts needed. Either way I needed an autopsy.
Good Luck!
/Gold-6
(PS. Well next post should have shown the main components of the miniature but... I just exceeded the attachment limit  . Well maybe later then...)
thank your for the pics and method!