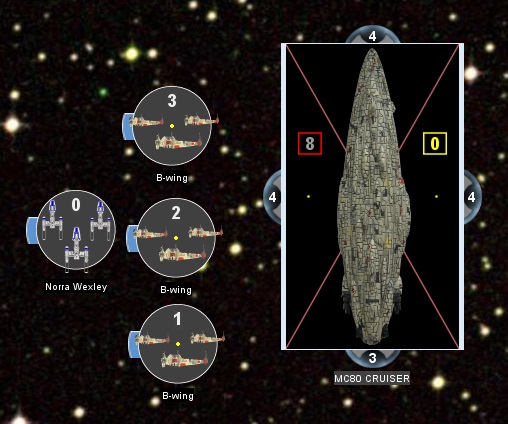
Cannot Get Your Ship Out October

By Snipafist, in Star Wars: Armada

11 hours ago, Snipafist said:

Keep an eye out for some guilt-free ramming opportunities against ships near the space station. Provided the ramming ship isn't 1 damage card from death, you can ram the opposing ship, take 1 damage, and then land on the station to heal the damage. Bonus points are awarded if you combine this with another ram (and heal) from Engine Techs.

Perhaps worth mentioning that the reason for this is the order of overlap damage / obstacle resolution, as that's one of those things that's obscure if you don't already know it.

13 hours ago, Snipafist said:

Placing aside squadrons is somewhat subjective process. In general, I find the best way to do it is to set aside the squadrons that are clearly going to be overlapped prior to completing the maneuver, but leave the "iffy" squadrons where they are. It will become clear once the ship attempts to slot into its desired location whether the "iffy" squadrons are overlapped and they can be removed with some help from the other player.

If it's unclear whether the ship will be able to fit into its desired end position, it gets a bit more complex (and we're getting to the ship-on-ship overlapping soon): I'd recommend using some kind of flat token or marker to keep track of where the squadrons in question are, then seeing if the ship will fit, and if it does, proceed as above. If it does not, then try to get the squadrons back where they were as best as you can. If any squadrons have a very important position (it is engaging squadron A but barely out of engagement with squadron B, at distance one of ship X, and at blue flak range of ship Y), then make sure to verify those with your opponent prior to using the marker so that if the squadron will need to be returned to its location, its position is easier to get just right.

The corner pieces make great markers for tracking squadron locations in this kind of scenario. Definitely agree that you should take care to verify any important engagements, ranges, and positioning with your opponent before you do this, though--just head that argument off at the pass.

7 minutes ago, Ardaedhel said:

The corner pieces make great markers for tracking squadron locations in this kind of scenario. Definitely agree that you should take care to verify any important engagements, ranges, and positioning with your opponent before you do this, though--just head that argument off at the pass.

Head them off at the pass? I HATE that saying!

/Hedley Lamarred

2 hours ago, svelok said:

Perhaps worth mentioning that the reason for this is the order of overlap damage / obstacle resolution, as that's one of those things that's obscure if you don't already know it.

Clarified in the article, thanks!

2 minutes ago, Ardaedhel said:

The corner pieces make great markers for tracking squadron locations in this kind of scenario. Definitely agree that you should take care to verify any important engagements, ranges, and positioning with your opponent before you do this, though--just head that argument off at the pass.

Agreed and that's generally what I use, although I've heard of people using washers that are the perfect size as well and should look into getting some of those...

45 minutes ago, Ardaedhel said:

The corner pieces make great markers for tracking squadron locations in this kind of scenario. Definitely agree that you should take care to verify any important engagements, ranges, and positioning with your opponent before you do this, though--just head that argument off at the pass.

They work well, but I find I use those much more to mark ships. If a maneuver looks hairy, not necessarily on the chances of ramming but my ability to actually place a ship somewhere without bumping the universe out of place, I'll go move ships, execute the maneuver, then attempt to replace the ship that I had to remove. Works well enough for me.

As of today, I've updated and edited and added links to Chapters 4 through 6 of the Squadrons Encyclopedia:

Squadron Encyclopedia Chapter 4: Large Fighter Coverage (Rebels and Imperials)
Squadron Encyclopedia Chapter 5: Using the Small Fighter Coverage group
Squadron Encyclopedia Chapter 6: Using the Large Fighter Coverage group

There have been some things removed from these chapters, yes. It's almost as if I pulled them out for a reason. A reason you'll all need to wait until tomorrow to see!

hueylewis.png
I don't know why I'm referencing songs about going back or returning to a future at all!

https://cannotgetyourshipout.blogspot.com/2017/10/squadrons-encyclopedia-chapter-7.html

Squadrons Encyclopedia Chapter 7: Actually Attacking Ships!

That's right, with Halloween two weeks away, it's time for this zombie to rise from his grave!
david%2Bs%2Bpumpkins.png
Nothing is scarier than David S. Pumpkins!

So, having done a massive review (stupid Rhymer nerf... stupid extremely helpful Rhymer nerf...) of the Squadrons Encyclopedia, I now have two more posts to add to this. The first, this one, is how to actually blow up ships with squadrons and all. I pulled some parts out of Chapter 4 and put them in here, and I added some more new stuff into this section, so theoretically this is chapter 4.5. However, arranging things in this fashion flows better this way, I feel.

Today, we'll talk some builds (in a general sense) and how best to apply damage and attack ships best. I covered a bit of this in chapter 4, (building the) Large Fighter Coverage group, and chapter 6, Using the LFC, but a substantial amount of that article is how to go about killing enemy squadron groups. This one is how to kill enemy SHIPS. The next article will be a combination of a Fighting Fleets article slash how to fight a heavy squadron fleet. I address some of THAT in chapter 3, with the Small Fighter Coverage group, but that again is more about attacking squadrons with your squadrons. I hesitate to say these two will be our LAST Squadrons Encyclopedia article, as I know soon enough I'll have yet another topic to add to this new thesis I'm writing, haha.
SWCNT.png
I actually wrote my Master's Thesis on growing SWCNT for potential use in photovoltaic cells and.... you stopped caring.
So, attacking ships. You know, that reason you brought Bombers. The first thing you need to realize is that when you're constructing your list (which usually includes a LFC), you need to be able to handle both other squadron groups and your opponent's ships. A swarm of Major Rhymer and 13 other TIE bombers IS somewhat scary, yes, but they're in a LOT of trouble versus 6-8 A-wings and substantial flak. You need to be able to kill squadrons and ships with your build, which is something Rebel squadrons excel at. As I said above, please see last chapter for a discussion on fighting squadrons with your squadrons. But in order to kill ships, you're going to want to put as much damage from your bombers into your opponent's ship as fast as possible. The more damage and dead ships your opponent has, the less ships he has to activate. Simple enough, right?
So what makes up a typical bomber build? You have 2 main options, quantity or quality. Quality bomber builds for Rebels tend towards Norra Wexley (mother of Snap) and several B-wing friends rolling 2 dice (for twice the chance at using her crit ability!). Quantity Rebel bomber builds tend to have 10+ squadrons for a START, with a majority of them being Y-wingsand X-wings. You're not going to deal a potential 4 damage into a ship with these, but you're going to be doing a LOT of damage to whatever ship faces you and overwhelming it with nickel and dime penny attacks (pennies were chosen as I refer to bomber attacks from B-wings in Chapter 4 as nickel and dime ones, but the principle is the same, terrible jokes aside). Major Rhymer and his 5-6 TIE Bomber friends excel at quantity, and they are pretty much the most commonly seen quantity plan.
q%2Bvs%2Bq.png
I got sick of quoting Joseph Stalin, so here, have a rock fact!
Imperial players CAN do quality with Firesprays hitting an opponent's ship, and Rebels can do quantity (Hi JJs Juggernaut!), with my previously mentioned Xs and Ys (or in JJs case, and my previously mentioned case, 8 Y-wings, 2 YT-1300s, and 2 HWK-290s). The reason you tend to see B-wings and Rhymer for Rebels and Imps respectively is the greater ways of pushing squadrons since wave II back in the day (Peltas and Quasars for Rebels and Imps, again resepctively). There's nothing wrong with running the other groups (Firesprays and Xs/Ys or intense Ys), and they can still get work done very well. I'm only focusing on the groups (B-wings and Rhymerball) that are most indicative of the strategy for some discussion of basic points below.

What both groups are trying to do is similar, however. Both are trying to either overwhelm the shields of your opponent's ship or your opponent's defense tokens, and then they're trying to overwhelm their health/hit points. The assumption you make when you're bringing a significant bomber presence is that you're going to use those bombers to deal the majority of your damage into your opponent's ships. Your carriers CAN contribute damage (ISD-I and ISD-II for example), but usually most dedicated carriers (Quasar, Nebulon B, Assault Frigate, Pelta) have less dice for the points than you would think. See Chapter 4 and the 2nd Goal Breakdown (Increased damage from your ships) for an explanation of why their damage is actually stronger than it seems.
weird%2Balbuquerque.png
I swear this article is more than just me pointing to previous other articles....
The "quality" B-wings group aims to deal significant damage fast to take out the shields of whatever ship you're facing. With Norra nearby, a blue crit and a black hit (2 base damage) turns into 3 total damage to whatever hull zone you're firing into (so long as there's a shield there). If you luck into the black hit+crit and a blue damage (hit or crit), that's 4 damage (3 from the dice, 1 from Norra's crit ability). That wipes the shields in that hull zone for everything but the LMC80, who's already not happy that B-wings are hitting him. Do that a few times and you've taken out the shields of your opponent's ship and then it's just straight hull damage after that. Your opponent starts burning redirect tokens to move the damage around, but it's significant enough damage on its own that they're just wiping out shields on different hull zones, allowing other ships and squadrons to start contributing hull damage faster. You CAN redirect the 3 damage my B-wing just rolled into your front arc, but that's taking out a LARGE amount of the shields you had in that side (if not all of them!)

The "smart" response to THIS attack plan is to just let the Norra-enabled crit wipe out whatever shields you have in that hull zone as fast as possible, as her ability stops working when you're not hitting shields any more. Of course, now you've got to redirect AWAY from the hull zone that's shieldless, but it's also one less total damage coming in at your shields. Let's look at an example of Rebel-on-Rebel violence.
norra%2Bexample.jpg
B-wing health as is to describe B-wing activation order(s)., MC80 shield zones to be described as compass directions
So let's say B-wing 1 goes first and lucks into that black dice hit+crit followed by a blue dice hit. That's 3 damage, plus Norra's crit ability, for a grand total of 4. That's horrifying. The MC80 player determines that he's going to just let it all hit that hull zone. When B-wings 2 and 3 activate, there are no shields in the West side of the MC80. Which ALSO means that any crits that occur are regular crits, not Norra enabled, for at most 3 damage (with the black dice hit and crit again). That means the MC80 only has to redirect 3 damage. Even assuming PERFECT 3 damage rolls from both B-wing 2 and 3, the redirects result in zero shields in the south and 1 remaining shield in the North. That's one shield less that needs to be regenerated, or one MORE that can be redirected to a different hull zone to keep that MC80 alive.

If, however, the MC80 player started redirecting from the get-go, it's much more of a problem for him. If we again assume 3/4 damage from Norra's crit from B-wing 1, he redirects 3 to the South and takes 1 from the crit on the West. B-wing 2, now with shields there in the West, gets an extra damage. One to the west, 3 to the north (redirecting again). We now have (after B-wing 2's attack) for shields 1-north, 0-south, and 2-west. When B-wing 3 goes and gets the same 3 damage on the dice, that's 4 from Norra. Even blowing the redirect again, that's 1 (crit damage) to the west, redirected 1 to the north, and then 2 more to the west. Which results in BOTH no shields anywhere but the East side AND 2 damage to the hull. Norra's crit ability gave them an extra damage EACH attack she could. And while Dodonna and B-wings love getting face up crits on your ships, they also really love damaged ships just as much. Take away Norra's ability to help them and she's just a 17 point bomber after that.
norra-wexley.png
Clubs, girls, dancing, naked, MOM?
The "quantity" group aims to just pour fire into an arc or two in such small amounts that redirecting it is nearly useless. There's so MANY attacks coming in to the SAME hull zone that the enemy ship just dies before it can have all its shields wiped out. Having been on the receiving end of this multiple times, you burn your redirect tokens on single dice attacks, and you get SO MAD YOU GUYS that the TIE bombers just keep wailing on you without your ability to do anything (and you have to keep taking all that damage). Liken this to a beam drill that's just tunneling into your ship, no matter what you do. Combine that with Major Rhymer's ability to get a LOT of TIE Bombers into one arc to keep hitting a ship over and over, and you've got a ship in a large amount of trouble fast. Because the Quasar exists now, you CAN throw 6 TIEs at one glance, which has a good chance of putting substantial damage into any ship you want, no matter what defense tokens your ship has.
rhymer%2Bexample.jpg
Once again, squadron health chosen for order of activations. MC30 shields named the same compass points as the MC80.
To keep things equal, we'll assume all the TIE bombers end up doing Hit+Crit damage, as I assumed max damage for my B-wing example above. So Rhymer does 2 damage to the west side. Bomber 1 does 2 as well (redirect one north, take remaining one on shield of west side). Bomber 2 does 2 (redirect both north). Bomber 3 does 2 (redirect 2 south), and then bombers 4 and 5 have 2 damage each into an unshielded hull zone that has NOWHERE to redirect using its final token, resulting in 4 damage and a dead MC30. In practice, the Admonition title means that all of this damage won't necessarily stick (especially when those Evade tokens get discarded to cancel the dice you're throwing), but 61 points of yours can kill 63 of theirs in one activation.

Like I said, in practice there's an Admonition title (there's ALWAYS an Admonition title, haha) that will negate some of your attacks. But that's tokens that can't be spent ignoring other dice and wiping out other dice; tokens that can't be used on future attacks, either. Either way, you need to follow your bombers in with more attacks to kill some of the more defensive ships and admirals.

Having shown these examples and all, is there a better version, quantity or quality? No, it really comes down to how you use them and what you kill with them and what you support your squadrons with. Remember from last time, chapter 6, where I mentioned Rule 8:

8) The goal of the game is to score the most points.

To quote Eric, "your large fighter coverage groups should, at their core, be a means to deliver damage to enemy ships, as that allows their large points investment to go towards winning the full game rather than just winning the squadron mini-game." You CAN fight enemy squadrons as needed and blow them up, but you want to be hitting ships with them more. Your standard bombers (B-wings, Y-wings, TIE Bombers, Firesprays) do much better work when you kill ships than when you kill squadrons with them. Both types of bombers are good at hurting ships due to the fact that they overload defense tokens from piling on damage that can't be significantly altered by those defense tokens. Speaking of what you kill with them....

Target priority!
So we talked the basic quantity versus quality builds, but how do you know what to hit? Do you go for the nearly dead MC30 or the healthy CR90?
dorado.gif
This whole movie was a giant exercise in what inappropriateness you can get away with
The real answer is that it depends, but you want to take out as many ships as you can. If you can send Luke to hit the CR90 twice (with Adar Tallon!) and another squadron or two as needed to finish off the MC30, that's the best plan. You'll need to evaluate the game state and how everything is going at that moment, what next turn may bring, what ship is currently activating and is moving where, what is it able to fire on afterwards, what SQUADRON is able to attack, for how much potential damage, where that damage can be applied to, etc etc. There's so much to take into account that choosing the right ship is never an easy thing to do.

The EASY answer is to go for the highest priority target right now. If that's a Raider nearby that wants to flak your squadrons, end it. If it's an Avenger ISD bearing down on you, well, start applying bombers as fast as you can, and hopefully keep your ships out of its way as much as you can.

How to Bomb
Because this article isn't long enough, I'm going to talk quickly about the correct way to bomb enemy ships and some minor pitfalls I've fallen into.

1) When you're sending in bombers, be sure you can send in ENOUGH bombers.
What this means is that Flotillas, while great by their lonesomes and provide that lovely Bomber Command Center reroll, have (with token use) the ability to send 3 squadrons in. That will do a good job at hurting or finishing off a crippled ship, but it may not be able to kill a healthy ship. When that ship activates, it may use some of its arcs to flak you. Or even worse, send in TIE fighters and THEN flak you. Then you've got to figure out how to get rid of the squadrons intercepting you while still being able to bomb your ships. That's potentially a way to separate your forces, leading to issues where you need your Fighters on the left and your Bombers on the right, but they're reversed for you currently. Not ideal.

I'm not saying "don't push squadrons with flotillas;" what I'm saying is make sure the squadrons you're sending will either kill their target or are your fighters off to intercept the enemy fighter screen. Flotillas that go early in the turn LOVE pushing my X-wings and A-wings and other fighters to get them into position. Usually for me, Bombers get launched by ships throwing out 3+ squadron commands a turn NATURALLY.

2) Don't overextend yourself
Know where your Bomber Command Center, Toryn Farr, and Norra Wexley are in relation to you and where you need to go. This will come over time with practice, but if you're depending on your B wing blue dice to NOT be an accuracy, stay at most 3 away from whatever ship you have Toryn Farr on. If you really need Luke to roll that Hit+Crit, keep him in range of at least one BCC you brought.

This ALSO ties in to where your ships will be next turn. If you're moving your Yavaris away from the ISD and running away, make sure your squadrons are going to end up in commandable range. I cannot tell you the number of times I've screwed this one up, so, uh..... try not to do that?

3) Don't land in a double arc. Especially of a Raider.
I've given Eric multiple kills of my squadrons by doing this. Again, try not to do this.... but this ties back into point 1. If you can send in 4 B-wings, you've got a good chance of killing his Raider (if you can ensure a BCC reroll that helps immensely). Just make sure that you send them in an order somewhat akin to what I have below. Yeah, you may end up double arced, but only one of them will be able to be double arced next turn (assuming you didn't destroy the Raider with repeated bomber attacks).
hitting%2Braiders.png
In this example, the health of the B-wings represents the order to send them in slash where to place them.
4) DO land in a strong firepower arc, especially of things without Gunnery Teams.
Raiders love using that front arc to attack ships, as do ISDs. H1MC80s love their side arcs. A VERY GOOD place to put your squadrons is in those arcs. If they DON'T have Gunnery Team, they have to choose between attacking the ships they want to shoot or the squadrons that are attacking them. Terrible, hard choices are the best choices. If they DO have Gunnery Team, that's one less attack coming at your ships. Which is a win for you, as at best, you'll only lose 2 HP to enemy flak. This relates to movement and point 6.

5) Concentrate your fire on the same arcs. Especially those ships without Redirects.
Looking at you, Raiders. Flak ME, will you? Well here comes a bunch of B-wings at your face! If they keep having to use their defense tokens to NOT take hull damage, that's better than you just bringing down their shields separately in different arcs. Why? If I can take out the shields on a zone, any further attacks on that zone have to either go INTO the hull (Is it crit enabled? Man i hope so!) or get moved away somehow. That's not an easy proposition for most ships to want to deal with, and if you can force them to spend away tokens, they won't have them on subsequent turns. Your next turn Yavarisfront arc attack might actually kill that VSD that didn't have any more redirect tokens left, which would let your bombers go and engage another ship, starting the process all over again! If you don't have to destroy X shields on a ship before it dies, that's as good as taking away X hit points from it. Motti ISDs already have 14 hit points, don't give them more by trying to take out ALL their shields first.
mc80%2Bex2.jpg
Our earlier example, the start of the next turn
As we can see in our above remaining example, hitting that MC80 in its arc is 3 B-wing shots worth of damage, which can potentially kill the MC80 if you roll well enough. It's not a guarantee, but there's no reason to worry about the shields on the opposite side of the hull and taking those out. Just keep hitting that same unshielded side arc. If you remember our OTHER example (with Rhymer and friends), they hit the same arc with all 6 shots. Over and over and over again.

If your opponent moves the shields around (with an Engineering order) that's damage into the ship that ISN'T removed and shields that AREN'T healed. Even if 4 shields were moved into that arc, that's 2 good rolls of a black dice to get the hit+crit and you're right back to hitting their ship. That's one lucky Norra-enabled B-wing shot. That's ALSO another arc that no longer HAS shields, so if you have a squadron command, you can just hop to the other side of the ship and hit that newly exposed arc.

6) When the ships move and you get to place your squadrons afterwards, stay in that same arc if you can.
This is also why I advocate hitting ISDs in the front. They're moving forwards all the time, so when they land on you (and they WILL land you, they are very fat and bulky), you can just place yourself in their front arc again to get more attacks against that hull zone. And hopefully by now, its shields are down from your constant attacks, letting you wail on its hull or force it to spend those redirect tokens it would rather use on larger attacks instead of against your bomber damage.

This does mean that if you're shooting an MC80, to stay in its front, you need to hit it in the front, which goes against my above advice of "hit them in the side." If you're facing Ackbar, oh, definitely go for that front arc and make him choose between using his admiral's ability and flakking your squadrons. If anyone else is bringing an MC80, it depends on how fast they're going and if they have Engine Techs on them. But the general advice of staying in the same arc and hitting them in the same arc applies. See point 8 below for more on this.

7) (New for this edition!) Don't chase crits.....after a fashion
Before the FAQ, BCC used to be seen in multiples, allowing you to reroll the first time for free before using your second BCC and second reroll to take care of any misses you saw. NOW, you get one reroll on those black dice. BCC is a dice fixer for when the dice screw you over. You've only got a 2/8 chance of rerolling into that hit+crit, and an EQUAL one of rerolling into a blank with no way of fixing that.
omar%2Bcoming.png
I chase hits+crits on black dice like a heroin user. But like Omar says, "all in the game."
Use the BCC as a dice fixer and accept your single hit black dice, you'll be much happier that way. You CAN reroll it, and sometimes it works. Sometimes it doesn't so badly that you end up getting a blank (as happened LITERALLY today to me with Luke, womp). I understand sometimes that we all NEED that Hit+Crit right here to win the game. But just know that it won't always work out when you chase it on that black dice and you'll be a little less prone to tilting.

The nice thing you CAN do as a Rebel is that with B-wings and Toryn Farr, you can reroll the blue dice with her ability once and then reroll it again with BCC. This IS legal, and DOES let you chase crits for Norra's ability. Be careful though, as you need to remain within 3 of Toryn's ship. If not, you may reroll the blue dice from BCC into an accuracy. Depending on if you're firing on a flotilla or not, this may or may not be worth it.

8) (New for this edition!) You can move and shoot in ANY order with a squadron command
This is something I first saw JJ do in the Worlds finale. His Y-wings, at distance 1 of his opponent's Assault Frigate fired into the available hull zone. He then, after firing, moved them away from the firing arc so that way more bombers could get into the area. He moved them in such a way that next turn they were able to get to another ship or hit the Assault Frigatenext turn if needed. This blew my mind when I watched it, as I knew it was possible, but I hadn't considered it. He just kept piling on the damage in the same arc, eventually killing the Assault Frigate, but seeing squadrons go BACKWARDS or MOVE AWAY from the ship? Mind blowing. Related to my above points about not outstripping your commanding ship(s) and staying in the same arc, you can fire on your opponent's ship and then move "forwards" (in HIS forwards direction) towards where he's headed, just for you to be able to hit him next turn again! Depending on dial choices, too, you might move it from one ship's command to be in range of the ship commanding them next turn!

There's not much more to say about how to hurt ships with your squadrons. The only remaining point I'll bring up is the same one from EVERY squadrons encyclopedia post, which is especially true for bombers:

Squadrons activated by squadron commands > Rogue squadrons > Unactivated regular squadrons

This is especially true for bombers, as activating squadrons with commands lets them potentially delete ships from the table BEFORE they get to activate and shoot at you, which is incredibly helpful. If they aren't activated, I hope those ships are within range 1 of your bombers so you can actually attack with them instead of just getting to move with them into position.

Anyways, that's some tips on how to actually start damaging ships with your bombers. As always, if you have any questions about anything, please let me know.

Relevant to at least a few people given Regionals are coming up, let's talk about preparing for and participating in an Armada tournament!

So with Regionals season upon us, there has been some discussion about what should be done prior to a tournament if you want to have a good time. This involves both training beforehand as well as properly planning for the event itself. Let's get started!

6-fitness-lessons-from-Star-Wars-featured.jpg
#darksidegains #sithswole

Fleet-building
This is the very first step (after RSVPing like a classy human, I should hope) and should ideally begin at least a month before the event. There are a few considerations you should be making during fleet building:

  • What kind of fleet archetypes am I comfortable running?
  • What kind of fleet archetypes do expect to face at a competitive event?
  • Does the fleet I have in mind have answers to common opposing fleet archetypes?
    • For example: big heavy fleets, swarm fleets, squadron fleets, etc.
      • This also needs to be flavored by what kind of versions of those archetypes are most likely to be seen (based on the meta - for example, Rieekan aces is still a not-uncommon Rebel squadron fleet archetype, but the Imperial version has a good chance of including Sloane as of wave 6)
  • What kind of a bid am I making, if any? Why?
    • If I'm relying on going first, is my bid large enough? What do I do if someone out-bids me?
    • If I'm relying on going second, is my bid large enough? What do I do if someone out-bids me and makes me go first?
    • If I don't care, what do I do against dedicated first or second player bid fleets?
  • What objectives am I using? Will those help me against fleets that I've identified might give my current build trouble?

In short, be really hardcore about your regular fleet building exercise. It's important to start with something you're familiar with. Maybe Avenger Boarding Troopers is all the hotness online at the moment, but if you're not very familiar with how to play it, now is generally not the time to start practicing unless you've got a few months of time to play around with it. Start with a core idea that you're familiar with at the very least.

On a side note, while there are some "net fleets" in Armada, I generally have found that most players will include "good stuff" based around a more generic archetype or archetype hybrid rather than outright copy fleet lists. This produces a large diversity of fleets, even at high-level competitive events. It's one of those things I love about Armada. You don't need to net-list a fleet (nor do I recommend you do so overall); instead I would just recommend being familiar with the basic "good stuff" you tend to see in fleets for both sides and be aware of the basic fleet archetypes. If a particular archetype seems very popular, I'd expect to see a fair amount of it at an event, but it won't be the only thing there. In general, playing something that can do well overall and particularly so against whatever is the new hotness will be more competitive than jumping on the internet bandwagon.

Now it's time to move on to training!

Training!

yCJUD.png
When in doubt, this routine will apparently make you superhuman.

Take your original fleet and start playing it against the best players you can find. Get in as much practice as you can. Make changes according to your results (I realize I'm repeating advice from the fleet building article, sorry).

It's important during this process to challenge yourself and specifically seek out matchups that you are worried about facing. Just going up against best-case scenarios does not make you or your fleet much stronger. Additionally, if you can get in a few games back-to-back, I recommend doing so. The event itself is likely to be three rounds (sometimes more!) over the course of a day and you need to work on your endurance. By the third round or so, elements that require remembering specific timing windows or optional effects can sometimes elude you; you will notice these screw-ups during multiple games in a day and your mistakes will teach you to remember. If you never catch the screw-ups due to only playing one game in a given day when you're mentally fresh, you won't catch them in time at a tournament and tournament play is much less forgiving than casual play (sorry bro you can't rewind back to an earlier part of your activation to do that, it's a tournament).

Because local metas vary considerably, there may be some kind of archetype that isn't popular in your area that you can't find a practice game against normally. In those circumstances, see if you can find a local player who is already at a comfortable place with their tournament prep and is willing to play that kind of fleet against you for practice. If you've got a healthy local scene, it's definitely possible. If you don't have that option available, then you'll need to accept that you're a little untested against some things and perhaps do a little research online if you're worried about it.

The more you practice with your fleet, the more you'll know it inside and out and the more confident you will be in using it, the more counter-strategies you'll have built into the fleet as you update it, the more counter-tactics you'll have available in your mental toolbox during the game, and the less likely you will be to accidentally mess something up during the game itself. For this reason, it's very important to not abandon your fleet archetype for another one during training unless you're absolutely convinced the entire core idea is unworkable. It's far better to make changes when you meet with failure and continue training than to throw out the entire thing; or to put it more proverbially, "you're more likely to hit water digging one well 60 feet deep than six wells 10 feet deep."

A quick note on the buddy system
If at all possible, do everything with a friend. Going to a tournament solo is doable but it's much more fun going with at least one other person you know and hopefully enjoy the company of. You can talk tournament prep together, train together, carpool in together, watch one another's stuff when the other person is making a food run (for both of you) or using the bathroom, share stuff when necessary, have someone to talk to when there's downtime, etc. It's highly recommended.

Things to do the day before the event

  • Double-check the location of the event and when it begins. Check to see how long of a drive it should be (or whatever method of transit you will be using). If you're carpooling there, make sure everyone is on the same page about the details of doing so.
    • One thing my group loves doing is grabbing breakfast nearby first. Group breakfast has become a cherished tradition and I understand that it's popular among the FFG forum members at the bigger events too. If you can get a group breakfast planned before the event, all the better.
  • Check on what's available near the event location (Google Maps is great for this). This will be what you have available nearby for food and possible entertainment.
  • Double-check the event location's website for their policy on food and drink. This will be important for packing the morning of.
  • (Re)familiarize yourself with the basic tournament rules.
  • Check your fleet list and make sure you have all of the necessary components to use it. Now (or earlier) is the time to start asking friends to borrow upgrade cards if that will be necessary.
  • Go to bed at a reasonable hour so you're well-rested for the following day!

Things to do the morning of the event

  • Pack up everything you'll need for the event. Double-check you're not missing something.
    • I strongly recommend a tournament tray if you've got one. It makes moving all your everything around during the event much easier. Worst case I'd recommending a cardboard box or edged cookie sheet as a vehicle for transporting your stuff.
      • Bring extra copies of your fleet list for opponents to use. I like putting a post-it-note over the objectives so they can't sneak a peek at those, but can verify you committed to those objectives if they choose to go first by peeling the note off after they've made their decision.
    • If the event allows food and drink, try to pack a thermos of water and some easily-transportable not-messy food with some substance, like a basic sandwich or granola bar or fruit.
    • Pack headache medicine. The event is likely to be fun, but a little stressful at times and mentally demanding. It's very easy to get a headache and/or back pain during the day. Cut that nonsense off at the pass with some painkillers and save yourself some pain and grumpiness.
    • Bring something to do if you get the bye. A book, a Kindle, a backup battery for your cell phone so you can play a phone game, whatever. Have a plan. Getting a bye and sitting there doing nothing for 2.5 hours feels like it takes forever.
  • Eat breakfast. If possible, do it with your friends also going to the event because that's fun.
  • Bathe and use deodorant. Please. You're going to be in a somewhat cramped environment with lots of other people. Nobody likes the smell of nerd funk. We're all in this one together, haha.
  • Wear some comfortable but decent clothes. You and your opponent for each round likely don't know one another and are going to be spending the next 2+ hours working together hopefully playing a polite and enjoyable game. Get started on the right foot with a good first impression.
  • Wear supportive shoes. You're going to be standing a lot, hunched over a table covered in plastic spaceships. Your feet are going to hurt if you're not wearing supportive footwear.

Things to do at the actual event

  • Get there early. You want plenty of time to register and get everything set up at a relaxed pace.
  • Submit your fleet list on time. Sometimes the TO will ask you to fill out the official FFG form, but most events will happily take an online fleet builder print-off.
  • Be polite, ask questions, make your intentions known, and seek consensus on the game state. Ideally, you and your opponent should have a clean, polite game. One of you is going to lose, but ideally everyone can walk away from the game feeling like everything was above-board. You don't really know one another, therefore it's difficult to know for sure if the person you just met is trustworthy or not and so you can, if you're not careful, get into a kind of prisoner's dilemma. The best way around this is to give your opponent the benefit of the doubt and be polite. By asking questions when you're unsure of something (are you ready to begin the Ship Phase? which ships haven't activated yet? what upgrades does that ship have, again?) and making your intentions known (I'm activating ship X and it reveals a Y command dial and I bank it as a token, ship X is spending its nav dial to speed up to speed 3 and spending its extra click at this joint, etc.) you can help clear up any uncertainty. It also helps to agree on the game state so nobody is surprised when something happens (squadron X is engaging squadrons Y and Z but is obstructed to squadron A, ship X's side hull zone is at close range of ship Y's front hull zone, etc.). This kind of communication helps substantially when little bumps happen during the game so nobody feels like the other person gained from an error (it's easy to reset to the agreed-upon state) or deliberately cheated. Anything that makes it run smoothly is desirable!
    • The short version of this point is "don't be a ****," but in general I like to extend this all the way to "actively be helpful and try to cooperate with your opponent as much as is reasonable while still doing everything you legally can to win."
  • Call a TO if necessary. I covered this somewhat in the tournament rules article, but if you absolutely need to call over the TO for anything, don't hesitate to do so. The TO is there to help with disputed calls or in particularly bad circumstances, to punish players for cheating or slow-playing.
  • Mind your spine. Hunching over a table while standing for hours and hours is going to destroy your back. Try to stand up straight when possible or sit down. By the end of a tournament day, my back is killing me from lurching my 6'4" self over a table all day. Don't be like me!
  • Eat and drink. When you have downtime between games, take care of your nutritional needs. Your mood and your play skills are going to deteriorate if you get extremely hungry or dehydrated. That's why I recommend packing that water and food if you are allowed. If you aren't allowed, that usually means the playspace itself provides those amenities or they are offered nearby. Worst case keep them in your car and eat/drink out of your trunk like a classy fellow while a buddy watches your stuff! Side note: soda and candy can do in a pinch but they're really not any kind of serious long-term solution. You need real food and real water, haha.

Things to do after the event

  • Chill out. Go out for dinner or get a beer or grab some ice cream and chat with friends on the way back home. Something to take the edge off. Even a really fun event where you did well can cause brain burn and some low-level stress/exhaustion, so find a way to let off some steam and give your brain a break.
  • Review your experiences later. Tournaments are a great way to get a peek at how players from outside your normal community build and run fleets and are often a great inspiration for combinations or archetype variants you may not have considered or may have incorrectly sworn off as too weak to merit play. Compare notes with other locals and reflect on what worked for you and what didn't and what interesting things you saw. I find that post-tournament fleet experimentation periods are second only to post-wave-release experimentation periods and it can be very exciting to try out a bunch of new ideas!

Final thoughts
I realize the article got a little long and I guarantee you I didn't follow all the recommendations I made during my first tournament (because I didn't really know what to expect just yet), so don't feel like you're a hopeless loser if you can't do everything I recommended. The more you can follow the basic checklist, though, the smoother the experience should be for you. Good luck!

I really liked the above article, but I would like to add a few points:

1. Have fun! That's why we all play this game after all.

2. For fleet-building, you are going to be playing that fleet ALL DAY! Make sure you enjoy playing that fleet. I made the mistake at last year's X-Wing regional of bringing a list that I am pretty good at flying but find kind of boring. I did ok in the tournament, but I regret not bringing the more fun list that I had considered instead.

3. Have fun!

1 hour ago, Snipafist said:

Be polite, ask questions, make your intentions known, and seek consensus on the game state.

This is super important. Don't underestimate the social aspect at play.

You are used to playing with people you're comfortable with, but your group probably has different social mores and conventions than all the others that will be there. The only thing you can be sure of is that you're all governed by the RAW. If you want your experience to not suck, it is incumbent upon you to go out of your way to ensure clean play in ways that would not normally be important.

Be explicit and above-board about everything you do. If you usually use a custom model or something, be sure you clarify what it is with your opponent, and have the original if they object. And don't ***** about it if they do, they're entirely within their rights even if you think it's unreasonable. If you usually measure once for your whole pile of squadrons and then shove them along in a group and guesstimate range, now is the time to take the extra 10 seconds and do it precisely--yes, even on turn one. If your group is usually okay with crass jokes and you've ever had someone tell you that you are not good at reading social situations, JUST DON'T.

Conversely, the rules are there to ensure a standardized experience in the game. They are not there to be your personal weapon. "Haha, you forgot ____!" is a *** way to play. Met a guy once who outright told me he likes Mon Karren because he can use it to "gotcha" people who spend an evade without realizing it's MK. That is a *** attitude--don't be that guy. If you foresee a questionable, uncommon, or unexpected rules interaction, you should in most cases* point it out as early as possible to head off tense arguments at the point of interaction ("what do you mean evading SW-7 blues into an accuracy still results in a damage??").

And finally...

NO.

FREAKING.

POLITICS.

*I'm not saying to tip your hand, draw attention to a subtle tactic, or give your opponent strategic advice. I'm saying avoid surprises that will likely be questioned well in advance if you can do so without revealing your plan or thoughts.

31 minutes ago, stonestokes said:

I really liked the above article, but I would like to add a few points:

1. Have fun! That's why we all play this game after all.

2. For fleet-building, you are going to be playing that fleet ALL DAY! Make sure you enjoy playing that fleet. I made the mistake at last year's X-Wing regional of bringing a list that I am pretty good at flying but find kind of boring. I did ok in the tournament, but I regret not bringing the more fun list that I had considered instead.

3. Have fun!

I assume people go to tournaments primarily to have fun but it occurs to me I should make that more explicit, haha. I've added an aside about it to the main article. Thanks!

Edit: added that blurb to the beginning of the article after the intro and it goes a little something like:

Quote

A quick provision before we get too much further: I assume you want to have fun playing Armada at a tournament, so please keep that in mind during all the discussion points/steps that follow. Don't bring a fleet you won't have fun playing, even if you think it might do better than the one you actually enjoy playing. Don't be a jerk/don't ruin others' fun. Try to keep a light spirit throughout the day and avoid tilting whenever possible. The article itself is primarily interested in how to prepare for a tournament competitively and how to treat yourself and others there well, but the core assumption I make is you're first and foremost there to have fun. Don't lose sight of that!

Edited by Snipafist

First, the nitpick.

2 hours ago, Snipafist said:

What kind of fleet archetypes do I expect to face at a competitive event?

Be proud of yourself for that one. I think that's the first time I've ever corrected your grammar, unlike my USA Today bestselling author girlfriend, whose emails I have to correct on a line by line basis.

Second, if you are so inclined to that sort of thing, Vassal can be of great help for exposing you, and by extension your fleet, to new and interesting adversaries. The way Texas plays Armada is not the way Georgia plays Armada is not the way Chicago or France or Germany play Armada. New fleets can expose you to new ideas and new tactics that you can adapt and incorporate into your fleets. My second favorite I-1 loadout I stole from Boston (from @PT106 specifically), so it definitely works.

My other suggestion, which I am just now starting, is to keep a log during the workup period. Log each of the training battles, the opponent, scenario, important facts, new things discovered, all that sort of thing. In all likelihood you will never refer to the journal again seriously, though you might occasionally peruse it as you meditate beat your head against a wall trying to figure out how to beat the RCAF, but the simple act of writing down the facts will help them seep into your memory just as effectively as the post-battle debrief I always try to hold with my opponent. To that last part, remembering to discuss both fleets and what went wrong or right for each has been very helpful to me, and probably endeared me to a few people just for my efforts to connect with them.

1 minute ago, GiledPallaeon said:

First, the nitpick.

Be proud of yourself for that one. I think that's the first time I've ever corrected your grammar, unlike my USA Today bestselling author girlfriend, whose emails I have to correct on a line by line basis.

Second, if you are so inclined to that sort of thing, Vassal can be of great help for exposing you, and by extension your fleet, to new and interesting adversaries. The way Texas plays Armada is not the way Georgia plays Armada is not the way Chicago or France or Germany play Armada. New fleets can expose you to new ideas and new tactics that you can adapt and incorporate into your fleets. My second favorite I-1 loadout I stole from Boston (from @PT106 specifically), so it definitely works.

My other suggestion, which I am just now starting, is to keep a log during the workup period. Log each of the training battles, the opponent, scenario, important facts, new things discovered, all that sort of thing. In all likelihood you will never refer to the journal again seriously, though you might occasionally peruse it as you meditate beat your head against a wall trying to figure out how to beat the RCAF, but the simple act of writing down the facts will help them seep into your memory just as effectively as the post-battle debrief I always try to hold with my opponent. To that last part, remembering to discuss both fleets and what went wrong or right for each has been very helpful to me, and probably endeared me to a few people just for my efforts to connect with them.

Good catch on the missing "I," and that has been fixed.

I like Vassal for setting up examples for the blog but for using it to play games online I find it very clunky. We've got a pretty good group of guys in the area that are down for pickup games more or less whenever, so it's a hard sell for me to stay at home on Vassal rather than driving in to the FLGS to play a pickup game with a friend. I realize it is more insular that way, but I do prefer the "meatspace" version of the game and I like the opportunity to sharpen up our local meta (both me and the guy I'm playing); we've got a lot of guys that are improving and looking to get even stronger and so it's good practice both ways. I freely admit that I'm really proud of the group @geek19 and I have built up over time and we've got a cool team spirit thing going on (potentially with silly t-shirts soon?). All that said, if Vassal works for you (the generalized as well as singular "you") then please go with whatever works!

Regarding a log, it's a good idea. Around here we usually do the debriefing (as you mentioned), which to me fulfills a similar purpose, but everyone remembers things better in different ways. I'll mention it to some of the locals to see if that might help them.

7 minutes ago, Snipafist said:

Good catch on the missing "I," and that has been fixed.

I like Vassal for setting up examples for the blog but for using it to play games online I find it very clunky. We've got a pretty good group of guys in the area that are down for pickup games more or less whenever, so it's a hard sell for me to stay at home on Vassal rather than driving in to the FLGS to play a pickup game with a friend. I realize it is more insular that way, but I do prefer the "meatspace" version of the game and I like the opportunity to sharpen up our local meta (both me and the guy I'm playing); we've got a lot of guys that are improving and looking to get even stronger and so it's good practice both ways. I freely admit that I'm really proud of the group @geek19 and I have built up over time and we've got a cool team spirit thing going on (potentially with silly t-shirts soon?). All that said, if Vassal works for you (the generalized as well as singular "you") then please go with whatever works!

Regarding a log, it's a good idea. Around here we usually do the debriefing (as you mentioned), which to me fulfills a similar purpose, but everyone remembers things better in different ways. I'll mention it to some of the locals to see if that might help them.

Don't get me wrong, I prefer meatspace Armada as well, especially given that I don't think I've actually played it since about the beginning of August. All that said, for the many virtues of the Marietta community, not the least of which is our impressive size and openness, we do have an issue (for me personally) where we really can only all play about one night a week, and that's a night I can basically never make it. I thus use Vassal to compensate. It can be a bit clunky, and I do prefer playing opponents while also using the Discord server, but as a stopgap it's more than ok for me.

12 minutes ago, Snipafist said:

I freely admit that I'm really proud of the group @geek19 and I have built up over time and we've got a cool team spirit thing going on (potentially with silly t-shirts soon?).

I am very much looking forward both to the eventual existence of those T-shirts and our wearing of them to tournaments in such a fashion that it gets noticeable FAST.

17 hours ago, Ardaedhel said:

Met a guy once who outright told me he likes Mon Karren because he can use it to "gotcha" people who spend an evade without realizing it's MK.

That's some next-level assholery.

Kinda glad such a human exists, if only to calibrate how impressive mankind's ability to just sorta mostly be reasonable is.

4 hours ago, svelok said:

That's some next-level assholery.

Kinda glad such a human exists, if only to calibrate how impressive mankind's ability to just sorta mostly be reasonable is.

Every now and then, every miniature wargaming forum (except this one, so far!) I've ever been involved with has had a thread that touted "psychological warfare methods," which were basically "technically legal things you can do in a game to mess with your opponent." I've never been a fan of this kind of approach as it's grating and poor sportsmanship, but there's always a few edge lords out there who think they are powerful because they can antagonize people while not technically breaking any rules. It's childish and regrettable that some people feel that way, but that can usually be resolved at a tournament by getting the TO involved or at casual game night by having the group or a group leader give them a stern talking to. I thankfully haven't had to do that (yet) with my local community, but should it ever be necessary I won't hesitate. I've seen that kind of nonsense cause serious problems in other communities when nobody addressed it and then the decent people just stopped showing up eventually because they got tired of it.

Thankfully, I haven't seen that kind of nonsense here. Armada overall seems to be more chill, which I appreciate. You still find the occasional bad apple, but not too often.

Edited by Snipafist

“Nose Punch” was about as psychological warfare-y as I got... hitting someone’s ship when they thought they were safe first activation of the game. Just to backfoot someone.

Just now, Drasnighta said:

“Nose Punch” was about as psychological warfare-y as I got... hitting someone’s ship when they thought they were safe first activation of the game. Just to backfoot someone.

And while that can be a bit jarring or a bit tilty, I should clarify that I mostly mean things like out-of-game behavior or "technically allowed but in poor sportsmanship if it can be proven to be deliberate" type of things. Like making weird noises. Or asking the same question repeatedly as though you forgot. Or having a deliberately messy play space so it's hard to read all your upgrade cards at a glance and therefore your opponent is more likely to not notice or forget something. Or changing the speed you play from very slow to very fast herky-jerky to throw off your opponent. Stuff like that. The kind of stuff that probably deserves a real nose punch when done deliberately ;).

20 minutes ago, Drasnighta said:

“Nose Punch” was about as psychological warfare-y as I got... hitting someone’s ship when they thought they were safe first activation of the game. Just to backfoot someone.

See, there's a difference (IMO) between that and what I agree with Snipafist starts at a stern talking to and can easily justifiably end in fisticuffs. You are executing asymmetric warfare with the intent to disrupt the other guy's OODA loop. You appear to be challenging fundamental assumptions about the game state, but you are in fact completely within the rules. That's psychological warfare, just as Intel Officers or Slicer Tools include an element of psy-war when they deliberately (and legally) rearrange plans or strategies.

The other sort of nonsense I would term as "psy-ops" (which in reality is hardly if at all distinct from the term psychological warfare, but I'm using the change in terms here to illustrate my point). Here you're deliberately tilting your opponent without using game mechanics or game space to do it. It's the kind of thing the Green Berets were recently revealed to have pulled in Uganda to deal with Kony and the Lord's Resistance Army, things like leaflets, aerial sonic bombardment, that sort of thing. Now, the MK dude is "using" game mechanics, but the tilt effect is actually his out-of-game actions, the "Gotcha" and being rude about what counts and doesn't count as spending a defense token. Now I have no doubt there are ways to manipulate the game mechanics to achieve more of these "Gotcha"s, but I think my point is sufficiently illustrated, so I'll stop talking in circles now.

EDIT: For those curious, here's an article.

Edited by GiledPallaeon
1 hour ago, Snipafist said:

Every now and then, every miniature wargaming forum (except this one, so far!) I've ever been involved with has had a thread that touted "psychological warfare methods," which were basically "technically legal things you can do in a game to mess with your opponent."

Sadly, we can't claim even this exemption. I haven't reread it recently, but I seem to recall some Grade-A asshattery being defended in this thread.

Possibly even by myself--I genuinely do not remember, but I've learned an awful lot about gaming etiquette in the last two years...

Edited by Ardaedhel
15 minutes ago, Ardaedhel said:

Sadly, we can't claim even this exemption. I haven't reread it recently, but I seem to recall some Grade-A asshattery being defended in this thread.

Possibly even by myself--I've learned an awful lot about gaming etiquette in the last two years...

Womp, well there goes that. I completely forgot about that thread.

I haven't seen Lyr around here in some time. Last I heard his community had made it clear that they didn't care for him and he basically quit. He started lots of threads about what to do if your community hates you and how to be a better opponent that people don't refuse to play against; because he was posting basically exactly the same thread each month I assumed it was not going well. Looking back on the thread you linked I'm reminded of why he rubbed some people the wrong way (including me on occasion, although we acclimated to each other over time to an extent).

To the forum's credit, the vast majority of the responses in that thread refute the premise that opponents should be manipulated or annoyed in any way. Overall I feel like the forum as a whole represented itself pretty well.

Edited by Snipafist

It should also go to say that the thread was essentially forgotten about, too. It’s hardly a constant reference for people.

4 hours ago, Drasnighta said:

It should also go to say that the thread was essentially forgotten about, too. It’s hardly a constant reference for people.

I wasnt around then, and who else knows how to run the search tool on here?

8 hours ago, Ginkapo said:

I wasnt around then, and who else knows how to run the search tool on here?

Why would you use the search tool when just googling with a "site: community.fantasyflightgames.com" works so much better?