7 minutes ago, Snipafist said:

Where's your fighting spirit?
My fighting spirit ended when I dropped the show after ep. 4.
It just didn't click with me.
-Says the guy who's watched the entire monogatari series.
7 minutes ago, Snipafist said:
Where's your fighting spirit?
My fighting spirit ended when I dropped the show after ep. 4.
It just didn't click with me.
-Says the guy who's watched the entire monogatari series.
1 minute ago, ianediger said:My fighting spirit ended when I dropped the show after ep. 4.
It just didn't click with me.
-Says the guy who's watched the entire monogatari series.
Here's the thing: the first few episodes are silly but generally forgettable and a lot of people drop out around there because it's a shonen-style anime but just... more dumb. Keep at it until about episode 8 and it gets much better while still overall retaining the over-the-top silliness. It's setting up rules and playing to tropes really hard and then it starts breaking them.
3 minutes ago, geek19 said:I'm SURE you'll have plenty of time soon!
I mean on one hand, kind of yes. On the other hand, not really, no. Transitioning to super dad is going to take some acclimation.

This was the first children's book I got, though!
1 hour ago, Snipafist said:I mean on one hand, kind of yes. On the other hand, not really, no. Transitioning to super dad is going to take some acclimation.
This was the first children's book I got, though!
Man, I love those books, but I have to say I was a bit disappointed initially: I don't think they're the greatest for reading-out-loud time for really young (<1 y/o) kids. You want words--not a lot per page, but enough to keep their attention and teach them how the general concept of reading a book works; and big, clear, simple pictures so they can fixate on them.
Once (s)he learns to look at the pictures it'll get better. Mine is just starting to get the idea of looking at the cartoons in these books at 11 months. He's also finally getting some use out of his baby shower gift from our FLGS.
YMMV, of course. ![]() Also, congrats and good luck!
Also, congrats and good luck!
1 hour ago, Undeadguy said:You forgot to mention SFO is like $15 on eBay, so you should pick up another Liberty if you want another, since you also get a bunch of useful upgrades. Like Chart Officer, who run about $5.
That's another article you should write. Chart Officer.
$15? Try unavailable entirely, at least the few times I've checked. I got lucky and got one in a trade early before they were widely valued... Really need two more, but ain't no way I'm buy two more garbage scows liberties for them.
On the other hand, you did make a good point that there are some other good upgrades in those. Ugh...
17 minutes ago, Ardaedhel said:$15? Try unavailable entirely, at least the few times I've checked. I got lucky and got one in a trade early before they were widely valued... Really need two more, but ain't no way I'm buy two more garbage scows liberties for them.
On the other hand, you did make a good point that there are some other good upgrades in those. Ugh...
I had checked briefly on my phone and saw 2 vendors were out. I think I know who bought the last 2 a few months ago. Back then they were $15 a piece, and CO was $2.
Could just wait for FFG to make an alt art before buying anything else.
16 minutes ago, Undeadguy said:I had checked briefly on my phone and saw 2 vendors were out. I think I know who bought the last 2 a few months ago. Back then they were $15 a piece, and CO was $2.
Could just wait for FFG to make an alt art before buying anything else.
Yeah, I think SFO is among the top candidates for upgrade alt-arts, now that they've hit both APT and TRC.
And Rapid Reloads... >.>
19 minutes ago, Ardaedhel said:Yeah, I think SFO is among the top candidates for upgrade alt-arts, now that they've hit both APT and TRC.
And Rapid Reloads... >.>
Flight Controllers first.\
Then it can duke it out Wave-to-Wave with Flight Commander.
16 minutes ago, Ardaedhel said:Yeah, I think SFO is among the top candidates for upgrade alt-arts, now that they've hit both APT and TRC.
And Rapid Reloads... >.>
Flight Controllers! But it's unrealistic for me to run more than 1.
Flight Commander, Flechette Torpedoes, Reinforced Blast Doors, and Dual Turbolaser Turrets are all ones I'd like. I only own 1 Arq and would hate to buy another.
1 hour ago, Drasnighta said:Flight Controllers first.\
Then it can duke it out Wave-to-Wave with Flight Commander.
Both FC's are relatively rare to need more than one, whereas SFO I plop into pretty much any command 2+ ship with open officer slots at this point.
15 minutes ago, Ardaedhel said:Both FC's are relatively rare to need more than one, whereas SFO I plop into pretty much any command 2+ ship with open officer slots at this point.
Yeah basically. The issue I run into is finding room in that officer's chair. Lando keeps leaving Colt 45 cans in the MC30 chair. Great on Salvation though.
Also, i just went to check and I didn't realize the Rebellion only has 3 command 2 ships. Weird, for some reason I thought there were more. Imps have 4, and he's great on Glads, Arqs, and Quasars. Mmmmmaybe not on Interdictors though.
1 minute ago, geek19 said:Yeah basically. The issue I run into is finding room in that officer's chair. Lando keeps leaving Colt 45 cans in the MC30 chair. Great on Salvation though.
Also, i just went to check and I didn't realize the Rebellion only has 3 command 2 ships. Weird, for some reason I thought there were more. Imps have 4, and he's great on Glads, Arqs, and Quasars. Mmmmmaybe not on Interdictors though.
He's done okay there for me, but in general I usually want an option with a bit more heft. Wulff or a Damage Control Officer or the like. Sometimes Tua, even.
49 minutes ago, Snipafist said:He's done okay there for me, but in general I usually want an option with a bit more heft. Wulff or a Damage Control Officer or the like. Sometimes Tua, even.
You gotta USE an Interdictor first, haha. I wish it was more worth using, I really do. It's so iconic and yet so left on the sidelines. At least you got the one in CC?
18 minutes ago, geek19 said:You gotta USE an Interdictor first, haha. I wish it was more worth using, I really do. It's so iconic and yet so left on the sidelines. At least you got the one in CC?
I do use one periodically, but usually in 500 point games. It's tough to fit into a fleet at 400. Not impossible, but tough.
3 hours ago, Ardaedhel said:Both FC's are relatively rare to need more than one, whereas SFO I plop into pretty much any command 2+ ship with open officer slots at this point.
That’s you.
ive never used more than the single SFO.
in fact, give me more FC and I have less places for SFO...
The other reason is more, they already have upgrades from rebel packs.... balance that out with some imp only packs, please...
Edited by Drasnighta11 minutes ago, Drasnighta said:That’s you.
ive never used more than the single SFO.
in fact, give me more FC and I have less places for SFO...
The other reason is more, they already have upgrades from rebel packs.... balance that out with some imp only packs, please...
I mean honestly I'd be down for both, eventually. If I had to choose then I give the award to SFO because he's easier to squeeze into a variety of fleets, but ideally we'll get both sooner or later.
8 minutes ago, Snipafist said:I mean honestly I'd be down for both, eventually. If I had to choose then I give the award to SFO because he's easier to squeeze into a variety of fleets, but ideally we'll get both sooner or later.
And I do admit, I don't generally find I need SFO. I do believe I generally get my commands right, so I don't need the correction - and I'm pretty **** ruthless with anti-slicers, or at least other redundancy, so I rarely need the emergency...
I'm good with command and maneuver. Heck, really, its my only strength in this game... So I rarely see the desire and use for the flexibility and insurance that it provides.
Also, Christmas for my little man this year: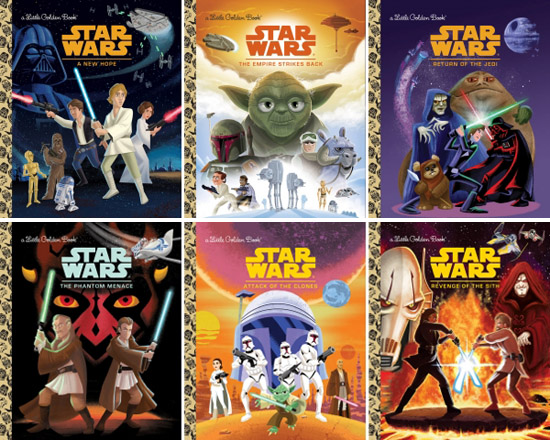
19 minutes ago, Drasnighta said:And I do admit, I don't generally find I need SFO. I do believe I generally get my commands right, so I don't need the correction - and I'm pretty **** ruthless with anti-slicers, or at least other redundancy, so I rarely need the emergency...
I'm good with command and maneuver. Heck, really, its my only strength in this game... So I rarely see the desire and use for the flexibility and insurance that it provides.
It's rare that I need him specifically for my own mistakes, although that does happen on occasion and is the most straightforward use for him. I find he's primarily useful for the command dial contingency planning and for when opponents abruptly shift their tempo (which is difficult to gauge as to when/if that will be happening, especially against commanders like Ozzel or, to a lesser extent, Leia who are adept at that kind of thing).
QuoteAlso, Christmas for my little man this year:
Hopefully my future son will enjoy Star Wars, because I would've loved me some Star Wars Golden Books back when I wasn't at double-digits yet.
13 hours ago, ianediger said:My fighting spirit ended when I dropped the show after ep. 4.
Isn't 4 the one-off episode where the art style changes?
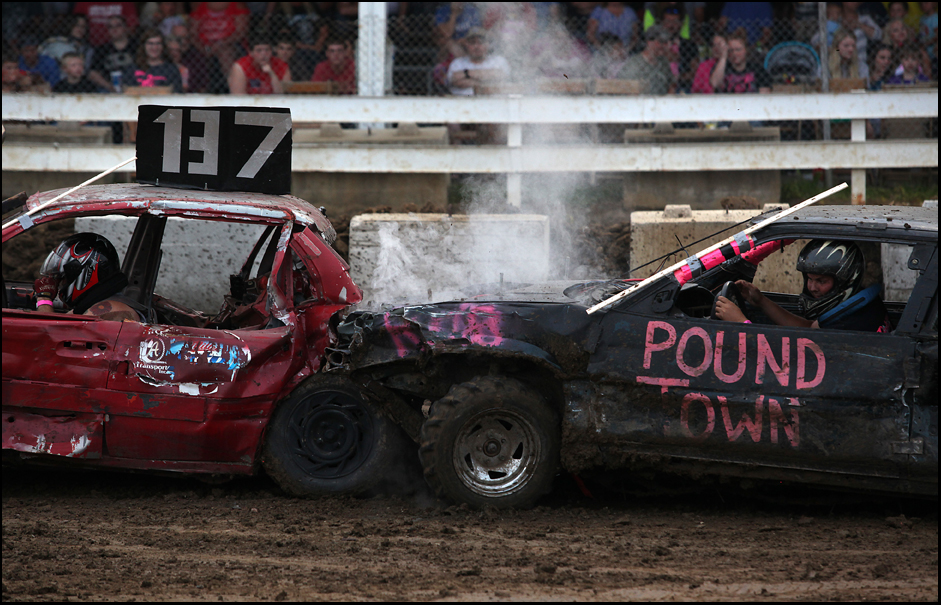
http://cannotgetyourshipout.blogspot.com/2017/10/overlapping-or-demolition-derby-in-space.html
Despite becoming a Chicagolander through osmosis occurring over more than a decade, I was born and raised in northwestern rural Illinois (where my high school mascot is a pretzel) and let me tell you city slickers that demolition derbies are awesome. Just a whole bunch of the most junked up barely functional cars all smashing into each other and driving around with pieces hanging off and smoke blowing around as they throw mud all over the place and get into loud crashes while the crowd screams until there's only one quasi-functional car left standing. If you've never been to a demolition derby, I highly recommend it. And with that said, on to the article...
|
|
|
Oh man, 137 is really getting taken to Pound Town. |
Overlapping, or "ramming" as it is more commonly referred to when it's ship-on-ship overlapping, is one of the elements of Armada that is rarely completely understood in all of its ramificiations early on by newer players (gotta practice those dad jokes, the kid's a month away!).
Before I go any further, I'd like to address the fact that some players are extremely salty about overlapping in the game. The argument is that space is 3-dimensional and so it's stupid for ships or squadrons to actually get in one another's way unless ramming is intentional, which should be difficult to pull off (as your target can try to avoid you in 3 dimensions) and dangerous. I can't dispute that it is a little unusual from the perspective of a space battle, but the simple fact is Armada is a 2-dimensional approximation of 3-dimensional space combat. We're constrained by the fact that the table itself is incapable of holding two objects in the same physical space and therefore some kind of rule is necessary to resolve incidences where two things want to be in the same place at once. FFG also likely realized that some players would want to be able to ram ships and decided to just roll everything together. I think it works just fine overall.
One other preliminary note: I've encountered some players who believe overlapping may only be done when it is unavoidable. That's completely incorrect. You can overlap deliberately all you like. Overlapping deliberately can be extremely useful and I'll talk a bit more about that once we've cleared the rules section which is coming up.
Rules discussion
Page 8 of the rules reference guide (and the Armada FAQ) informs us how to deal with overlapping and I'm copy-pasting what it has to say below. The rules text itself will be bold and italicized and my commentary will be in regular text.
Overlapping
If a ship executes a maneuver and its final position overlaps one or more squadrons, move any overlapped squadrons out of the way and finish the ship's maneuver. Then the player who is not moving the ship places the overlapped squadrons, regardless of who owns them, in any position around that ship so that they touch the ship that moved. He can place those squadrons in any order, but he cannot place them outside the play area. (this last bit was added in the FAQ).
I would also like to add summarize relevant bits about ships overlapping squadrons from the FAQ:
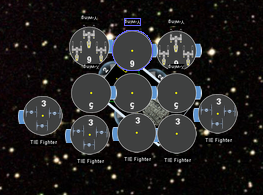
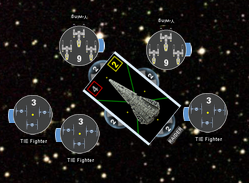
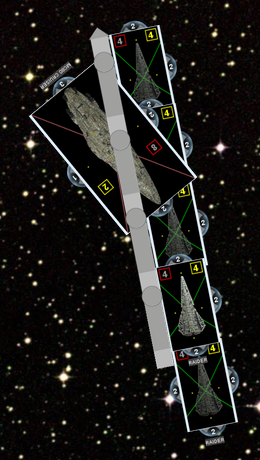
Let's provide an example of all these principles in action. A Raider-I comes crashing into the middle of a dogfight between X-Wings, Y-Wings, and TIE Fighters, overlapping all of the squadrons I've marked with blank bases:
|
|
|
You can barely make him out there, buried under pissed-off squadrons. |
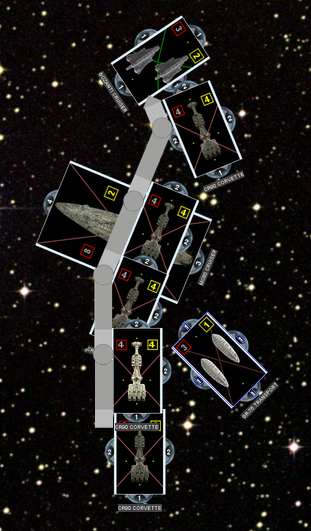
The 6 overlapped squadrons would be temporarily set aside, leaving us looking at this:
The Rebel player would then need to put the 6 overlapped squadrons in base contact with the Raider in whatever order they pleased, trying to fit in as many squadrons touching the Raider as they could and then placing any leftover squadrons in base contact with other squadrons in base contact with the Raider. Please note that none of the non-overlapped squadrons are in base contact, themselves, so they're not candidates for "contact buddy" and they need to be placed around when it comes to getting those 6 overlapped guys in there. The end result might look something like:

I left the overlapped squadrons blank to make it clear where additions were made. There isn't room to get a squadron into base to base contact between the Y-Wing and TIE Fighter on the right and it's impossible to get 3 squadrons in base-to-base contact with the Raider's back-left and rear hull zones due to the placement of the back-right and left TIE Fighters, so the Rebel player chose to put the two overlapped TIE Fighters in the rear, and placed his X-Wings and Y-Wing in the front hull zone and in base contact with placed friends in the front hull zone. This was a good decision when it comes to weathering the dogfight, but may cause some trouble when that Raider unloads with flak next turn...
Other items of note:
Placing aside squadrons is somewhat subjective process. In general, I find the best way to do it is to set aside the squadrons that are clearly going to be overlapped prior to completing the maneuver, but leave the "iffy" squadrons where they are. It will become clear once the ship attempts to slot into its desired location whether the "iffy" squadrons are overlapped and they can be removed with some help from the other player.
If it's unclear whether the ship will be able to fit into its desired end position, it gets a bit more complex (and we're getting to the ship-on-ship overlapping soon): I'd recommend using some kind of flat token or marker to keep track of where the squadrons in question are, then seeing if the ship will fit, and if it does, proceed as above. If it does not, then try to get the squadrons back where they were as best as you can. If any squadrons have a very important position (it is engaging squadron A but barely out of engagement with squadron B, at distance one of ship X, and at blue flak range of ship Y), then make sure to verify those with your opponent prior to using the marker so that if the squadron will need to be returned to its location, its position is easier to get just right.
If a ship executes a maneuver and its final position would overlap another ship, it cannot finish its maneuver normally. Instead, temporarily reduce its speed by one (without changing the speed dial) and move the ship at the new speed. This process continues until the ship can finish its maneuver, even if that maneuver is to remain in place at speed "0."
The wording here is a little awkward. Effectively, what the rules reference guide is saying is "if you would overlap at your current speed's setting on the maneuver tool, keep moving back one step along the maneuver tool until you finally find somewhere you fit." The reference to speed can cause some players to mistakenly think that the speed dial is in some way affected by this when it is not.
Then deal one facedown damage card to the ship that moved and and the closest ship that it overlapped.
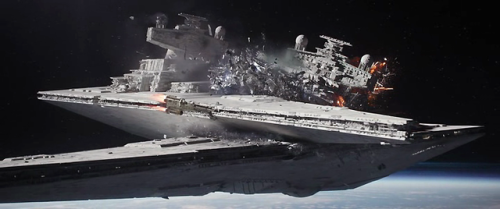
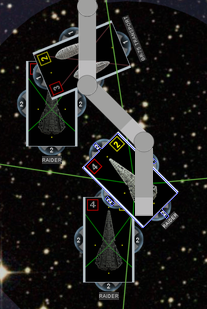
The part I want to highlight and repeat here is important. The damage card is dealt to both the overlapping ship and the closest ship that it overlapped. This can result in some paradoxical situations, which I'd like to illustrate with another example. Let's say your speed 4 CR90B is trying to get into an iffy position to line up an attack on an enemy Gozanti by hopping over your own ships but ends up overlapping the Gozanti accidentally. Here's how that would work out:
Okay, so we can see the poor CR90 underestimated where the shield dials would overlap and can't fit at the speed 4 joint. It then moves back to the speed 3 joint and won't fit there either. It moves to the speed 2 joint and again will not fit. It moves back to the speed 1 joint and fits successfully. The CR90 will now take a facedown damage card and it needs to determine which other ship will take a facedown card as well. It has 3 candidates in this example and I'll explain why they do or don't qualify:
This result may surprise some people because they would think "well this whole problem would not have happened in the first place if it hadn't been for the initial overlap with the Gozantis, so therefore they should take the ramming damage!" That's true, but that's not how the damage from overlapping rules work. Be careful when you're performing a risky move like the one above where you may end up smashing your own ships due to a Rube Goldberg machine of failure.
If a moving ship or squadron overlaps an obstacle token, it resolves an effect depending on the specific type of obstacle token that it overlapped.
We covered how this works back in the obstacle deployment article.
This is the bullet point for "no, for real, you don't actually do anything with your speed dial when your ship overlaps another ship, why did we write this so confusingly?"
Speed 0 maneuvers (a favorite of this blog) are still maneuvers and if it turns out you overlapped a ship and didn't move anywhere, you still rammed that ship and you still landed on wherever you started, potentially triggering obstacles all over again. Being stuck ramming something and landing once more on a debris or asteroid field is a very bad place to be.
This is a huge deal and is occasionally missed, so please don't overlook it. When you overlap a ship and move back along the maneuver tool, your ship can overlap the maneuver tool at its earlier joints. This is the only time ever ships are allowed to overlap the maneuver tool.
It's also important to note that you don't get to break this rule for where you're "supposed" to land, going the speed that's on your dial. Even if it's obvious that there's absolutely no way you can avoid overlapping at your current speed, the original regular speed destination must be done in good faith following the "no overlapping the maneuver tool" rule that is otherwise always in effect.
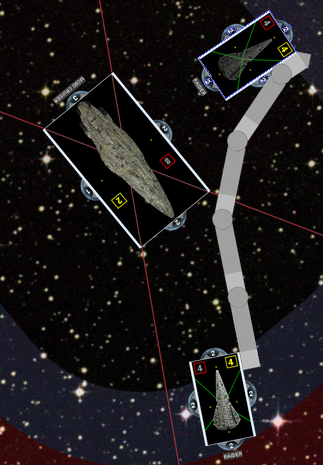
Time for another example picture!
The speed 2 Raider overlaps the GR-75s at speed 2 and so retreats to the speed 1 joint where it overlaps the maneuver tool. Note that the speed 2 landing zone would be a legal maneuver without the GR-75s present. This is a sneaky maneuver because it not only deals 1 ramming damage to the GR-75s and none to the Raider (as the GR-75s are flotillas and the Raider is not), but it also sets up the Raider for a double-arc next turn. I like to use Raiders for examples because I love Raiders but also because they're very maneuverable and flak-capable ships and thus likely to be overlapping something or another throughout the course of a game when it benefits them.
Squadrons don't share table space just like ships don't share table space. Remember that ship shield dials count for overlapping, so squadron bases cannot go underneath shield dials despite physically fitting there. When it comes time to move a squadron and you're not sure if it will fit near other squadrons/ships or not, mark its starting position so you can return there and try a new move if your original move is illegal because you overlap something at your planned destination.
This is a reminder that in Armada, ships and squadrons don't get dragged across the table from point A to point B, they get picked up from point A and dropped at point B and so can hop over intervening models without trouble provided they can land at their destination.
Being placed due to being overlapped is not moving and so doesn't trigger any effects that are movement-triggered, like the space station healing damage and using the Strategic Keyword or Mauler Mithel's ability or the like.
For ships, the shield dials and shield dial frames count as the ship's base for both overlapping and placing in base-contact purposes but squadron activation sliders are purely a play aid and don't count for overlapping. Feel free to spin those squadrons around whenever you like so the tabs cause minimal trouble.
|
|
|
Pictured: how not to do it with your own ships. |
Gameplay
That's all the rules covered and I've already mentioned a bit of gameplay advice, but there's a little more to discuss in the way of overlapping tricks available to you.
A friendly game of bumper cars
Sometimes it's better to ram your own ships than the alternative. For example, if a ship won't be able to adequately slow down and is heading into big trouble (a trap set by the enemy, a bad obstacle, flying off the table), it can be better to park a ship (particularly a flotilla, as only the flotilla takes ramming damage when involved in an overlap with a non-flotilla) in its way and suffer the damage rather than the alternative.
It doesn't always need to be such an apocalyptic situation, but sometimes if you deployed poorly (due to something like Superior Positions or Solar Corona or just due to being out-deployed), it can help to just keep a crucial ship held back without having to slow down to speed 0 and leave it vulnerable. That's easily worth 1 flotilla hull point to see how the enemy battle line develops so you can react accordingly without floating into bad times in a round or two.
Just be sure to have a plan for next round that makes it all worthwhile - when done poorly this can result in a doomed ship still being doomed and not doing much of value to compensate for the ramming damage dealt to your flotilla and the weird position part of your fleet is now in.
Cheat your way through shields
Some ships, such as MC30s, have an awful lot of shields compared to their low hull values. When in doubt, you can chip away at them fairly effectively through ramming. This can be the sort of thing that comes in handy when setting up an attack for next turn or with some help from Engine Techs and a healthy disregard for your own life can do the trick all on its own. Speaking of which...
A note on Engine Techs and extra maneuvers
You can overlap an enemy ship more than once per activation if you're allowed to perform an additional maneuver from an effect like Engine Techs or Quantum Storm. This can allow you to double-ram an enemy if necessary, but be aware of the damage you're doing to your own ship!
The space station
Keep an eye out for some guilt-free ramming opportunities against ships near the space station. Provided the ramming ship isn't 1 damage card from death, you can ram the opposing ship, take 1 damage, and then land on the station to heal the damage. Bonus points are awarded if you combine this with another ram (and heal) from Engine Techs.
Finishing blow
It's not uncommon to bring an enemy ship down to 1 hull after your attacks are complete. Ramming is a great way to finish them off when you are in such circumstances.
Flotilla crash landing
Because flotillas are uniquely vulnerable to collisions with non-flotillas (as the flotilla takes damage but the non-flotilla does not), it's quite appealing to crash land into them with flotilla-hunting corvettes. The ideal situation is to overlap the flotilla to deal it one damage earlier in the round, have the flotilla activate but be going too slow to escape from overlapping the corvette and so it will overlap it once again during its maneuver, and then either attack the flotilla to finish it off next round or find a means of overlapping it once again while your corvette busies itself going after more important prey.
Setting up double-arcs
As demonstrated in the Raider example earlier, being able to land on the maneuver tool once you backtrack due to overlapping can set you up for a double-arc when it otherwise would have been impossible moving normally.
Lesser of two evils
Sometimes smashing into an enemy ship and staying in a better position is superior to wandering into guaranteed death. It's been a little while since I provided an example, so it's time for another picture!
The Raider above attacked the Ackbar HMC80 and is doing its best to make a getaway at speed 4. If it's trying to avoid overlapping, the best it can manage is the course I show above. That's a super dead Raider (at least 8 dice coming its way soon) barring an extremely unlucky HMC80 or activation advantage for the Raider and the HMC80 has already activated and there's nothing better to activate first. So... a lot of things need to go right or else that Raider is hosed. Not great. Conversely, it can deliberately overlap the HMC80:
...which will leave it going fake speed 1 and remaining in the front arc, where the HMC80 has only 3 intrinsic dice available. I'll take 1 hull damage to me and the HMC80 and 3 dice versus no hull damage and 8 dice any day of the week. The HMC80 may ram the Raider in turn, but at least the Raider will continue to deal damage and inconvenience the HMC80 rather than getting casually swatted down.
Anticipating overlapping of your own ships
All the tricks I recommended you use to your benefit can be used against you in turn, so don't let them catch you by surprise. The only other thing to add to this header is keep an eye out for circumstances where you can trap an enemy ship by moving a ship into its flight path and forcing it to overlap you, preferably while also making it land on a damaging obstacle it was expecting to jump over. Preventing an enemy ship from turning (particularly broadsides ships at a crucial moment) can be game-clinching all by itself, but getting anything stuck on an asteroid field is also great.
Overlapping enemy squadrons
If there's a huge unavoidable bomber cloud ahead of your ship and it still has fairly healthy shields, it can be worth landing on as much of the blob as you can. The displaced squadrons will need to be placed around your overlapping ship rather than concentrated in one hull zone. For ships without redirects, this can help prolong your life expectancy substantially. For ships with redirects, it will decrease the pressure on your redirects at the very least. It also makes disrupting Intel-aided groups much easier as elements of the cloud will be more widely dispersed than before, making complete Intel coverage nearly impossible. This is also a great opportunity for smaller fighter coverage groups to gang up on the spread-out displaced squadrons to at least achieve local superiority in gunning down some enemy squadrons that are lacking backup for the moment.
But wait, there's more! If there's a big pile of squadrons dogfighting somewhere and you're pretty confident your opponent doesn't have (m)any squadron commands queued up (as they're fine just duking it out in the Squadron Phase) and you do, don't be shy about belly-flopping a ship into the furball to displace squadrons all over the place. Although your opponent will have control over where the displaced squadrons go, the chaos of the furball dispersing often causes problems for squadrons that intended to simply attack (and not move) during the Squadron Phase, which can be exploited.
Either of these two tactics can produce opportunities to get a lot of flak attacks in, sometimes double-arcing a squadron or two, but be very careful that you're not biting off more than you can chew.
In short, the basic principle of maximizing the value of displacement against squadrons is "look for situations where enemy squadrons actively want to be concentrated in one specific area and then overlap them to spread them thin." Even though your opponent gets to choose where the overlapped squadrons are placed, the overlapping ship (and other nearby ships and squadrons) can result in those squadrons being placed in non-ideal locations.
Anticipating overlapping of your own squadrons
The final squadron shenanigan is a pretty basic one that's been useful for B-Wings since the wave one days, and that's to anticipate overlapping against enemy ships. If you've got a pretty good idea as to where an enemy ship is going to wind up, either because it has a medium or large base and/or is slow and/or unmaneuverable OR if the enemy ship is strongly telegraphing what it intends to do (Demolisher attack runs when handled recklessly often fall into this category), your own bomber squadrons can function as mobile minefields, awaiting an enemy ship to land on them where they then get placed (hopefully) in the front arc so they can continue this trend. When done well enough against an ideal target (slow and medium+ sized base) you can even ignore the need for squadron commands because the target will be overlapping your bombers constantly and those bombers will keep getting placed into the front arc.
Be careful of relying too strongly on this tactic in the wrong circumstances, though. If a fortuitous navigate command will throw everything into disarray, you need a better plan. It also works better with smaller numbers of heavy bombers (hence the B-Wings comment) - a full-on bomber swarm is simply going to take up too much space and will by necessity need to be placed around the flanks when the front gets full and thus will need some extra help to keep up with the target.
Final thoughts
Overlapping is one of those little nuances in the rules that doesn't immediately reveal all of its secrets to you, but when used well in the right circumstances can absolutely decide the course of a game. I hope I've been helpful in shedding some light on the matter! Go smash into some ships!
Edited by Snipafist
33 minutes ago, Snipafist said:
And not a single Becky joke, tsk tsk, haha
2 hours ago, geek19 said:And not a single Becky joke, tsk tsk, haha
There is a weird section where you quote overlapping OBSTACLES, then go on to talk about OBJECTIVE TOKENS.
Maybe change that bit a little.
One thing I notice some players ignoring, is that shield dials count fur overlapping ALSO VS SQUADRONS.
There is room for the squad base to fit underneath the shield, but it's still an overlap.
Yet, shield dials do not count for overlapping the table edge... another “edge case” technicality ?
9 hours ago, geek19 said:And not a single Becky joke, tsk tsk, haha
I really should've, but it's too late at this point. Plus you used a bit of that a month or so ago, didn't want to overdraw from the well just yet ;).
7 hours ago, Green Knight said:There is a weird section where you quote overlapping OBSTACLES, then go on to talk about OBJECTIVE TOKENS.
Maybe change that bit a little.
That was weird and has been clarified. Every now and then my brain's wires cross and obstacle and objective get flipped, especially when obstacles are referred to as "obstacle tokens" (which technically they are, but... nearly nobody in reality refers to them that way during a game). My bad.
6 hours ago, Green Knight said:One thing I notice some players ignoring, is that shield dials count fur overlapping ALSO VS SQUADRONS.
There is room for the squad base to fit underneath the shield, but it's still an overlap.
Agreed, and that was covered in the article. Those shield dials count.