


And ... my finished T-47
The only thing I did not try on it in terms of weather was either salt / hairspray techniques. Considering how they turned out on my other test model (Walker), I opted not to go there on this.
What Did I Learn
At this point I would feel comfortable adding decals to my incoming FFG T-47 or using some masking fluid/tape to add some different colors. I feel like I could knock out the AT-RT over a week. The oils would take the longest to dry but a lot more confident in my ability to prime; rattle can and, then, do panel lines & filters.
Other new guys ... you don't get better if you don't paint
After nearly a year and an exercise in delayed gratification, I got my first ever game in today at Dragon's Lair in ATX. This is my perception through the lens of someone having never war gamed ....
Have to give some credit to fellow Texan and Austin'nite ... Imperial Terrain. His products are awesome and scale to the larger Legion characters.
Observations
Note Specific to New Painters ...
This table top quality ... at arm's length ... people do not notice ... you are your own worst critic ... ALL TRUE.
The store had all sorts of stuff going on today so I walked around and looked at other people's models ... think 40K. My collection of 5 test minis look just as good. My confidence went up a little bit today. Not being judgmental by any means. I just finally saw first hand how this all works and, now, I feel like my painting is good enough for where I am.
Oh ... and not out of want but need ... yeah, just threw a whole bunch more gear onto my pre-order. Because that is what you apparently do ... buy more minis than time ... or actual game play allows
Game is just awesome
So I went into my local store for the Opening Weekend extravaganza. First, as a new guy to all this, the gaming community is a friendly and helpful group. Everyone willing to answer questions real-time. Next, I stuck with this model ... SLOW ... and, if you have been following along, I have my general hand issues. Little numb yesterday and I was able to get this far with my Z6 trooper.
I went ahead and focused on a single model vs painting the entire squad. Very visual and I wanted to see how some of the colors ended up working out on the model, as I had tested them all on some acrylic friendly art paper. Anyway, I sat and painted a good chunk of the day. Slow, thorough and, if you have been following along, have some issues with my hands. Yesterday, could barely feel my fingers so slower than normal.
For my effort I got one of the Best Painted awards, which was pretty sweet.
I always like my minis at this point ... pre-shading/washing
This needs touched up and I want to revisit the Z6. Make the barrel more silver and the stock more black.
Struggle picking out the facial hair
For those still deciding ...
Not the best of pics ... did not feel like messing with lights and background this morning
Tip to other new guys ... what I learned ... what I picked up yesterday watching and asking ...


Thanks for following along and the help
I notice a difference in my results since this summer
All the toiling on the Bandai kit and, then, brush on paper worked/is working
My WIP Rebel Squad ... need to finish Ion Trooper coat; facial hair on the one crossover IA sculpt and helmet on the commander ... and, sort the arms out/on
Oh, and not looking up correct spelling on all the paints today. Apologies in advance
These are all PRE WASH and where I need help I feel my work is pretty neat/clean. I don't want that ruined via wash and, thus far, I really dislike how my stuff turns out post wash.
Dilute the wash with medium and carefully apply?
Forget the wash and just use colors/glazes to get where I want?
I put a lot of time into these and want the best results I can get from this point on. As always, all feedback welcomed.
Colors
My plan ...
With these done I have the option to do 2 more squads just like this, while switching up who gets what color, or using 2 more desert style themes. I have 2 other ideas in uniform colors, which will tie into colors already used.
Learned ...


Ok ... I should be at the local game night and due to work have missed it again. So I put some time into one of my AT-RT, as I bought a new product I wanted to try ...
Blue Stuff, Green Stuff or in my case Apoxie Sculpt, which comes in two separate containers and I was is easier to work with than Green Stuff. I would not really know a difference but, hey, it was instant vs waiting on an Amazon delivery.
In my previous adventures I had used something to fill some self inflicted damage on my T-47 build. However, after seeing all the mods and cool stuff people are doing with their troops I wanted to see if I could do something simple.


Found a few tutorials; rolled out a small piece on a piece of plastic; let it set for 10 minutes and boom ...
Now, this would be a lot easier with proper clay/modeling tools. All I had was my Exacto, which is not exactly smooth.
Not the modeling equivalent of the Mona Lisa ... yet I am pretty happy with the results and I got over this small fear I have of ruining one of my models. This would be a baby step towards doing a full head swap.
Other new guys ... this guy's videos are AWESOME ... Tom Mason ...
https://www.youtube.com/watch?v=hugr6VTl6NQ
They're looking good! Can't wait to see them all ready to go!
On 22/10/2017 at 3:12 PM, TUZ said:Looks awesome, great job!
I second that sentiment!
And the face looks great!!
Thanks for the link! Just what I've been looking for.
Well, I should have used my time to finish my troops but ... feeling little confident with my short foray into sculpting and inspired by all the mods folks are doing ... went ahead and chopped up my second least favorite Rebel mini to make it into ...
A trandoshan via a cut-up IA Bossk figure
Not planned. Coincidental stop at Barnes & Nobles ... found a discounted Bossk sitting on a random table. Stop at my local shop and purchased the Hired Guns pack.
My wife, when she saw this modeling taking place, why don't you just finish so you can go play? I blame the community. Totally getting into this.
I got this far into a dual effort between the Bossk conversion and readying my AT-RT for desert rust/decay effects and sliced my finger. Had JUST swapped in a BRAND new Exacto blade. With that ...
Few of you suggest I a jeweler's saw. Guys, you probably saved my hands. Got one at Michael's with a 40% coupon for $10-$12. It is good enough for what I will use it for and to all the other new guys considering this ... get one. I was using the Excacto for some molding work when tiny disaster happened.
The AT-RT is a primer coat of Tamiya's Rust Oxide. Then, a mist of dark brown (Rustoleum ... their paint sucks on minis. I have used this 4-5x on different projects and it ALWAYS flecks/spots. Always. Never again minus terrain) and Tamiya Neutral Gray. The gray spotted a little and it has more to do with how I used it. Tried very hard for a random pattern and a LIGHT mist of gray. It has gone from 91 to 40 in 24 hours and the gray dried in the air. The primer worked fine. I so need an airbrush. The spotting, though, will add to the random weathered look so per Bob Ross ... happy accident.
Bossk's feet are drying to the body and my Tamiya Flat Clear is too. Tomorrow I should be able to add the head; arms and, then, hit my AT-RT up with hairspray and a coat of Zandri Dust. Water. Small brush. Go on chipping.
I used the upright female mini for Bossk. Just searched for his size and listed at 6'2". Left his feet little long. Managed to get his arms off. Model stands little taller than the others. His arms really good size too. The figure chopped up offers a higher upper back via the smaller back pack. My thoughts are get the arms & head on and, then, make a poncho/zeltbahn to both cover up my work and, then, give the effect of bulk/size.
Rodian's are smaller. Read avg height of 5'8". I did clip the stem off the Ion trooper, which is one of my favorite minis. The Rodian head looks just a tiny, tiny bit out of scale. The heavy duty coat is the problem. The Bossk head fits cleany, as do his arms (in case someone else wants to try) but you would need some SERIOUS skills to sort out the Ion rifle and, then, blending the mold of the head into the poncho/coat.


Oh ... almost forgot ...
Bought an OLD WW2 German Infantry solider pack. So happens it has some baggage that I fitted onto my AT-RT. Bought it for the ammo pouches and grenades and such but had a bag just right for the AT-RT. I did the undersize to give it heft and make it look in place. More photos on that later.
Edited by Dash Two
Not knowing how the paint was going to react I was hesitant to do too much prior to making my attempt to re-activate the hairspray. Well, worked awesome and, now, little regret I did not do more. I used the helmet band color from my squad on the front chevron; some square and rectangle areas on the legs and a few of the circles on the legs.
Which generates the question ... will the hairspray re-activate with water tomorrow or the next day IF I do not seal the paint again? Like, how long does the hairspray respond?
These photos are the result of the hairspray technique. A few pages back I really screwed up my first attempt. Today, the score board says ... Me 1 and Model 0.
Of course I am just putting the AT-RT up and I snap the antenna off. Maybe it is 1-1.
I wanted to do more today but the cut suffered is on my left index finger. Left handed. Limiting. I got the model this far.
The mix of colors before the hairspray and base coat worked out nicely. The rust shading is random and various hues ... like rust.
Opinion, the results of this technique are SIGNIFICANTLY nicer than chipping via sponges ... dabbing paint. However, this requires much more time. A lot more time due to drying times between priming coats; clear coat seal and, then, base coat. This even promotes a 3D effect, as you are literally stripping paint away. Creates depth.
Now ... I need to finish painting different areas; seal it with a gloss; pin wash; flat seal and, then, onto filters.
You'll see a split in the fin and line down the seat. This model came split open. TINY gap that I did my best to seal.


The effect looks really good, I may try it even though it takes more time
For clarification this was not hairspray & salt. It was ...
Primer
Mist of 2 colors
Sealed with Tamiya's Flat Clear. Dry overnight
Hairspray. Left to dry for 6 hours
Spray coat of Zandri Dust. Left to dry
Water, flat brush and tooth pick. Then, a good chunk of time working the paint loose and getting desired effects.
Wow ... I knew it had been a month since I have been able to play (launch weekend) and it appears I have barely painted in a month. Jealous of some of the time/speed folks have.
I carved out a few hours the past 2 Saturdays and have made incremental progress on my first AT-RT and my first 2 squads. My third team is just about to get the final zenithal layer of priming.
Been trying to take PTO the last 6 weeks. No dice. Travel and availability for the local game night also has not worked out due to work. However, I have some PTO this week and my goal is to finish the AT-RT; highlight layers on my 14 shaded guys and, then, base coat my last 6. I have a 7th that is a Bossk IA conversion (a side project, as if I have the time) that is temporarily on hold.
Figured out my hands have max of 3 hours of painting/modeling time prior to going numb. Previously mentioned the limitation. With that I have embraced the suck, if you will, and gotten ok with being slow. From my first IA practice guy a few pages back until now ... progress. Getting better.
AT-RT


I still have to paint the control panel; bags I added and driver. Then, debating some really light and strategic edge highlights. Not sure.
Other new guys ... time consuming ... oh, yes ... this took time due to the multiple steps. Skill level? Easier than painting a tiny dude to look pro level.
Speaking of minis ... here are some of the figs I have gotten done
Base coated
Washed
Quick note to other new guys ... I STRUGGLED with washes. I hit these with light, light layers of washes mixed with Lahmian Meduim. To help guarantee I had it thinned enough I used several soda/water bottle lids. Each wash went into one. Enough medium went in to make it clear enough for me to see through the wash to the bottom of the lid. Then, controlled layers, while wiping off what I did not want where it did not belong. Layer. Let dry. Layer. Let dry.
Taking these photos and getting them to come out awesome is harder than painting. It's hard to see on all but the squad leader and the Rex like mini. Very subtle, which is what I wanted.
Now, I have 14 of these to hit with highlights and, most likely, it could just be edges and, then, working on the coats on the leader and both ion troopers. To me the zenithal priming; light layers and controlled washes finally worked in my favor. Oh, and have to finish their faces.


My man got an unfortunate poke of wash right under his eye. IT. IS. BUGGING. ME. Sorting that out during the highlight process. I am pretty proud of my Duros.


New guys ... pick up those brushes!
Holding out hope I have a an AT-RT and 14 guys along with some pending items to take to game night next week in Austin.
These look really, really good!
Sorry about the hair spray. I didn't think it would have acted like that; sorry ![]() They still look fantastic to me though.
They still look fantastic to me though.
Great choice in colors.
@Force Majeure Thank you, sir
And the hair spray coming back to life was a happy accident.
That process is simple. Just takes time. A fair amount of time, as I also hit the AT-RT with Tamiya Panel liner. You prime. You hairspray. You seal. You base coat. Hours between each. Then, you scrub with water and brush. You re-seal. You hit with filters or pigments or whatever. You re-seal. Some of those steps require 24 hours between.
Love the results. Just large investment of time.
I had left myself a note to to check to see if the hair spray would reactivate. knowing yes/no would confirm if you had to do that whole step in a single sitting OR you could do a little and stop. I got lucky and figured out you can do a little and stop. It comes back to life until you seal the model a second time.
Since other new folks follow along ... figured that out for sake of science.
I attempted to mix pigments. Found an awesome tutorial. Had a really odd reaction, as I mixed a grey with a rust. As it dried, the grey ... BAM ... really popped. Like, looked out of place. Good news was the model had been sealed again with a matte coat and was easy to wipe away. Pigments are tricky.
The Vallejo liquid weathering effects super easy to work with. No different than a wash. Thin in different levels. Add a little. Let dry. Add another level at a different mix ratio. Let dry. Add some more.
I have ideas for my other 2 AT-RT and T-47 and all require more control than I can probably get via rattle cans. Gonna test some stuff out on random plastic and see how it goes.
Baby steps, FM. Baby steps
An observation ... or two ... and a few questions for all the painters ...
What is the deal with yellow?
I have noticed some colors go on easy. Some require little more work and, then, there is yellow. To get the hue to what I wanted ... and this was over a light tan base coat ... 7 coats. I have noticed other colors require 2 or 3.
Yellow ... 7 coats ... whoa ...
And it is equally finicky on the model. There's this fine balance between not enough ... wait ... now, you put too much on ... just wow
As with all my painting exploration, I found all the tutorials around painting yellow. Forewarned yet gave it a go. Still, just wow.
You ever get nearly done with a squad or army and decide ...
Oh, this would look better?
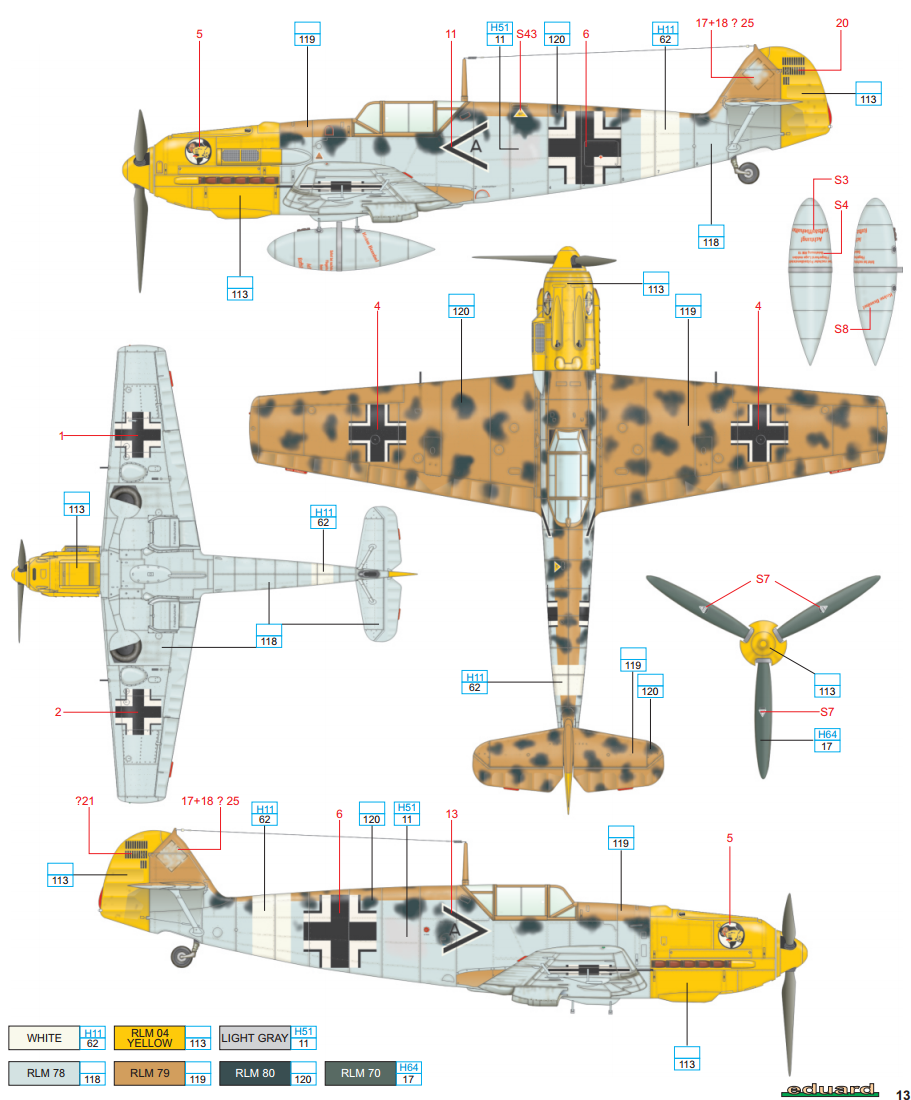
https://www.cybermodeler.com/aircraft/bf109/images/bf109e_profile02.png
My Rebels are based off these colors. Luftwaffe colors ... grey green; grey; green grey ... and, then, various browns for the webbings. Had a specific plan ... that plan had me staying CLEAR of yellow and light blue due to the challenges associated with the colors.
Helmet band green grey ...
One squad would have grey as a primary color of shirts and coats
Another squad would use green as a primary color of shirts and coats
End up with that happening and ... yep ...
Intellectual curiosity and, then, cool factor got to me and drifted into the aforementioned yellow on a mini last night. Let it set. Slept on it. With full knowledge the color is more labor intensive ...
Oh, yeah, need 7 guys with some yellow.
So, now I have 14 washed (not highlighted); 1 AT-RT done; 1 AT-RT driver base layered and, then, 4 of my last 7 base layered. Suddenly, tiny bit of regret around not trying the yellow earlier. Which, of course, went right into the light blue, which is only incrementally easier than yellow.
Photos are not awesome ... quick shots ... it also has the follow-up photo to my first attempt at sculpting. Scarf on the AT-RT driver ended up being far better than I could have hoped for a first time.


He's WIP. That's 7 coats of yellow on the jacket. Punched out prior to doing the sleeves.

Yeah ... grand plans to glaze the barrel to look warm/smoking. At this point ... why not try
I like using a wash over yellow paint or white color with yellow watch. Easier to shade, but I think red is the hardest color to get gradual shading
Ok ...
A few weeks back, when I started by AT-RT, I magnetized the weapons. With that I nearly put the pin vise; drill bit (came with the magnets) and an Exacto blade through my hands. Made a mess. Glued a pair of magnets together. Melted enough of the plastic around the resting area I had to do some molding to level it out. Oh, and the weapon mounts equally screwed up. Just did not go smoothly.
That was on a day I had good use of my hands. My first attempt at magnetizing the 3 guns took me at least an hour and the 3 weapons are a little shorter than intended.
Woke up super early today with the intent of painting. Zero control of my fingers. Yeah ... was not real happy. Put everything up.
Figured I could at least glue some stuff or build some some stuff. Something not requiring much dexterity. Then, I remembered ...
In the spirit of Occam's Razor ... saving myself a trip to the ER or a finger ... saving myself time ... I bought a $2 Fuzzy Face (below) toy. Bought this the day after I did my initial magnetizing. Forgot I had it and figured I would put my other AT-RT together.
Today, I got around to trying my little theory and I present to all other new guys ... magnetizing in minutes.
The magnets ...

Fit right into the under carriage of the AT-RT. The drill bit is beyond my ability to use on the weapon mount. Lack enough feeling in my fingers to use it, as mentioned, and just worried about putting it through my hand.
Glued 2 in in seconds.
The Toy ...

Yep ... I was shocked these still existed, given today's technology. $2 at the grocery store. I took a hacksaw to it. Dumped out the iron filings. That took less than 2 minutes.

I put a pin head's worth of CA glue on the weapon's mount. Dipped it into the iron filings. Lit tap to level. Less than 30 seconds. Repeated 5x. 3 minutes tops. You need just the TINIEST of filings and glue.
I had the toy open; filings dumped. both magnets glued and all 6 weapons done under 10 minutes.

Oh, and zero frustration; mess; blood and the weapons hang in a balanced manner.
The score today being ... New Guy 1; Hobby Stuff - 0
Edited by Dash Two
Sorry to hear you had a bad time pinning stuff. I pin stuff all the time and I usually destroy miniatures, not my fingers. Glad you found a very ingenious solution to your problem. I never would have thought of that.
@Bohemian73 Thank you, sir
Those tiny magnets are REALLY strong. A pin head, which I also tried, or the filings just make it so much easier.
Just started yesterday, I am putting magnets on both parts. I use a smaller magnet on the gun. I will have to post my minis and terrain.