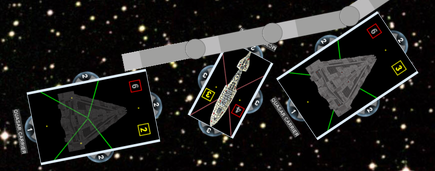
Alright, I'm leaving the analysis of the original variants to you, since you're pretty thorough to begin with. NOTE: I am not in the headspace required right now to do the probability calculations for average damage, so if someone can supply them I would greatly appreciate it. First up, the ISD-K, or the Kuat Refit.

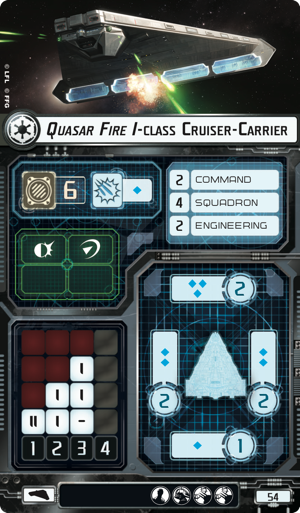
Bottom line up front: this ship is a better sustained brawler than the Imperial-1, but that ship retains the twin yokes of fighting supercarrier and BT Avenger in many fleet comps (not all). Others have commented that both ships are essentially modified versions of the original I-1 and I-2, and that's generally true, especially for the Kuat Refit. The changes here are all fairly directed at one goal, and one goal one, relieving the original I-1 of brawling duties. With the replacement of a blue in each side arc, we now have more consistent damage out of those arcs, at a slight cost to possible damage (7 vs 8 maximum, but equal averages of 3.5 versus 3.5 flat). Tag in the ability to use Leading Shots and H-9 Turbos in the side arcs, and now it's much easier to kill flotillas in arcs other than the front arc, and improved damage averages, even after the lost die. Moving away from armament, the Kuat Refit comes with a native Defensive Retrofit, freeing up our officer slot from Minister Tua. It also picks up the long-coveted Ordnance slot, in exchange for two squadron points and one of the Offensive Retrofit. And a mere two extra points of fleet cost.
Long story short, this ship is the better sustained brawler without wasting any additional capability (squadron command). For one-shot use, the ability to add External Racks (or an extra ten points for reusable Expanded Launchers), you can actually improve over XI7 armed Star Destroyers, since at maximum damage output you can completely burn a redirect shield arc, and still have the entire normal forward arc to smash the target. If that's not your cup of tea, you can use options like ACM or APT to deal additional damage to targets in multiple arcs, or outfit yourself with Flechette Torpedoes (add Ordnance Experts and Agent Kallus to taste) to provide squadron stuns on a much less fragile platform than a Raider (albeit a hideously more expensive one). The weakness of this ship are limited ability to use Boarding Troopers without a double arc to really punish tokens, ineffectuallity at herding squadrons (Sloane probably still wants the fighting supercarrier the I-1), and lower output of direct, "penetrating" damage enabled by XI7 turbolasers. Without that upgrade, this ship is a blunt instrument, ableit an extremely effective and sustainable one.
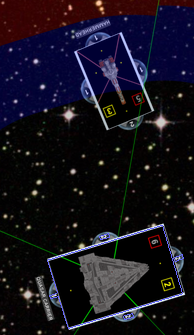
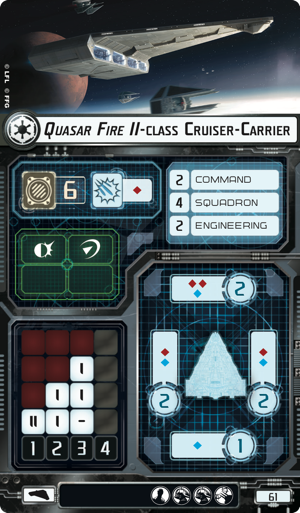
Moving on, I present the Cymoon 1 Refit.
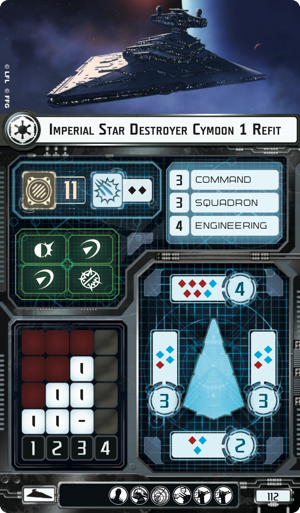
While probably still best thought of in the same vein as the Imperial-2 , this ship definitely takes a very different tack. BLUF: The Imperial-2 presents a better generalist battlewagon, but the Cymoon offers better extreme range engagement and better fleet support options than her cousin. First off, the changes. The Cymoon doesn't get a Defensive Retrofit, it doesn't get Ion Cannons, she loses a squadron point, and her threat in all arcs (save the stern) is diminished compared to the I-2. In exchange, we get two (2) turbolaser upgrades (look out Liberty), better red firepower in the forward arc (five native, better than any other ship in the game), and the first Imperial Fleet Command slot. The card fan even appears to include the long-await "Intensify Forward Firepower" upgrade for the Concentrate Fire command (my money is either additional anti-squadron output or rerolls, not full dice, but we'll see).
What can we do with the Cymoon? Unfortunately, she doesn't have an Ordnance slot to equip Flechettes for her double black anti-squad, but that is an imposing self-defense battery, as anyone who has ever tried to bomb a Liberty Battlecruiser can attest. However, unlike the Kuat, I can easily see her finding a place in a squadron centric fleet. All Fighters Follow Me can essentially retire Corruptor (we all remembered that existed, didn't we?), and can let a Sloane fleet employ TIE Fighters and TIE Bombers like their Interceptor and Defender cousins. The Pelta allowed Rebel fighter commanders to contest Imperials for automatic squadron alpha strikes; Cymoon takes that back. Shields to Maximum can allow JJ to proc himself at will without much concern for repairing those wounded shields, or Entrapment Formation to give yourself the Grand Inquisitor fleet-wide. If you're willing to cough up the premium that is an ISD chassis, the Imperial Navy now has all the Alliance's tricks.
As a combatant, she is no slouch. Her side arcs equip the same battery as an Interdictor Suppression, so enemies should be wary of trying to flank the ship at medium ranges. At long range, her front arc can boast seven red and a blue die (Spinals, QBT, and CF), and like all variants of the Imperial class, she has Weapons Team to put six red and a blue on a second target. She can't use that blue to get rerolls, but Vader/DTT/CF tokens can solve that issue. She can also fit Needa/TRCs and still take another turbolaser. Overall the I-2 is a deadlier warship, but underestimating the Cymoon is a fatal mistake.
Anyone see any build ideas I missed?