Actually, I think the good times for the Bantha are over anyways. There are so many units, that can kill a Bantha from across the map. And so many units the Bantha can't kill in one activation even with Jundland ...
Thoughts on Nal Hutta Swamps
Jets are pretty money on this map. Mobile units in general should have a good time. Shield generators and dropping crates seem to discourage sitting back and sniping.
6 hours ago, DerBaer said:Actually, I think the good times for the Bantha are over anyways. There are so many units, that can kill a Bantha from across the map. And so many units the Bantha can't kill in one activation even with Jundland ...
I can see a resurgence once we stop seeing a majority of lists sporting Rangers and eQuays. Bantha's strength also heavily depends on the maps in rotation. I think it'll still be a solid figure later in the games life. Maybe not top tier but defintely not unplayable either.
Paul did ride his Bantha to the final table at Worlds :-)
-ryanjamal
Even PAUL HEAVER wasn't able to make a Bantha win Worlds!
![]()
We had a casual Q3 kit tourney today and went with the new maps. Brought an eNexu and it was really solid on Nal Hutta, especially the crate claiming mission.
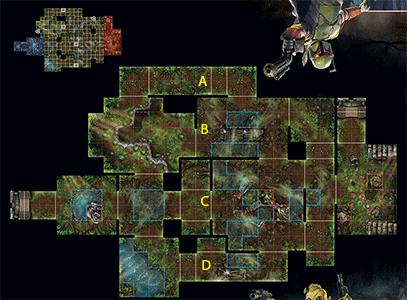
It seems to me this map is going to be about which horizontal lane(s) that you and your opponent choose to use and ultimately control in the late game. I've attached a map that labels the lanes so we can discuss them better. Here's my lame-brained lane thoughts:
- Lane A can barely be reached by double-moving Speed 4 figures from the edge of both deployment zones... but you'll need double-moving Speed 5 to get next to the crate. If you don't have initiative in the first round, you could run a Focused Greedo up to A with your last activation, and with the start of the 2nd round, Greedo could harass anyone in Lane B or even take vertical shots down at figures in parts of Lane C.
- Lane B is so wide open! It has the second-least amount of cover in-lane and both terminals are completely unprotected. This lane seems tailored for mobile units to use to ambush forces in Lane C. In particular, Imperial players starting in the blue deployment can control Lane B's crate at the end of round 1 with Jet Troopers.
- Lane C seems to be the most "traditional" shooting gallery. There are several walls or obstructions that block line-of-sight for figures from both deployments -- but don't necessarily protect them once figures get within 4 spaces of each other. This lane has several points where figures have good line-of-sight down each of the other lanes, and vice versa. Honestly, I'm not for sure if controlling Lane C *should be* the primary objective, but losing control of Lane C seems like certain defeat.
- Lane D is the easiest lane for up-close-and-personal combat. In my test games so far, I've sent IG-88 into this lane to secure the crate in the lane and then begin attacking figures in Lane C. This also seems like the lane Jedi Luke would run to first.

7 minutes ago, cnemmick said:It seems to me this map is going to be about which horizontal lane(s) that you and your opponent choose to use and ultimately control in the late game. I've attached a map that labels the lanes so we can discuss them better. Here's my lame-brained lane thoughts:
- Lane A can barely be reached by double-moving Speed 4 figures from the edge of both deployment zones... but you'll need double-moving Speed 5 to get next to the crate. If you don't have initiative in the first round, you could run a Focused Greedo up to A with your last activation, and with the start of the 2nd round, Greedo could harass anyone in Lane B or even take vertical shots down at figures in parts of Lane C.
The crate on A can be reached from the blue deployment zone with a move 4 figure double moving. This would only matter for the Shield Generator mission though.
Edited by TheUnsulliedOther random thoughts in no particular order. The Red deployment side has 7 amazing spots to hide long range figures(from lane C LoS) right in front of their deployment zone perfect for eRangers to sit all game and take pot shots down all the lanes except for A. Unless I'm missing something blue side only has one good spot to hide figures while moving them up(in the one corner of the long hallway in lane C)
With and opponent running Hera or Gideon for movement shenanigans there are very few safe spaces for anyone on either side of the map to hide other than the ones I mentioned.
eRangers should be getting their rerolls a majority of the game and the double blue definitely makes a difference for range now vs the double green of eQuays. In other maps this seems to be mitigated more. eQuays make up for this by hiding and being even further away than usual.
Any way to get hidden really helps your survivabilty on this map in round one if you get the side without much cover(Blaise, Murne and the hidden command card)
Melee figures with decent health do okay on the Shield Generator mission but seem at a large disadvantage for the Raining Frieght mission.
Large figures without mobile hate their life here(Terro, Dewbacks) The only lane they can avoid rough terrain is D
My eJets and ePigs list is very sad that this became the new tourney map ![]()
Spelling
On 7/21/2017 at 1:13 PM, Fightwookies said:I'm hopefully going to get to play this tomorrow, so I'll share some thoughts then.
We got to play both scenarios today at MBG.
We played shielded first, and this is the one that seemed more straightforward to me. I started in the blue zone, and I think that is the worse of the 2. With the blue zone, I kind of stormed straight out to the reachable two spots (lane C & D from the example above) while the opponent got a little more spread out trying to send a few figures to control the other zones. Hera really was the star of my group. Call the shots is so versatile. Adding a few timely surges really helped on that scenario. Weequays were able to prowl and shoot a few times also to help negate the lost surge.
I played the raining freight mission against @seef1033. I again started in the blue and stormed straight ahead. Dave made a pretty concerted effort to go after the crates while I ignored them and went after his rangers. Dave placed his end of round crates where his figures would be able to pick them up and still be able to shoot. I stuck my initial two in the back of his deployment zone. I wanted Gideon to have to retreat further from the action to pick up the crates, but Dave sent a rebel Sab to retrieve them. Either way, it took a figure out of the action for the round, so I considered it a win and kept hacking away at his figures. Hera seemed to give out more accuracy during this mission, but that versatility makes her awesome. The strategy of where to place those crates is obviously going to be interesting.
Final thoughts: Double eWeequays are still very very strong, and Hera around to give them a boost when needed worked out well.
Edited by Fightwookies3 hours ago, Fightwookies said:@seef1033Dave placed his end of round crates where his figures would be able to pick them up and still be able to shoot. I stuck my initial two in the back of his deployment zone. I wanted Gideon to have to retreat further
Still within 2 spaces of one of the opponent's figures? You must have had figures quite in close combat for the former and a figure quite far back in the deployment zone for the latter.
1 hour ago, a1bert said:Still within 2 spaces of one of the opponent's figures? You must have had figures quite in close combat for the former and a figure quite far back in the deployment zone for the latter.
Correct. Within 2 spaces of the opposing figure. I think he did a focus and moved another figure with Gideon in the first round, so he was still in the deployment zone. I put my first two crates within 2 of Gideon but towards the Jabba nook on the red side and the very back of the red zone. His crates went two spaces ahead of my figures towards the big tile in lane C. He ran the other Sab up and grabbed at least one of the 2 that he put down.
7 hours ago, cnemmick said:
- Lane D is the easiest lane for up-close-and-personal combat. In my test games so far, I've sent IG-88 into this lane to secure the crate in the lane and then begin attacking figures in Lane C. This also seems like the lane Jedi Luke would run to first.
Awesome thoughts! And thanks for the helpful labeling of lanes, makes for a much easier discussion. I played with Jedi Luke a few times from the blue (I have yet to play from the red) and did exactly this (though I've also moved him to the right-side nook in C). Just wanted to point out that when Luke is on the bottom square of D's nook, he can jump jets over to surprise attack whoever is hiding between the two blocked terrain spaces :-). It's awesome.
-ryanjamal
On 7/23/2017 at 6:28 AM, ryanjamal said:Awesome thoughts! And thanks for the helpful labeling of lanes, makes for a much easier discussion. I played with Jedi Luke a few times from the blue (I have yet to play from the red) and did exactly this (though I've also moved him to the right-side nook in C). Just wanted to point out that when Luke is on the bottom square of D's nook, he can jump jets over to surprise attack whoever is hiding between the two blocked terrain spaces :-). It's awesome.
-ryanjamal
@ryanjamalYup, that was very surprising ? Goodbye rangers...?
My wife and I played through the map a couple times this weekend - we both enjoyed Shielded, but we completely forgot the mission for Raining Freight for the first two rounds and then just decided to play to the death. Upon further review, the mission seems a little confusing. How does raining freight work - can someone let me know if I've got this right?
(1) The crates start the game in the same position as noted on the insert (where they are in the shield generator mission); at set-up, each player "claims" two tokens as described, but no victory points are scored.
(2) An adjacent figure can spend two MP to gain two VPs and claim the crate (regardless of control).
(3) at end of each round, in initiative order, each player places two claimed crates (moving the crates from their current position) to within 2 spaces of an opponent's figure
the questions are:
re: 1, for the first round, are the crates where indicated on the insert?
re: 2, (a) when the crate is claimed, does it stay at the placed position or does it follow the figure that claimed it?
re: 2, (b) when the crate is claimed, can it be counter-claimed by an opponent's figure on their activation, during the same round?
re: 3, each player moves two claimed crates within two spaces of his opponent's figures - does my or my opponents claiming a crate overrule the set-up "claim" we each put on two crates? (If I manage to claim all four crates, I place two, my opponent places zero, or do we always place the two crates we claimed at the start of the game?)
43 minutes ago, yourmomlies said:My wife and I played through the map a couple times this weekend - we both enjoyed Shielded, but we completely forgot the mission for Raining Freight for the first two rounds and then just decided to play to the death. Upon further review, the mission seems a little confusing. How does raining freight work - can someone let me know if I've got this right?
(1) The crates start the game in the same position as noted on the insert (where they are in the shield generator mission); at set-up, each player "claims" two tokens as described, but no victory points are scored.
(2) An adjacent figure can spend two MP to gain two VPs and claim the crate (regardless of control).
(3) at end of each round, in initiative order, each player places two claimed crates (moving the crates from their current position) to within 2 spaces of an opponent's figure
the questions are:re: 1, for the first round, are the crates where indicated on the insert?
re: 2, (a) when the crate is claimed, does it stay at the placed position or does it follow the figure that claimed it?
re: 2, (b) when the crate is claimed, can it be counter-claimed by an opponent's figure on their activation, during the same round?
re: 3, each player moves two claimed crates within two spaces of his opponent's figures - does my or my opponents claiming a crate overrule the set-up "claim" we each put on two crates? (If I manage to claim all four crates, I place two, my opponent places zero, or do we always place the two crates we claimed at the start of the game?)
1. The mission has 8 crates. 4 start on the map and then 2 are claimed by each player to keep in their specific play area.
2. Neither. It goes into your play area and basically just sits on your side of the board. Figures don't carry them around at all they are removed completely from the board.
2b. No because it is no longer in the play area.
3. No. No matter how many crates you claim or pick up each player drops only up to 2 IF you have claimed them. If you run out of claimed crates of your own you just don't drop any.
Crates are placed on the map as indicated on the insert. In addition, each player has two crates, that are not on the map (let's call these your supply), that are for later use.
A character can claim a crate (which then is removed from the map, and goes into your supply), by spending two movement points while adjacent. Therefore, there can't be two claims on a crate.
Per (3), at end of the round, you place two crates (from your supply) near two squares of your opponent.
Also, I assume that if you run out of crates in your supply, that you do not have to place any near your opponent. This happened in my game on Saturday.
My question for everyone is: Is it worth going after the crates?
A little anecdotal but I played Raining Freight last night against a Blaise & Jets list (even with a regular Jets group with Cross-Training for objectives) and I was hit with at least 2-3 Blaise shots from Deployment zone to Deployment zone just to trigger Interrogate. After losing out on some good cards, I was later hit with Strategic Shift to dump 5 cards for just 2, and then Interrogated again.
In that game, I only managed a very close win by playing the crates aggressively and very early. I decided that, since you only need to drop 2 crates per round, you should be encouraged to scoop up as many crates as possible and re-capture the ones you're force to drop as quickly as you can.
Now, I don't know how Blaise would handle himself on the other two maps but I had forgot how rough Spies could be, and Nal Hutta Swamps gives him another safe avenue for some cheeky Interrogations.
Edited by Smashotron1 hour ago, yourmomlies said:re: 2, (a) when the crate is claimed
When a player claims a token or component, he places it in his play area. The effect of claiming a token is explained in the mission's rules.
· At the end of a mission, all claimed tokens are returned to the game box.
@TheUnsullied, thank you. 8 tokens, and the clarified "claim" rules were exactly what I was missing.
@Jaster Mereel, I think the answer is, it depends.
Played through both missions again last night. The crates on raining freight really kept the game close and kept our units in each other's faces. We both kept throwing our crates in areas that forced us closer together, which I don't think I'd do so willingly again. RD3 started with the scoring at 30-38. My opponent made a play with a rJawa to double move, and grabbed three crates. I managed to grab the victory with a lucky shot on the next activation, but the crates were at least 8-10 points for both of us. Grabbing those three crates prevented me from the guaranteed victory, and if he rolls an x-man (it was 3po, so two tries) he wins on his next activation.
I don't think we placed the crates very well, which makes me wonder if crate placement is going to be a deciding factor for top tier play.
After a couple of reps, it feels like the crates are going to be something that will either be largely ignored or integral to victory/defeat, from game to game.
After playing the map twice this past weekend (once from each deployment zone) I've learned that the blue zone offers zero actual cover from ranged attacks. A ranger starting in one of the 2 front-most spaces can get LOS to every space on that map that's not in the deployment zone (and possibly all of those too). The same cannot be said about the red zone as the wall and blocking terrain right in front of the deployment zone are prime for snipe and cover tactics. I lost several figures to this in my first game and couldn't figure a way around it. When starting in the blue zone, you are basically sacrificing a figure or two and hoping the others are able to stick around for round 2 where you can actually attack.
Again this is assuming you are playing rangers. Elite Weequays can hit from a decent distance as well, but they do need to come a little closer for consistent accuracy, so probably more likely round 2 attacks.
As far as objectives are concerned. When starting from the blue zone, you can only get to 3 of the 4 objectives (assuming you have no mobile figures). The red zone offers access to all 4 crates. So with 5 movement figures, that can be a solid advantage.
Basically, I can't see any benefit from being in the blue Deployment Zone, and i think the Red is by far the superior choice if you have one.
Could it be with the new AT-DP that this advantage is temporary until the next wave drops?
2 hours ago, 3rrant5had0w said:Could it be with the new AT-DP that this advantage is temporary until the next wave drops?
I'm definitely hoping for a Skirmish Upgrade fix to the AT-ST/General Weiss as one of the 3 fixes for "iconic figures".
3 hours ago, cnemmick said:I'm definitely hoping for a Skirmish Upgrade fix to the AT-ST/General Weiss as one of the 3 fixes for "iconic figures".
I'd hazard a guess that it's pretty unlikely for that to happen.
Edited by TheUnsullied