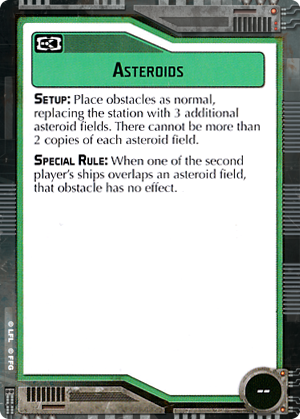
Objectively the Best: Asteroids.
Are you looking to impress a certain princess?
Maybe test the sanity of some Imperial pilots?
If so, Asteroids is just the lucky objective you’re looking for, even if you don’t want to hear the odds.
I poked around the forums here a bit over the last week or so looking to see how much love we admirals have for this objective, and well, let’s just say that Asteroids and Jar Jar Binks would be BFF’s. It’s true, asteroids, as obstacles, are utilized by many cards in the objective deck, so why would you want to choose an objective that offers nothing more than a bunch of rocks, a couple of debris fields, and no victory tokens? Boring! You might encounter the Asteroids objective playing the CC Campaign, but outside of that arena, how much incentive do you have to play it, especially if your focus is tournament play where points and scores really matter? Why play this when you can play Dangerous Territory?
I’m not a tournament player. My enjoyment of Armada comes from playing the game from a thematic perspective. I love crafting a narrative and playing the long game. All of my battles take place in a star system selected from Star Wars: The Essential Atlas (Wallace & Fry, 2009). All of my ships use titles as every ship in the galaxy has a name. I build my ships and fleets based on Canon or Legend lore, utilizing appropriate upgrade cards and freelancing where I need. I also play fleets of varying point sizes, sometimes within the same game. Asteroids have appeared in the Canon and Legend stories since the beginning of the Star Wars saga. So, if you find playing Armada from a thematic perspective the least bit interesting, I encourage you to give Asteroids a try.
Biggs’ April Challenge: May the odds be in the second player’s favor.
The special rule for the Asteroids objective gives the second player a slight advantage over his/her opponent in the form of immunity from the damage effects normally incurred upon overlapping an asteroid field. Thus, the second player only needs to remain cognizant of the remaining two debris fields while maneuvering his/her ships. So now, does this second player advantage create the hellish situation that Biggs is looking for in this challenge? And the answer is…it’s just a beginning. You must be willing to do what must be done. Do not hesitate…show no mercy! Only then will you be powerful enough in the…oops, sorry…got caught up in the moment. Where was I? Oh, yes...your first goal is to ensure that you are indeed the second player. So offer to pay your opponent triple. If that doesn’t work, use the force, or Twi’lek dancers…whatever gets the job done. In my neck of the woods, I always get my way. The only other player within fifty miles of here is…me. Game night here kind of sounds like this:
Imperial Me: You Rebel scum!
Rebel Me: Bantha poodoo!
Voice from the next room: Is everything alright in there?
Me: Roger Roger.
Oh, least I forget…you want to be the Rebel side as well as the second player when it comes to Asteroids. More on this in a bit.
You really want to enter an asteroid field?
The next step for creating **** for your opponent occurs during the placing of the asteroids and debris fields. We all know the rules…we must take turns placing the obstacles in the play area beginning with the second player. Now, unless you are specifically directed by the rules of a particular objective such as Salvage Run, you would probably think that the most effective placement for the four obstacles in your possession is to place them in a manner which “complicates” the deployment of your opponents’ ships or directs him/her to move those ships during the first couple of rounds of play in a particular manner. And, you would be correct. Thus, your obstacles usually end up somewhere on your opponent’s side of the play area. Your opponent is most likely thinking the exact same thing in regards to you, and once both of your fleets are clear of the obstructions, the game becomes an open slaughter fest. Oh, the humanity! Not the destroyed ships…I’m talking about those poor little asteroid and debris fields that just get to sit on the sidelines missing out on all the fun.
What you want are happy obstructions, engaged and fulfilling their role in life during the climax of the battle. So, second player, use your divine influence and convince your opponent to place his/her four obstructions with yours in the center of the play area. This, by the way, is also a thematic placement; think the asteroid field in The Empire Strikes Back. You want these obstructions to create a hellish situation for your opponent, so the pattern of the asteroids in the center of the play area is extremely important. Place them in a zig zag above and below the lengthwise center line of the play area with a range ruler distance of two along the x-axis and a distance of one on the Y-axis. This placement guarantees that any large-base ship passing through the field directly from your opponents’ side will suffer at least one damage, even at a speed as high as three, unless the ship lands exactly next to one of the obstacles and then clears it the following turn still at speed three. That is some fancy flying though, and it’s rather difficult to achieve. Attempting to turn a large-base ship within this pattern will yield at least two damage. Happy asteroids indeed!
More to say have you? As a matter of fact I do. If your Imperial opponent is using ISDs, he/she has a couple of strategy options available. The ISDs could maneuver around the field. Or, your opponent may feel that the potential damage is worth the risk and just plow through. An Interdictor deploying Grav Shift would affect four of the obstacles at most, and it’s likely your opponent would move them outward, expanding the size of the obstacle area in an attempt to create a clear passage through it. Even with this change in the obstacle pattern, the ISDs are still going to have to focus on their movement through the field. With ISDs comes a predictable second danger, namely a large contingent of squadrons most likely built around the most dreaded Imperial creation since the infamous Death Star: the Rhymerball. ![]()
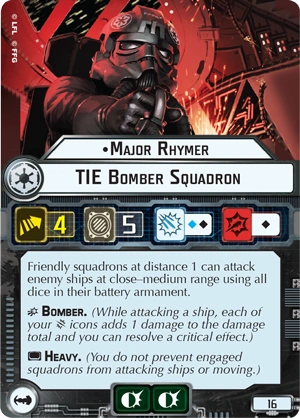
Always anticipate the presence of a Rhymerball since squadrons are unaffected by obstacles. An Imperial opponent with a pair of ISDs, a couple of Gozanti support ships, and Rhymerball would most likely position his Star Destroyers outside of the field in a flanking position. The Rhymerball would then sweep the field in an attempt to destroy your ships. I know what you’re thinking. I’ve got a bad feeling about this. Now it’s **** for me! Patience, young padawan. **** is still on your side.
Madness and a Bit of Hope
As promised, now we chat about the Rebel fleet. You will want a fleet that’s fast and highly maneuverable. So, MC30c and CR90 type vessels are your best bet. Either avoid the ISDs altogether, or get your fleet through the asteroid field and behind your opponent’s ships as quickly as you can and stay there. But, what if your opponent is using medium or small based ships like Victory’s, Gladiators, or Raiders? Approach VSD’s and Gladiators the same as ISDs. Avoid Interdictors at all costs. Scatter your fleet if the Imperial player uses Arquitens or Raiders. Use the asteroids to your advantage. Evade, zig-zag, use your speed, and avoid those turbolasers. Make your Imperial opponent chase you all over the play area. You don’t want ship to ship combat if you can avoid it.
That’s no moon…it’s a Rhymerball.
I know what you’re thinking, again. This is Armada. This guy wants me to build my ships and not use them? What a half-witted, scruffy looking nerf herder! Trust me, this is no trap and I’ll tell you why. The Asteroids objective is the perfect opportunity for your squadrons to take center stage. This is Han Solo versus the Tie pilots in the asteroid field outside the Hoth system. This is Obi-wan versus Jengo Fett in the rings of Geonosis. You want to bring the best fighter list you can muster that addresses the following priorities:
1. Build a Rhymerball ball-buster. Various Rhymerball compositions have appeared in the forums. Study them. Run simulations. Find effective counters within the Rebel Squadrons that give you an advantage. For example, try using a YT-2400 as a counter for a Firespray-31. Both ships have 6 hull and rogue, but the YT-2400 is faster and has better firepower.
2. Have a second set of squadrons in position to assist the ball-buster. I call these ships “The Needle.” Use it to help pop the ball.
3. Keep a third squadron composed of bombers near your ships that can keep pace with them. Use the bombers against any ships that come within striking distance of yours. E-wings may work well in this role.
Your squadrons must neutralize the Imperial fighters while your ships are busy evading the destroyers and/or cruisers. You can use the squadrons from the ball-buster and “The Needle” against your opponent’s ships if you pop the Rhymerball quickly. This is how you make this objective **** for your Imperial opponent.
Parting Shots
I want to share a couple of house rules I’ve developed for this objective and for obstructions that I think make play more interesting, challenging, and fun. First, I modify the special rule for the objective to read: “When one of the second player’s ships overlaps as asteroid field, that obstacle has no effect on the first occurrence for each ship. Thereafter, if the second player’s ships overlap an asteroid field, that obstacle deals its normal damage to those ships.” This rule makes the scenario a bit more challenging for the second player as it requires him/her to more thoroughly plan when one of his/her ships will perform an overlap. Also, add more (a lot more) asteroids to the play area, and then speed through them. The house rules for obstructions change in the following manner: Squadrons suffer one point of damage when they overlap either a debris field or an asteroid. I think this rule change brings this situation more into line with what we’ve seen thematically within the saga, after all, how many Tie fighters were destroyed by asteroids during The Empire Strikes Back? Additionally, I think having to maneuver a mass of squadrons around the obstacles makes the play more fun. Lastly, I’m considering a house rule that would change the rule in regards to obstructed attacks. I’m playing around with something involving range and the use of percentile dice, but as I have not completely worked this out yet, so I won’t go into it any further here. But, stay tuned as I’ll post it on the forum for feedback when I have it ready.
I hope my little spiel here has convinced you to take another look at the Asteroids objective, both inside and outside the CC Campaign. I also hope that it encourages you to consider the alternative of thematic-orientated play. I think it’s a perspective on the game that really works for those of us who for whatever reason don’t participate in tournaments, for those who don’t have access to other players, or for those who are interested in the narrative and the long story. I’ve got more to say on this too, so look for more posts from me on this subject.
May the force be with you.
P.S. If after all this it comes to be that my ideas above belong in a trash compacter, I have one last suggestion that will absolutely guarantee you a hellish situation for your Imperial opponent: Throw a giant-sized Wookie tantrum. After all, it’s always a good strategy to let the Wookie win. ![]()
Edited by WigTii

