llu's Imperial Assault Miniature

By Iluvatar66, in Imperial Assault Painting and Modification

Hi guys.

I'm an Italian Star Wars fun.

I apologyze with you if my english will not perfect.

I'd like to share with you my Imperial Assault collection.

I thank Sorastro for his fantastic tutorial that followed for many of my miniatures then making changes in terms of shadows and mid-tones .
This is the link to my facebook album .

For all the board games with miniatures I use usually clear acrylic bases to afford to see through the various types of terrains .
I believe that this trick allows to appreciate more fully the beauty of the tiles

I thank in advance all those who will have the pleasure of watching it.
If you want it places the steps of some miniature long as you ask me .

https://www.facebook.com/media/set/?set=a.10207739176131503.1073741855.1056308479&type=1&l=5b95c6ef31

They look great!

Thank you

AI%20Impero%2001_799x600_zpssdjxmoiw.jpg


AI%20Impero%2002_800x600_zpsol6xkvhk.jpg AI%20Impero%2003_800x600_zpskf04aexl.jpg AI%20Ribelli%2001_800x600_zpsfphtq8ga.jp AI%20Ribelli%2002_800x600_zpsnamcsbuz.jp AI%20Ribelli%2003_800x600_zpsodvek5bc.jp AI%20Mercenari%2001_800x600_zps05cawsvl. AI%20Mercenari%2002_800x600_zps4ikhrjj0. AI%20Mercenari%2003_800x600_zpsw8q3flfn.


Very, very nice! Thanks for sharing! Can I ask where you get the bases from and what method you use to transplant the figures?

wow! nice!

why did you change to clear bases?

I think that with clear base you can appreciate better the type of terrain in a tabletop game.

I've cut the miniature underneath the feet and pasted with attack to the clear base.

Simple

You can find it on facebook:

Magic Works Games

Edited by Iluvatar66

Love the clear bases. Really makes the minis paint schemes pop. 25mm by 2mm or 3mm?

Probably the best painted IA set that I've seen so far. Impressive, most impressive... ;) Do you use airbrush for highlights (Imp officer) or is it 100% brush work?

How did you get them off of their regular bases without slicing the crap out of the feet of the figures?

Love the clear bases. Really makes the minis paint schemes pop. 25mm by 2mm or 3mm?

Height 2 mm.

Probably the best painted IA set that I've seen so far. Impressive, most impressive... ;) Do you use airbrush for highlights (Imp officer) or is it 100% brush work?

Thanks a lot. I'm not able to use airbrush :D . It's a 100% brush work

How did you get them off of their regular bases without slicing the crap out of the feet of the figures?

I use a medium cutter for first step. Then with a smaller cutter a define around the feet and underneath the feet to level. Then i use attack to paste in the clear base.

See this picture.

The utility knife at the top is for the first step , the lower one for the second.

20161219_161537_zpsppvygueh.jpg

Now my facebook profile is public.

This is the link to myImperial Assault Album: https://www.facebook.com/media/set/?set=a.10207739176131503.1073741855.1056308479&type=1&l=5b95c6ef31

Edited by Iluvatar66

Thanks for the tips on how to remove them. I have been wanting to rebase them for awhile now. Just was scared to do it and screw them up. I have some similar tools that I will try.

Thanks for the tips on how to remove them. I have been wanting to rebase them for awhile now. Just was scared to do it and screw them up. I have some similar tools that I will try.

If you want I can post a video.

SNOWTROOPERS

Primer:

Spray White Obscurium

Base Color:

Helmet, backpack and armor White Scar applied several times quite diluted.

Gloves and calves bands Stormvermin Fur.

Pants, bags and arms Celestra Grey + Screaming Skull.

Kilt Screaming Skull

Shadows:

Washing with 1 part Nuln Oil + 1 part Guiilliman Blue + 4 parts Latham medium.

Selective shadows with 1 Nuln Oil + 1 + 1 Guiilliman Blue Latham medium

Lights:

Adding white scar at the base colors with lots of steps. Dilution 1÷4

Lights on the backpack:

Mephiston Red, green glaze and blue glaze also used for the back Backpack.

Dirty cloak with Steel Legions drab and Rinox hide.

Blaster damage with black and Rinox Hide Ryza Rusy rust at the center.

20161219_181251_zpsvwolkmyz.jpg

20161219_181311_zpseobkjhrf.jpg

20161219_181223_zpskmck6nda.jpg

20161219_181159_zpstsuabhrj.jpg

Edited by Iluvatar66

Awesome as always. Your minis are works of art. I'd live to have mine up to your or sorrestros quality someday.

Still loving the clear bases. Thinking of going with the acrylic bases too. What brand did you use?

Taskens and Bantha Raider

20161223_002655_zps1nxckr1b.jpg

20161223_002627_zpsxfha1woo.jpg

20161223_002726_zps28y2trkx.jpg

20161223_002748_zpsehmgzzel.jpg

20161223_005853_zpsjabcmjyh.jpg

20161223_005830_zpsku58wgcc.jpg

20161223_005808_zps0esao51k.jpg

20161223_010103_zpsn060sixv.jpg

20161223_010103_zpsn060sixv.jpg

20161223_010006_zpsyx4zg2xa.jpg

20161223_010048_zpsbvbe2sxx.jpg

20161223_005922_zpsoooq4ovd.jpg

Edited by Iluvatar66

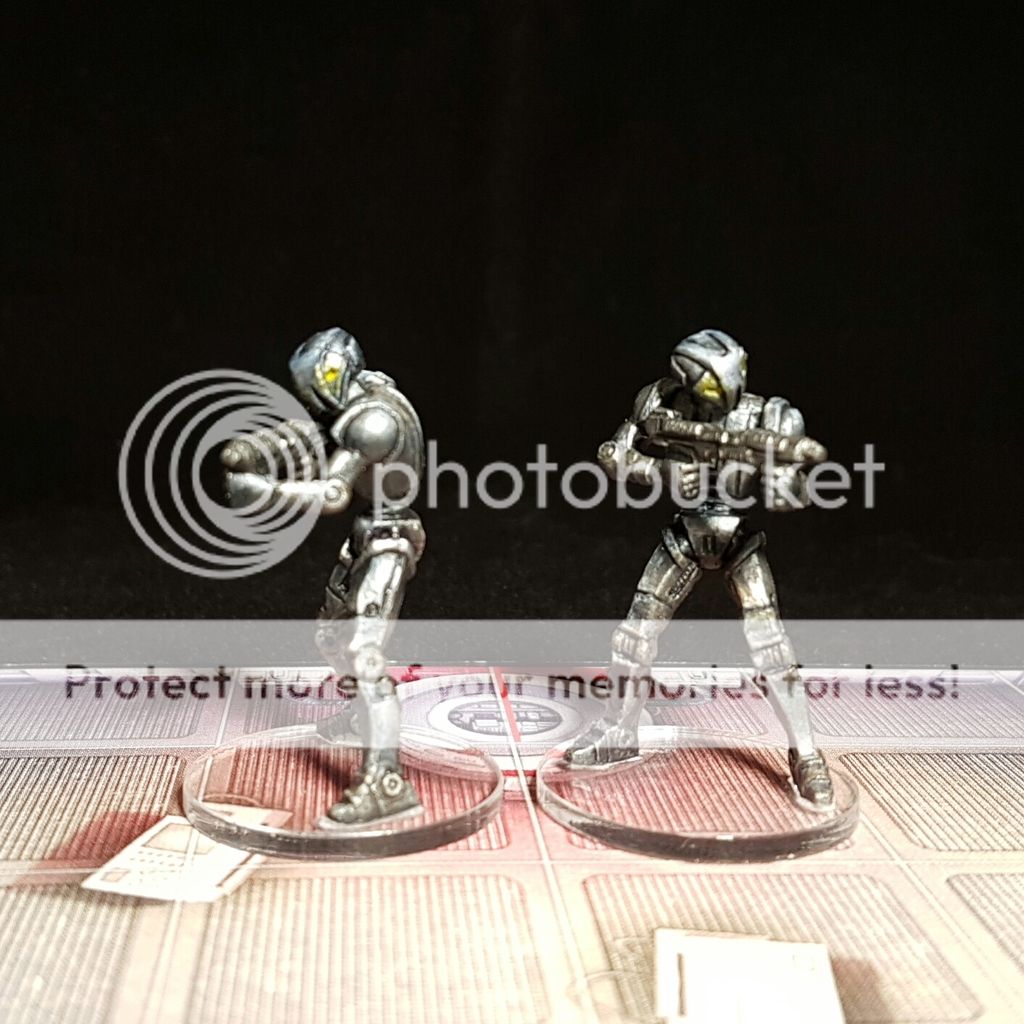
HK DROIDS

Primer Spray Leadbelcher GW

Drybrush with Shining Silver (Army Painter)

Weapon and dark parts Leadbelcher and black

Washing Nuln Oil + Lamhiam Medium

Washing Nuln oil and Drakenhof nightshade

Shadows with nightshade

Lights with Leadbelcher adding Shining Silver

Eye in white with glaze with Lamenters Yellow

Final Glaze with Guiilliman Blue and Lamhiam Medium

For orange droids washing with Agrax and Lamhiam Medium

Then 3/4 Glazing with Bloodletter more Agrax more Lamhiam medium

Shadows with Agrax

Shining lights with gold

Dirt with Ryza Rust and Typhus Corrosion

20161225_191825_zps542dgqdl.jpg

20161225_192102_zpszluycrl4.jpg

20161225_192043_zpscqwhmxqo.jpg

20161225_192214_zpsjioae4q2.jpg

20161225_192023_zpsl9rr8wyy.jpg

20161225_192157_zpsmkccosue.jpg

20161225_191924_zpsejxchsae.jpg

20161225_192138_zpsxnlt1eag.jpg

20161225_191859_zps8gtnbihp.jpg

Edited by Iluvatar66

These are all amazing quality! Thanks for sharing and looking forward to seeing more!

How did you do the tuskens and Bantha. They look amazing.

I've followed the sorastro tutorial with some light layer more.

for the Bantha horns i have started by a color a bit darker as the Karak stone and then highlighted by adding Screaming skull and white. In this way I got more intermediate tones.

These are all amazing quality! Thanks for sharing and looking forward to seeing more!

Thanks a lot!

IG88

I've followed the Sorastro's tutorial for this minia.

The only difference is that I've added a very little white dot in each head lights before Ardcoat.

20161227_204223_zpsbkmrco54.jpg

20161227_203925_zpsoknaf4s3.jpg

20161227_204010_zpsx9dtposk.jpg

20161227_203925_zpsizvplysy.jpg

20161227_204156_zpsm1n3rgve.jpg

Thanks. Missed the tusker episode will have to give it a watch.

REBEL SMUGGLER

BASE COLORS

Screaming Skull: sleeves, forearms and knee pads and edges anchiere

Karak Stone: shirt and trousers side part

Tallarn Sand: part pants inside

Mournfang Brown: leather parts such as gloves, ammunition belt, epaulets, shirt line

Rinox more Mournfang Brown Hide: belt and mask

Black more Mechanics Standard Grey: black belts and boots

Black more Mechanics Grey Standard more Kantor Blue: Hair

Alaitoc Blue Jackets

Nuln oil: glasses and then Guiilliman Blue

Bugman's Glow: Incarnate

Leadbelcher for particular metal and gun tip

Leadbelcher blacker for gun body

SHADOWS

Nuln oil for boots, black parts and metal

Agrax Earthshade for brown clothes

Drakenhof Nightshade to gilè

Reikland Fleshshade for skin

LIGHTS

Leadbelcher and Shining Silver for metal parts

Basic colors for his clothes by adding Screaming skull and white

Base color more Space Wolf Grey for hair and then shadows with Drakenhof Nightshade and then Nuln Oil for darker areas

Mournfang Brown and then XV88 for leather

Bugman's Glow / Cadian Flesh / Flesh Kislev / White to incarnate.

Gems with white and then 2/3 Layer Guiilliman Blue

Ardcoat of lenses glasses and boots.

20161229_230531_zps6hqqfckg.jpg

20161229_230400_zpsfkbllyay.jpg

20161229_230426_zps3tul8nvp.jpg

20161229_230450_zpsqinlwony.jpg

20161229_230508_zpsxveuccpt.jpg

Edited by Iluvatar66