I'll take five T-70 vipers to go please.
Between you and MacrossVF1, my heart is going to explode.
I can't approach the level that you're at (yet,) but you give me something to aspire to. And as they say, we all need goals.
I'll take five T-70 vipers to go please.
Between you and MacrossVF1, my heart is going to explode.
I can't approach the level that you're at (yet,) but you give me something to aspire to. And as they say, we all need goals.
Amazing work on that Viper!
Barry, please don't take this the wrong way but I hate you!
You make the conversion for Z to Viper look so, so easy. Beautiful work, as always.
I have to ask. What do you use to hold the model while you're doing the cutting? If I tried hand held surgery like this I'd end up with bloody stumps.
I'll take five T-70 vipers to go please.
Between you and MacrossVF1, my heart is going to explode.
I can't approach the level that you're at (yet,) but you give me something to aspire to. And as they say, we all need goals.
Ha Ha thank you very much to all.
I just by posting pics of the build would some of you to see how easy...and fun it is to convert the ffg models.
Stone face
Not so much as protected fingers as a new scalpel blade every time I start a conversion.
The best safe option is as sharp as it can be.
And no heavy cuts, light fine cuts....more cuts but lightly. So you don't apply to much pressure then slip....and cut yourself !
Also, in most cases.
A few light cuts, then pick up the part and bend along the cut line.
And it come apart along were you have trimmed
That's the best and safest option.
And take your time !
Most of all, enjoy conversion
Thanks chaps
All the best.
Barry.
What few know is that there is a system beyond the outer rim, in wild space, where the currents of the main hyperspace routes deposit most of the debris of the void. In this system an enterprising space mechanic and ship builder has a sprawling station devoted to building and rebuilding the wrecks that drift nearby. Racers, hot-shot mercenaries, and gentle-beings of fortune will venture there to acquire some of the most exotic ships in the galaxy. They call it...Harker's Hacks and FighterWerks. (Someone do that in neon aurebesh please)
Thank you iron Ox.
Made me smile !
Harker's Hacks has plenty more ships to to cut up,modify and convert.
All the best,
Barry.
Oh I really like this one. Not that I don't like the rest of your stuff, but for some reason the 'Viper Mark Zed' just looks so damned sexy. I might just steal this idea for one of my own Zeds!
Thank you Ken,
I'm really looking forward to you building a Z type VIPER !
Especially with your expert paint finish !
All the best
Barry.
Here are the finished painted models.
I will post the painting process and better photos Tomorrow.....doing this on an Amazon note book....not easy !
Thank you to all.
Glad you like the Mod Z Viper.
All the best,
Barry.


Food for thought for another thread, what about a star viper to B5 starfury? The cockpit is not to far off and the wings would only need to be rotated.
On 15/11/2016 at 2:20 AM, IronOx said:Food for thought for another thread, what about a star viper to B5 starfury? The cockpit is not to far off and the wings would only need to be rotated.
You know, its funny you should mention that,
when I was building my STARGATE inspired F-302.......


I was thinking the cockpit area is very much like a B5 Starfury.
So yes, I will build one as its a great Idea !
And I love the Starfury, great Ron Cobb Design.
All the best,
Barry
Edited by Barry HarkerFollowing on with the Painting of the Vipers.
Here is a simple break down of how I got the colours, again very easy.....in fact i find this method so much easier than freehand painting !
just cut the masking tape, and let that do the work for you !
Here you can see the aerosol paint I used, the orange was sprayed over the primer.
then I could begin the masking process with thin TAMIYA masking tape.....

Always use a new blade ! the tape can tear, and create a burr along the tape line, causing a furry pant line to appear on your model
especially when they are this small !


One piece is enough to do both models as it is cut into fine strips, layed on a clean cutting mat......

Edited by Barry Harker
Now with the sharp blade, you can pick up the tape, and lay it out on the model....

one of the best things for applying pressure on the tape with out marking the paint underneath is a soft wooden tool, I use an sculpting tool.
but a ice cream lolly pop stick would work just as well ! I do use one sometimes, with one of the ends sharpened up with sand paper.

Here you can see the masking tape strip laying down on the wing, take your time. if you get the line wrong. just ease it up.
then apply it again. then you can apply pressure with the wooden tool to make it seal better.


Edited by Barry Harker
one of the best things for applying pressure on the tape with out marking the paint underneath is a soft wooden tool, I use an sculpting tool, but a ice cream lolly pop stick would work just as well ! I do use one sometimes, with one of the ends sharpened up with sand paper.
Great tip, Barry - wish I'd thought of it a few days ago when I was taping up the Ghost conversion...ended up with more tape over my hands and wrist than on the model ! 
do you press your masking down into the scribed lines or not?
Now all the tape is layed down for the orange strip, I have sprayed grey primer over the model, and now masking up the grey stripes
on the engines and nose cone.
some may worry about using this much paint......but here's the thing.
spray paint lays down much much thinner that painting by hand !
and you wont lose surface detail ![]()
so you can do this backwards approach, and keep your lines nice and even and strait.
Spray paint reacts differently to painting by hand, it stays [ green ] for up to 8 hours.
by green, I mean the paint is in a porous state, also slightly soft. so it will except other paint with out the need to sand or treat the surface of each layer.
so you can lay down layers....even on top of the gloss, and it wont come up afterwards !

Now the models have been Drybrushed in white, ready for a coat of black citidal ink........


Edited by Barry Harker
one of the best things for applying pressure on the tape with out marking the paint underneath is a soft wooden tool, I use an sculpting tool, but a ice cream lolly pop stick would work just as well ! I do use one sometimes, with one of the ends sharpened up with sand paper.
Great tip, Barry - wish I'd thought of it a few days ago when I was taping up the Ghost conversion...ended up with more tape over my hands and wrist than on the model !
Ha Ha yes, back in the day when i was learning....I use to get it all over the place.
but then I use to paint full size cars and motorbikes.....still do, just no where near as much as i use to.
in fact I have to respray my car soon, now I have decided on the colour !
at least spraying these tiny models doesn't take much tape in comparison ![]()
do you press your masking down into the scribed lines or not?
yes but not to heavily, remembering these models are very small. and if you press to hard, you can tear the tape.
I tend to cut longer than I need, lay the tape loosely over the surface, then press down on the tape with the wooden stick.
working from say around the engine down to the wing....so as not to stretch the tape. and leave a gap underneath for paint to seep underneath.
hope that helps.
all the best,
Barry.
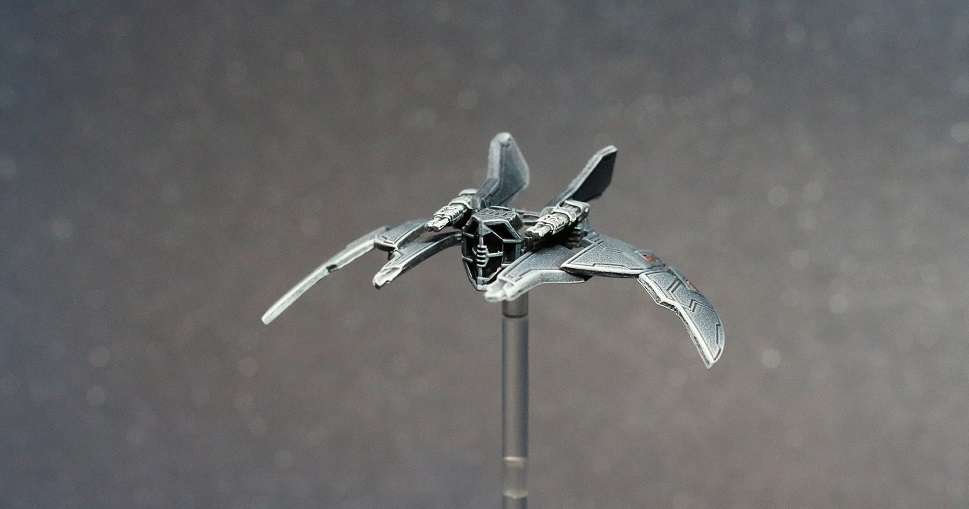
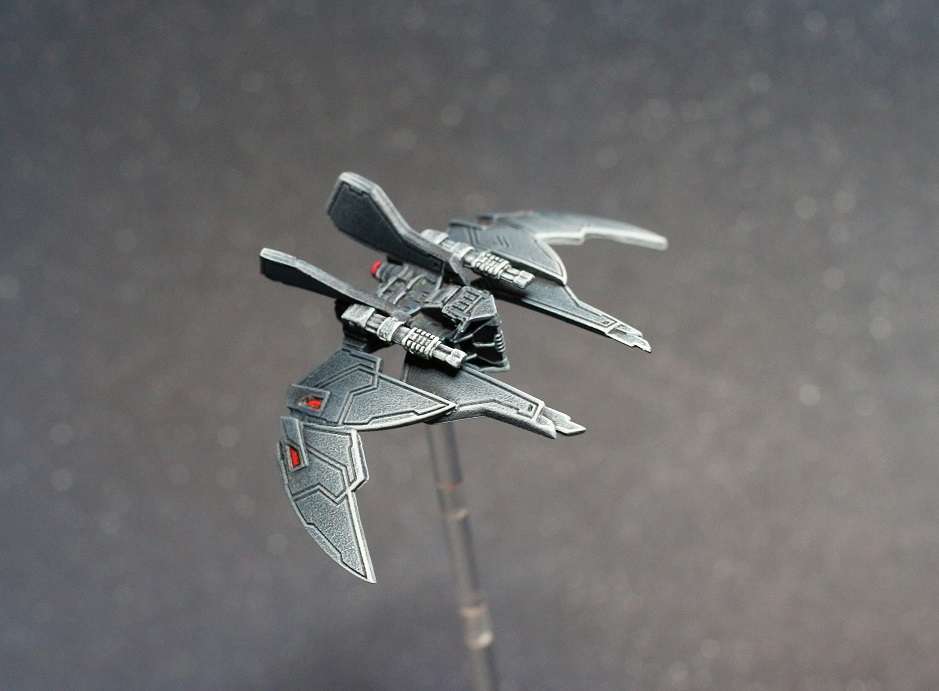
Finished....Well sort off.
I like the Model and the paint except for the crap looking gold !
I used Tamiya paint for the gold.......and it didn't come out very well.
so ill be re-doing those again when i buy some better gold and re-do the laser cannons.
But here are the Z-95 and T-70 VIPERS.......


Edited by Barry Harker


Took me an Afternoon to convert a standard Z-95 and T70 Into something a little different.
then another day painting. so not a big exorcise......but a lot of Fun !
Thanks for Looking,
And hope some of the tips help any of you out.
All the best,
Barry.


Edited by Barry Harker
Took me an Afternoon to convert a standard Z-95 and T70 Into something a little different.
then another day painting. so not a big exorcise......but a lot of Fun !
Two Days!  The way I get sidetracked, I'd be lucky to finish in two months!
When I'm not working.
I dont get many distractions.
The joys of being single again.....
Freedom !
So I get to enjoy a few days painting.
Plus.
I'm recovering from surgery on my ears this week.
So I'm taking it easy.
Have a few weeks to get better.
And enjoy some more days painting...once the anaesthesia wears off !
All the best,
Barry.
Edited by Barry HarkerI'm recovering from surgery on my ears this week.
So I'm taking it easy.
Have a few weeks to get better.
And enjoy some more days painting...once the anaesthesia wears off !
Oh, here's hoping you make a quick recovery...never nice to have problems with your senses! ![]()
I second that emotion, uh, sentiment. Speedy recovery. Apply Bacta drops every 4 hours to your ears.
By the way, thanks for the walk through. It's nice to see how a real pro does it.
I do have a question about spray can primers. This weekend I was attempting to prime a T-65 using my usual primer (Tamiya) and I wasn't getting the coverage I was used to. The primer didn't seem to want to go down evenly, almost spotty, but the spots were so minuscule about the size of the dot of an "i". I figured since the paint was still wet, it would gradually spread out and smooth out on its own. Well, that didn't happen, so I did the only thing you can do: spray more primer. And that fixed it right up, the end.
Actually no, it didn't. The dots on the laser cannons started beading up, making them all bumpy, but the bumps were so small they looked almost hairy like an insect's legs. I stopped there of course. I removed the primer from the cannons and the upper wings where it got too thick. The rest of the ship had a decent coat of primer. Not perfect, but I can work with it.
Here's the question: What do you think happened? It was a warm day and the can was stored indoors at room temperature, not cold at all. I'm feeling a bit gun shy concerning using this particular can of primer. I'm guessing I should warm the spray can in future attempts (hot water in a bowl/bucket for 20 minutes) and make sure the nozzle is clean. Other than that, do you have anything from your experience that you can add?
Thanks in advance,
Joel
Thanks for the get well.
As for your paint.
Mmmm sounds like sticky resin particules...paint is to thick.
Needs heating up.
Fill a bowl or the sink with very hot tap water.
Then leave the can in there for 5-10 minutes.
Then when the can is hot.
Shake it up....a lot.
Rotating it every so often.
Then do a spray test on something, something small. Cocktail stick.
Then something flat.
Like a bit of scrap card.
And see how the paint is.
Unfortunately sometimes you can get a dodgy tin of paint.
Where the mix can be a bit of.
How far from the model are you spraying ?
If it's hot outside.
The paint particles can become enert....dry before hitting the model....spray a bit closer to keep the paint wet, but move the tin faster to avoid to much build up.
Paint in the spray tin needs to be warm, but if it's to hot outside
That can dry the paint particles..
Ha ha,
It's an ever fighting battle !
But the warm paint in the tin will help. It will thin the paint.
Along with vigorous shaking.
See if that works.
Good luck and all the best,
Barry.
Edited by Barry HarkerThanks for the advice. I will give it a go!
On 14/11/2016 at 1:48 PM, IronOx said:What few know is that there is a system beyond the outer rim, in wild space, where the currents of the main hyperspace routes deposit most of the debris of the void. In this system an enterprising space mechanic and ship builder has a sprawling station devoted to building and rebuilding the wrecks that drift nearby. Racers, hot-shot mercenaries, and gentle-beings of fortune will venture there to acquire some of the most exotic ships in the galaxy. They call it...Harker's Hacks and FighterWerks. (Someone do that in neon aurebesh please)
Well following on from that sentiment.....
Harker's Hacks and Fighterwerks are very busy at the moment.........

Lots of ships to customize and modify.
Along with getting my Firespray finished.
I'm starting to convert a mist hunter with the idea of Siddhi's upside down mist hunter.
Although mine will have a long tail, big weapon pods and the cockpit from a republic gunship.
.....end up looking a bit like a Mil Hind Helicopter.
Lots to do and enjoy.
All the best.
Barry.
Edited by Barry HarkerI've always been impressed with your mods and have tried a few myself using other model bits and oddly enough legos. I'm sure this has been asked but where are you getting the plasicard(or w/e its called)? I found something that seems similar on amazon and wasn't sure if it was the same thing.
Those finished Viper inspired ships are bonkers, in a totally good way.

