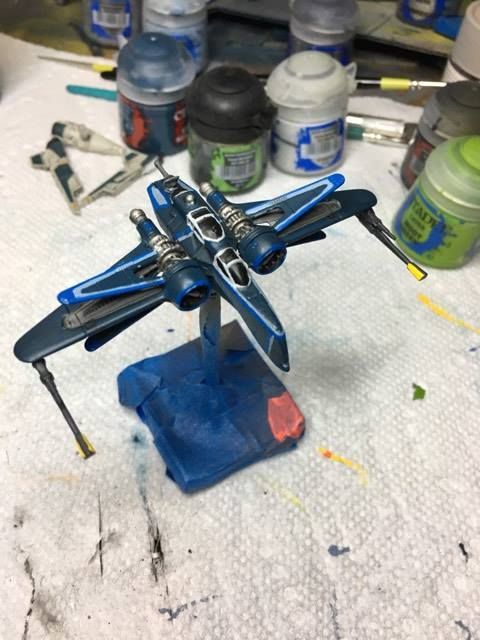
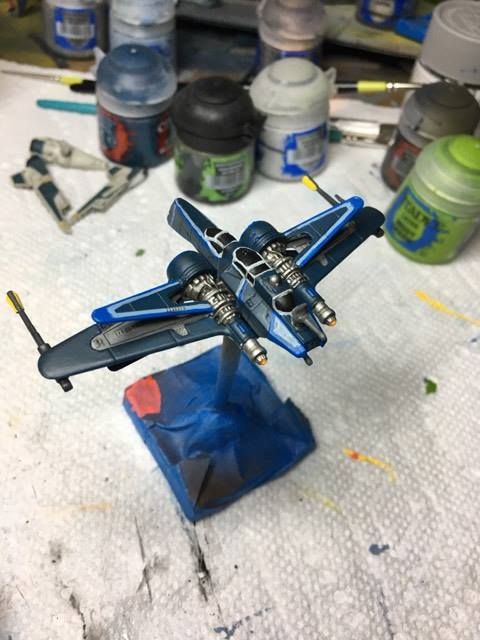
NCC-62516 USS Shadowcaster - Repaint and Lighting Mod

By ZealuxMyr, in X-Wing Painting and Modification

Greetings all. As soon as the Lancer -Class Pursuit Craft was announced this modification began bouncing around my head. For the most part she's finished, just need to sort out how to paint/decal the NCC-62516 USS Shadowcaster call number onto her hull. Hope you all enjoy this franchise crossing modification!

MvIfXiR.jpg

Edited by ZealuxMyr

And now the process of the conversion with some explanations (I did not take photos of each step, something I will rectify as I begin my second conversion).

Step One: Unboxing

F6UqjFv.jpg

Step Two: Pokey Staby Time

dQj17wd.jpg

Removing the caps over the aft portion of the engines was easy, you can wiggle the plastic until the glue cracks and just slide them off. If they're being stubborn you can slice through the brown portion along one of the groves. Make just one incision you can glue it back together later (I prefer using Methyl Ethyl Ketone to bond the plastic back together).

rFdOL3R.jpg

The front caps of the engine have a nice grove in them where you can slice right down the side of the engine. This is a fantastic way to cut your hand open or finger off. So please be careful, X-Acto knives are fantastically sharp.

iWC8eRx.jpg

FFG made the Shadowcaster absurdly well. No other large ship has as many pegs holding its top and bottom parts together. This is the first time I've ever had to use multiple screwdrivers (tiny glasses ones) in order to pry the two sections apart. Good news is you now get to take vengeance upon those pegs, cut ALL of them off except the front one by the cockpit - that one holds the two parts together well enough when you're done this project.

Edited by ZealuxMyr

Step Three: Painting

Paint your model. Make sure all holes are made for the LEDs so that you won't have to risk messing up your painted model.

Step Four: Wiring

gIzdlfF.jpg glt08mz.jpg

Sorry, only took a photo when I finished the project. What you have here is one 12v 23A camera battery (my personal favorite for large ship lighting mods) wired to four LEDs in parallel. Due to the voltage of the LEDs I had on hand no resistors were necessary.

Step Five: Bringing Clarity

Sh5zNTh.jpg 6NR46zb.jpg

So, simple process, use that X-ACTO knife and slice off the front and aft engine caps (do this before you wire it). Here I made silicone molds of each piece I removed so that I could pour clear acrylic versions of each part. Once the clear pieces had cured you may find you need to drill out the holes for the LEDs so that they are mounted into the plastic. I used hot glue (low temp) to attach the clear parts over the LEDs. I used low temp hot glue for two reasons: 1. I've found for the YT-1300s I've done that it diffuses the light from LEDs almost perfectly. 2. It won't get all over your painted model as you go to attach the caps.

Edited by ZealuxMyr

Here's some more final shots for your viewing pleasure and no I have not added a dark wash as I'm still on the fence as to whether or not I want a dirty model or not.

d1BfhGD.jpg f0PSMGc.jpg Ygw36Cj.jpg FJ0FW9U.jpg l0jZjcT.jpg

3YLLvhX.jpg

Edited by ZealuxMyr

Nice!

Can we see a pic of that blue/back ARC in the background?

It's good to know that the engine cowling things come off easily, I was worried about painting around those.

(Also a fabulous conversion/paint job)

I think that if you're trying to make it look like a Federation ship, clean is the way to go. I don't recall seeing many of them being dirty at all.

excellent work sir

Looks **** fantastic!!

:D

Brilliantly done!

For some reason, I suddenly want to order "Let's show them what they're up against!"

I hope you will use Aurebesh for the ship name on the hull :P

Can you walk through your molding process? I've been looking to do learn the craft, but reading online about it makes it seem so much more expensive and difficult than everyone that talks about doing it.

Nice!

Can we see a pic of that blue/back ARC in the background?

I will post a picture when I get home from work today. It's three shades of blue with some gray/darkwash detailing/shading.

Can you walk through your molding process? I've been looking to do learn the craft, but reading online about it makes it seem so much more expensive and difficult than everyone that talks about doing it.

To be honest it was very easy. The only expensiveish portion of how I do my molding was buying the actual two part silicone and acrylic resin for the project.

I first start by taking a piece of cardstock and draw a grid pattern on it so that each square in the grid is 1 inch by 1 inch. I then figure out how large my item is when compared to this grid, for these caps I made 1 mold with all 4 parts in it and used a 1 inch by 1 inch base with 1 inch by 2 inch walls. Then you cut out your grid so you have a + sign shaped piece of cardstock. Folding along what will be your base tape the upright sides to each other (painters tape and scotch tape work well). For this project I hot glued all 4 parts to the inside of the cardstock mold face-up on the 1 inch by 1 inch bottom. I then mixed my 2 part silicone per manufacturer's instructions and poured it over my plastic do-dads. From there you just have to wait for the mold to dry, you can then cut through the tape and take apart the cardstock mold. The plastic parts pop right out of the silicone without much of an issue. Follow your instructions on the acrylic resin bottle for proper mixing (catalyst-resin) and pour a small amount in at a time, let it trickle in to avoid trapping air at the bottom of the mold. I'll also through up a picture of the finished mold tonight.

Warning : When working with acrylic resin do so in a WELL ventilated area (like outside), a respirator is strongly recommended (if you'd like to avoid respiratory problems and/or cancer). #trustMeIAmAChemist

Edited by ZealuxMyr

Nicely done.

Can you walk through your molding process? I've been looking to do learn the craft, but reading online about it makes it seem so much more expensive and difficult than everyone that talks about doing it.

To be honest it was very easy. The only expensiveish portion of how I do my molding was buying the actual two part silicone and acrylic resin for the project.

I first start by taking a piece of cardstock and draw a grid pattern on it so that each square in the grid is 1 inch by 1 inch. I then figure out how large my item is when compared to this grid, for these caps I made 1 mold with all 4 parts in it and used a 1 inch by 1 inch base with 1 inch by 2 inch walls. Then you cut out your grid so you have a + sign shaped piece of cardstock. Folding along what will be your base tape the upright sides to each other (painters tape and scotch tape work well). For this project I hot glued all 4 parts to the inside of the cardstock mold face-up on the 1 inch by 1 inch bottom. I then mixed my 2 part silicone per manufacturer's instructions and poured it over my plastic do-dads. From there you just have to wait for the mold to dry, you can then cut through the tape and take apart the cardstock mold. The plastic parts pop right out of the silicone without much of an issue. Follow your instructions on the acrylic resin bottle for proper mixing (catalyst-resin) and pour a small amount in at a time, let it trickle in to avoid trapping air at the bottom of the mold. I'll also through up a picture of the finished mold tonight.

Warning : When working with acrylic resin do so in a WELL ventilated area (like outside), a respirator is strongly recommended (if you'd like to avoid respiratory problems and/or cancer). #trustMeIAmAChemist

So if I'm understanding your process correctly, you're not making a two part mold. I'm assuming this works due to the geometry of the parts in that there's a taper, allowing you to pull them free. So when you're making the casting, do you overfill and then cut/sand to size afterwards?

Don't suppose you have links (or names) to the materials you use?

Thanks again, I always enjoy learning new skills I can use.

Here's a couple shots of the molds I made. As you can see they are one part molds, and Khyros guessed correctly that I did it this way due to the tapered shape of the parts I was trying to mold. It made it easy to do a single mold. I do overfill them slightly but then I smooth off the surface of the mold with a popsicle stick to minimize the amount of finagling I have to do once the acrylic sets. It should be noted and added that I drilled out holes for the LEDs to set into on the backs of each clear acrylic piece and secured them with Low Temp Hot Glue (diffuses light).

Mold1_zpsa8onameu.jpg Mold2_zpsvxo4t8kq.jpg

And here's the ARC-170 that was hiding in the background (WIP - need to do some touch up work and finish off the astromech):

ARC170Bow_zpspjcbwwre.jpg ARC170Stern_zpsyreha8ut.jpg

That ARC is a beaut! Haven't seen many blue ships out there; usually it's an accent, striping and such. The Navy blue looks perfect.

Well, I was hoping someone was going to do a mod like this and yours is fabulous!! That ARC is something else too, great color choices and work.

Edited by MtnWook

Thank you all for your compliments :D

Looks awesome and the tutorial is sweet (and that ARC, swoon ), but it's missing one thing keeping it from true Star Wtrearks: A deflector dish.

Actually...

It does have deflector dishes, they're painted and not lit-up. I painted in the inserts of the forward baffles underneath the hull behind the cockpit a blue-green color specifically to be the dual forward deflector array .

I'll try to upload a better picture tonight. :P

When I make a second one I'm going to wire the LEDs in parallel instead of in series, this will give me the POWER (of the dark side) that I need to add an LED for the dual forward deflector array. This model got wired in series because my 12v battery and the 4 LEDs I had for the necelles mathed perfectly to not need any resistors. I then made sad face when I realized I didn't have the power to light up the forward deflector array (glad I didn't cut the panels I painted off before I found this out).

how do i get the pictures to show up? its just bunch of % signs and numbers

ditto

She's beautiful