[CR-90 campaign] The Point of No Return

By heychadwick, in X-Wing

We're moving on to the next mission soon. Does anyone have a good idea as to how to win T2B as the Rebels? It seems really rough to me.

Wait, if the Rebels won, why are you moving on to T2B? Shouldn't you be moving on to T3A?
We're covering all the missions in the campaign, not playing through it the normal way. We'll cover 2B next, then 3A, 3B, and 4. To cover the campaign thoroughly, we need to look at every mission.

I want to know how you handle 4 then :) because there's goodies for the rebels depending on how many missions they have won before. Winning all 3 before basically ensures win on the last if you field Biggs and that Cargo that will make the CR90 an obstacle that adds 3 dice instead of 1.

I think we'll make an assumption based on how the missions shake out; if Rebels have an advantage in a mission, I think we'll assume they won it... Or we might look at it twice, trying the last mission with max bonuses for each side. I think the Rebels are going to have a rough time either way, based on my read of the mission. Although that depends on the Imperial deployment tactics more than anything else.

For T2b, can't give much advice here since in our campaigns Rebels always won T1. But I think judging from the description it should be fine, bring firepower.

Like

Wedge Antilles (29)

Crack Shot (1)

R2 Astromech (1)

Integrated Astromech (0)

Rookie Pilot (21)

R2 Astromech (1)

Integrated Astromech (0)

Rookie Pilot (21)

R2 Astromech (1)

Integrated Astromech (0)

Total: 75

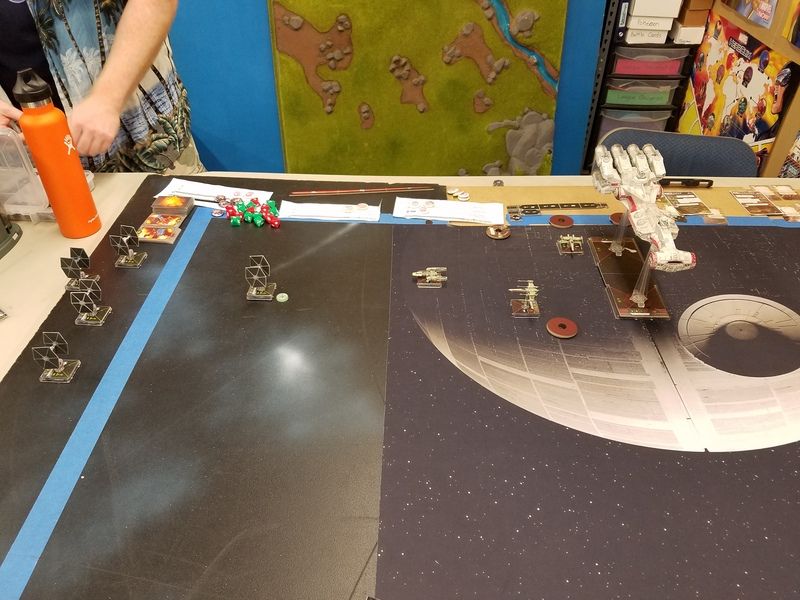
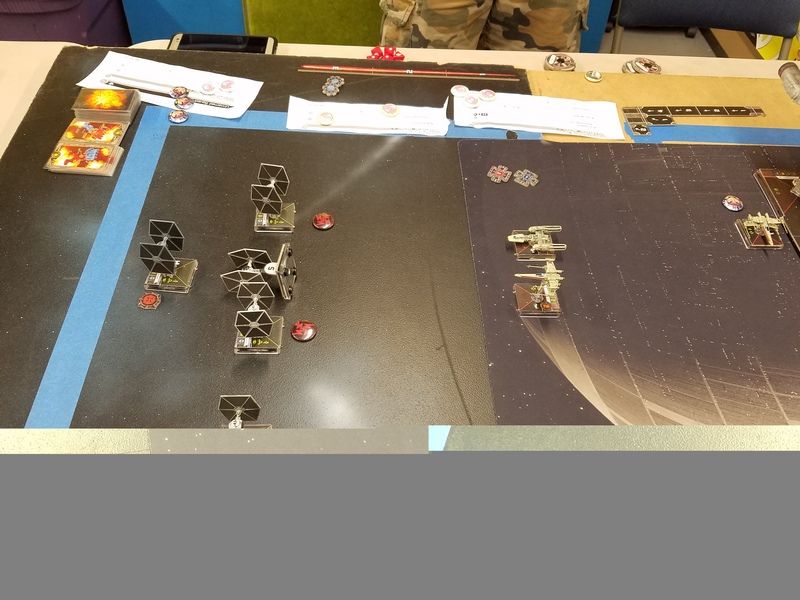
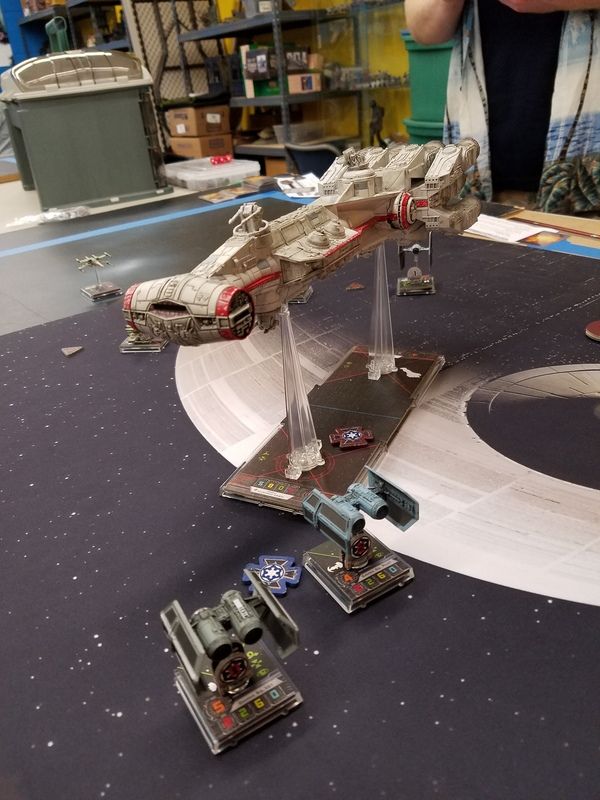
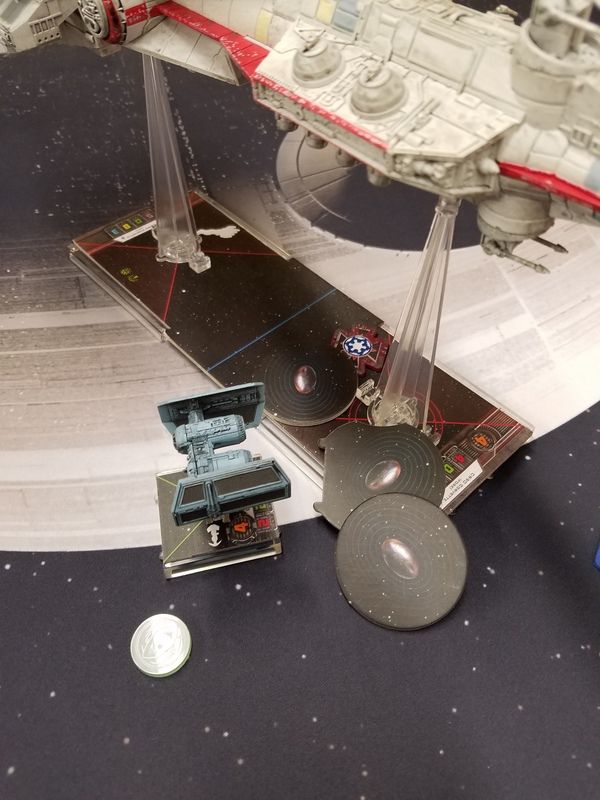
First turn, get 3 energy, place them into weaponry (2 in single turbo, 1 in quad), then get 3 energy from gas containers. Burn 1 energy during main gun attack to attack with 5 dice. 2nd turn get 3 energy again, have 5 energy at disposal -> put into weapons again or recover shields. Intercept main attack force with all your x-wings, try to block and of course focus fire on bomb carriers/heavy hitters. That's what I would do, not sure it would do it but yea. Love to hear how to turns out. Definitely bring a squad that has firepower so you can take stuff down, maybe block stuff to deny actions. Not sure if 4 A-Wings would cut it though.

I've already played it once and drilled it a number of times as Imperials flying against 100 points of rebel fighters (X-wings) instead of 75, flying two TIE miniswarms, which can reach firing range in two turns. Dead CR90 each time. The CR90's position and lack of shields is just really hard to overcome as the Rebel player, as far as I can tell. And let's not talk about what the mission would be like if the Imperial took Phantoms...

Not to say that it's an auto-win for the Imperials. But I think you'd have to make bad list choices and go up against a well-built maximum aggression list (like the one you suggest) to lose as the Imperial.

OK....so we will be playing this on Thursday. Once again, I'm not sure who is going to play what. I think it's easy to think about what the Imperials take. If we play it, I think Howlrunner died, so I don't get to use Howlrunner in my game. I'm kind of wanting to play Rebels to find something that might work.

Thinking about the Rebels....it's going to be hard. They get no Shields. They need to get them up fast. J-bot and I haven't played the first one yet and we can just guess which section is hurt already. I would probably want the front section as it has more shields to bring up. I think the main goal of the CR-90 is to bring up the shields ASAP. For that, you can get 3 Energy for free and burn that Tibanna Gas the first turn. Use it all for Shield Recovery on the front section. 6 Shield is better than nothing for that first turn. Next turn you Recover 3 for the rear section. That's 2 turns. So....you need to try to hold them off for 2 Turns while you get your shields back online. Then, you can do the Reinforce action.

Having Biggs for the Rebels is a no brainer. If J-bot is Rebels, I hope he isn't going to be different and go without him as I want it to be a fair fight. You can't take anything different on the CR90 than the default stuff, so no upgrades that turns it into an obstacle. Just normal CR-90. Astromech for Biggs? Part of me says R2-D2 and just do green moves to stay within R1 of the CR-90 every round. If enemy goes with some sort of heavy hitter, than R4-D6 (You only take max 2 damage from each attack) might be a good option. Not so good if you are only facing Tie Fighters.

Next....I think Ion Torpedoes could really save your bacon. If the enemy clumps together, you can try to hit them with an Ion Torpedo to Ionize a whole group of them. That means they go 1 forward for a whole, crucial turn. If you hit them early enough, they might not even be in range! I like the idea, but you need to make that Torpedo hit. Three green dice for the Tie Fighters could mean that they just might roll really well. I had to look and the Rebels get a SINGLE unique ship. So, you can't take Horton and Guidance Chips. Too bad as that would be awesome. Heck, Horton with R2-D6 to give him PTL and you can TL and Focus. Then, he re-rolls all his blanks. GC to change one more blank to a hit. It would be a good chance of hitting with him. That would mean no Biggs, though. The only other option would be to have a Y-wing with Ion Torpedo and GC. It still makes me nervous. Maybe have a 2nd Y-wing with TLT to remove tokens on someone...and then have the Y-wing fire the Torpedo at the same target? It would mean I would only have 3 ships.

Biggs Darklighter (25)
R4-D6 (1)
Gold Squadron Pilot (18)
Ion Torpedoes (5)
Extra Munitions (2)
Guidance Chips (0)
Gold Squadron Pilot (18)
Twin Laser Turret (6)
Total: 75
I could always swap out the TLT Y-wing for 2 Z-95's, but would they really do much good against Tie Fighters with 3 Agility? Maybe strip their tokens, but that's about it. If I dropped R4-D6, then I could go with:
Biggs Darklighter (25)
Gold Squadron Pilot (18)
Ion Torpedoes (5)
Extra Munitions (2)
Guidance Chips (0)
Rookie Pilot (21)
Proton Torpedoes (4)
Guidance Chips (0)
Total: 75

Biggs would be the sacrificial lamb. Y-wing would be there to Ionize the big group. The X-wing can dish out the damage and it's got a Proton Torpedo for some alpha strike options. With GC, it might be able to take out a Tie Fighter in one shot. Or...it can go for whatever isn't in the clump. Try to hit fast and hard. I kind of like this option better. Once the ordnance is gone, the X-wing can fire at things with 3 red dice. It's much better than Z-95's.

OK....so....Do that and hope it buys you enough time to get both shields up and running. Then, you make a run for the border at full speed. Use Reinforce. I need to look at the booklet again to ensure that I am looking at the right board edge for retreating off of!

What do you guys think of this plan?

OK.....so....just if I have to play Imperials, I don't want to go with something that will kick in J-bot's teeth. I would want to go with something fun, thematic, and middling power level. I have to admit that getting a free Jonus makes me want to take at least one Tie Bomber for his bonus effect. The extra Bomb effect makes me want to take Deathfire. The new Cluster Mine rules makes me want to take Cluster Mines! Wait....so....if you effect the CR-90 twice...does that mean each time you roll over a section you roll 4 dice?

As for beyond that, I just like some Tie Fighters. I love Tie Fighters. They are the foot soldier of the Empire. I will go with a number of different guys.

"Deathfire" (17)
Plasma Torpedoes (3)
Extra Munitions (2)
Cluster Mines (4)
"Scourge" (17)
"Winged Gundark" (15)
"Youngster" (15)
Rage (1)
"Wampa" (14)
Academy Pilot (12)
Total: 100
Youngster and Rage just seems fun. I don't think I've used Rage much and I want to try it. Winged Gundark could get into R1 of the CR-90 pretty easily and turning something into a crit could actually be a really good ability. I want to put him in. Wampa just might get a crit and be able to dish out a hit to the CR-90 and even go through shields. So, I'm happy with him for the odd chance of using his ability. Scourge will be rolling 3 dice when firing at the damaged section! Woohoo!
Now, if I wanted to be power gamer, I would probably go with Youngster and Rage and a bunch of Black Squadron guys with Wingman. That would reduce the stress to one and they can do a green, so you can Rage each turn. I'll be mellow about it, though.

I'm trying to get my game in this week vs theorist so I can properly get slaughtered by 3 Black Sq, 2 ps5 phantoms and soontir. All I have is 3 X-Wings with no upgrades :P

I think Tie Phantoms wreck this campaign.

For 2B I like Biggs; he might buy you a decent amount of time to get the CR-90 in fighting shape and on its way to the edge. The only downside is that you may not have him later in the campaign if he dies in the mission. He would probably be most useful in the last mission of the campaign, which technically decides the overall winner.

The Ion torps are also good if you can get them off on a swarm. Anything that slows down the enemy is gold for this mission. For that reason you should reconsider the Z-95s; they can make for good blockers if you can get enough of them on the table in front of an enemy formation.

As far as the Imperials go, this is kind of a milk run, but I think they could lose it if they make enough mistakes. One thing I don't like is loading up a low-agility ship with upgrades (bombs+missiles), because they make good targets for the CR-90's guns, as well as the escort. Neutering the corvette's turbolasers with six agility is really nice - TIE fighters have a really good chance of evading those attacks altogether. But a TIE punisher is rolling two dice to the turbo's 4. With two turbos, the main guns, and escorts, I could see a fully loaded punisher going down, possibly before firing a shot - and that could hurt.

A dispersed rage swarm works well. Don't bunch up, so you can avoid Ion splash and blocking efforts. Youngster's ability works at range 1-3. I wouldn't bother with spamming wingman, either. Just pop rage when you have a decent shot and drill the damage in. The game will probably end on that turn. The key to that is keeping youngster alive long enough for that shot, which is tough if you don't have a bigger target on the board. (but maybe that's your punisher).

Edited by Babaganoosh

Keep up the posts. Looks like fun

I could see a Tie Defender /D title would be pretty good with Jonus around. They would survive the Turbo Lasers better than the Tie Fighters, even. The two shots would be good. Maybe go with Ion and main guns.

As for Biggs, you could always keep around until just before death, and then bug out. Let them target the CR-90. Of course, that's not always easy to do. You might be dead before you get a chance to know it's time to go.

Yeah, that's a good idea, even if it's a bit risky. You could also set up a kind of super Biggs here, where you coordinate him for extra actions, and maybe give him R2-F2. If you fly Jan Ors on a Kyle Katarn HWK on top of that, you could give him a focus+evade on three agility, which could be quite nice. It could be a little tricky keeping him in enough arcs to prevent damage altogether, but you could definitely mess with the enemy's plans.

Help me follow this please?

1) Kyle assigns a Focus token to Biggs: 1 Focus; 0 Evade; 2 Agility

2) Jan converts it to an Evade token: 0 Focus; 1 Evade; 2 Agility

3) R2-F2 action adds an agility: 0 Focus; 1 Evade; 3 Agility

Without PTL, which Biggs cannot use, where is the Focus token coming from?

4) CR-90 does a Coordinate action and lets Biggs take a Focus action.

The front of the CR-90 can either TL or Coordinate. Coordinate lets you give an action to someone in R1-2 of the front. It's not used very often as most people want the TL.

Coordinate action from the CR-90 giving the B-man a free action and he takes focus.

Ninja'd!

Edited by BlodVargarna

Alright, so I did get the game in last night! J-bot just took the list that I wrote, but I think he was disappointed with hit. Discussion afterwards had him saying he thinks the only possible defense is a strong offense. I also think his Biggs dice could've been better. I went with my list. We randomized which section was crippled and it was the rear. Personally, I'd rather have the front as spending 1 energy for each action is no where near as bad as not being able to Reinforce unless you have 3 Energy on the ship!

We only had 1 mat, so it looks a little odd for the 3x6 table. Here is just after a couple of moves.

20161027_173211_zpswpe3e0rh.jpg

And Tie Bombers on the other side:

20161027_173215_zpspcowhyjl.jpg

So.....I wasn't really thinking when I set up. I know he had Ion Torpedoes, but still set up within R1 of each other. Then, I put the Academy pilot in the front and center. I was just thinking....OK....but the cheap chump in front where we know he is going to die. I didn't think that he would go first and then the Y-wing would be able to TL him. I set up before he did and didn't think that he could grab a TL on the first turn. I was pretty stupid. So....the Y-wing rolled up, grabbed the TL and fired at the Academy. He rolled 4 hits and I rolled 1 Evade. Dead Tie Fighter and 3 others Ionized!!!

20161027_174339_zpsnfswhyhv.jpg

After that, I got really lucky. He moved the Y-wing up and grabbed the TL on the guy in the back. I thought....my 3 Tie Fighters will be ionized again! Well, I was able to fire first and managed to get one crit through his shields. It was BLINDED PILOT!!!! He couldn't fire that turn. Saved my bacon. Instead, I moved up. I took some shots on Biggs and knocked all his shields off. Biggs would roll 4 green dice with a Focus and get 2 blanks, 1 eyeball, and 1 Evade. Bad for Biggs.

20161027_180442_zpswkgxrlqd.jpg

Energy went to main guns and the Rebels concentrated fire. He was able to blow up two Tie Fighters this turn! I was able to hit Biggs so that he was down to 2 Hull and I managed to do some damage to the rear. No more than knocking shields off. Things were looking pretty grim for me. I was thinking I didn't have much of a chance. The Tie Bombers were just lumbering forward on the far end. Oh, I think it was this turn that I did shoot the first Plasma Torpedo and knocked all the Shields out of the front. I even got a crit through that removed a crew card.

I think this next point was the pivotal moment. I went 1 forward with my Tie Bombers, but the CR-90 came at me. I got nervous with Jonus and barrel rolled him out of the way. I totally forgot that I could've given the action to Deathfire to BR. It wasn't until after dials were down that I saw the potential of the CR90 coming straight at me and running me over. That's what happened. The CR90 came about 1/2 an inch from my ship! It was quite close.

20161027_182842_zpsjsz7ahzt.jpg

Biggs did a K-turn as he was almost dead. He didn't want to stick around. Here is is from the other side:

20161027_182849_zpsmtihgsw7.jpg

My Tie Bombers fired at point blank range and were able to take the front section down to 4 Hull! Not having Reinforce for the CR90 is brutal.

The best moment of the game. For the next turn, Deathfire goes 3 forward...and grabs a Focus. This allows her to drop her Cluster Bombs!!!!

20161027_183250_zpsdjchmim2.jpg

The special rules means I roll 4 dice for each bomblet. The first one does.....1 point. The second one does....4 points!!!! The CR-90 is crippled! Imperial victory.

Discussing it afterwards, I do kind of agree that it's stupid for the special rule with Bombs. Why? The Rebels don't need another thing to screw them over. It's hard enough as it is.

Gutsy plan, bombing that corvette!

OK....time to start thinking about the next one!

Mission T3a: Satellite Uplink

Having survived yet another Imperial entanglement, the captain of the CR90 vows to thwart the Empire in whatever way he can. Volunteering his services, he must stay near a satellite cluster in order to intercept an Imperial transmission of the utmost importance.

Mission Setup

Rebel: CR90, Wedge Antilles with Proton Torpedoes and R2 Astromech, 100 squad points; the Rebel player cannot field any other unique Ship or Upgrade cards.

Imperial: Maarek Stele with Cluster Missiles and Marksmanship, 4 Black Squadron Pilots, 100 squad points; the Imperial player may use squad points to equip these Black Squadron Pilots with Upgrade cards (this is an exception to the normal campaign rules).
The play area is 3' by 4'.
The Rebel player places the CR90 within Range 3 of the Rebel edge and approximately equidistant from both neutral edges. He must place the CR90 so that it is parallel to the Rebel edge.
Then, the Rebel player places five satellite tokens in the play area. He must place one satellite token within each range section (Range 1-5) from the Rebel edge. That is, he must place one satellite token within Range 1, one within Range 2, one within Range 3, and so on. He cannot place a satellite token within Range 1-2 of another satellite token or overlapping the CR90. Then, he places his remaining ships within Range 1-5 of the Rebel edge.
Then, the Imperial player places his ships within Range 1-2 of the Imperial edge.
The Rebel player has initiative.
Special Rules
  • Satellites: Satellites are treated as obstacles that can be attacked, target-locked, damaged, destroyed, and have shields as if they were Rebel ships. Each satellite has a hull value of "2" and an agility value of "1". For each damage or critical damage a satellite suffers, remove one shield token. If the satellite had no shield token to remove, place one damage token near that satellite instead. When there are two or more damage tokens near a satellite, it is destroyed.
  • Destructive Feedback: When a satellite is destroyed, remove the satellite and its damage tokens from the play area. Then, the Imperial player deals one faceup Damage card to either the fore or aft section of the CR90.
  • Protect the Satellites: When the CR90 performs a recover action, it may either recover its own shields or assign shield tokens to one or more satellites. With this action, the Rebel player may recover the CR90's shields, assign shields to satellites, or any combination of these two (up to the number of energy tokens removed). A satellite cannot have more than two shields at any time.
  • Reinforce the Satellites: When the CR90 performs a reinforce action, the Rebel player may assign the reinforce token to a satellite instead of to a section of the CR90.
  • Uploading Data: During the Planning phase, the Rebel player does not assign a maneuver dial to the CR90. During the Activation phase, the CR90 still activates, but it does not execute a maneuver. Instead, during the "Gain Energy" step, it gains energy equal to the number of satellites remaining in the play area.

Mission Objectives

Rebel Victory: Destroy all Imperial ships.
Imperial Victory: Destroy the CR90 or destroy all satellites.
Edited by heychadwick

First question with this involves fixes. Should Wedge get Integrated Astromech and Maarek get the X1 title? These came out after the fact. I can see arguments for both. It's been balanced for not having them. I'll admit that the Imperials would have the advantage in the bonuses for each.

With the energy from the Satellites, the CR90 will be able to fire it's Single Turbo Lasers often enough. Or replenish energy for the satellites. I do like that they can use those actions on the satellites.

Not sure what Rebels would want. If they go with numerous cheap Z-95's they can try to protect the satellites, but they probably won't do much damage. That is unless they go with an alpha strike ordnance component. X-wings might be just as good at that point, but just a few more points in price. Going for damage would be a good thing. Maybe a mix of ships? I can see some TLT Y-wings would be a good thing to try to whittle down the Imperials. A-wings might not be a bad option. They are cheap and fast. They can do the Evade action or try to hit the Imperials.

The Imperials probably want to leave the CR90 alone and just go for the objective. Either that or try to blast the Defenders to pieces and then pick off the satellites. Not sure what is the best type of ship to go for. I hate to say it, but Tie Interceptors with AutoThrusters sounds like a plan. They have the damage to hurt the objectives and the AT to avoid the long range damage from the CR90. I can also see V1's doing well as they would get a TL and the free Evade. Not as much damage as Interceptors, though. It would be a perfect mission for the new Tie Striker and the free Boost. The Lambda Shuttle might be OK for a cheap gunboat for the Imperials. It doesn't cost too much and gets 3 attack dice. The only problem is the Single Turbo Lasers would eat it up. Might not be a bad distraction, though. Throw it out there to suck up the fire from the CR-90. Go with Sensor Jammer to turn one of those hits to an eyeball. Yes, the Single Turbo gets to change 1 eyeball to a hit, so it might not be all that. Cheap Tie Fighters are not a bad option.

EPT choices for the Black Squadron should be simple and cheap. Crack Shot is an option, but one use. The defender probably won't roll an Evade with that one green. I think Juke would be better, as it would turn that one Evade into a Focus, which it doesn't have. It also works more than one round. It works on other ships and forces them to burn their Focus on defense. I think it could work.

I would look again at targeting the CR90 with your attack. It may be more vulnerable than you think. The CR90 does not move in this mission, and is showing the Imperial deployment it's midline. The Turbolasers and main guns will be firing at full power, but you can close the gap with fast-moving ships before those turbolasers can clean you out, and once you are in close range of the CR90, there isn't much it can do to stop you.

I'm looking at a dispersed swarm TIE attack for my testing. You start with 4 black squadron pilots and Stele. Throw in another 6 academy TIEs and a force modifier like Youngster, and you are looking at a lot of damage. Even better, since the CR90 is showing you its midline, you can fairly easily plan your attack vector to give your attack force shots on both sections. With that many TIEs, even allowing for moderate casualties, you can almost guarantee a section crippled on the first pass; probably the fore, if the Rebel player knows what they're doing and reinforces the rear. After the fore is crippled, the Imperial player could self bump or koiogran to the other side of the CR90 and continue attacking the corvette's rear at close range. Throw enough three dice attacks and the rear will go down regardless of a reinforce token or not.

An Imperial player could probably opt to target the rear section and kill it, if they have enough ships at range 1. That would leave the fore section very vulnerable to attack, since it would no longer have the recover or reinforce actions, which are on the rear section. Choosing critical hit cards from Mareek Stele's ability could be devastating in any case.

Could this be a case for Youngster touting Expose? get into range one and blow the cr90 out of the sky!

hahaha

no, expose is still bad, as far as I can figure. Far better to go for a close-range rage swarm attack. That's 3 virtually guaranteed hits from each TIE that rages, at range 1. Expose gives a TIE 4 dice at R1, but no dice mods, so you'd expect two hits on average. In general, it's almost always better to just focus instead of expose, in terms of average hits that you get from the roll. The only times expose can be good are when you have other dice mods coming into play, to make the most of the extra die. This is not very often, unfortunately.

The drawback is the two stress tokens, of course. But if you clean out the rear section of the corvette with an attack like this, the Fore section is easy pickings later.

Depending on what you will allow, a Resistance Sympathizer with Tac Jammer and Rigged Cargo might set up a few blocks to the imperial shooting. ORS would also work, just be that much weaker.

A minelayer or two might help as well in that regard.

Imperial wise, throw in a few Advanceds with AC's and prockets.

4 Tempests so equipped will allow for tactical adjustment on the fly.

Depending on what you will allow...

I don't want to go into Force Awakens stuff. It just doesn't fit.

Depending on what you will allow...

I don't want to go into Force Awakens stuff. It just doesn't fit.

A Tac Jamming mine layer would still be nice to have I think.

OK....after thinking about it, here's what I like for Imperials:

Storm Squadron Pilot (23)
Cluster Missiles (4)
Accuracy Corrector (0)
Guidance Chips (0)
TIE/x1 (0)
Storm Squadron Pilot (23)
Cluster Missiles (4)
Accuracy Corrector (0)
Guidance Chips (0)
TIE/x1 (0)
"Chaser" (14)
"Night Beast" (15)
"Dark Curse" (16)
Total: 99
This list has two ships that I love, the Tie Advanced and the Tie Fighter - both Wave 1 ships. I don't feel like I've gotten my fill of Tie Adv. after the fix. I first just threw in the generics with no missiles and figured that they can save their actions for defense and just fire away at the satellites. Their high Agility combined with the Shields should help them get to the target. I had points left over and threw in the Cluster Missiles, because....why not! Threw on GC for free.
As for the Tie Fighters, they get some action economy with Chaser and Night Beast. I figure they can do an Evade or something to help keep them alive. Dark Curse is in a class all his own, so he stays alive. I figure having some ships with better chances of living would be good.
Need to think of some Rebel lists...

OK....here's my list that's not really very inspired.

Green Squadron Pilot (19)
Push the Limit (3)
Concussion Missiles (4)
Veteran Instincts (1)
Guidance Chips (0)
A-Wing Test Pilot (0)
Rebel Operative (16)
Twin Laser Turret (6)
Recon Specialist (3)
Red Squadron Pilot (23)
R2 Astromech (1)
Integrated Astromech (0)
Red Squadron Pilot (23)
R2 Astromech (1)
Integrated Astromech (0)
Total: 100
I figured a HWK is cheaper than a Y-wing for a TLT. I don't think it will be shot at that much. At the end, I had just enough points for a Recon Specialist. I thought an A-wing would be good to be fast and maneuverable. It lacked firepower, but I had points for a Concussion Missile. After that, just figured some X-wings would be good. PS 4 so they can always get to fire if blown up.
It was harder with no other Uniques.