Match report from german armada national 2016.

By Tokra, in Star Wars: Armada Battle Reports

Even when it was already some time ago, i want to post my national experience as well.

When playing this list I had always the song from „Die toten Hosen“ called “ 10 kleine Jägermeister ” in my mind. No idea why. :D

After long trying, playing around and testing I decide to take the list with the 8 Gozanti.
I tried a few other fleets, but was not pleased with the results.

So I thought, let’s take the G8 list and have the laugh on my side (at least this worked).

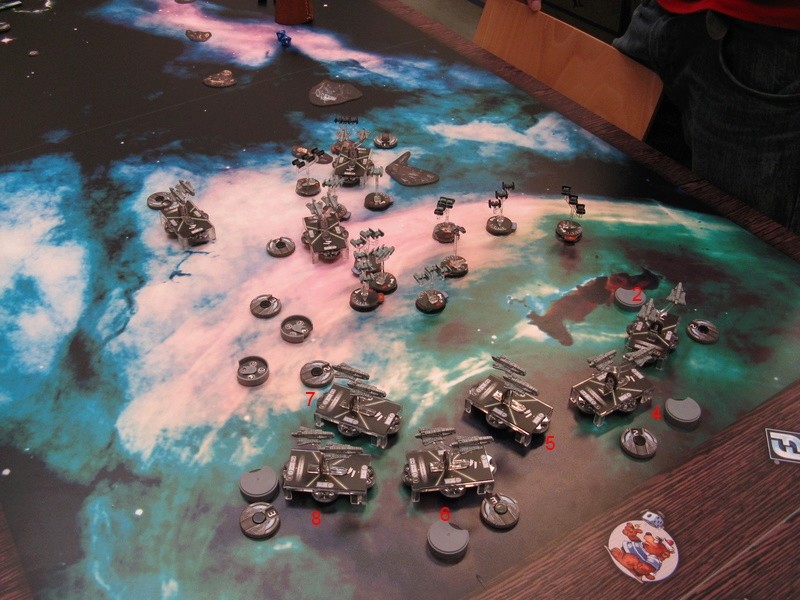
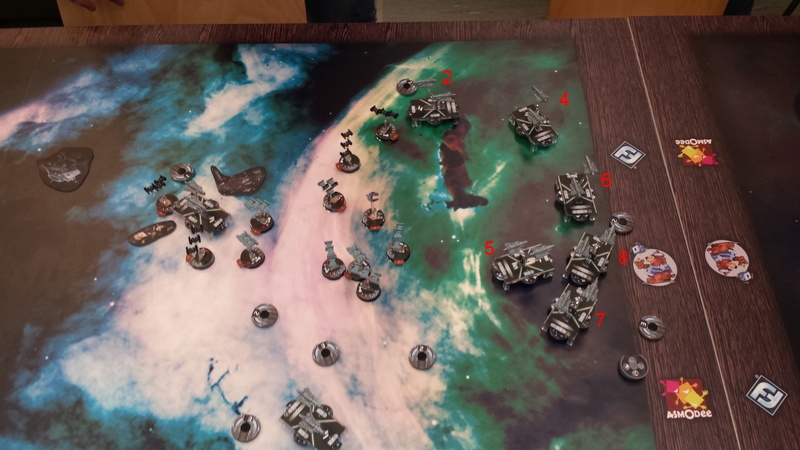
The main idea of this list was to have a lot of ship activations. So I can wait for as long as possible to react with the squadrons. And I have a free choice what to do. On top of this, a lot of ships mean it will take some time to take these down.

And the bombers, combined with the Bomber Commando Center should do good damage and take down enemy ships really fast.
Small ships can die in one round, medium ships in two and a large ship might go down in 3 rounds (if the enemy is giving the time and is not engaging the squadrons to much).

DM Test 6
Author: Tokra

Faction: Galactic Empire
Points: 399/400

Commander: Grand Moff Tarkin

Assault Objective: Most Wanted
Defense Objective: Contested Outpost

Navigation Objective: Superior Positions

Gozanti-class Cruisers (23 points)
- Bomber Command Center ( 8 points)
= 31
total ship cost

Gozanti-class Cruisers (23 points)
- Boosted Comms ( 4 points)
= 27
total ship cost

Gozanti-class Cruisers (23 points)
- Boosted Comms ( 4 points)
= 27
total ship cost

Gozanti-class Cruisers (23 points)
- Boosted Comms ( 4 points)
= 27
total ship cost

Gozanti-class Cruisers (23 points)
- Vector ( 2 points)
- Expanded Hangar Bay ( 5 points)
= 30
total ship cost

Gozanti-class Cruisers (23 points)
- Bomber Command Center ( 8 points)
= 31
total ship cost

Gozanti-class Cruisers (23 points)
- Bomber Command Center ( 8 points)
= 31
total ship cost

[ flagship ] Gozanti-class Cruisers (23 points)
- Grand Moff Tarkin ( 38 points)
= 61
total ship cost

1 Major Rhymer ( 16 points)
1 JumpMaster 5000
( 12 points)
6 TIE Bomber Squadrons
( 54 points)
4 TIE Fighter Squadrons ( 32 points)
1 Dengar ( 20 points)

Card view http://armadawarlords.hivelabs.solutions/view_list.php?token=42440

Fleet created with http://armadawarlords.hivelabs.solutions/

After some nice talking to the other players we finally could start with 23 players. The notice in advance were over 40 player. It was a bit sad to see only this few players, when so many did a reservation.

3 Players used a regional bye.

Match 1:

The first match was a bye from a regional. So I could check out what the other lists were.

I saw a lot of lists that I didn’t like. Way too many squadron lists. Only good that I added a few Tie Fighter to my list (it was 10 Tie Bomber earlier).
Nearly every rebel list had a MC80, nearly every imperial list had an ISD.

Even the tripple Mark II with the 8 YT-2400 was there (one list i knew will cause some problems to the Bombers).

There were 12 rebel and 11 imperial lists. Most used Admiral was Ackbar (5). But i didnt see a Cracken oder Tagge List. All other Admirals were present.

Wave 4 was not allowed, because it was not (and still is not) released in Germany.

Match 2:

A little feeling of Groundhog Day. As always I had to play against a team member (Herendon).
Too bad we have tested out lists against each other for some times, so each knew the strength and weaknesses.

List:

Commander: Admiral Motti

[ flagship ] Imperial II-Class Star Destroyer (120 points)
- Admiral Motti ( 24 points)
- Support Officer ( 4 points)
- Gunnery Team ( 7 points)
- Electronic Countermeasures ( 7 points)
- H9 Turbolasers ( 8 points)
= 170 total ship cost

Gozanti-class Cruisers (23 points)
- Expanded Hangar Bay ( 5 points)
- Bomber Command Center ( 8 points)
= 36 total ship cost

Gozanti-class Cruisers (23 points)
- Expanded Hangar Bay ( 5 points)
- Comms Net ( 2 points)
= 30 total ship cost

Gozanti-class Cruisers (23 points)
- Slicer Tools ( 7 points)
= 30 total ship cost

1 "Howlrunner" ( 16 points)
3 TIE Interceptor Squadrons ( 33 points)
1 Major Rhymer ( 16 points)
3 TIE Bomber Squadrons ( 27 points)
2 TIE Advanced Squadrons ( 24 points)
1 JumpMaster 5000 ( 12 points)

Card view link

Fleet created with Armada Warlords

Setup:

I had more points, so he could choose who is player 1. He took the initiative and chooses my mission Superior Positions.

He placed his ships relative in the middle with the ISD in the middle and flanked by the Gozanti. This way he was able to fly to both sides really fast to catch my Flotillas.

With this in mind I had to change my setup a little bit. So I placed my ships crossways to be able to keep out of range of the ISD for as long as possible.
Gunnery team and H9 Turbolaser are real killer for the Gozanti.
Additionally I started with speed 2.

My biggest bonus were the Boosted Comms. This way I had more control over my squadrons.

bild_110.jpg

Round 1:

Still really carefully we flew our ships and squadrons and keep them tight together.
The ISD turned around to catch my Gozantis.
I was trying to stay near the edge of the map and keeping the squadrons between our ships.

bild_210.jpg

Round 2:

Because of the many ships I could wait with my squadrons and watch what he is doing. So I flew at first with the outer Gozanti a little bit further.
His ships turned further around but one was landing on his own squadrons. So I could move his Howlrunner alone in front of his ISD.
After all his ships activated (but not the squadrons) I could decide what to do. 3 Tie Fighters went for Howlrunner and took him down. The Bombers went for the ISD. I thought I have to take him down really fast, or I will get problems.

Thanks to the Bomber Commando Center (BCC) I did 5 Crit+Hit out of the 7 attacks. 2 on the left, 2 on the right, one cut in half. And still the first damage cards on the ISD. But he has still all his defense tokens.
The Jumpmaster and Dengar were staying a bit behind, but still giving the Counterattack to all the squadrons.
The Gozanti were trying to stay out of range of the ISD.

He moved his squadrons in position in the squadron phase. The Tie Bomer were on his lower left side.

Round 3:

First was a squadron command from one of his Gozanti. He could activate 4 squadrons. But the blue dice refused to work for him. My Dengar was out of reach for his squadrons. So he tried to bind my Bombers and take out some of the Tie Fighters or the Jumpmaster. But not one of my squadrons went down.
My first Gozanti (as well with squadron commando) took out two of his Tie Interceptors and the Jumpmaster.

The ISD had a repair commando, because he knew that I will go for it. But this way he lost one ship to activate his squadrons, because the ISD and one Gozanti with Comms Net will do repair commands.

Either way, 3 shields were restored on the ISD, and a little bit of Flak fire on the squadrons. Sadly this Flak killed my Jumpmaster. And now my Bombers are engaged with his Tie Advanced.

So I was busy to take down the Advanced and the ISD didn’t receive this much fire this round. Only a few more shields were stripped, and a few more damage cards for the ISD. At least a few shots went into the rear, so I could start to collect some victory tokens.

At the end of the round one more Tie Interceptor and one Tie Advanced went down. I lost one Tie Fighter and the Jumpmaster.
But the ISD is now in range of the Gozanti. Now it can be that I will lose two ships each turn.

bild_310.jpg

Round 4:

The ISD activated first. Again a repair command (and again 3 shields restored). The first Front attack aimed for the rear of Gozanti 3 (red 3) on medium distance and killed it easy.
The second attack did not go for the Gozanti 1 (this one will fly into his Bombers, and I guess he was hoping they are enough). So the second attack went for the Flagship (Red 4). But it was not enough to get it down.

My first activation was a squadron command and I could take the last Tie Advanced.
And all my Tie Bombers went for his ISD. This time it was too much and the Star Destroyer went down in a quite bang.

But as suspected my Gozanti flew right into his Bombers. In the end the Red 1 went down as well.

Two Tie Fighters went down to the flak from his Gozanti as well.

bild_410.jpg bild_510.jpg

Round 5:

This was the last round (time was called).

Not much happened in this round. My last Tie Fighter tried to play chicken game with the Gozanti and lost.

My Tie Bombers could only take down one of his Gozanti. The second one survived barely.

bild_610.jpg

Final score:

One ISD, one Gozanti, several squadrons and only 4 victory token for me.

2 Gozanti, 1 Jumpmaster, 4 Tie Fighter and one victory token for him.

Net 233 points for me, 9-2

Resume:

The big problem was the time. We had too many ships and too many squadrons. I didn’t have the feeling that we were playing slowly.

We lost a lot of time in the beginning because we were still in setup when the round started. But even with the extra time it would not have been enough to get to round 6.

The rerolls from the BCC did not help as well. They take some time. 7 Bombers with 3 BCC can be really a big time sink.

In the end it was a really close match. The result could have easy been totally different.
I had a lot of luck with the squadron fight. I did not lose too many and could take out his Interceptors really well.

But it is really a pain to take down an ISD with Motti. The ship was receiving at least 35 damage.

Match 3:

This was a really interesting fleet with 10 Tie Bombers. I was a bit surprised that he did so well against these heavy squadron lists.

But he went 10-1 and 9-2 in his first two matches. I could see his first match during my bye. And the alpha strike ability is quite nice.

There are not many pictures from this match, because it was recorded and can be find here.

The time of each round for the video is standing on each round.

List:

Commander: Grand Moff Tarkin

[ flagship ] Victory II-Class Star Destroyer (85 points)
- Grand Moff Tarkin ( 38 points)
- Gunnery Team ( 7 points)
- X17 Turbolasers ( 6 points)
= 136 total ship cost

Gozanti-class Cruisers (23 points)
= 23 total ship cost

Gozanti-class Cruisers (23 points)
- Bomber Command Center ( 8 points)
= 31 total ship cost

Raider-I Class Corvette (44 points)
- Instigator ( 4 points)
= 48 total ship cost

Gozanti-class Cruisers (23 points)
- Bomber Command Center ( 8 points)
= 31 total ship cost

1 JumpMaster 5000 ( 12 points)
1 Major Rhymer ( 16 points)
1 Dengar ( 20 points)
9 TIE Bomber Squadrons ( 81 points)

Card view link

Fleet created with Armada Warlords

Setup:

His initiative, my mission (again). And what a surprise, Superior Position again.

And again was the big ship (this time “only” a VSD) in the middle, flanked by the small ships.

Sadly I had to place my ships as well in the middle. Because he was at 19 points and I only at 17 I had to go in. A draw would mean he will win. If I want to win, I have to win at least 7-4.

So I placed my ships between two asteroids. And I had to fly a bit forward or I would get a lot of damage from these obstacles.

bild_110.jpg

Round 1 (8. Minute):

The VSD was going with full speed ahead. And I had to go forward as well, because of the obstacles to the sides.

The squadrons were moved into tactical positions for the next round.

bild_210.jpg

Round 2 (25. Minute):

The VSD was landing on a few squadrons (his Dengar was one of them). This was my chance to take him out. So I placed Dengar in the front and all other in the back.

Now the Gozanti with the titel was activated and 4 Tie Figher were going in. But Dengar survived it with 1 hull left.

Now he used a squadron command from one of his Gozanti. Dengar was moved out of the danger.

I could wait with my squadrons until all of his ships moved.

But he has quite a lot of bad luck. One of his Gozanti was ending his movement with a shield dial on an asteroid and it received a faceup damage card.

He moved in the raider as well at full speed and with the intention to bind my Bombers with the Titel.

I could send in my Bombers onto his raider and four Tie Bombers later the raider was no more.

The formation of the Gozanti started to break up already (earlier than planned) because I flew a little be uncoordinated.

Round 3 (74. minute):

First one was the VSD again. It had a repair command because he thought that I will go for the big ship. The big ship was already in medium distance to one of the Gozanti (sadly). He had one Accuracy for the scatter, so it was too much for the little Flotilla.

On the other hand he had bad luck again with his Gozanti. This one ends the movement again on the asteroid (this time with the rear shield dial) and was destroyed because of a structural hit.

His Dengar was chased by a Tie Fighter to take down the last hull. The remaining Tie Fighters went for his Jumpmaster. It tried to get away on the station and repair one hull. But the last Tie Fighter went after him and finished what the others could not.

My Tie Bombers started to go for the Gozanti from him and took out another one.

But my “formation” was gone. The Gozanti started the first bumping and ramming.

Round 4 (115. minute):

This round I had to give out navigation with my Tarkin to get the ships as fast out as possible.

The VSD was still on repair commands. So there was only one Gozanti left to activate his squadrons. Not enough to do some real damage when I can fly out of the range of the bombers.

The only problem was the VSD, who was standing like a wolf in the flock of Gozanti and could fire one broadside after another. But I had some really great luck in this round. One Gozanti went down in the frontal fire of the VSD but the second one only received 3 damage and was still alive.

On the other side I had to decide if I go for the last Gozanti or start to get some victory token from the rear of the VSD. In the end I went for the rear.

I used the Tie Fighters, to engage his Bombers as long as I can. Dengar had to withdraw already on an asteroid because he was down to one hull.

His squadrons were a little bit shattered over the map and he could not concentrate his fire on one Gozanti. This way he could not get in any damage at all, because the scatter negated the attacks.

I lost one more Gozanti (the badly damage one) because I had to fly into the VSD with it.

Round 5 (136. minute):

This was again the last round. The VSD could only destroy one Gozanti. I could scatter one of the attacks.

For this last round I took the save victory tokens from the attack in the rear instead of finishing his last Gozanti. It was most likely because there were no Bomber Command Center in range for the attack on the Gozanti.

Final score:

I destroyed the Raider, 2 Gozanti, 1 Jumpmaster, Dengar and 4-5 Tie Bombers. And got 15 victory Token.

He destroyed 4 Gozanti, 4 Tie Fighter and 1 Jumpmaster. And he got 4 Victory Token.

Net: 198 points and a solid 8-3.

Resume:

It was the time problem again. This time we had even more ships and squadrons on the field (13 ships; 25 squadrons).

But one round more would have mean that the VSD would have died and I might have lost 2 more Gozanti. In the end it would not have changed to so much.

This was really a great match. And it really did help me that I had so much more ship activations.
It did help me as well that the VSD was on repair command. This way he had not enough squadron activations left.

Edited by Tokra

Final Standing and last word:

I had 25 points and was first in the end. The second player had 23 points. And this shows again the (little) problem with armada. The second player had won all his matches as well. And he had a solid average of 7.67 points/match.

And this shows only that you have to go for missions with bonus points in some way. It is too risky to try to get a 9-2 or 10-1 with only ship and squadron destruction. In this case it is even better to be player 2, if all 3 missions give some bonus points (like the 3 I had).
There is nothing worse than having to take a mission from the opponent that does not give bonus points (or mainly for him like contested outpost or fire lanes) and losing the tournament because of this.
I really hope that Corellian Conflict will give a lot more choices on missions.

This fleet did way better than I thought at first. These many ships gave me the time that I need to get the squadrons in position. The alpha strike of the Tie Bombers is really great. But I had luck as well.

A fleet with a lot of A-Wings or with a lot of YT-2400 could have been a really big problem. These squadrons just soak up to much damage and only 4 Tie Fighters will have a hard stand against these.
It was really good that I changed to squadrons from 10 Bombers to a mix of Bombers and Fighter.

The ability to wait and see and still have the movement and attack of the squadrons is really insane. It is like a rogue ability where you pay the rogue with ships. Basically you can pick a ship and take it down. And there is not much that the opponent can do against it (at least not in this round).
After this alpha strike it depend on the opponents squadrons. And rogues can be really a pain, because they take down a few Tie Bombers in this first attack round.

The Gozanti were really hard to take down. But there are quite a lot of counters for these. H9 Turbolaser, Home one and the Quad Turbolaser from wave 4 are only a few really good cards.

In addition they are really fragile against lot of tiny attacks from squadrons. 6 Tie Bombers take down a Flotilla nearly 100% of the time (with BCC).

Against ships you just have to stay out of range for as long as possible and let the Bombers do their job. Even on long distance it is hard to take them down.

Thanks for sharing, man. Totally agree, the objectives that net points are much better most of the time. It's sort of like ship insurance, and 2nd player is usually more likely to lose a ship first.