The Battle over Endor, A Scenario

By What, in Star Wars: Armada

In two weeks, the 16th, my FLGS league will be doing an Endor themed battle with multiple people on each side to celebrate waves III and IV.

I've already made a thematic Imperial list, and I have the FFG DS2 play mat, but there's still one problem... an awesome scenario that captures the most epic fleet battle in Star Wars history (so far.)

So far, all I have are a few loose ideas - I would love to hear yours, and collaboratively build an epic scenario suitable for this event!

What ideas I have so far:

-800pts per side (To keep with the time constraints and expected number of players)

-Due to the expected number of ships in play, each team uses their own damage deck.

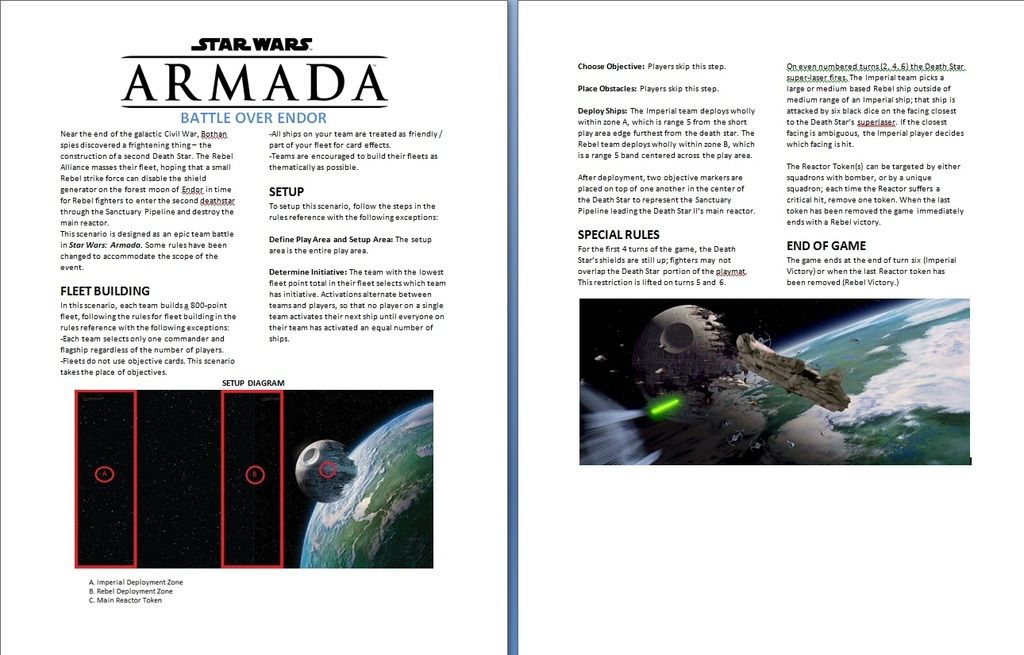
-The Imperial team deploys within range 5 of the short edge furthest from the Death Star; the Rebel team deploys in a band range 10-15 away from the Imperial deployment zone. There are no obstacles.

-On turns 3 and 6, the Imperial player picks a Rebel ship within long range of the Death Star's laser; that ship loses all shields on the closest facing and then takes five face down damage cards.

-Some sort of token at the center of the death star that can only be targeted by unengaged fighters. Destroying this is the Rebel victory condition.

So! What ideas do you have / what would you like to see in a balanced, awesome, re-enactment scenario?

Version 1.3 (Most Recent)

BoE%20V1.3_zpsca6d3yo8.jpg

Edited by What

The Imperial Fleet:

Canon

6 Star Destroyers

-Including Annihilator (ISD2 commanded by Captain Needa) and Devestator (ISD1 commanded by Admiral Montferrat), and one Tector-class, the Harbinger

Numerous Interdictors

A "large star destroyer / battlecruiser", the Pride of Tarlandia

TIE/LNs (Including Howlrunner) and TIE/INs (Including Soontir Fel)

Major Rhymer (Not in a ship)

Imperial Admirals are: Darth Vader (Present)

Imperial Officers are: Admiral Chiraneau (Aboard the Executor, advising Piett)

Legends/Unknown

Possibly the ISD-1 Relentless

Admiral Screed, possibly but unlikely Admiral Konstantine (But if he was there, it wasn't aboard his flagship, the Relentless.)

Possibly, but unlikely, Admiral Titus

VSD-1 Dominator

Scimitar Squadron (TIE/SA bombers) w/ Major Rhymer

The Rebel Fleet:

Canon

Admiral Ackbar, General Madine, General Cracken (Sort of, on the Falcon w/ Lando)

Walex Blissex (Aboard the Home One)

A-Bunch-O CR90 Corvettes

Lots-o Nebulon-Bs (Including the Redemption)

Numerous GR-75s

MC80s - The Home One, and at least 2 liberties, the Liberty and the Nautilian

A-Wing Green Squadron (w/ Tycho)

B-Wing Blade Squadron

X-Wing Corona Squadron, Red Squadron (w/ Wedge)

Y-Wing Gold Squadron, Gray Squadron

The Millenium Falcon piloted by Lando

Legends / Unknown

MC-80s Independance, Defiance

Keyan Farlander (B-wing, escorting Defiance)

Edited by What

Nice list to somewhat succinctly run the battle. Feels lacking without the Executor though, you should order the shapeways model today and get it there in time to roll some SSD goodness.

Wasn't Needa killed in EsB?

He forgot to evade.

1. Fighter squadrons seem light.

Remember the battle was squadron heavy. I would drop the Interdictor since they did not take part in the battle, they just keep the rebels from retreating.

this is handled by the RAW nicely since any ship that leaves the pay area is destroyed.

2. The Death Star

I would say " On turns 2,4,and 6 the Imperial play my target any Large or Med (Maybe just)ship that is not within short or maybe med range of an Imperial ship with 6 black undefendable (no defense tokens) dices

3. The Executor

a. When attacking any ship within med range of the Imperial setup zone add 2 blue dice to you total.

b. Executor provides a pool of 8 red and 8 blue dice that use the Imperial setup zone as their base for measurement/line of sight purposes.

No attack can have more then 4 red/ 4 Blue in total.

4. Victory SD /Gozanti

Not sure how cannon your trying to make this fight, but in the cannon battle there where no Victory SD /Gozanti in the fleet.

P.S Needa was dead before this battle.

5. The Tector

the cannon on this one is up in the air. though it was in some cannon materiel, all but the brief appearance in RotJ has fallen out of cannon.

that said the only difference between a ISD 2 and a Tector seems to be the lack of a fighter bay, so I wouldn't think any modification is necessary here

Edited by tenchi2a

I'm not sure how I missed Needa's death. Whoops!

I was lumping the Gozanti in with the 'numerous support ships' the wookiepedia lists... also because Wave III is coming out!!

The Victory I should have put in legends - it's not listed on the official list of combatants, but if you go to the Dominator's wiki page it says it was present... and since I don't want to go buy another ISD that cannot fit in a normal game, I figured I'd take it. :P

The Tector was supposed to be focused on anti-ship combat rather than the fighter support, so I gave it the heavy turbolasers to make it stand out and call it a day. In this specific list I think the intel officer would be a far stronger, but less thematic, choice to do roughly the same thing.

The Interdictor makes a token appearance because it was definitely there, and wave IV exists now!

You're right that it needs more fighters. Dropping the tractor beams and turning the Interdictor to a target-scrambling combat refit should free up room for more TIEs, but even so I'll be closer to 1/4 than 1/3.

I like the idea of having the deathstar's targeting restriction be x-away from Imperial ship, rather than range from the laser dish; it's better at accomplishing the same objective of having the rebels prefer to be close to the imps rather than hang out next to the DS2 and lolligag. The amount of damage though... what's a value that's high enough to cause serious concern/motivation to close with the Empire without letting the DS2 just win the game itself?

I'm also up in the air about the 'Power Core' token in the center of the DS2 regarding how much health to give it. It has to be able to withstand the ~3 turns of movement it'll take Imperial fighters to get there (Unless the Empire deploys some fighters on the opposite edge of the fleet?) while still providing the Rebels with a fair chance to blow it up and claim victory.

What if it was just 'If the Rebels have a bomber or unique squadron within range 1 of the Core token at the end of turn 6, they win' ?

Edited by What

I'm not sure how I missed Needa's death. Whoops!

I was lumping the Gozanti in with the 'numerous support ships' the wookiepedia lists... also because Wave III is coming out!!

The Victory I should have put in legends - it's not listed on the official list of combatants, but if you go to the Dominator's wiki page it says it was present... and since I don't want to go buy another ISD that cannot fit in a normal game, I figured I'd take it. :P

The Tector was supposed to be focused on anti-ship combat rather than the fighter support, so I gave it the heavy turbolasers to make it stand out and call it a day. In this specific list I think the intel officer would be a far stronger, but less thematic, choice to do roughly the same thing.

The Interdictor makes a token appearance because it was definitely there, and wave IV exists now!

You're right that it needs more fighters. Dropping the tractor beams and turning the Interdictor to a target-scrambling combat refit should free up room for more TIEs, but even so I'll be closer to 1/4 than 1/3.

I like the idea of having the deathstar's targeting restriction be x-away from Imperial ship, rather than range from the laser dish; it's better at accomplishing the same objective of having the rebels prefer to be close to the imps rather than hang out next to the DS2 and lolligag. The amount of damage though... what's a value that's high enough to cause serious concern/motivation to close with the Empire without letting the DS2 just win the game itself?

I'm also up in the air about the 'Power Core' token in the center of the DS2 regarding how much health to give it. It has to be able to withstand the ~3 turns of movement it'll take Imperial fighters to get there (Unless the Empire deploys some fighters on the opposite edge of the fleet?) while still providing the Rebels with a fair chance to blow it up and claim victory.

What if it was just 'If the Rebels have a bomber or unique squadron within range 1 of the Core token at the end of turn 6, they win' ?

The problem during the battle was not really blowing up the core, it was that the Death Star was shielded for most of the battle.

I would say that no rebel ship/squadron can enter the Death Star zone till turn 5 or 6 and that its must suffer a 2 Black crit from squadrons to be destroyed.

A lot of this fleet comes down to are you running a cannon or Legends fight.

Cannon fight

no victory SD

since the Interdictors did not engage they don't need to be on the board.

The cannon Tector SD is just missing its landing bay stats unknown so personally I would drop its squadron level to zero and give it a free Turbolaser upgrade.

other then that the lack of the Interdictor would free-up all the points you need for the fighters.

Legend fight

have fun not to much is out of the question.

now on the rebel side you will probably need to set some restriction of fleet build or you will have 30 CR-90 attacking you lol

Edited by tenchi2a

Endor%20Scenario_zpswh8nqm1a.jpg

I whipped this up in good ol' MS Word. Thoughts?

Edited by What

Two crit hits for a rebel victory sounds very easy with an intel unit to enable. Jan and two ywings can leap in and win the game.

Two crit hits for a rebel victory sounds very easy with an intel unit to enable. Jan and two ywings can leap in and win the game.

I agree that's the thing I'm most iffy on. My thoughts are that the rebels have only two turns to get the required number of crits, and theoretically the imperial player is doing everything in their power to kill/engage the squadrons.

Do you think adding more tokens would be the answer, or adding a requirement that the attacking ship not have any enemies within range 1, or some third option?

Edit: Just for quick reference, at extreme values, the Rebels could have 26 Y-Wings versus 33 TIEs.

Edited by What

Two crit hits for a rebel victory sounds very easy with an intel unit to enable. Jan and two ywings can leap in and win the game.

Sure, but they have to survive 4 turns to do it.

... Maybe that's why only the Fighters are Attacking, and those Star Destroyers were only to make sure they don't escape... :D

I know the rules I'd suggested on fb were a wee bit complex, but I think they capture the feel of the whole uncertain, desperate situation.

They can't enter the shaft until the shield generator is destroyed.
At the beginning of each turn (maybe starting on turn 2 or 3), a rebel player rolls three red dice. If they roll at least 4 hits/crits the shield is destroyed, and fighters can enter
the tunnel.
Any fighter can destroy the Death Star. Any imperial fighters that enter the shaft on the same turn or after can take a shot at any rebel fighter in the shaft. Imp fighters in the shaft also are attacked with 1 blue die (hitting the sides, none of the rebels did IIRC) at the end of each turn.
At the end of at least one full turn in the shaft (end of the turn after they enter), each fighter in the shaft can take 1 anti-ship shot. Roll all the dice together. Either six regular hits or two crits (cumulative) is enough to destroy the Death Star.

This will make it more beneficial for the rebels to use named fighters for their attack run, and gives the imperial players a chance to stop them.

Also, I'd say give the rebels some extra points, and maybe make Home One (or the flagship) immune to the superlaser (since it wasn't destroyed in the battle).

I also had suggestions for handling the Executor, if you wanted to include it, that could make it a tougher decision for the rebels to "engage those star destroyers at point blank range" since they "won't last long against those star destroyers."

The imperial short edge represents the Executor. It fires at range 6 (5+a range 1), with 8 red dice. Anti-fighter of 3 blue dice at medium range. Six Shields. Once shields down rebel fighters can attack the Executor just like for a trench run by flying off the imperial board edge (and thus be lost), with 4 hits or two crits doing the job.

Also, for a rule "I wonder what those star destroyers are waiting for". All Imperial ships start at speed 0.

Thoughts everyone?

Edited by Admiral Theia

Like the speed 0 idea :)

I love the idea of having the Imperial ships start at speed 0! Should the Rebels then start with initiative to keep with the same feel?

I'm not sure about including rules for the Executor, in part because part of me really wants to see an official model... though that would probably require a points increase.

As for randomizing disabling the shields and the core-run minigame, I love the ideas but am concerned about the added complexity. I think both of those events lend themselves to another game very well (Having a game of Imperial Assault to determine when the shield drops, and a game of X-Wing to navigate the core and fire ordinance into it) but aren't reflected as easily in Armada.

For the same reason I was skeptical about making the super laser X dice instead of a static number: I wanted to avoid as much extra dice rolling as possible to stream line things in an already twice as big as normal game.

I'm very torn on this though - those two events were extremely important to the outcome of the battle and should be given very careful consideration.

Edited by What

Here are my in altered thoughts, so they're not meant to be balanced or fair and are definitely not canon as I'm thinking of this as an attack on a death star as a opposed to the battle over endor.

Special rules.

Us the blue/orange turn token to mark the "exhaust port" or "core" that any rebel fighter can attack if not engaged. Only bombers can attack it. It can be moved like a fighter up to distance 2. Bombers that attack it must score a critical in order to have destroyed the death star. Luke is the exception he only needs to score a hit or crit.

Every turn the death star can attempt an attack of 1 blue die of unlimited range measured from the exhaust port that can be moved around. This shot can be obstructed. Meaning in order for it to fire it has to have a clear line of sight to its target. If the blue die scores a hit then the target is destroyed, crits and accuracies are considered misses or weapon still charging.

The Death Star exhaust port is placed anywhere on the Death Star picture by the imperial side before the game begins

Deathstar movement. The Death Star is treated like a ship for activations and its activation is controlled by the imperial side. But it's movement is controlled by the rebel side. So during a turn instead of activating a ship the imperial side can choose to activate the Death Star, fire it's 1 blue die and then the rebel side can move it anywhere on the Death Star picture on the map up to distance 2. This prevents the imperials from parking 30 tie fighters on top of it and saying come at me bro.

No Intel allowed for either side.

Imperial tie fighter rule. All normal non unique tie fighters that are destroyed are respawned in base contact with an ISD or VSD the next turn. A ship can only respawn it's squadron number worth of ties in any given turn. This rule only applies to normal tie fighters.

Rebel rules.

When a ship is destroyed it is respawned at the beginning of the next turn touching any table edge chosen by the imperial side. It looses all upgrades and characters and can be placed at any speed allowed.

At the beginning of the battle the rebel side can choose up to half of their points as squadrons.

The special rules are meant to encourage agressive play and give incentives for the rebel ships to engage star destroyers at point blank range and give the imperial side incentive to throw every fighter they have at stopping rebel squadrons.

Rebels have 6 turns to take out the Death Star.

With the current win condition, the rebels hide till turn 4 at the far end of the board, untouchable by vsds and interdictors. Then lauch 3 ywings and jan for the victory.

A simple fix. Ban all intel units. Jan, hwk, dengar and jumpmaster. Now the incentive is to clear imperial squads before turn 5, leaving you free to take the death star. Easier said than done.

Oh, and either imps need initative or should be able to put their fighters on the death star.

Turn 5, Vaders advanced should be waiting on the death star.

I love the idea of having the Imperial ships start at speed 0! Should the Rebels then start with initiative to keep with the same feel?

I'm not sure about including rules for the Executor, in part because part of me really wants to see an official model... though that would probably require a points increase.

As for randomizing disabling the shields and the core-run minigame, I love the ideas but am concerned about the added complexity. I think both of those events lend themselves to another game very well (Having a game of Imperial Assault to determine when the shield drops, and a game of X-Wing to navigate the core and fire ordinance into it) but aren't reflected as easily in Armada.

For the same reason I was skeptical about making the super laser X dice instead of a static number: I wanted to avoid as much extra dice rolling as possible to stream line things in an already twice as big as normal game.

I'm very torn on this though - those two events were extremely important to the outcome of the battle and should be given very careful consideration.

Yeah. A big scenario day like you described could be awesome. Maybe we can start planning it for May 4th of next year, after doing some single battles of each type of game to test mechanics. Plus you'd have to have each turn for each game play out.

For our purposes this month, though, I thought the random shield destruction would make for at least one tense moment of each turn until it is destroyed. Same with the DS Shaft "minigame". It would really be that you just set the fighters aside, maybe on a cut out DS on the side of the table. After all ships and fighters on the board have acted, each imperial fighter gets to shoot at a rebel fighter (targeting the same one until it dies). Any rebel fighter with a victory token may shoot at the death star core, as described in my original post, and any fighter that does not have a victory token then gains a token. I don't think it adds any real complexity, just a bit of a twist to the squadron phase.

As for the DS shooting, the single blue die idea I saw is good, I think, but I'd make it any hit or crit, with accuracy having some lesser effect (a near miss from a moon-mounted lightsaber is still gonna mess you up), maybe stripping all shields, or dealing two face up cards (or more). Or an accuracy can just show that it is still charging and didn't shoot at all, then add an extra die the next turn. It'll kill before long. I still support making Home One/Reb Flagship immune.

I'd also say giving the Rebs some extra points might be good, but they still have to win before their fleet is destroyed. Maybe give the rebs 100 extra points for caps, and the imps 100 extra points for fighters.

would need to set a absolute shields down turn just so the rebels don't lose by bad luck on the once a turn dice roll

for your power core idea, you could have a separate 3x3 play mat off to the side, and cover it in a print out of the inside of the deathstar done as a labyrinth/maze. Then whatever fighter you managed to land on the powercore, grab the same model in the X-Wing Minitaures line, and fly that through the maze as a side game at the end of each squadron phase.

The track through it should be just wide enough for the falcon. And for every rebel ship that makes it inside, two 2 fighters accompany them at range 3 behind them.

Just a thought.

That's a neat thought, though I'd say again for later, after the Armada portion is tested.

Tench, could start with two dice, looking for five hits or at least two crits. Add one die each turn. It'll all but guaranteed to happen by turn 5. If there's no random to it the rebel can plan around when it will happen. Those in the air had no clue when it would come down, and I'd think it would be good for the rebel players to feel the same way.

That's a very good point, Admiral Theia. The rebels had no idea when the shield would go down, and had to seize the moment rather than plan around a set turn.

So, (fake)math time - it'll take the Imperials 2-3 turns to even close with the Rebels depending on speed (assuming they dont start at speed 0), and turns 4-5 to reach the Death Star. Imperial fighters can reach the DS in... 4 turns at speed 5, 5 turns at speed 4.

Rebel fighters, on the other hand, can reach the DSII in 2 turns, minimum, unless they're B-wings without Independance.

With that in mind, what if we did some sort of random shield dropping from turns 3-5 as has already been discussed, with it automatically dropping turn 6, BUT Imperials can deploy fighters overlapping the DeathStar... and fighters overlapping the death star are counted as obstructed to ships? (My concern about fighters starting on the DSII is the entire Rebel fleet has nothing better to do than bombard them while waiting for the Imps to get close.)

(Edit: This is basically Ginkapo's idea!)

I also like the DSII's super laser being a single blue die with different effects based on outcome. Accuracy is lose shields on closest facing, hit is lose all shields, crit is all shields + 5(?) face up damage cards? My thoughts on this are we want it to be super threatening to encourage the Rebel fleet to flee towards the Imperial fleet and not sit near the DSII and cover it with AS fire.

That said, the current restriction is the laser targets medium-large ships, so there's nothing stopping the rebels from taking 5 Nebulon B Escorts and doing it anyway... so maybe just line of sight cannot be drawn to/from squadrons overlapping the DSII by ships?

Edited by What

in true this would make a better game-day type event then a combat scenario.

with a gm running the deathstar/shield

that way he rolls on a chart that has

the turn the shield comes down and when the superlaser fires

this would keep both players from being able to time either

Edited by tenchi2a