it was less about the manouvering and more about the deployment and approach speeds. I started too slow and too many on one side of the board and then went too fast and concentrated too quickly. I learned that better distribution on deployment along with letting your out-activated opponent come into your overlapping field of TRC fire is better.
Discussion: Are TRCs OP'ed?
It takes a lot of movement skills to run CR90's right. Even just running the Raider is not good enough.
I recommend just using navigate commands. You have so many shots that concentrate fire is not as needed as a double arc is.
I disagree with this as blanket advice. Spamming nav is great while you're still learning the CR90 dance, but 1) CF helps a lot with your damage output and your efficiency with burning through defense tokens, and 2) it's pretty easy to predict one turn ahead whether you're going to need a nav dial. Your goal should be to advance beyond the need to spam nav within a few games of playing the swarm. I'm not saying you don't ever need to command nav, but you want to minimize the need to do so, and recognize when to nav and when to CF.
What you do want is nav tokens. Those things are worth their weight in gold in getting you positioned for double arcs while still being able to maximize your impact with that double arc by having a CF dial.
As an aside, they're also invaluable for juking squadrons: a CR90 with a nav token and a nav dial really can't be ambushed by dropping a ball of squadrons in front of it. The only non-commanded squadrons that can't be juked are Rhymerballs, and even those you can at least get into medium range to gain use of your evades.
Yeah, this, I have enough experience to know to bank nav tokens and when to throw CF vs Nav, the experience gap was definitely in deployment and higher-level board control.
It takes a lot of movement skills to run CR90's right. Even just running the Raider is not good enough.
I recommend just using navigate commands. You have so many shots that concentrate fire is not as needed as a double arc is.
I disagree with this as blanket advice. Spamming nav is great while you're still learning the CR90 dance, but 1) CF helps a lot with your damage output and your efficiency with burning through defense tokens, and 2) it's pretty easy to predict one turn ahead whether you're going to need a nav dial. Your goal should be to advance beyond the need to spam nav within a few games of playing the swarm. I'm not saying you don't ever need to command nav, but you want to minimize the need to do so, and recognize when to nav and when to CF.
What you do want is nav tokens. Those things are worth their weight in gold in getting you positioned for double arcs while still being able to maximize your impact with that double arc by having a CF dial.
As an aside, they're also invaluable for juking squadrons: a CR90 with a nav token and a nav dial really can't be ambushed by dropping a ball of squadrons in front of it. The only non-commanded squadrons that can't be juked are Rhymerballs, and even those you can at least get into medium range to gain use of your evades.
I don't agree. I have played entire games with just the Navigate command. Did not need anything else because I was able to completely control my movement to get double arcs consistently. This allows you to push more damage.
If you get only 1 arc and add 1 die it is not the same as a whole new attack. Remember, when you make multiple attacks you are forcing the decision of using defense tokens. Add on to that for multiple ships doing this and you are getting far more Firepower than a single die.
I don't agree. I have played entire games with just the Navigate command. Did not need anything else because I was able to completely control my movement to get double arcs consistently. This allows you to push more damage.It takes a lot of movement skills to run CR90's right. Even just running the Raider is not good enough.
I recommend just using navigate commands. You have so many shots that concentrate fire is not as needed as a double arc is.
I disagree with this as blanket advice. Spamming nav is great while you're still learning the CR90 dance, but 1) CF helps a lot with your damage output and your efficiency with burning through defense tokens, and 2) it's pretty easy to predict one turn ahead whether you're going to need a nav dial. Your goal should be to advance beyond the need to spam nav within a few games of playing the swarm. I'm not saying you don't ever need to command nav, but you want to minimize the need to do so, and recognize when to nav and when to CF.
What you do want is nav tokens. Those things are worth their weight in gold in getting you positioned for double arcs while still being able to maximize your impact with that double arc by having a CF dial.
As an aside, they're also invaluable for juking squadrons: a CR90 with a nav token and a nav dial really can't be ambushed by dropping a ball of squadrons in front of it. The only non-commanded squadrons that can't be juked are Rhymerballs, and even those you can at least get into medium range to gain use of your evades.
Double arcs are obviously great. You shouldn't need to spam nav to get them with a CR90.
If you can get double arcs without having to spam nav (which, again, is completely doable in a CR90 swarm in which you only have to predict the game one round ahead), then you're putting out more damage with the CF than with the nav. And it's a greater-than-linear damage increase, particularly in SW90 swarms where a CF means you're doubling your post-brace damage throughput out the side arc.
To some extent, the entire debate on TRCs can be reduced to this:
The better you are at maneuvering, the more you win at this game.
This obviously generalizes to almost any other context as well, but I am boiling it down to that because a lot of times people forget this. The overwhelming majority of games are not won in list construction, they aren't won in dice rolling, and they aren't won in command choosing (though obviously all of these things can help). They are won in maneuvering. Lists are easiest to debate because we can represent them well in text, but I would suggest that once you get beyond a basic level of "pretty good" so the list isn't causing a loss, they aren't the driver of victory anymore.
Edit: The annoying part of this fact is that it also means that in a vacuum, the right answer to things like "do I take a nav or CF command" is "it depends"...
Edited by ReinholtTo some extent, the entire debate on TRCs can be reduced to this:
The better you are at maneuvering, the more you win at this game.
This obviously generalizes to almost any other context as well, but I am boiling it down to that because a lot of times people forget this. The overwhelming majority of games are not won in list construction, they aren't won in dice rolling, and they aren't won in command choosing (though obviously all of these things can help). They are won in maneuvering. Lists are easiest to debate because we can represent them well in text, but I would suggest that once you get beyond a basic level of "pretty good" so the list isn't causing a loss, they aren't the driver of victory anymore.
That is my philosophy. Every ship is great in its own way. That is why this game maintains a diverse range of lists and maintains is balance. Everything can work bit you. Have to know how to maneuver.
I don't agree. I have played entire games with just the Navigate command. Did not need anything else because I was able to completely control my movement to get double arcs consistently. This allows you to push more damage.
It takes a lot of movement skills to run CR90's right. Even just running the Raider is not good enough.
I recommend just using navigate commands. You have so many shots that concentrate fire is not as needed as a double arc is.
I disagree with this as blanket advice. Spamming nav is great while you're still learning the CR90 dance, but 1) CF helps a lot with your damage output and your efficiency with burning through defense tokens, and 2) it's pretty easy to predict one turn ahead whether you're going to need a nav dial. Your goal should be to advance beyond the need to spam nav within a few games of playing the swarm. I'm not saying you don't ever need to command nav, but you want to minimize the need to do so, and recognize when to nav and when to CF.
What you do want is nav tokens. Those things are worth their weight in gold in getting you positioned for double arcs while still being able to maximize your impact with that double arc by having a CF dial.
As an aside, they're also invaluable for juking squadrons: a CR90 with a nav token and a nav dial really can't be ambushed by dropping a ball of squadrons in front of it. The only non-commanded squadrons that can't be juked are Rhymerballs, and even those you can at least get into medium range to gain use of your evades.
Double arcs are obviously great. You shouldn't need to spam nav to get them with a CR90.
If you can get double arcs without having to spam nav (which, again, is completely doable in a CR90 swarm in which you only have to predict the game one round ahead), then you're putting out more damage with the CF than with the nav. And it's a greater-than-linear damage increase, particularly in SW90 swarms where a CF means you're doubling your post-brace damage throughput out the side arc.
True to a degree but at the same time it is missing a few tidbits.
While it can be at times easier to navigate a CR90 into a double arc, you have to balance where your ending position will be when compared to what you want.
People will get smarter at dealing with swarms soon. They will realize that they need to take it slow and watch where you will end up. At that point, if you can't escape the trap and keep the ship alive, you are losing far more potential damage than you will gain from a Concentrate Fire dial.
That is why I navigate. Sometimes it is smart to slow from 3 to 1 in a single turn, some times it is best to get an extra sharp end turn, but no matter what, it is always good to navigate
Edit: The annoying part of this fact is that it also means that in a vacuum, the right answer to things like "do I take a nav or CF command" is "it depends"...
Yup, this is all I'm saying: that the answer to "do I take a nav or CF command" is not always "nav."
Edit: The annoying part of this fact is that it also means that in a vacuum, the right answer to things like "do I take a nav or CF command" is "it depends"...
Yup, this is all I'm saying: that the answer to "do I take a nav or CF command" is not always "nav."
I will agree with that. I will Nav 9 times out of 10 though. Survival is more important to me
The better you are at maneuvering, the more you win at this game.
This. This for days. I played pt106 last night, and his maneuvering (plus my choosing CF over Squadron with a carrier fleet. . .that was a great decision) won the game handily. He can really use Nav commands on ISDs effectively, and took this:

I was planning on trading the rightmost VSD for his middle ISD. But his Nav and expert maneuvering turned it into this:

And more maneuvering went to this:

Most players I play against would have just rammed into my VSD with the ISD, traded shots, and the ISD would definitely have died. I'm not used to people spamming Nav commands and finding the perfect little spot to drop a Large ship without overlapping. It was impressive. Most impressive.
This game was won by maneuvering, plain and simple. Well, that and a well-built list, but a list that was flown very well. Had he settled for slamming into my VSD head-on, he would have traded a Raider and ISD for a VSD, and lost the game.
Question about that list:
It looks like 2 ISD1s and 3 Raider 1s with Motti and Intel/Leading shots on the ISDs. This setup only leaves a 2 point bid and I do remember PT saying that going first is fairly important to his list, so why such a low bid?
Edit: sorry it's ordnance experts, still same points.
Also begs the question why NOT leading shots? yeah you lose a blue die but you get to re-roll 7 front arc dice instead of 3, or I guess if you count double arc you get 7 rerolls out of 11 dice vs 5 rerolls out of 5 dice
Edit Edit: Also leading shots has value at medium and short range but OE only in short and costs same points...
Edit Edit Edit: It also just occurs to me that you can use leading shots to re-roll your black AS if you whiff on an AS shot
Edited by HastatiorQuestion about that list:
It looks like 2 ISD1s and 3 Raider 1s with Motti and Intel/Leading shots on the ISDs. This setup only leaves a 2 point bid and I do remember PT saying that going first is fairly important to his list, so why such a low bid?
Going first is very beneficial. Having 5 ships is more important.
People keep getting confused and choosing to make him play first, as if that would make his life difficult. Presume a case of poor decisions in a pressure situation.
Question about that list:
It looks like 2 ISD1s and 3 Raider 1s with Motti and Intel/Leading shots on the ISDs. This setup only leaves a 2 point bid and I do remember PT saying that going first is fairly important to his list, so why such a low bid?
Intel/Ordnance Experts. 2 points bid, this is correct (however in this game I ended up getting first, as reegsk carriers were at 399). My list is expected to be second most of the time (and activate ISD's late to trap 2 ships in the front arcs as well as to have some unpleasant objectives to choose from) however it is devastating if allowed to go first. And the reason for the low bid is that there are no points to spare without compromising ISD's strike power (it needs both Intel and OE on ISD's). This will change with wave 3.
This game was won by maneuvering, plain and simple. Well, that and a well-built list, but a list that was flown very well. Had he settled for slamming into my VSD head-on, he would have traded a Raider and ISD for a VSD, and lost the game.
First of all, thank you for the game, you are a good opponent and a very good guy overall, so I'm glad for the opportunity to meet you in person.
As far as the game went there was also some bad luck on your part (losing VSD squadron command to comm noise turn 2) and good luck on mine (killing Rhymer turn 4 with perfect AS rolls)
Ordinarily I should've lost one of my ISDs. (However even then trading ISD + Raider to 2 VSD's with Tarkin Motti still benefits me: 121+44 vs 83+115101 is 33 19 MoV in my favor)
Edit: forgot you had Motti is this build
Edited by pt106
This game was won by maneuvering, plain and simple. Well, that and a well-built list, but a list that was flown very well. Had he settled for slamming into my VSD head-on, he would have traded a Raider and ISD for a VSD, and lost the game.
First of all, thank you for the game, you are a good opponent and a very good guy overall, so I'm glad for the opportunity to meet you in person.
As far as the game went there was also some bad luck on your part (losing VSD squadron command to comm noise turn 2) and good luck on mine (killing Rhymer turn 4 with perfect AS rolls)
Ordinarily I should've lost one of my ISDs. (However even then trading ISD + Raider to 2 VSD's with Tarkin still benefits me: 121+44 vs 83+115 is 33 MoV in my favor)
This is why I prefer firesprays. They don't lean on the crutch of Squadron commands and I have learned to keep them out of black AS range ![]() (also I call Tie bombers my "black dice blank magnets")
(also I call Tie bombers my "black dice blank magnets")
PT can you check the edits on my earlier post RE Leading shots? I think I might try your list at a tournament Saturday but i might go 1 with LS and 1 with OE to see
This game was won by maneuvering, plain and simple. Well, that and a well-built list, but a list that was flown very well. Had he settled for slamming into my VSD head-on, he would have traded a Raider and ISD for a VSD, and lost the game.
First of all, thank you for the game, you are a good opponent and a very good guy overall, so I'm glad for the opportunity to meet you in person.
As far as the game went there was also some bad luck on your part (losing VSD squadron command to comm noise turn 2) and good luck on mine (killing Rhymer turn 4 with perfect AS rolls)
Ordinarily I should've lost one of my ISDs. (However even then trading ISD + Raider to 2 VSD's with Tarkin still benefits me: 121+44 vs 83+115 is 33 MoV in my favor)
This is why I prefer firesprays. They don't lean on the crutch of Squadron commands and I have learned to keep them out of black AS range
(also I call Tie bombers my "black dice blank magnets")
PT can you check the edits on my earlier post RE Leading shots? I think I might try your list at a tournament Saturday but i might go 1 with LS and 1 with OE to see
Firesprays are good and are bad news for this list, however they also have weak points (they're good targets for fighter-heavy lists). I would usually go for a mix of bombers and firesprays.
As far as the leading shots go, they're much weaker in this list. It expects to fight in a close range and OE allows you to reroll side arcs (which is huge - it changes a zone between two side arcs from being dangerous to being deadly) as well as do more damage from the front (by not losing a die with the hit). Also the ability to do a free reroll to chance that 1 extra damage needed to kill a ship can't be discounted. For AS it's a wash with OE being slightly better (OE allows a black die reroll on AS)
Edit: essentially rerolling black dices gives you a best bang for the buck. every black is 0.25 probability of a double-hit with 1 avg damage. Reds give you 0.75 avg damage with 0.125 probability of a double-hit. So you aren't going to reroll red hits or blue dices (ususally one does benefit from accuracies here), while rerolling black single hits may be a viable strategy (especially if the roll is below average)
Edited by pt106
This game was won by maneuvering, plain and simple. Well, that and a well-built list, but a list that was flown very well. Had he settled for slamming into my VSD head-on, he would have traded a Raider and ISD for a VSD, and lost the game.
First of all, thank you for the game, you are a good opponent and a very good guy overall, so I'm glad for the opportunity to meet you in person.
As far as the game went there was also some bad luck on your part (losing VSD squadron command to comm noise turn 2) and good luck on mine (killing Rhymer turn 4 with perfect AS rolls)
Ordinarily I should've lost one of my ISDs. (However even then trading ISD + Raider to 2 VSD's with Tarkin still benefits me: 121+44 vs 83+115 is 33 MoV in my favor)
You too, man! It was a good game, and I definitely learned something about the value of Nav commands on ISDs.
You too, man! It was a good game, and I definitely learned something about the value of Nav commands on ISDs.
These beasts are way more maneuverable then most people think (With Nav dial they have the same flight profile as a Gladiator with Nav dial).
And to get back to the original topic - TRC's are a good counter vs ISD's (and without them Rebels will be at significant disadvantage against high-hull-no-evade imperial ships)
Edited by pt106
This game was won by maneuvering, plain and simple. Well, that and a well-built list, but a list that was flown very well. Had he settled for slamming into my VSD head-on, he would have traded a Raider and ISD for a VSD, and lost the game.
First of all, thank you for the game, you are a good opponent and a very good guy overall, so I'm glad for the opportunity to meet you in person.
As far as the game went there was also some bad luck on your part (losing VSD squadron command to comm noise turn 2) and good luck on mine (killing Rhymer turn 4 with perfect AS rolls)
Ordinarily I should've lost one of my ISDs. (However even then trading ISD + Raider to 2 VSD's with Tarkin still benefits me: 121+44 vs 83+115 is 33 MoV in my favor)
This is why I prefer firesprays. They don't lean on the crutch of Squadron commands and I have learned to keep them out of black AS range
PT can you check the edits on my earlier post RE Leading shots? I think I might try your list at a tournament Saturday but i might go 1 with LS and 1 with OE to see
Firesprays are good and are bad news for this list, however they also have weak points (they're good targets for fighter-heavy lists). I would usually go for a mix of bombers and firesprays.
As far as the leading shots go, they're much weaker in this list. It expects to fight in a close range and OE allows you to reroll side arcs (which is huge - it changes a zone between two side arcs from being dangerous to being deadly) as well as do more damage from the front (by not losing a die with the hit). Also the ability to do a free reroll to chance that 1 extra damage needed to kill a ship can't be discounted. For AS it's a wash with OE being slightly better (OE allows a black die reroll on AS)
Edit: essentially rerolling black dices gives you a best bang for the buck. every black is 0.25 probability of a double-hit with 1 avg damage. Reds give you 0.75 avg damage with 0.125 probability of a double-hit. So you aren't going to reroll red hits or blue dices (ususally one does benefit from accuracies here), while rerolling black single hits may be a viable strategy (especially if the roll is below average)
I guess if you plan on sandwiching a lot I can see that. I would have to do the math but my gut feeling is that LS is better on the front arc for the reasons I stated, namely they function at medium range and more importantly allow you to reroll your whole pool in the biggest arc you've got. In that arc they provide the same utility as OE re black dice and give you the added benefit of maximizing the full damage spectrum. In fact you can use it to go accuracy fishing in black range too, if thats more important (e.g. you roll 2 blue hits and decent red damage and no accuracies, rerolling that one blue for an accuracy result will reduce your damage pool by 1 but potentially lock down a brace that will double your effective damage making it MUCH superior to OE.)
I will test it out. If only Snipafist would read this and go all mathy on it.
As for firesprays, my main list runs a killer ISD2 and demolisher plus a raider, when facing enemy bomber/fighter lists I actually use the firesprays to surprise the opponent locking down their bombers while my ISD and Demo go do work on the closest carrier. Played a B-wing list once in a tournament where the Bs didn't get a shot off on my ships but my firesprays didn't either, except I focus fired carriers and tabled at a cost of 3 firesprays lol.
I can, in fact, go all mathy on it, but with as flexible a reroll as Leading Shots I would need to know what desired end result we are looking for. Are we just looking to crank raw damage as high as possible? Do we want 1 Accuracy result no matter what? Do we want more Accuracy results than that? Once that is decided on I can start crunching numbers, but it would probably be best to move it over into another thread so as to not keep clogging up this one.
Lets move this discussion to the dedicated thread that already exists
https://community.fantasyflightgames.com/topic/222240-isd-i-ordnance-or-leading-shots/page-3
I'll define goals/desired end results (as I see them) there.
One additional point on maneuvering and upgrades that PT & Reegsk's commentary brought to mind here:
They are very context dependent.
The firespray vs. bomber comment brought that to mind, as the first thing that popped into my head upon reading that was "how do you intend to use them".
If you are looking for a list that is going to use squadron commands to boss around bombers, or that relies upon acute concentration of force at a single point directed by the entire list, you want bombers over Firesprays in at least some amount.
On the other hand, if you want AS capability and a squadron component fully capable of operating independently of your ships (or at least all but one raider for anti-squadron), you want Firesprays. You might even want all Firesprays and not even Rhymer in some cases. This is because you might want your fleet to be fighting/running away at one end of the table and your Firesprays greeblehauling some stuff at the other end of the table, and you might want to be able to do both independent of the other, therefore you need rogue.
Context is king. Understand what you want to be available to you in terms of strategies (no list can do everything), and the relative strength of upgrades changes in response. Good upgrades/ships can become average or great as a result of this.
PT's comments on his ISD are also good here in that it reveals this thinking: he knows what he wants to do (go second, have objectives that favor this approach, and have an ISD loadout with enough activations that severely punishes the largest group of opponents possible who allow this), so he built a list to do it with the right upgrades for it. A list like that is only going to lose to superior play, or a list that is just a match-up nightmare (there is at least one for every list).
yeah. exactly. I have actually considered ditching Rhymer and the only reason I've kept him is that I find he is great at the squadron phase "rhymer turret" where he allows my firesprays to have a tremendous effective range letting them hunt down fast, almost dead ships from running away with impunity. My ball is often acting as an additional unit focus firing with the rest of my ships so that my Demo will do what demo do and ISD is throwing concentrate fire and nav. It's a no carrier carrier fleet.
Its not awesome at anything but its decent at most.
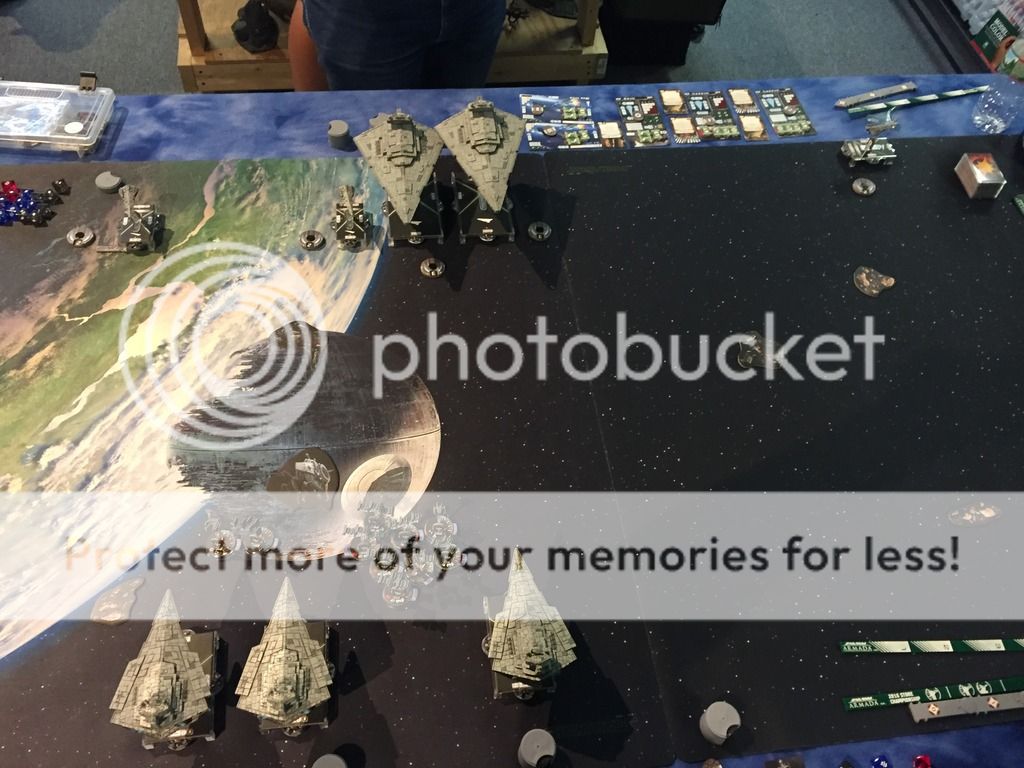
As for the game in the pictures, I simply don't understand how you end up in a scrum in the middle of the board with a rhymerball. You have the opponent egregiously out-deployment and you know where he will be coming from and where he will be going, you can set a Rhymerball trap and isolate one of the ISDs. I guess I just don't understand VSDs...
Edited by HastatiorAs for the game in the pictures, I simply don't understand how you end up in a scrum in the middle of the board with a rhymerball. You have the opponent egregiously out-deployment and you know where he will be coming from and where he will be going, you can set a Rhymerball trap and isolate one of the ISDs. I guess I just don't understand VSDs...
We were playing contested outpost, so we both knew where everyone will be.
Also I did fly directly into the Rhymerball on turn 2 as expected,so I'm now sure what Rhymerball trap you're talking about.
Maybe turn 1 (deployment) picture will help (it was done by reegsk)?