Yep. Just make sure to give it a light dusting.
Good advice, because yes, it can really mess things up if you do it wrong. Just a light coat is all you need.
Yep. Just make sure to give it a light dusting.
Good advice, because yes, it can really mess things up if you do it wrong. Just a light coat is all you need.
This is really impressive stuff, and is definitely tempting me to have a crack a painting a ship that I've got multiples of to be able to Hide My Shame if need be (Scyks, I'm looking at you). This is almost certainly a terrible idea, because I've got zero artistic talent and a not-especially-steady hand.
I think we need a public bet, because I'm almost certain that I have even less artistic talent and dexterity. Here are my proposed terms.
What do you think? ![]()
This is really impressive stuff, and is definitely tempting me to have a crack a painting a ship that I've got multiples of to be able to Hide My Shame if need be (Scyks, I'm looking at you). This is almost certainly a terrible idea, because I've got zero artistic talent and a not-especially-steady hand.
I think we need a public bet, because I'm almost certain that I have even less artistic talent and dexterity. Here are my proposed terms.
- We both pick a small ship of our choice from our current collection.
- We both buy supplies, with a total budget of something like $25 (or the approximate equivalent in pounds/Euros).
- We both document our work.
- At the end of June(?), we start a thread together and both post our work.
- The forum gets to vote on whose work is better, and the "winner" has to replace the other painter's ship.
What do you think?
I'm not going to peer pressure anyone into any actual bets, but, at the very least, a competition is a great idea!
I'd love to see any number of beginners show what they've got in painting skills. Plus, competing may push you to your best!
I think we need a public bet, because I'm almost certain that I have even less artistic talent and dexterity.
The trick is to rest your hand on something steady. Use your elbows or the table edge or something. My hands are shakier now than when I was in college, but as long as you steady yourself, it's not so bad.
I'm not going to peer pressure anyone into any actual bets, but, at the very least, a competition is a great idea!
I'd love to see any number of beginners show what they've got in painting skills. Plus, competing may push you to your best!
It's not really that I want the competition. It's that I think it would be some combination of cool and funny if I had an insurance policy against completely ruining a ship. ![]()
The fact that I think Rodafowa is in the UK makes things more difficult, of course, because shipping probably costs nearly as much as the mini itself. It might be a bad idea from that perspective. But he's someone whose posts and opinions I respect, and I think that would help keep it fun...
Oh something else...
When you finish painting it, give it a spray of Dullcote or I've found Krylon clear matte finish does the same thing for less. (Dullcote is $7 for 3oz, Krylon is $13 for 11oz.)
That helps protect the model from having the paint chipped when it gets bumped or even dropped.
Yep. Just make sure to give it a light dusting. Do it from recommended distance. Don't do it when it's humid or too hot or too cold. If you do something wrong, you give the whole thing a layer of frost that utterly ruins all your hard work. Just....a light dusting.
I think I grabbed an off brand from Wal-mart for a few bucks.
Already got some! I got the cheapest Walmart kind, too. I think it says something like "Crystal Clear Coat" and "Flat Finish". I am hesitant to try it on a model, though.
There will be trial runs before it so much as looks at my repaints.
I'm not going to peer pressure anyone into any actual bets, but, at the very least, a competition is a great idea!
I'd love to see any number of beginners show what they've got in painting skills. Plus, competing may push you to your best!
It's not really that I want the competition. It's that I think it would be some combination of cool and funny if I had an insurance policy against completely ruining a ship.
The fact that I think Rodafowa is in the UK makes things more difficult, of course, because shipping probably costs nearly as much as the mini itself. It might be a bad idea from that perspective. But he's someone whose posts and opinions I respect, and I think that would help keep it fun...
I misread. The "winner" is the one who replaces the other's ship.
I like it.
Alternatively, you could both just buy an expansion that you mainly want the cards from. Both models would then be sacrificial. Just a thought.
Thank you, everyone who has commented so far. I probably won't get to paint much until next week, but in the mean time I can post a few pictures of my experience with the Y-Wing that we've forgotten about.
The problem was that the white is just as bad as the yellow in terms of pigment density, if that is the correct term. It is very translucent, so it takes on the high end of several layers to get a good coat. For the other Y-Wing, I will definitely be airbrushing it on. By the time I got a good basecoat, it looked like this:

And here's a close-up:

The paint was pretty thick at this point. Thicker than I wanted, but I didn't want to start over. Again, I'm lazy when it comes to doing something that I don't want to. "I'll just put twice as much work into another solution, instead..." must be my thought process.
Anyways, I think my solution worked enough for me. Since a loss of detail was my main gripe, I decided to just scribe the panel lines back into the paint. I went over each panel line with the back of my razor blade to redefine that detail.

Since Y-Wings are supposed to be the oldest workhorses of the Rebellion, I don't mind that some of the paint flaked. What does bother me is that I just realized that I missed some of the lines, and that there is a hair on the cockpit! It's probably a brush hair from when I washed the model...
After that, I decided to just throw some yellow on. I plan on weathering the Y's heavily, so I expect that I'll have to strip it all down after a screw up at some point. May be not, but that is why I'm only painting one of them for now.

It's the same yellow as what is on the X-Wing, but being next to the white makes it look far too bright for what I am wanting. I think the heavy weathering will tone it down a lot. If it doesn't, I'll have to go over with with a dirtier yellow.
Also, why am I taking pictures of the painted version next to the primed version? I have no idea. I suppose it brings up a good thing to mention, though. The primed Y-Wing is attached to a Q-tip stick, and then to a rock with masking tape. I should really get some corks to use as bases, like the pro's...
This is really impressive stuff, and is definitely tempting me to have a crack a painting a ship that I've got multiples of to be able to Hide My Shame if need be (Scyks, I'm looking at you). This is almost certainly a terrible idea, because I've got zero artistic talent and a not-especially-steady hand.
Do it and share your results. I had a lot of fun with it.
However, with this method, you pay for the lack of cost with time.
You have to just stop after each layer and let it dry a day or two, because going back over it with a wet brush is too much for it.
A hair dryer may be something that you would want to look in to to help speed dry it if you want to go faster... just don't melt the model.
The problem was that the white is just as bad as the yellow in terms of pigment density, if that is the correct term. It is very translucent, so it takes on the high end of several layers to get a good coat.
Instead of just painting several coats of the same color, try to do a grey-white mix first. Then go lighter. Then do the pure white. It works better than just layering the same white on top of each other.
What do you think?
I mean, I'd be cheating a bit because I HAVE got a bunch of paints and a tiny tiny bit of experience from dabbling with Airfix modelling. But that will only make my inevitable defeat all the funnier.
I'm game.What do you think?
I mean, I'd be cheating a bit because I HAVE got a bunch of paints and a tiny tiny bit of experience from dabbling with Airfix modelling. But that will only make my inevitable defeat all the funnier.
I'm putting it on my calendar, and I'll PM you in a couple of weeks when I pick up supplies!
I'm putting it on my calendar, and I'll PM you in a couple of weeks when I pick up supplies!
You know what is awesome to do while painting X-wing minis? Listening to podcasts about X-wing! Why, I think I have a link to one here somewhere....
http://shuttletydirium.podbean.com/e/episode-2-imperial-vets-and-the-id-menace/
![]()
The problem was that the white is just as bad as the yellow in terms of pigment density, if that is the correct term. It is very translucent, so it takes on the high end of several layers to get a good coat.
Instead of just painting several coats of the same color, try to do a grey-white mix first. Then go lighter. Then do the pure white. It works better than just layering the same white on top of each other.
I was hoping that the primer was light enough to be a good undertone for the white. It was not.
I think I'll try airbrushing the white on the second Y-Wing to avoid the hassle. Airbrushed colors seem to go on much more solid.
I was hoping that the primer was light enough to be a good undertone for the white. It was not.
I think I'll try airbrushing the white on the second Y-Wing to avoid the hassle. Airbrushed colors seem to go on much more solid.
That's the quality of the paint there. GW makes a good white. Still sometimes worth it to do the grey/white layering, though. It just looks better, especially if you leave a little bit of the grey part near the edges of the panels. Makes it kind of look worn.
It works better than just layering the same white on top of each other.
Same idea in the other direction as it were...
I've been painting some marines for kill team. The armor is black. But rather than starting with black and then having nowhere to go. I prime them (it happens to be a tan but any light color works for me) then I paint them a dark grey, and yellow for the gold.
Then I make a thick wash. Normally I use a wash that is about the same thickness as say milk. For this step I make it even thicker maybe half way between stright paint and a wash... Then brush that over the grey. It has given me a very nice very dark grey that looks black, but doesn't have the flat lack of details that straight black often gives you.
You could do the same thing in reverse like heychadwick mentions above.
You know what is awesome to do while painting X-wing minis? Listening to podcasts about X-wing! Why, I think I have a link to one here somewhere....
http://shuttletydirium.podbean.com/e/episode-2-imperial-vets-and-the-id-menace/
LOL! Excellent shameless plug! Great podcast.
Oh God. I just thought of doing a T-65 in bare aluminium with yellow/black markings, like a Korean War F-86 Sabre. Nnnnng...
This is really impressive stuff, and is definitely tempting me to have a crack a painting a ship that I've got multiples of to be able to Hide My Shame if need be (Scyks, I'm looking at you). This is almost certainly a terrible idea, because I've got zero artistic talent and a not-especially-steady hand.
Do it and share your results. I had a lot of fun with it.
However, with this method, you pay for the lack of cost with time.
You have to just stop after each layer and let it dry a day or two, because going back over it with a wet brush is too much for it.
A hair dryer may be something that you would want to look in to to help speed dry it if you want to go faster... just don't melt the model.
Not that I know how to do it better, but I've never seen a metallic color look good for anything other than highlights.
You may want to see if you can learn how to paint metallics with non-metallic colors. I think it is a matter of drybrushing the metallic on lightly after getting your base coat down.
That's just my $0.02 before you get started, if you decide to go with that idea.
It works better than just layering the same white on top of each other.
Same idea in the other direction as it were...
I've been painting some marines for kill team. The armor is black. But rather than starting with black and then having nowhere to go. I prime them (it happens to be a tan but any light color works for me) then I paint them a dark grey, and yellow for the gold.
Then I make a thick wash. Normally I use a wash that is about the same thickness as say milk. For this step I make it even thicker maybe half way between stright paint and a wash... Then brush that over the grey. It has given me a very nice very dark grey that looks black, but doesn't have the flat lack of details that straight black often gives you.
You could do the same thing in reverse like heychadwick mentions above.
I did my Poe repaint almost the same way, but with gunmetal mixed with dark grey. Then two thick washes. Its the PERFECT black for that ship! I finished mine with a semi-gloss so the metal comes through really well. I did the same thing on a y-wing and it didn't look near as good, not near enough flat surfaces like the xwing.
"I won't be able to paint for a while," I said. I guess that was a lie, because I found time. I've done some weathering to the X-Wing. Talk about painful... It was very difficult to muster up the courage to paint over my work thus far in order to make it look worn and trashed.
I looked up some reference images for worn paint on metal, then made a plan from those. The first step was to go over the worn areas with a lighter color than the base color to make it look worn down, then go over that with a dark color to try to simulate oxidized or otherwise grimey metal, then a very light gray over that for spots where the metal was kept polished by debris. A step after that, which I haven't decided on doing or not, is to add some rust to the exposed metal areas. Seems riskier than I care to try.
I decided to start on my practice canvas first, of course. Even though the bottom is never seen, this was still a scary step. Also, notice how the bottom as a lot of the original color showing through. This was from handling it so much while painting the top. I attached a straw to use as a handle from now on, though I should have done this in the beginning.
I didn't die of heart failure, so I repeated it on the top.
Then the dirty metal:
I survived this step too, so on to the top again.
After that, I added the lighter color metal that would have been almost polished and kept free of grime due to wear and tear.
and the final product(for now):
I'll be gone for a week. See you guys when I return!
OK...now you are entering into a phase when "edging" would look really good. What is edging? It's where you paint a lighter color than your base paint along the hard edges of the ship. So, along those long lines of the nose and the hard edges of the wing. Mix up a white-grey that is lighter than the base grey enough to make a difference. You then take your detail brush and paint along the edges. It can really make your model "pop".
I really want to find a picture to show how awesome it makes things look, but I can't find anything good. I did find an old picture of a WWII tank that I did with weathering on it. Just notice the edges of the turret and the front edges of the tank. It doesn't take too much, but can make a world of difference.
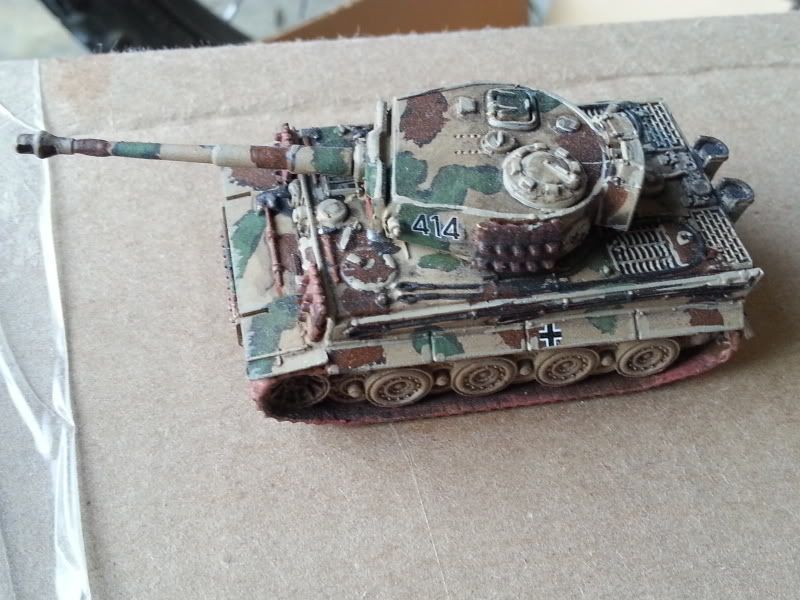
Besides that, it irks me that the scratch on the yellow looks like a straight line. It look intentional. I think you should do it at a slight angle or make it uneven. Going straight across looks too planed.
Hope this helps!
OK...now you are entering into a phase when "edging" would look really good. What is edging? It's where you paint a lighter color than your base paint along the hard edges of the ship. So, along those long lines of the nose and the hard edges of the wing. Mix up a white-grey that is lighter than the base grey enough to make a difference. You then take your detail brush and paint along the edges. It can really make your model "pop".
I really want to find a picture to show how awesome it makes things look, but I can't find anything good. I did find an old picture of a WWII tank that I did with weathering on it. Just notice the edges of the turret and the front edges of the tank. It doesn't take too much, but can make a world of difference.
Besides that, it irks me that the scratch on the yellow looks like a straight line. It look intentional. I think you should do it at a slight angle or make it uneven. Going straight across looks too planed.
Hope this helps!
I've already done the edge highlighting, actually. I mentioned it on the second page, but here is it again:

Of course, I've covered most of it by now with the weathering, but I'll go back over it again at the very end. As you said, it definitely helps things pop.
Also, for the line through the yellow, are you talking about the yellow line on the nose? That's supposed to be a straight line. I need to work on it to make it more crisp and even with the line through the green on either side, but it is intentional, not an attempt at weathering. It's supposed to be another reference to the squadron number. One block on the front to match its imaginary designation of "Dragon 1". If I do another, it'll have 2, the third will have 3, so on and so forth. Now that I look at it again, I realize that I'll run out of room for markings along the yellow long before I run out of room with the green.
I'll figure something out.
Oh, it is intentional! OK...never mind on that, then.
I do like the edging on that earlier pic. Yeah, you don't need me to tell you anything on it.
I always do Edging as one of the last things. It can also be used as a type of weathering at places, too. So, put some light colored bits on the nose or so to make it look a little bit scratched up. The pencil usually works for a scratch that goes through the paint. The edging can be used to just show a scratch that isn't that bad.
I need to try the pencil sometime. I think I like dark edging for heavy weathering more than the lighter color. This is an example that I think looks amazing

Not sure exactly how it was done, though. I think the picture is part of a guide, but I can't check it out at the moment.
It looks like a lighter color on the edges, then a darker color over that, then a tiny line of a light metallic color over that.