My Storage solutions for SWIA and the two expansions

By defiantworkshop, in Star Wars: Imperial Assault

OK, I'm an admitted obsessive storage nut when it comes to board games. I probably spend more time making custom inserts for my games than I save by having an easy storage solution. But its something to do with my hands and fun and happy to see every time I open a box. So, when trying to reconcile all three boxes into a simple solution, my brain got fried. What if a new expansion comes out and blows away everything I've done!? How in the WORLD can I fit a Bantha and two AT-STs in ANY box? After WAY too long agonizing and experimenting, I think I've settled on a solution, and just getting started. My requirements were keep the storage inside the boxes if at all possible (no Plano boxes or the like if possible). I like the box art too much, and just honestly don't have the money to drop on huge tackle boxes. The basics are as follows:

The core SWIA box will be used to house the minis
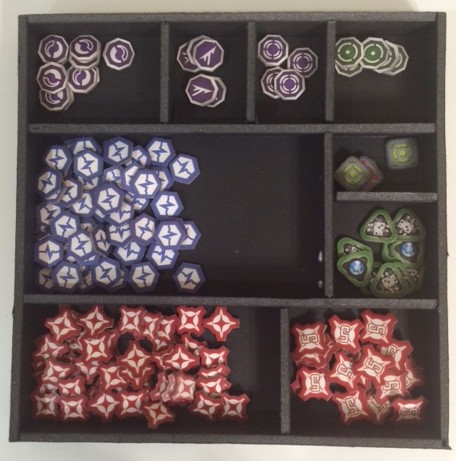
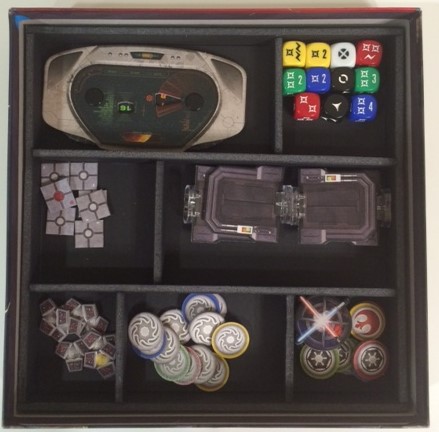
The Twin Shadows expansion box will hold all tokens and chits
The Return to Hoth box will hold all cards and other assorted campaign/skirmish material
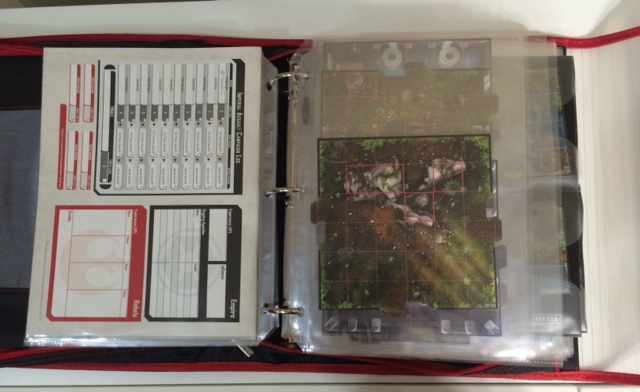
The tiles will be held in a notebook

I started on the notebook and card trays this week, and wrapped them both up yesterday, so here's what the RtH box looks like, with all the cards. I unfortunately didn't keep dimensions for everything as I kinda was winging it as I went, but I can guess at it if anyone's curious.

I started simply enough with a base plate with rabbet cuts, but the walls I did rabbets on ended up tearing, meaning my blades were dull, so it was time to order more.

I then started making walls for the base layer, and the first cut I made with my rabbet cutter shredded the piece. I figured it was time to change the blades....and then discovered I had no more blades. So immediately after starting, I was shelved. I waited a week for my new blades to arrive, and then picked back up. The bottom layer was created a little taller than the top, and contains all the character and item cards. I designed it so that if new card types are ever released, the larger campaign hero cards can actually sit on the walls in the middle (they're purposefully shorter than the outer walls for that very purpose) and I can use the space they occupy for new cards:

FullSizeRender.jpg

Then I made a thinner top layer, with the campaign cards and skirmish cards and missions in there. Just like the bottom layer, I have options to move that larger skirmish battle sheets into a notebook and use the space for more cards if I need to, so even if more things come out, my design isn't devastated. Even the skirmish summary cards (below, lower right) can move out to create room for a new campaign, or I can consolidate all campaign cards if need be. Lots of options to counter any future FFG releases.

FullSizeRender%2B%25281%2529.jpg

The tiles, to me, were the most difficult part of figuring out how to store all the contents, and are the one item I relented on my requirement to keep everything in one of the original boxes. The shapes are so irregular and varied, that a catch all solution WHILE storing cards, tokens, and minis, just wasn't feasible, especially for quick indexing to make maps much faster than sorting through mounds of similar tiles.

I knew if I was going to do this, I needed a zip up binder to keep the pages in good condition and from sliding around too much. I also wanted a velcro enclosure to give the CD sheets a little extra room that having all 3 sides zip up wouldn't allow. I found this guy at Target for about $15:

FullSizeRender%2B%25282%2529.jpg

From there, I ordered large full size sheet protectors, some 5x7 photo sheet protectors, some 3 ring CD sleeves, and some baseball card sheet protectors.

FullSizeRender%2B%25284%2529.jpg

FullSizeRender%2B%25286%2529.jpg

FullSizeRender%2B%252810%2529.jpg

I have a few other pictures that document the process if anyone's curious as to how it looks. You can find them here. I prefer this method for easy indexing and building, rather than sorting through piles of tiles that are all different shapes and sizes and taking more time setting the game up. My group and family are impatient gamers, so cutting down on set up time is a must. Now off to work on cutting inserts for the tokens!

Edited by defiantworkshop

IMG_2110.JPG

Since the chits are a little less in number than the cards, I decided they'd go in the Twin Shadows box. Its by far the smallest of the two, and has odd size constraints, especially from top to bottom. I decided to risk it anyway and make two levels to make access to the tokens easier.

I made two 9 5/8" square bases, then rabbet cut both of them and added 1" walls to both. After that, I put all the "status" tokens (damage, conditions, anything that would be applied to a character) in one, sorted it, then made spacious walls around them all.

IMG_2111.JPG

For the bottom tray, I put all the things that go on the board in it...doors, computers, crates, objectives, etc. Anything involved in level set up goes in there. The same dimensions applied, and I tried to create a lot of room in between the pieces to allow for more things whenever FFG forces me to have more tokens.

IMG_2109.JPG

The idea behind ALL the spacious room for all of my inserts in this series is for future expansion. Some of the inserts look too large for the tokens, and that's on purpose. For a bit, it makes things easier to grab. After any expansions, I can create more walls and separate other token types. I was exhausted when I made this, so my lines unfortunately aren't perfectly straight, but things are held in place, so I'm good with it.

Super job building the storage space with the boxes.

I'm not sure how I want to organize my stuff, yet.

I looked at the Plano boxes, but at $40 and up, I decided to wait.

I have just the core set and some expansion figures. I know I'll be adding more in the future...

I'm giving thought to inserts for the core box like you have done.

Thanks for sharing

Thanks for taking the time to look and comment! I spent weeks trying to figure out what was best for me overall. I highly considered Plano boxes due to its ability to expand, but I knew I wanted to keep the original boxes if at all possible. I still have to do my mini insert in the core box, and it hasn't even begun (I had the other three above pretty well mapped out), but I feel like this gives me the best fit and options for expansion as well. Hopefully it helps just one other person out that was like me, agonizing over how to store so many different pieces, then documenting the process is worth it.

Really top notch work!

I, myself was just looking at a similar system using the insane amounts of foamcore I have sitting around the house.

I made use of Sir Willibald's tuckboxes, but I'm definitely stealing your idea for token trays.

I just received and put together Broken Token's organizer, and it was awesome. Can't recommend it enough for $40. The above setup looks fantastic for organization. Great idea on sleeving the tiles for ease of finding them.

This looks great, but I think I may have missed something. What is the back stuff that you are making the dividers out of?

TV - almost ALL of this was made from scrap, except the large flat bases. The walls are so short that you don't need huge chunks.

blk - I highly considered the BT inserts as well. They're so well done, but don't leave room for all expansions.

BR - the black material? That's just foamcore. What we all did science projects on in school. Its like $11 for a 3 pack on Amazon. Usually one 3 pack can make inserts for 2 games, maybe 3 if you're super judicious in your planning.

I have everything in little plastic bags. I put all heroes in their own bag with their cards. All minis, heroes, class, agenda, and item cards in the core box. All the cards and tokens use during missions are in the Twin Suns box. All the tiles are in the Hoth box.

I really like your sheet protectors idea. Well done & thanks for sharing.