I'm going to try really hard to get this to happen on the tabletop. Just to take a picture.
I'm going to try really hard to get this to happen on the tabletop. Just to take a picture.
I always assumed it made sense to approach from the front with bombers*, these seem to assume you're approaching from behind. Is this after the first engagement?
*I've had very few games, don't know what I'm doing at all from a tactical perspective
I always assumed it made sense to approach from the front with bombers*, these seem to assume you're approaching from behind. Is this after the first engagement?
*I've had very few games, don't know what I'm doing at all from a tactical perspective
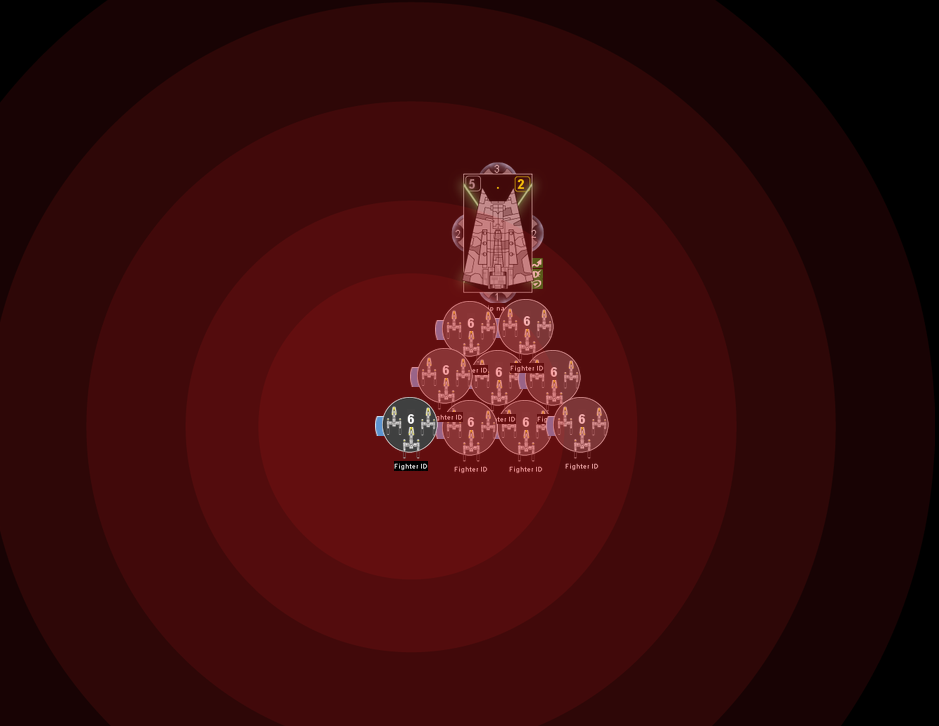
In the diagrams there's a ship down at the bottom of each image, which is the AF2s starting point before the bombers show up. The bombers set down slightly in front of it so that whatever speed it goes at they'll have a shot next turn. Depending on where the AF2 goes they could remain in front if it slows down, but because it's capable of speed 3 they need to start far enough ahead of the AF2 to catch its rear if it goes full speed. The cluster of AF2s that the bombers are ending behind show the best place to catch it after it's moved regardless of which way it turns.
So in effect you're right, you want to place your bombers in front of the target, so that after it moves next turn you're still in range to attack without using a squad command.
I always assumed it made sense to approach from the front with bombers*, these seem to assume you're approaching from behind. Is this after the first engagement?
*I've had very few games, don't know what I'm doing at all from a tactical perspective
In the diagrams there's a ship down at the bottom of each image, which is the AF2s starting point before the bombers show up. The bombers set down slightly in front of it so that whatever speed it goes at they'll have a shot next turn. Depending on where the AF2 goes they could remain in front if it slows down, but because it's capable of speed 3 they need to start far enough ahead of the AF2 to catch its rear if it goes full speed. The cluster of AF2s that the bombers are ending behind show the best place to catch it after it's moved regardless of which way it turns.
So in effect you're right, you want to place your bombers in front of the target, so that after it moves next turn you're still in range to attack without using a squad command.
Aaah, gotcha, thanks!
No time to post the diagram, but here's something else I've found out: if you can setup so that the fighters are still in "intercept" position (the enemy ship drives into the line) then more often than not the best way to activate is to shoot, then move backwards (the thing that fighters can do that ships can't!). While that may not seem like much, this is actually HUGE- so often a joust or broadside exchange between fast ships results in them basically disengaging for the rest of the game, but this allows your bomby gifts to keep on giving! With b-wings in particular, this allows 3 attacks if you can spam commands even on ye grande potato without the possibility of the fattie shaking the fighters.
Conclusion? It's almost always a better idea, if you can predict where, to set your fighters up to catch, even if you are spamming squadron commands, as it maximizes free travel distance from overlaps and also keeps your damage in the same arc. Messing around with Liberty, the primary benefit may just be doing that "first" command to setup the "greeting" (as if you do this properly, you won't need to activate Liberty's ability the rest of the game).
The only exception is if the person has dial + nav and suddenly slows down to speed 1. In that case, though, they're in for a whole 'nother world of hurt if they aren't using their speed as you've been given one free round of extra maneuver over your prey. This may have been part of the design intent all along- the fighter mechanics greatly reward predicting where your enemy is going to be even in a constant command situation!
Played around a little with this and the difference between speed 4 vs speed 3 (let alone speed 2) squadrons is pretty big. At speed 3 you can't bring all fighters into optimum positions. At speed 4 you can, whihc seems very advantageous. Go TIE bombers! (and their equally fast escorts).
Conclusion? It's almost always a better idea, if you can predict where, to set your fighters up to catch, even if you are spamming squadron commands, as it maximizes free travel distance from overlaps and also keeps your damage in the same arc. Messing around with Liberty, the primary benefit may just be doing that "first" command to setup the "greeting" (as if you do this properly, you won't need to activate Liberty's ability the rest of the game).
I think you mean Independence. ![]()
Conclusion? It's almost always a better idea, if you can predict where, to set your fighters up to catch, even if you are spamming squadron commands, as it maximizes free travel distance from overlaps and also keeps your damage in the same arc. Messing around with Liberty, the primary benefit may just be doing that "first" command to setup the "greeting" (as if you do this properly, you won't need to activate Liberty's ability the rest of the game).
I think you mean Independence.
Oops: that'll throw some people's forum searches off ![]()
I am liking more and more the concept of the Independence and Boosted Comms. . . I think it is a match made in heaven.
Adar Talon adds more flexability when included with this combination as well.
Although, the trade off in squadron budget might be too much at that point.