Custom Quick Game Table I made

By TurboDart68, in X-Wing

I just wanted to share a custom table I built. I am a carpenter by trade and never skip an opportunity to build myself something fun.

I originally made a frame to build a full size 36"x36" table, and after i had built it I realized what a huge space it took up if I had it free standing. So I decided to make a "quickie" table that is 22"x22" which seems small, but for me and my fiance' to play, it works perfectly for a hour or so game with 3 small ships each.

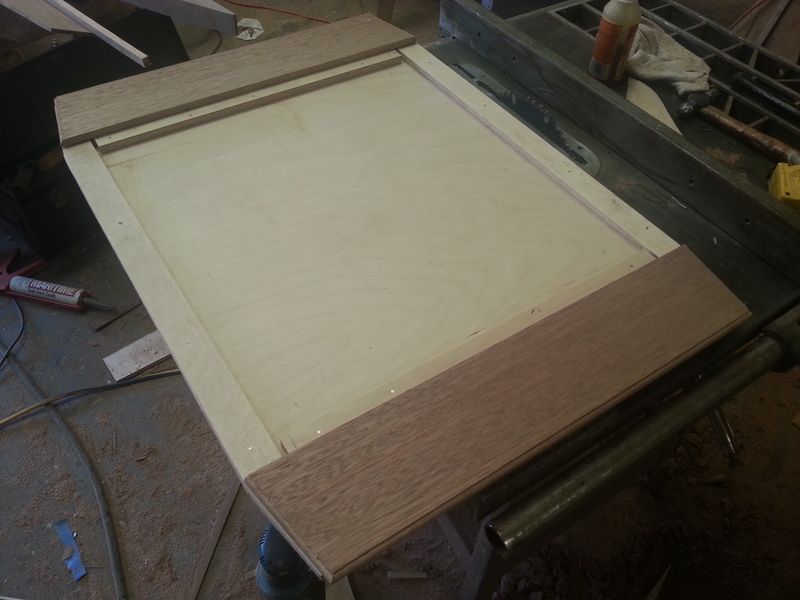
I started with 1/2" plywood, and made a 22"x22" square out of aircraft ply. Then I made 1" supports that sit on all 4 sides and would also hold up the card trays. For the card trays I made 2 3/8" pieces of 6" wide mahogany, cut the ends at a 10* angle, and then used an OGcove router bit to make the ends look kind of old school. The idea was to make it look like some odd piece of furniture with a functionalist aspect.

20150924_110716_zpscdfd19y8.jpg

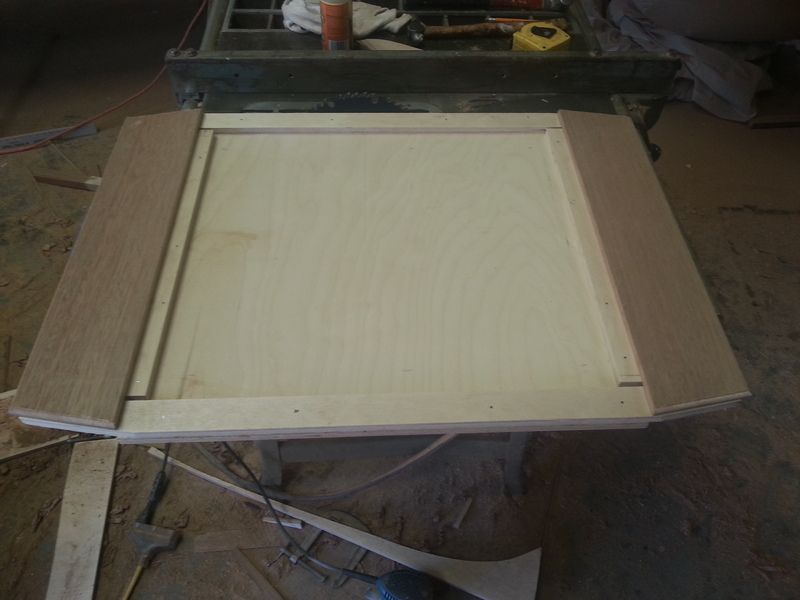
I left spacing between the side rails so that I could run LEds into the table in the future so that I could run the wires in without drilling.

The supports I cut down to the same shape as the card tables, which are made of Phillipine ribbon grained mahogany.

The supports also are just finish nailed and glued in, the tables are glued and screwed in from the bottom. The spacing between them remains 22"x22".

20150924_110712_zpsl2rqgrpc.jpg

I thought I had a picture, but i guess not... but after construction, I mixed up some plaster of paris, and dropped in a few bits of it to make asteroids. These serve two purposes - they look cool to make a 3D image and they will touch the bottom of the plexiglass going above it to support it. So it's decorative structure. I taped off the end tables and shot gray primer all over the center section on top of the asteroids.

I used a brush and painted the field black, brushed a black and brown wash over the asteroids, and used a toothbrush to flick some oil based white all over it.

20150924_160025_zpslhijaoin.jpg

I brushed out some gray and then later went in to make some "cloudy" surfaces by feathering in black to make it look right.

20150924_160639_zpsvugqei6i.jpg

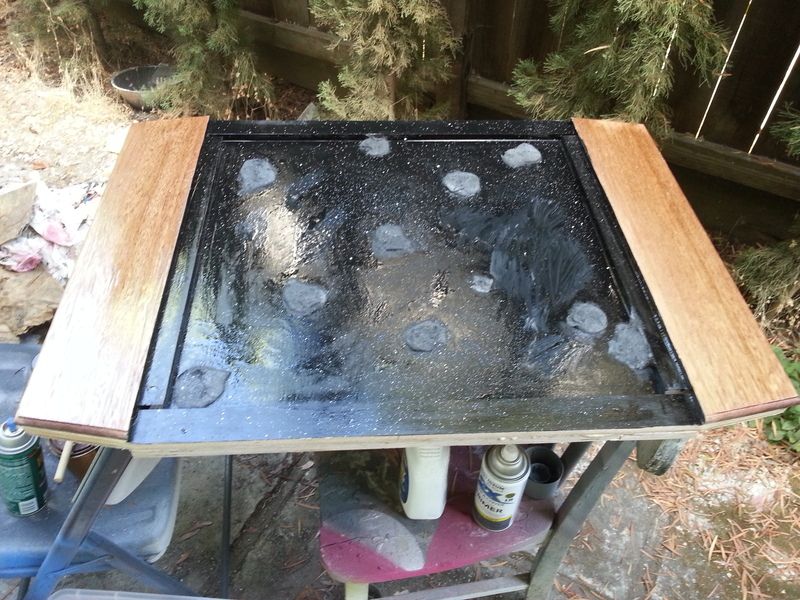
I did some more painting and then shot the end tables with clear coat, still haven't decided what to do with the sides of the table at this point. After the paint adjustment I went and got a piece of 1/8" plexiglass that is cut to 22"x22" and then drilled out in even increments on the sides, attached with #6 screws and finish washers so it would be easily removed and look nice.

20150926_170335_zpsoxqecy2f.jpg

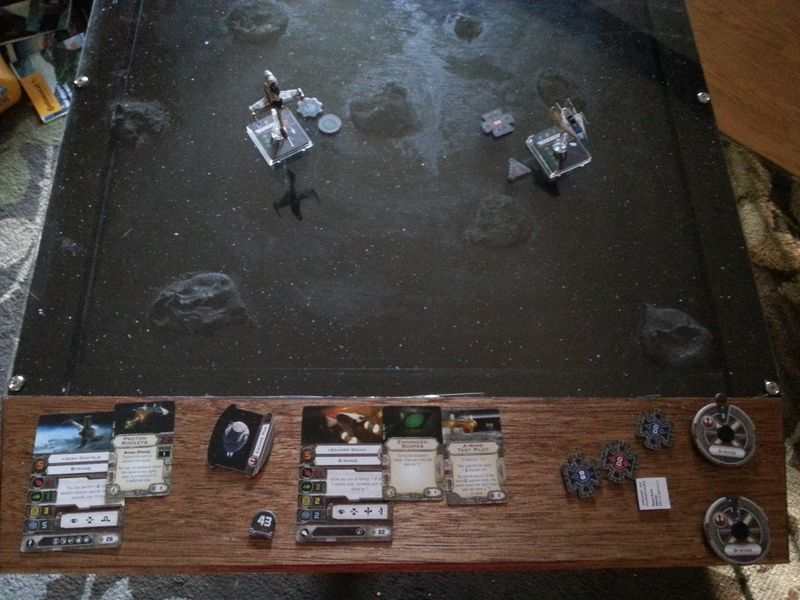
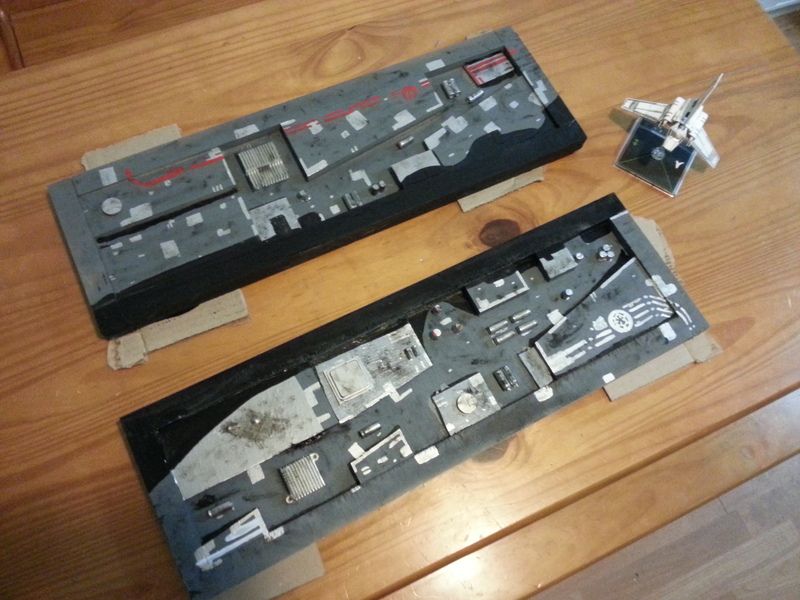
All the cards were just thrown down to test that the tables fit everything kind of - they're not setup for anything. The reflections of ships even look cool on the plexi. Me and my fiance' have played 3 games on the table so far, and they are pretty fun even at a small range. Basically after the first move pretty much every ship can fire on something, and then on the second round all the ships pretty much pass each other and have to wrap back around to hit again. It's cool. For now it's a good table to play on, I have it set up on a custom table stand i built that allows it to be scooted up to the couch and then we each sit on one side of the couch with the table in the middle and play.

Now, I ordered a Lambda Shuttle and a YT 2400. I play rebels, and she plays imperial. Right now we balance out a squad of Two Tie FO's, and one Tie Defender, vs. a Rebel ace duo and T-70X wing. I basically always buy stuff in pairs so it remains fair and we can balance it out. Before i get those in, I want to add two 7"x22" wings to each side out of 1/4" plexi with some kind of space scene painted on each, that folds down against each side, and folds up and is supported when in play to make the surface 22X36 so still small, but enough to allow the larger ships on the board.

This! This is what I'm talking about! (But with more skyscrapers.) Love it!

That table looks amazing! Great job man! I'm definately not as skilled a carpenter as you are, but what's a rough estimate of price if I followed your instructions and used similar materials?

That table looks amazing! Great job man! I'm definately not as skilled a carpenter as you are, but what's a rough estimate of price if I followed your instructions and used similar materials?

I usually use leftovers from materials I already have. I restore antique wood boats, so mahogany is always around, as is aircraft ply. But I pay $40 for an entire sheet of 8'x4' half inch ply, and the mahogany I get in bulk - usually $7,000 worth of mahogany at a time.

BUT

If you were to go to a hardware store, you could pick up a piece of nice red oak that is already planed, for about $8.00 that will build both tables on a 3' table, and the plywood would cost you about $25 for a sheet which is more than enough to build the table The screws will vary, and the plexiglass for this size table cost me $12.00.

So it should be $50.00 give or take, which is pretty reasonable I think. It also makes a nice end table or something. lol.

That looks amazing. Bravo.

I don't have any red oak, but I do have cherry (black) which I believe has similar properties to red oak...would that be OK for this project?

Black walnut, and teak. If you have those two, you can do anything.

Teak: Waterproof, oily, thick attractive grain, hard to carve. Pale gold.

Walnut: Hard, aromatic, fine grain, can be polished to a finish. Dark brown.

They offer a fine contrast, are both fairly workable, and with minimal preparation should last a lifetime.

Can be expensive though, depending on retailer.

Edited by OneKelvin

Black walnut, and teak. If you have those two, you can do anything.

Teak: Waterproof, oily, thick attractive grain, hard to carve. Pale gold.

Walnut: Hard, aromatic, fine grain, can be polished to a finish. Dark brown.

They offer a fine contrast, are both fairly workable, and with minimal preparation should last a lifetime.

Can be expensive though, depending on retailer.

Any oxidation with the teak? (Does it get darker when you work with it) I work with cherry alot and if its fresh it usually turns a few shades darker naturally after a few days.

Teak always looks odd when you cut it, then it all kind of turns the same shade of orange/whitish/brown. It's fairly light with dark spots. Walnut is nice if you can get it in big enough pieces - expect to spend a lot for it. The type of wood for the tables is totally up to you, I just used what I had and used something that would look nice with no paint and just a clear urethane over it. I suggested red oak because it is cheap and available at lowes and home depot type stores for real cheap and already planed.

Also teak doesn't glue up well because it is naturally waxy. It's also not cheap right now. I just paid $22.00 a board/ft for it. That's about $120 for a 1"x6"x8' plank.

Black walnut, and teak. If you have those two, you can do anything.

Teak: Waterproof, oily, thick attractive grain, hard to carve. Pale gold.

Walnut: Hard, aromatic, fine grain, can be polished to a finish. Dark brown.

They offer a fine contrast, are both fairly workable, and with minimal preparation should last a lifetime.

Can be expensive though, depending on retailer.

Any oxidation with the teak? (Does it get darker when you work with it) I work with cherry alot and if its fresh it usually turns a few shades darker naturally after a few days.

Yes, it's fairly important actually. When freshly sawn it may be streaked or multi-colored, the oxidization process and sunlight change the color to the nice gold-brown that people expect from their teak. Let it get some sun for a few weeks the color should be.... Master Turbo beat me to it. =P

(edit. I really need to refresh the replies when I'm typing.)

Edited by OneKelvin

Thanks onekelvin and turbodart68 for the suggestions! You guys are awesome! I think I'll try with the cherry I have, but I'm interested in the teak as well.

Ok, so update. I finally had a thought of what I wanted to do for the extensions since my Lambda shuttle and Outrider showed up in the mail rather quickly.

I didn't want to do just a plexiglass wing, so I decided it should have the same construction as the core table, have a hinge on the bottom, and a magnet, so that the wings will fold over all the way and be "hidden" underneath the table, not just hanging down on the side - it will fold up right against it, and then fold up flush with the regular table.

Each one is a 7"x22" extension. This way the total table is 22x36 which is a little bigger to play on, and will allow for the bigger ships to move around. I was kicking around the idea of more space with asteroids like the center, then finally figured out what I wanted to do - two large ship surfaces...

20151007_190959_zpscslit3le.jpg

The construction is the same as the table, with 1" wide sticks around the edges of 1/2" aircraft ply to support the plexiglass. The hinge will also bite into that thicker portion in the front on the bottom to allow the folding action. It also allows the table to stay the same height all around. I went back to my shop once I thought of the final addition, and knocked these two pieces out in a couple hours.

Once the frames were made, I went over to my planed scrap pile, and found two pieces of mahogany - one about 5/16" thick, and the other about 1/8" thick. I went over to the chop saw and set it to whatever angle, at whatever, and just started cutting 1/2" ply, 5/16" stuff, and 1/8" stuff. I felt like the only way to make it look "authentic" was to make it random. So I have no idea what i did, just made some pieces and arranged them.

20151007_191621_zps69ywawda.jpg

Then I arranged my 5/16" pieces to look like - something, and glued and sent one finish nail through each. I didn't want the extensions to match each other.

20151007_192611_zpsrhrgaqxn.jpg

After a little arranging and everything, this is what I wound up with with my 3 thicknesses of wood. I glued everything down, and for the smaller pieces I taped them down with gorilla glue underneath so I didn't have to nail them. Everything had to be held down well because these pieces will be stored upside down when the ends are folded down.

20151007_194934_zpsffivb8d8.jpg

After that I sprayed some gray primer at the top surface ready for some glazing putty to smooth everything out, and still deciding how i want to detail them. I want them to be a bit brighter than the primer for sure. I also know i want to put shadows, and depth, and some red stripes and starbirds on one side, and the other one probably some small imperial cog or something somewhere.

I also want to put more greeblies on it. I save a bunch of heat sinks and crappy motherboards and video cards from an old e-cycle bin, just because they look cool and I thought they would be good for something - I think this is it.

So with that, I added some depth by outlining the sides of each piece in some oil based black to make a "shadow" of sorts anticipating that the "light" comes from the center of the table.

20151007_201005_zpsz4b52guo.jpg

And that's where I'm at so far.

I dug out some of those random computer parts, two motherboards looked like all I really needed, as they each had a few little greeblies I wanted. I didn't want to go too wild with the components because I don'r want anyone to think - "techno computer junk" I want them to think "spaceship stuff" and I noticed that capacitors would probably work as some kind of external tank, so I can paint those all gray, with little warning emblems, etc, and some of them that are already gray can be left alone, and I found the backup batteries, which will make perfect vent things, and one heat sink each, because they look interesting, and I'll get those grayed out a bit. The whole thing should look worn and rusted and used when done. I even glued a processor to one because it looked like a good depth piece - gray and more interesting looking stuff basically.

Once it's all painted I hope it looks right.

20151007_205227_zps0rolbv68.jpg

20151007_213302_zps2rknbnkb.jpg

And last update for the night now that everything is basically the color it's supposed to be. Lots more detailing to do.

20151007_234051_zpsexud1ew5.jpg

This is what I am dreaming of! My dream table would have an entirely planetary scene, though, which would be accessible. But right now I live in a tiny appartment, so no way that is happening anytime soon! I hope i still get to play X-Wing when I have the ability.

That is the same problem I face. I have an appartment and two kids that are running around and like to have somewhere to play.

Right now I have the two extensions attached to the table, and hinged. I have a way to latch it in the closed position that works excellently, and now I am just trying to figure out how i want to lock them in the upright play position. I could have slides underheath or something, but I want something that is single action - like release latches, spin a thing, table ready to go. I'd have pictures up but my phone died, so that has to wait till tomorrow.

I had a seperate idea that I wanted to try that is almost like this one, but it was a 1" thick table like I have here, that is still 3 dimensional, but folds like a board game board - think "Sorry" or "Clue" where it folds once back on itself, and then two times after that. It would basically be 18"x18" squares - 4 of them, with hinges to eachother. Then the whole board unfolds onto a table at 36x36" and then folds back together into a 4" x 18" assembly. It would allow you to store it in a closet, or beside the couch, or under a coffee table - pretty much wherever.

Edited by TurboDart68

Ok, got it most of the way sorted out. The latches work good, The hinges work perfectly, and the table folds and unfolds as it should. I have a long piece of 36" mahogany that holds the wings in an unfolded "attack" position. You slide three bolts into three holes - one in each wing, and one under the center of the table. It's not as elegant as I want but it works for now.

Locked and closed:

20151010_193822_zpsmqqwc8en.jpg

Wings unlocked.

20151010_193744_zpszpoqbjek.jpg

Wings in "attack" position:

20151010_193600_zpss4q6qodz.jpg

Edited by TurboDart68

775.gif 241.gif 887.gif

264.gif 1187.gif 1536.gif

This! This is what I'm talking about! (But with more skyscrapers.) Love it!

It has ship terrain now. It is now exactly what I'm talking about! And I need one yesterday.

I think I want to make a folding table like the one I described earlier as well, but not sure what to make the terrain as. I think it would still be 1" thick, but fold like clue board or something. It would also be full size 36x36 and just sit on my kitchen table when played.

Also thank you. I thought two huge ship surfaces would frame the area perfectly and I was thinking of something that made sense to "launch" the ships from. More space scene just seemed, eh... to me. It needed something else.