I'm surprised by Alex Davy's apparent change of heart towards the idea of setting up a fortress. So much so that he'd even include a suggestion for it in the article.
But, he's got a point.
Moralo is a strong candidate for the best choice in the game as the centerpiece for a fortress build. Of course, whenever you think of fortressing, PWTs come to mind, and for good reason: it's hard to question full-arc coverage. However, PWTs suffer from the out-of-arc designation that comes with that advantage, and the admittedly few but nonetheless powerful cards that can exploit it. The YV-666 does not have such drawbacks.
I will preface by saying that the PWTs still hold the title for simplest to set up. You can make a blind-spot-free fortress in the middle of the board. Being limited to a mere 180 degrees makes your choice of spot for the YV-666 somewhat unforgiving. Fortunately, there is a place where the ships can set up that makes it impossible to approach from any blind spot. And that'd be the board corners.
This is not a particularly new idea; Wingman can be used with the Lambda's "0" red to form a fortress. This strategy is rarely seen, and that's for a number of reasons. Most of the reasons are wrapped up in "you need a ship with an EPT for Wingman", which the Lambda does not have-- so the fortress relies on another ship, most likely with less health than the Lambda, and also, "the Lambda has large blind spots", which means that your fortress must balance overlapping multiple arcs against effective board coverage-- and they tend to be mutually exclusive. On the other hand, the YV-666 outclasses the Lambda in every way. The Wingman fortress strategy, while originating with the Lambda, can find its perfection in the YV-666.
So let's start with the list.
The basis of the YV-666 fortresses is this:
"Fortress Core"
76 points
Pilots
------
Bossk (40)
YV-666 (35)
Wingman (2)
K4 Security Droid (3)
Moralo Eval (36)
YV-666 (34)
Outlaw Tech (2)
Since the general plan is to do a "0" red maneuver with Moralo, and then Bossk's Wingman to make it an over-and-over again park maneuver, the crew member who fits in with Moralo the best is the Outlaw Tech. Bossk, on the other hand, will have access to the 1-speed green maneuvers on his dial, since he'll be ramming Moralo ad nauseum. So the K4 Security Droid is a great choice for him. With this, we've easily solved the action-loss problem often felt by fortressers.
The question that remains is what to do with the rest of the points.
Option #1:
"Hammer Fortress"
93 points
Pilots
------
Bossk (45)
YV-666 (35)
Wingman (2)
K4 Security Droid (3)
Gunner (5)
Moralo Eval (48)
YV-666 (34)
Heavy Laser Cannon (7)
Gunner (5)
Outlaw Tech (2)
Maybe the best answer to that question is to pop a gunner onto Bossk and Moralo, to up their accuracy against token-heavy foes, and then stick a HLC onto Moralo for 4 dice at all ranges from him. This fortress list is simple, but I'd wager it's also effective.
7 point initiative bid means the enemy will almost always have to fly to you.
Option #2:
"Finger Fortress"
96 points
Pilots
------
Bossk (50)
YV-666 (35)
Wingman (2)
K4 Security Droid (3)
Gunner (5)
Ion Cannon (3)
Tactician (2)
Moralo Eval (46)
YV-666 (34)
Ion Cannon (3)
Gunner (5)
Outlaw Tech (2)
Tactician (2)
Action-heavy lists will wither against this list. Two ion cannons and two Tacticians means you have flexibility to deal with everything. You could easily envision a scenario where you wind up stressing four separate ships, possibly ionizing up to two of them. Alternatively, you can ionize a single large ship in one turn. Setting up in the board corner means your opponent is already going to be precariously close to the edge. Putting hazardous conditions on them is icing on the cake-- and, you don't necessarily need to sacrifice damage output to do it, since you can always choose to use your primary instead (e.g. against a Howlrunner swarm, which really doesn't care about actions or ions). Four point initiative bid is less effective than the seven point initiative bid in the previous list, but still probably pretty safe.
So, what's this look like? Easy as pie, that's what it looks like.
The setup:
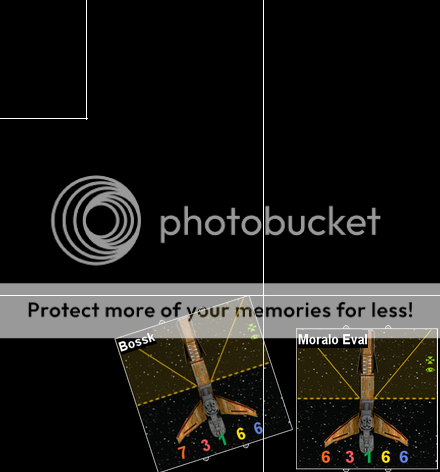
I've got the fortress setting up in the right corner of the board. The white lines are VASSAL's range 1 and range 2 borders, for orientation's sake. You just want to set Moralo up as close to the edge as possible, and then put Bossk as close to Moralo as you can, at any angle less than 45 degrees. You do want him at an angle pointing towards the inside of the board, since you want to minimize your blind spots and you want to make the most of his arc, too.
The first move:
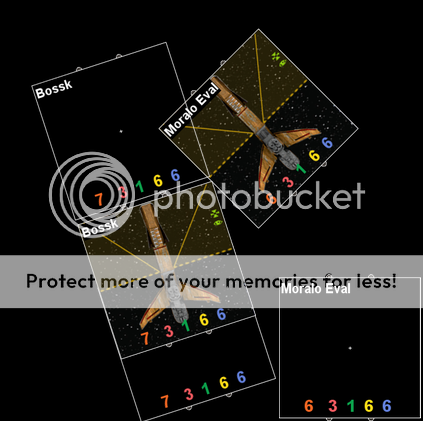
Moralo moves first and does a 1 left bank. Bossk does a 1 forward and overlaps; after clearing the collision, the fortress is set. How's it look?

It looks good. It looks like you can't approach without having two arcs on you in just about any direction.
What you can see in this image is that it's not completely flawless; there is one little arcless corner (to Bossk's left side) where a single small ship can just barely fit, and have arc on both without return fire. Can confirm, have succeeded. However, it is close enough to the board edge that it would require excellent technique on the opponent's behalf to exploit. Furthermore, to get there without being shot at for a turn requires a 5 forward plus a forward boost. A 3 forward plus 3 forward SLAM could do it too, if it wanted weapons disabled. Due to the difficultly in getting to this position, the opponent will telegraph if that's his strategy, and the fortresser can simply break the fortress position. It will not have much payoff, if any, for the enemy to get himself to this spot. You could equip bug zappers, if you felt like it, to further discourage the approach to this point-- it will kill Soontir in 2 turns if you do (the first turn he is out of range 1 of Moralo, if he's in the exact blind spot I mentioned. Which works well, because you don't want Moralo to get two ion tokens. Bossk doesn't care, in that regard).
This fortress strategy is not without its drawbacks. The most obvious one is likewise the most potent: a stress inducer will force the fortress to break apart on the following turn. Wingman's stress-clearing tactic is triggered at the start of the combat phase. Therefore, just about everything that can apply stress (Flechette Cannon, stressbot, Tactician, or even Mara Jade) will be able to take its toll.
Silver lining: Rebel Captive will most likely not work, since Bossk can shoot before Moralo and thereby squelch that issue. Flechette Torpedoes will also never work. Other silver lining is that, even though the build is designed to fortress, you may elect not to and still enjoy the benefits of a solid 24 hitpoint list with two 180-degree arcs. A stresshog will not last long against these ships, and its usual compatriots are not going to be able to significantly outmaneuver the YV when it is not in fortress mode.
If you insisted on fortressing in spite of a stress-heavy opponent, you could equip Inertial Dampeners on Moralo to allow you one extra turn of fortressing despite being stressed. This seems like a bad choice to me, but it's a possibility.
Ionizing Moralo will also force the fortress to break up. Thankfully, they're large ships, so they don't get ionized without some dedication. You should be able to put the hurt on the ionizer in the time it takes to get those tokens on Moralo, unless your opponent is running a control-heavy list with many ion elements to it-- in which case you should probably avoid setting up the fortress in the first place, and plan to dogfight instead.
The YV is a good ship. It can be used for more than just a fortress. But it also possesses many desirable qualities for setting one up very effectively, with the ability to put out a lot more pain than many other fortress styles. The Wingman fortress can be used to great effect with only two ships. Do you think this strategy will start to see more use?
Edited by Sparklelord
