Let's Go Raiding!

Since the Raider's announcement, I've been developing a few missions on Mission Control that feature the Raider-class corvette. Two of these scenarios were designed to show the Raider doing what it was meant to do: opportunistic attacks on Rebel forces that larger Imperial ships would be incapable of. Both of these scenarios were playtested repeatedly for balance, mechanics, and to make sure they were fun! The third is a more straightforward fight to the death between a Corellian Corvette and a Raider, with an emphasis on the destruction of each side's capital ship.
Here's a brief look at each scenario.
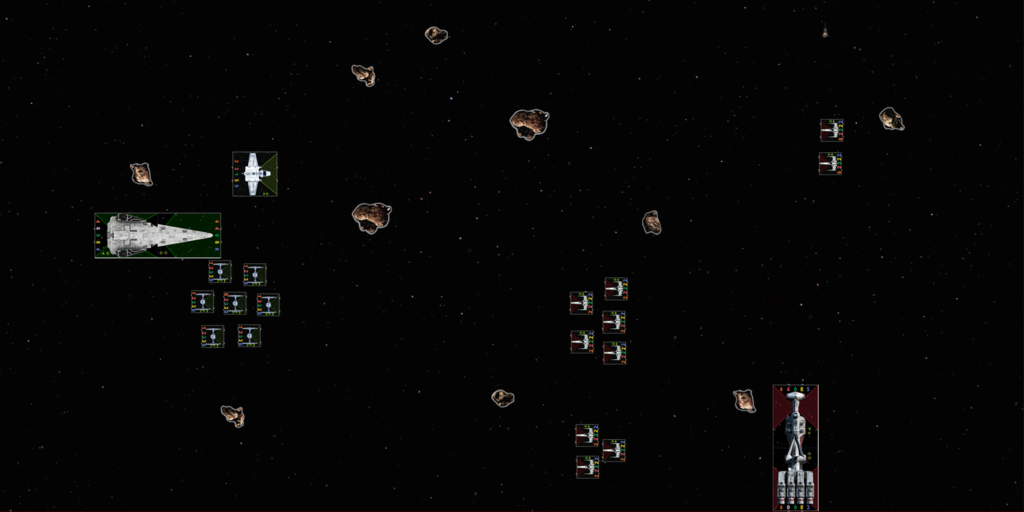
Imperial Agents have discovered the location of a hidden refueling and refitting station being used by the Rebel Alliance to re-arm a Corellian Corvette which the Rebels have recently used to terrorize innocent Imperial citizens. The Corvette will only be at the station for a short time; only a small Patrol group consisting of a Raider-class corvette and its escorts will be able to strike before the Rebels escape.
The Corvette is defended by a large force of smaller Rebel ships. The Rebel force present is numerically superior to the Imperial strike force, but the Imperial Navy expects their strike force to eliminate the threat of the Rebel Corvette no matter the cost.
This scenario sees an Imperial Raider and its escorts bearing down on an unprepared Corvette. The mission hinges on the fate of the Corvette, so the Imperials need to break through the Rebel escorts and put damage on the Corvette as quickly as possible. The Rebel player has a tough decision to make; the Corvette is still attached to a refueling station, and if it leaves before the ship has fully detached, there will be considerable damage. The Rebels could conceivably start a run for the hyperspace buoy as soon as its second movement phase, but with at least six face-up damage cards assigned to each section of the ship - which could leave either section crippled, depending on what cards you draw!
The Imperials need to maximize speed and firepower to blow past the Rebel escorts and hit the Corvette with enough firepower to destroy it before it escapes, but they also need to make sure they don't lose too many ships to the Rebels on their way in - the Rebel player actually has more points than the Imperials in this scenario, so they can do a lot of damage if ignored. But remember, all the Imperials need to do to win is destroy the Corvette before it escapes, so don't let yourself get caught up in a dogfight with the Rebel escorts, or the Corvette will escape and you'll lose.
A typical deployment is pictured below. The Imperial player has decided to use a fast-moving TIE swarm backed up by a pair of engine upgrade-equipped shuttles to supplement their Raider. The Rebels have thrown their points into a large force of Z-95s, planning to clog the enemy's movement lanes.
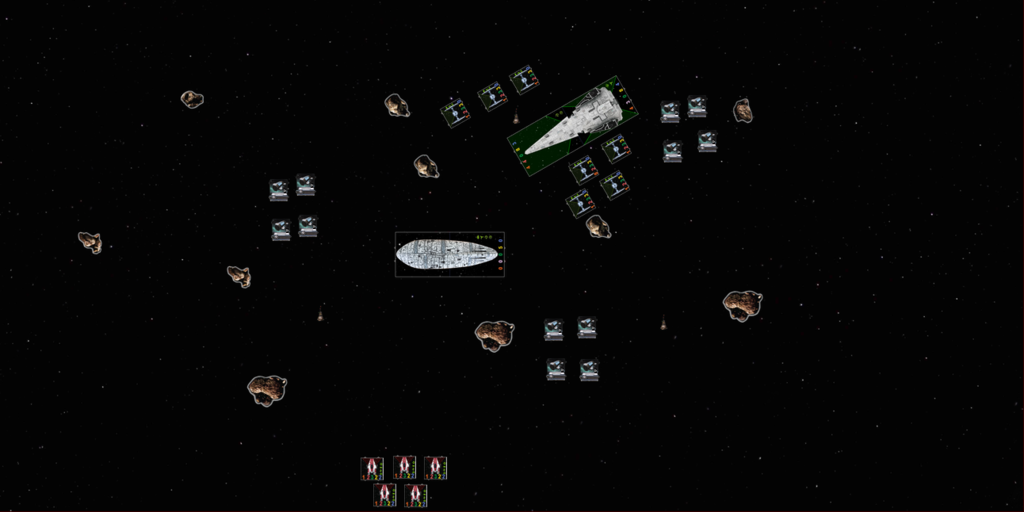
Acting on information supplied by informants within the Rebel Alliance, Imperial Command has dispatched a Raider-class Corvette and its escorts to attack a Rebel supply area in deep space before it can be evacuated. Knowing the layout of the Rebel's hideout, the Imperial commander plans to execute a precision attack, dropping out of hyperspace at the most vulnerable point in the Rebel's defenses.
The Rebels are scrambling to defend and evacuate the facility. Only a handful of snubfighters are on-site to repel an attack, but additional fighter groups are en route.
The Imperials do not have overwhelming forces available to attack the Rebel facilities, so they are counting on the element of surprise to give them enough time to destroy the Rebel supplies and cripple the Rebel's efforts in this sector.
The Imperial Raider finds itself in a target-rich environment here. Maximizing your speed and damage is key to winning this scenario, for both sides. The Imperials need to destroy their targets quickly, before Rebel reinforcements can arrive and make attack runs on the Raider. Meanwhile, the Rebels need to be able to move quickly across the play area to engage the Imperials before they do too much damage.
There is an interesting wrinkle in this scenario in the form of the hyperspace buoys and rules for ships arriving from hyperspace. The Imperial ships and Rebel reinforcements deploy close to one of three hyperspace buoys on the table as they arrive during the game, rather than from a board edge. Each side decides where their ships will be arriving without knowing where the enemy is going to arrive - so its important to think about where your enemy might be deploying their ships as you choose which buoy your own ships will deploy at. During the game, players have to make the best of their decisions, planning attack runs carefully.
Here, the Imperial player has deployed their force behind the Rebel Transport, aiming to destroy it quickly with many attacks from TIEs and the Raider, before it can escape. The Rebel player guessed that the Imperials would pursue the transport, but the deployment of their initial squad at the table edge is still not optimal. The Rebel player will be able to move their A-wings with enough speed to make a combined strike on the second or third turn of play, assuming they chose well when deciding where their reinforcements would arrive (a choice they need to make before the Imperials deploy).
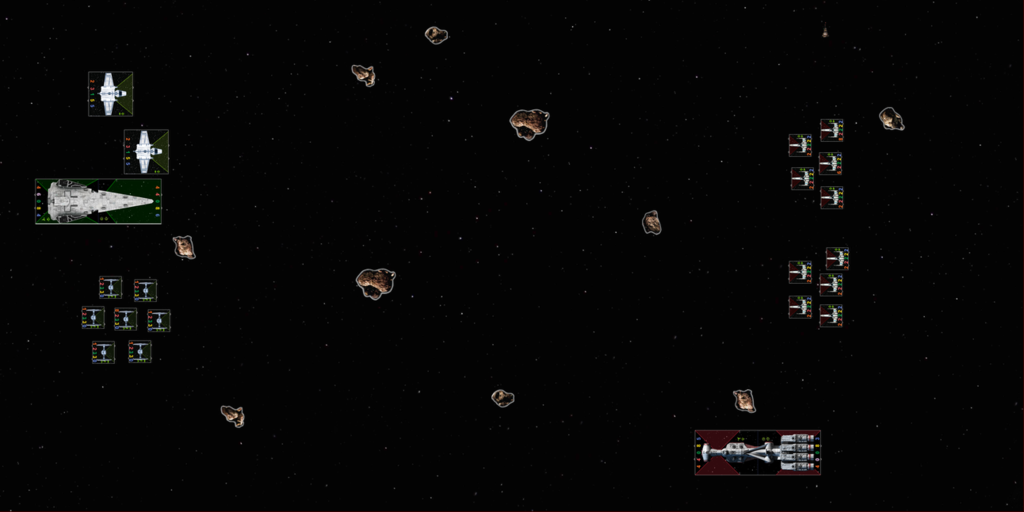
For months, the Rebel and Imperial commanders in a disputed system have probed and scouted, launched skirmishes and raids against each other, but never met in open battle. But now, the Imperial commander has taken personal command of his Raider-class corvette to hunt down the Rebels and destroy their command ship - a Corellian Corvette. The Rebels realize that if they can destroy the Raider and kill the Imperial commander, Imperial resistance in the system could crumble, and decide to take this chance to eliminate their enemy.
This scenario is in a modified deathmatch format. Victory depends on destroying the opposing player's capital ship, so there are two basic strategies to be considered here. First, you could send in your fighters in an attack run against the enemy command ship, hoping that enough of them survive to destroy it. Or, you could make a more deliberate attack, keeping your fighters close to your command ship and using it to support your attack. You'll be bringing your ship into combat, and you could be vulnerable to a lightning strike from your enemy, but you'll benefit from the support your huge ship can offer.
Below, the Imperial player has decided to make an attack run on the Rebel command ship, picking fast ships like a pair of shuttles and a TIE swarm. Meanwhile, the Rebels have deployed two groups of Z-95s a little behind and above the Corvette, setting up for a combined attack where the Corvette will turn in to present a broadside to the Imperials with the Z-95s flying close for support.
With the Raider rapidly approaching stores, and now playable in Vassal, I hope some of you take advantage of these scenarios. When my Raider arrives, I'll be trying them out on the tables of the NYC x-wing community.
Enjoy!
