The HWK has been largely ignored by most players and dismissed by others as lackluster. They are relatively cheap, but the 1 Attack Die primary means that more points must be spent on them to have them be effective. Their dial is rough, probably the worst in the game, so they have difficulty engaging a nimble foe even with a turret equipped. The rebel HWK pilots have abilities that don't quite abrogate these difficulties. Useful in corner cases, but not usually worth the points.
Scum, however, changes this equation. The Rebel HWK pilots are all about helping each other and other hippy tree-hugging nonsense. Scum has no need for group hug therapy like the rebels do. No, Scum HWKs have brutal, vicious abilities that can rapidly change the course of the battle. This treatise aims to explain these abilities, explore builds which magnify their threat, and exploit their menace in full lists.
Torkil Mux
Our first brigand is Torkil Mux, costing 19 points for PS3. At the end of the Activation Phase, he may choose one enemy at range 1-2 and, for the rest of the round, zero out their Pilot Skill. Making an enemy ship PS0 is incredibly powerful, as it now shoots last. The most obvious benefit of this is that the victim shoots last. That means that all friendly ships get to attack that target prior to any return shots. This can potentially remove an enemy ship before it ever has a chance to fire, dramatically changing the balance of power in the game. This alone would make Torkil a valuable asset. But this ability has even great implications.
Because the high PS ship suddenly loses its ability to shoot first, it may suddenly find itself required to expend a focus token on defense instead of offense, trying to survive to even get a shot that, against any other list, would have been a foregone conclusion. Thus, not only can Torkil ensure that a threat may be taken off the board before it can shoot, if it manages to survive its damage output is diminished.
But this isn't the only consideration for the utilization of Mux's ability. Torkil also changes which order the enemy must fire in. Even if all enemy ships are naturally lower PS than any friendly ships, Torkil's ability still retains value. Say the enemy has two ships of the same PS. One has one possible target, but it's range 1. The other has two targets at range 3. Normally, the ship with a single target should attack first in case they remove that threat from the board. Torkil can force the closer target to attack last, forcing a decision on the enemy about which to attack.
This can further break synergy lists by changing fire order. Airen Cracken now shoots last, unable to pass out an action until after his allies have shot. Wes doesn't get to remove a token until the very end of the Combat phase, preventing him from shutting down the offense or defense of his target.
Torkil can severely hamper other 'after attack' abilities as well. Turr Phennir can no longer dance out of arc before return shots if he shoots last. Advanced Cloaking Device is a major casualty, as a Phantom finding itself shut down by Torkil won't be able to cloak until all attacks against the ship have been made already. Whisper may get a focus token if she survives long enough to shoot, but as the last ship to fire, that token is useless. Garven won't get to pass a focus token unless he gets to spend one on defense.
This can be further exacerbated by abilities that can add stress during the combat phase. Tactician, for example. Not only can this shut down any after attack actions, like many of the ones listed above, but it can shut down any stress averse abilities. Jan Ors could be given a stress before a friendly ship shoots, meaning she could not add an attack die. Dace Bonearm could similarly be prevented from utilizing his ability.
And these are just the direct game effects. With the full knowledge of the above, it can shape how one's opponent must fly against it. Every maneuver must be considered carefully lest a critical ship be caught by the massive Range 1-2 bubble of anti-PS. Boost and Barrel Roll must be weighed against this threat. Actions must be considered in this light.
One conflict in which Torkil seemingly loses is versus his goody-two-shoes counterpart, Roark. Torkil must choose his victim at the end of the Activation Phase while Roark gets to buff a ship at the start of Combat. This means that Roark can run along and buff the target that has suffered Torkil's depredations. Keep in mind that Roark cannot target himself can only target one friend. Torkil can still make Roark's life difficult by trashing the PS of a ship other than the one Roark planned to buff, leading to a difficult choice about which ship to give PS 12 to.
Torkil's ability is amazing. It has so many applications and implications that it is daunting. It can change the very course of the battle and has such nuance that one can spend untold hours contemplating them.
Torkil Mux Builds
The HWK does not have the dial to effectively utilize the Autoblaster Turret, at least on Torkil. The Blaster Turret is similarly wasted on Torkil due to the loss of the focus token required to fire it. As such, Torkil most benefits from the Ion Cannon Turret. While limiting his damage slightly, the control added by the Ion token makes it the ideal choice on Mux. Thus, with one recommended turret and no EPT, the builds for Torkil mostly rest upon choice of crew.
No Crew: At 24 points, this is an easy ship to slip into a build. Capable of controlling enemies, this build creates a threat far beyond its cost.
Recon Specialist + Moldy Crow: What's more annoying than a brutal HWK ability? One with an endless supply of focus tokens. At 30 points, this build will gain 2 focus per turn and keep them. When under heavy fire, these focus tokens can quickly prove their worth, leaving the ship alive far longer than expected.
Flight Instructor: This crew allows a ship to reroll one EYE result when defending. If the attacker's PS is 2 or less, it may reroll a blank instead. Except Torkil can force one attacker to be PS0. This means that, in addition to a focus token, Torkil can ensure he has a defensive reroll, leading to a much more robust defense than one might otherwise expect. At 28 points, Torkil can weather far more damage with this build. Adding in the Moldy Crow title does take the build up to 31 points, but is just mean. Now Torkil has defensive rerolls plus a nigh endless supply of focus tokens.
Greedo: One of the biggest problems with an Ion Cannon Turret is that it has no ability to add a crit to the opponent. It's a nice, safe, predictable weapon that either misses or does one damage and one ion token. Greedo changes this equation. Due to the way Greedo is written, if the ICT does a damage card, it is faceup. This can be devastating. Further, return fire only does a crit for the first attack against him, so if that attack misses, he is safe for the round. Because Torkil can adjust firing order, he can force the opponent to make a worse shot against him first, which is less likely to deal a damage card. At 25 points, this is cheap enough to risk, especially if the other ships in the build are higher threat. This build has the further joy against Fat Han of ensuring that Greedo shoots first.
Tactician: Torkil is already a right blackguard (translation: a mean jerkface). Tactician makes him truly despicable. At Range 2, in arc, Torkil can make target PS 0, then stress them, then give them an Ion token. This can mean that next turn, that victim must perform a 1 forward and be deprived actions, setting it up for a very unhappy time for as long as it remains stressed and ioned. For 26 points, you can experience the undying enmity of your opponent.
Palob Godalhi
Torkil is not the only terrible monster lurking in the Scum faction's HWK pilot roster. During the start of the Combat phase, Palob Godalhi gets to choose one enemy ship at Range 1-2 and steal a focus or evade token from them. At 20 points, this pilot gets PS 5 and an EPT. This means that one more point than Torkil gives him +2 PS and one of the most coveted upgrade slots.
Palob's ability is not as nuanced as Torkil's, but that doesn't mean it isn't just as nasty. Most ships in the game of X-Wing rely upon Focus and Evade tokens to survive. Green dice are fickle. Three Squiggles on Eight sides are just not enough to reliably avoid damage. Focus tokens and Evade tokens help shore up the defenses of a ship. Focus is the most often taken action in the game because it is so versatile, allowing both offense and defense. Carnor Jax is rightly feared for his ability to shut these actions down.
Palob, however, does more than shut them down. It's one thing to not be able to take the actions for focus or evade, or to not be able to spend those tokens. It's quite another to have those tokens taken from you.
In the face of Palob, opponents have two fundamental choices. They can either not focus or evade with any of their ships or they can act as normal, knowing they are donating focus or evade tokens to Palob from whichever ship is most likely to need that token. Often opponents will chose to perform other actions instead of focus or evade, such as target lock or barrel roll. However, many of these same ships are now vulnerable to fire that they would otherwise be able to avoid, leading to more rapid casualties.
Palob's ability extends Range 1-2, meaning his bubble is immense. Because he is PS 5, any low PS ships must choose to act before knowing whether Palob will even be in range to steal their tokens.
In short, while Palob is alive, the enemy fleet is effectively tokenless and vulnerable.
Palob Godalhi builds
While the admonition not to take Blaster Turret might apply to Torkil, the same cannot be said for Palob, as his ability to steal focus tokens can help ensure that the can gain the necessary focus token even when blocked or stressed. As such, this is a viable option.
Opportunist + Blaster Turret + Moldy Crow + K4 Security Droid: Palob with this build is a monster. First he can build up focus tokens for use on turns when he is unable to act thanks to the Moldy Crow title. These tokens can be used to ensure that the Blaster Turret can be fired regularly. Blaster Turret has 3 Attack Dice, which is useful but not great without modification. K4 starts the modification by allowing a Target Lock to be acquired when Palob performs a Green move. For his action, he takes a focus. Now, the insidious part is that he can ensure that his victim doesn't have a focus or evade token, allowing him to activate Opportunist. This gives him a stress, but allows him to attack with 4 dice, with TL and possibly focus against a target that has no defensive modification. This 34 brigand can ruin the day of almost any ship.
ICT + K4 Security Droid + Expert Handling: One common method to circumvent Palob's refusal to tolerate focus tokens is to start using Target Locks instead. Slightly better than focus for attack (though not useful for defense), this is usually the only option left to ships that want to attack with some beneficial modification. Expert Handling breaks this. Not only does it allow Palob to perform a Barrel Roll, it allows him to break a Target Lock. This means that Palob can move, barrel roll to end up in places no one expects a HWK to be, break the last remaining action option enemies have to hurt him, shoot in any direction, and K4 ensures that he himself has some offensive modification. Because EH gives him a stress, he's likely to want to perform a green maneuver anyway, ensuring that he gets the TL. In this configuration, this 30 point Palob can dance around arc-wielding enemies with impunity and still return fire.
Lone Wolf + Blaster Turret + Moldy Crow + Recon Specialist: Designed to operate alone in hostile territory, this build clocks in at 32 points. With defense and offensive rerolls and a bank of focus tokens, this ship can survive for a surprisingly large amount of time. This late game threat can wreck the day of many a ship thinking the game already won.
Dace Bonearm
Dace costs 23 points and has an EPT at PS7, costing 3 more points than Palob for +2 PS. Often considered the weakest of the Scum HWKs, this pilot allows himself to be stressed to deal an automatic damage to an enemy within Range 1-3 when that enemy gets an Ion token. This is an ability that should not be discounted. One of the biggest downsides to Ion Weaponry has historically been that, while the control aspect is nice, the damage is lackluster. However, two damage radically changes that equation.
Many small ships only have a few hitpoints. Whisper, for instance, only has 4 HP. Normally, an ICT would have to hit Whisper four rounds before she is destroyed. A difficult proposition. When Dace is on the field, she can be dead in two hits. Same with Soontir. And only one hit has to land in the attack for this damage to be inflicted. If only one hit is rolled, but goes through, the result is still 2 Damage.
Large ships need fear just as much. While they have many HP, they worry more about Ion tokens causing them to fly off the board, making them more predictable. But the big surprise is against Fat Han. Fat Han is able to ideally absorb up to 3 damage a round. 1 from Agility/C3P0, 1 from Evade token and 1 from R2D2. Here, that equation changes. Dace only needs to get 3 hits, instead of 4, in order to land a hit. That hit does 2 damage (The shield from R2D2 and then one tasty Hull damage). Dace will not be able to solo Solo, but he has the chance to win even if he is the last ship remaining on the board. That's not an ability to ignore lightly.
Further, Dace does not have to do the Ion damage himself, he simply has to be at Range 1-3 of an Ioned ship. If an enemy is out of ICT range of Dace, it can still take a damage from him if a more proximate friend is able to land an ion token.
His ability compares well with that of Jan Ors. While she can add a dice, that dice does not always translate to an extra damage, even with focus and a reroll. Dace is more likely to result in a full extra damage.
Finally, keep in mind that the ion token does not need to come from an attack. Leebo crew may effectively never get used, but if Dace is around when Leebo decides to get boost-y, Dace can instantly damage that ship. Since that's during the activation phase, it is theoretically possible that a ship at lower PS uses Leebo crew, Dace stresses himself to damage it, then Dace clears his stress with a green move, then damages something else later.
Feedback Array ships need to be very careful near Dace, as suddenly they can pay a far dearer price than expected for their own 'free' damage.
Automatic damage should never be dismissed lightly. Dace deserves more love. While not as incredible as his compatriots, his ability is quite potent.
Dace Bonearm Builds
Dace, like Torkil, benefits most from the Ion Cannon Turret. This venerable weapon not only controls the enemies, but his ability means that the control aspect of the ICT is paired with surprisingly potent damage potential. As such, this will form the core of all the builds explored here.
Veteran Instincts + K4 Security Droid: This build clocks in at 32 points. K4 gives attack modification and since Dace's ability stresses him, green moves to clear that stress are common. PS9 means that he is often a threat to ships that otherwise have little to fear from a HWK. Whisper and Turr Phennir now need to worry about being ioned for two damage. Corran can find himself in a bind, taking more damage per turn than R2D2 can repair.
Veteran Instincts + Tactician: A point cheaper at 31 points, this build isn't quite as capable of dealing damage as K4, but it replaces that with a terrifying ability to add stress. If Dace successfully attacks in arc at Range 2, the enemy gets the joy of receiving 1 Ion Token, 1 Stress Token, and 2 Damage. This cocktail of Bad Stuff is likely to ruin the day of anything. The Stress isn't even contingent on the attack hitting. A stressed and ioned target doesn't get to clear the stress with the 1 Forward, meaning that the victim is now helplessly adrift. This is not a combination to be ignored, as it can quickly end even the most valiant ship. Add Engine Upgrade for 4 points and this ship suddenly becomes able to dodge out of arcs an into Range 2 arc for that stressful shot.
Sample Lists
A Murder of Crows

We start with the bulk of this force. 5 Black Sun Soldiers, all with Feedback Array. This potent card allows the ship to, instead of attacking, deal a direct damage to an enemy at Range 1, but suffer a damage and ion in return. Five of them mean that they are quite likely to burn down nimble but fragile targets and still have massed fire enough to take down major hard targets.
Torkil joins this with an ICT and Greedo. Torkil makes this list deadly by taking a threat and dropping it to PS0. The large number of Z-95s with Feedback Array are quite likely to destroy or cripple a target before it has a chance to fire. Torkil's Ion Turret makes this even more brutal by ensuring that targets are moving into a known location. Remember, if that ship bumps one of the Black Sun Soldiers, that Z-95 can still use Feedback Array on that target. Greedo makes this worse by allowing Torkil to crit with his ICT.
A hidden benefit of this list is that all ships are PS3. They can move in any order, allowing for the tricky task of flying in close formation possible. Bumping is a completely viable tactic, as Feedback Array can cause damage even while touching and without rolling dice. Further, they can shoot in any order. This allows one to shoot with the Z-95s until the defenses of a target are down, then hit it with an Ion Cannon and ensure the Crit goes through, then finishing it off if necessary. At PS3, it's resistant to Predator and fires before most swarms. It has enough firepower to bring down a B-Wing before it can shoot.
Kath Hounds
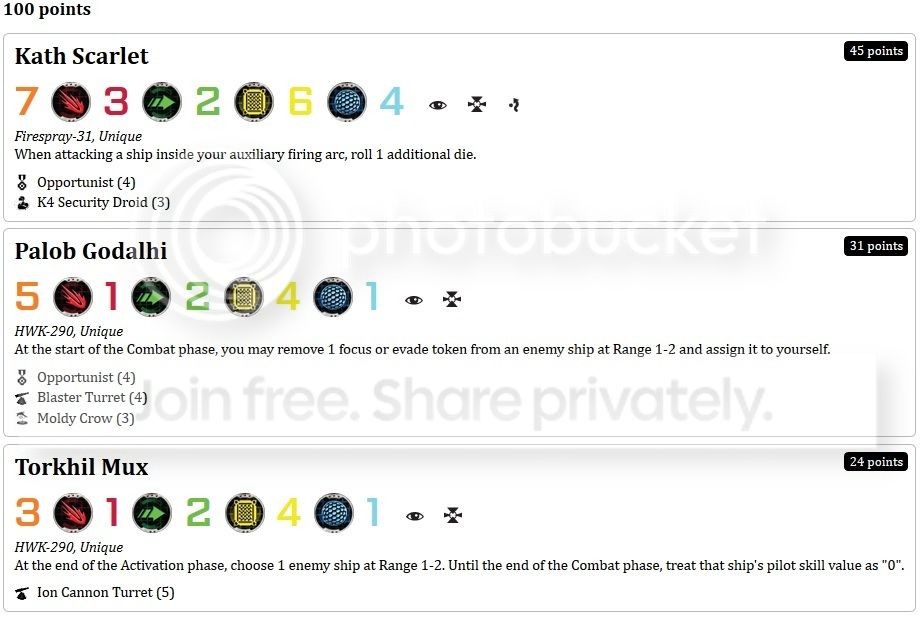
We start with Torkil with an ICT. At 24 points, he can ensure that any enemy within range is made to be PS0 before it has a chance to shoot. Palob with Blaster Turret, Opportunist and Moldy Crow at 31 points is a serious threat and able to do damage as discussed previously. Kath Scarlet with Opportunist and K4 Security Droid rounds it out for 45 points.
During the Movement Phase the twin HKWs move into contact with the likely location of an enemy at Range 2. With luck, that location is in front of Kath, who moves past them with a green move. That way she gets a TL on the victim. During the end of the Activation Phase that target becomes PS0. Then during combat phase, Palob steals any focus and evade token from them. Now, Kath at Range 1 behind her gets to attack. It's 3 dice plus 1 for Rear Arc, plus one for Range 1. Then Kath uses Opportunist against the focus/evadeless target for another dice. Kath now had 6 attack dice with Focus and Target Lock against a ship with no focus or evade tokens. Pulling this off can easily to 5+ damage to a single target in one attack roll. Assuming the target survives, it then has to deal with 4 attack dice from Palob. If it manages to weather that, it still has another damage coming in from Torkil, which will also ion the target. More likely, Palob and Torkil are shooting at the next target to set it up for the next turn of pounding. While the maneuvering means this is difficult to set up in one turn and almost impossible in consecutive turns, removing threat like Whisper or Soontir in one shot is too powerful to ignore.
Murder Most Fowl
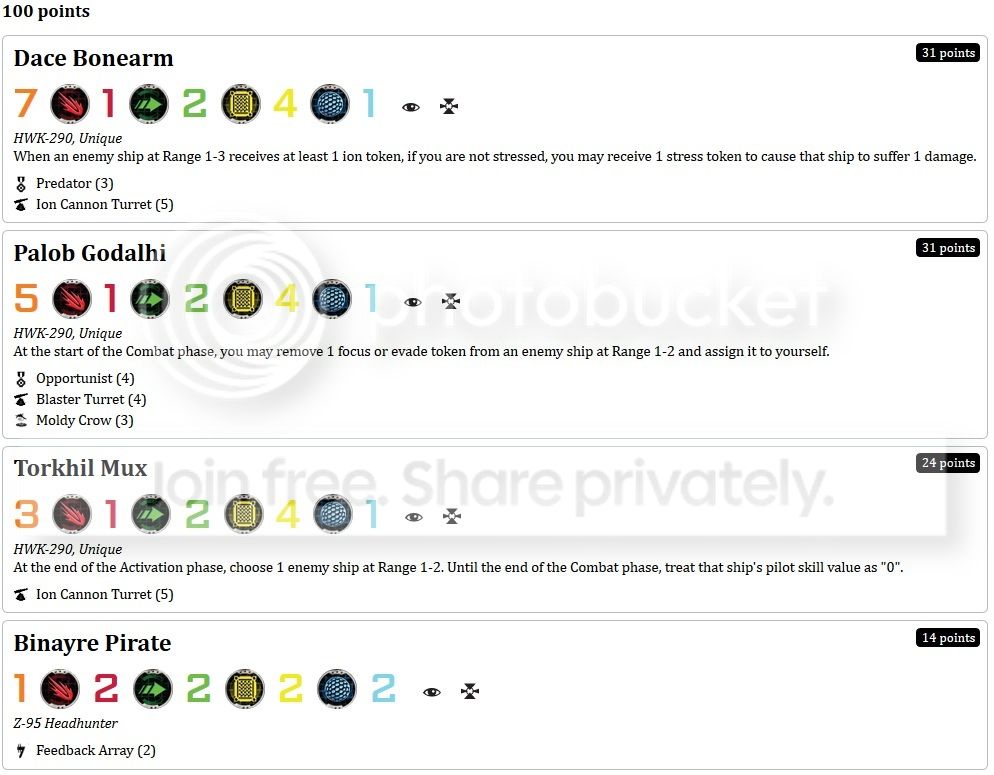
This list starts with a Bananazapper. This PS1 Z-95 with Feedback Array acts as a blocker, a closer, and a general low level threat. Torkil behind him at PS3 with an Ion Cannon Turret ensures that the Z-95 will not be the last ship shooting. Because the Bananazapper can hurt ships he is touching, moves before almost any opponent, but can still hurt the ship he is touching before it can attack, he acts as the ideal blocker. Palob, with Opportunist, Blaster Turret, and Moldy Crow can amass focus tokens and strip the enemy of their defenses. Opportunist allows him to attack with 4 dice, making him a credible threat. Dace with Predator and ICT rounds out the list. He is able to Ion ships to start, then use his ability to do extra damage. Predator means that he gets to reroll two dice against any target that Torkil has cursed to the dustbin of the PS world.
Keep in mind that if Dace Bonearm misses his attack, he can still trigger his ability against any target that Torkil then successfully hits. The same concept applies if Dace destroys his target without having to use his ability. Palob ensures that the target of his own attack is cleared of tokens, leading to heavy damage output. Torkil also runs a defensive tactic by ensuring that the ship with the best attack is attacking last, hopefully removing that threat.
The list is a bit squishy, with only 19 HP behind 2 defense dice, but the removal of tokens and the messing with firing order can be decisive.
Conclusion
The named Scum HWK-290s are all beasts, designed for one purpose: to make the opponent suffer. They can all deal crippling effects to the enemy, which can be exploited to great impact. The entire game can swing on the crushing of PS, the removal of tokens, or the doubling of Ion damage. They can work alone or in teams, ruthlessly hunting down the enemy. These should not be dismissed as unimportant or easy kills because of their stats, as their abilities can rapidly skew those numbers. The strongest list can be crushed by these ships if the opponent does not take into account the existential threat these pilots can pose.
For more information on Greedo, please see my previous article here: http://teamcovenant.com/sablegryphon/2014/12/03/greedo-explored/