The time lapse at the bottom was very interesting. I can see some of the problems with a slow ship. You really have to plan your moves out with the VSD. Thanks for the info.
First game, REALLY fun and learned a lot
Thanks for that link to the review. Too bad the imps lost but I'm sure you will redeem yourself!!
Yeah, a VSD is a slow boat that you REALLY want to have 2 sections attacking your opponents ship. I really struggled to do so; coming from X-Wing there is a lot you will need to "unlearn" since initiative switches back and forth in each round.
Also worth noting: the Learn to Play scenario is, just like FFG's other games, not meant to demonstrate the finesses of the actual tournament games balance and subtleties but rather "just" meant to get you experiencing tha rules in action and test out the differences between ships/squadrons etc.
Awesome! Can't wait for the translated review ![]()
A bulk upload for your enjoyment. Explanations will follow. Alas all my TIE's suffered a horrible demise.


Hello Forensicus,
Can you please tell me where you obtained that playing surface? It looks really cool...is it from x-wing?
Thank you
Hello Forensicus,
Can you please tell me where you obtained that playing surface? It looks really cool...is it from x-wing?
Thank you
It's from GaleForce 9 and is called "Ice Planet" and I also use it for X-Wing. They are JUST 1 cm or so short of actually being 3 x 3 feet. I will soon be getting a GripMat (Google it) which will be totally anti-slip and it'll be 3x3
Actually, one really useful think you could confirm for us - the regular play area for Armada as set out in the rulebook, is it 6x3 feet or 6x4 feet? I know a few of us are waiting on ordering mats until we can see the rules ![]()
(Im guessing the 3x3 is just for the learning game?)
Hello Forensicus,
Can you please tell me where you obtained that playing surface? It looks really cool...is it from x-wing?
Thank you
It's from GaleForce 9 and is called "Ice Planet" and I also use it for X-Wing. They are JUST 1 cm or so short of actually being 3 x 3 feet. I will soon be getting a GripMat (Google it) which will be totally anti-slip and it'll be 3x3
Great thank you!
I can't read Danish, but watching the timelapse video (which was a brilliant idea, by the way, wonderful way to let us have a flavour of how the game goes), it seems pretty clear that the two sides alternated who went first each round. It appears this is how the Blockade Runner avoided the Destroyer's main guns, by activating after it in one round and before it in the next (which would work even if the Rebel player was always going first, but the players alternate who makes the first activation of the round). Was this an error you two made in your learning game, or was my understanding of how the rules work wrong? I had thought from the previews that one player always went first, and that this was balanced in to the objective selection process...perhaps this is something that only happens in the learning game? I'm curious.
I think he mentioned in the learning game that the players swapped initiative each round.
Possibly because the learning game doesnt feature an objective.
I saw the picture of the neb-b with 5 of 6 the ties in its side arc and the VSD in its front arc and could only imagine the maniacal laughter from your opponent.
How much damage did the capital ships end up taking?
Hey guys and goodmorning from Europe.
Forensicus an I had a great game last night, and I finally got the review up on papskubber.dk - hope some Google translation will help you through it.
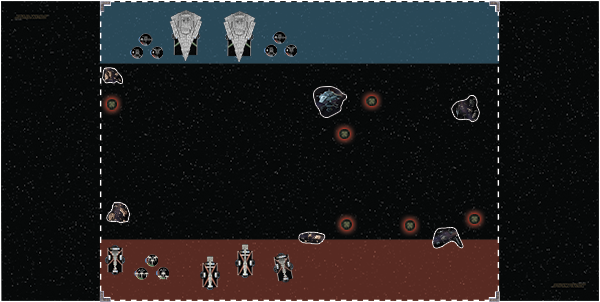
Just to fill you in, on some of the details from our time lapsed video. Some of you mentioned that the blocade-runner slips right under the nose of the Star Destroyer. You're right - and this was a bold move on my part. Could easily have gotten stuck and collided with it. What you don't see is the amount of damage it caused to the Corvette.
Comming up behind the VSD earned my side hull section a 4 hit attack from it's rear and side-section. One of those critical damage. So essentially dropping it side shield to 0, redirecting one hit to the port-hull and taking a BLINDED GUNNERS critical - crew effect. Resulting in not being able to use "accuracy" if rolled on my dice for the rest of the game.
I'd played a couple of games, and was kind of afraid of the Tie-Swarms so the move of the Corvette using the alternating initiative to move quickly by.
The Frigate, on the other hand, rolls two blue dice when attacking squadrons - in contrast to one blue die rolled by the Corvette. This is what happens 1:18min into the time-lapse video. A massive Frigate super-shotgun with the concentrate fire command deals a serious crippling blow to 4 out of 6 Tie Squadrons.
The Capital Ships ended up pretty wounded. The VSD had one or two shields left (due to some repairs) and the Corvette had an open side and one Shield front and rear (I think). But with the defence-tokens spent you can cancel damage or redirect damage to adjacent hull sections. The Frigate was never really attacked .. the X-Wings locked the Ties in engagements and so they can't fire on big ships - if engaged with the small once. This tactic worked pretty well for me in this particular game.
I hope you can make some heads or tail in the review and enjoy both image gallery and video.
Feel free to ask questions, will check back in a few days and clarify if anything is unclear.
Edited by BlasterBoActually, one really useful think you could confirm for us - the regular play area for Armada as set out in the rulebook, is it 6x3 feet or 6x4 feet? I know a few of us are waiting on ordering mats until we can see the rules
I logged on to ask that very question but you beat me to it Maverick ![]() Surprised no-one thought to ask Forensicus before actually.
Surprised no-one thought to ask Forensicus before actually.
Actually, one really useful think you could confirm for us - the regular play area for Armada as set out in the rulebook, is it 6x3 feet or 6x4 feet? I know a few of us are waiting on ordering mats until we can see the rules
(Im guessing the 3x3 is just for the learning game?)
Actually, one really useful think you could confirm for us - the regular play area for Armada as set out in the rulebook, is it 6x3 feet or 6x4 feet? I know a few of us are waiting on ordering mats until we can see the rules
I logged on to ask that very question but you beat me to it Maverick
Surprised no-one thought to ask Forensicus before actually.
Yes, for the LtP we used 3x3.
For "real" games the Rules Reference (RR) says:
"The setup area for a 300 fleet point game is the 3'x4' area in the center of the play area. If playing with a 3'x3' play area, the entire play area is the setup area.
The setup area is marked by setup area markers. (These are removed after setup is completed)"
So basically it means that you may use 3'x3' but if going for larger map (an illustration indicates what looks like 3'x6') then it's the center 3x'4' which can be used for setup.
Just trying to wrap my head around that lol
Coming from X-Wing where it is 3x3 or 3x6 for Epic, is there more flexibiliy around Armada?
3x4 sounds like a really tiny space for what would probably be double the forces you had there if playing 300 points?
In the Gencon videos they said the board space was 3x6 (or 4x6 in another video) for 300 points so that sounds a bit odd that it would suddenly halve the gameplay space in the released version?
How do you mean the 3x4 area is the setup area? Sounds like you have to deploy in the middle? Or that you cannot deploy in that area?
Edited by MaverickNZThanks Forensicus ![]() So on the full size map, there is a 1 ft strip each side where you can't deploy?
So on the full size map, there is a 1 ft strip each side where you can't deploy?
Wouldnt it be the opposite? that on each side would be an area where you must deploy? Just thinking of what we saw in the Gencon videos. In the review time lapse video the ships all started on the edge of the play area, but was that different because of it being the learn to play game?.
Edited by MaverickNZWouldnt it be the opposite? that on each side would be an area where you must deploy? Just thinking of what we saw in the Gencon videos, and in the review time lapse video the ships all started on the edge of the play area?.
You're thinking of the wrong edge. If the game is played at a kitchen table (this is all inference from what is posted above) on a 3x3 mat, ships can be placed along the entire edge of the mat closest to the player. On a 3x6 mat, ships can be deployed along the centre 4' of the edge of the mat closest to the player. This means that there is a 3x1 strip of mat on either end of the play area that is used in tournaments, but you can't start with a ship deployed on the very corner of the mat. Presumably this forces greater interaction over a huge play area, and makes it harder to accidentally fly off the mat.
Right, so does that mean that the standard "play area" should be 3x6 then for the purposes of buying a playmat that would be tournament size? (and then you just deploy in the middle 4 feet)
I wonder how the Gencon comment about a 4x6 table came in then, unless they were talking about the card space around the table also?
Just confused by it saying "If playing with a 3'x3' play area, the entire play area is the setup area."
Does that mean that Armada is played on a 3x4 or 3x3 normally and that the 3x6 is the epic version like X-wing? Cause if its *supposed* to be played on a 3x6, how could you play on a 3x3 with 300 points and still have as good an experience?
Edited by MaverickNZThraawn is correct, I was referring to the sides, not the player edges. The way I understand it:
* You can play on 3x3 (presumably for the Learn to Play and small games), in which case the setup area uses the entire map.
* You play standard (300 pt) games on 3x6. You deploy in the 3x4 area in the centre of the map, leaving 1ft either side of the player edges.
I do like the fact that you can't deploy in the corners ![]()
I just remembered the minefield objective had a diagram for deployment.
(Sorry on phone so can't embed)
So if that sounds like what the rule book is saying
I didn't realise the black at each end was actually play area (part of the mat)
Edited by MaverickNZWell spotted Mav ![]()
Rough outline of game area and setup area with deployment zones for standard 300 point games:

How does the Evade token re-roll interact with Accuracy results assigned to another defense token? If the attacker uses an Accuracy against a brace token, can you use the Evade re-roll to potentially change the Accuracy result and free the Brace token? If you re-roll dice due to the Evade token and the result is an Accuracy, can you now retroactively spend that Accuracy to cancel a defense token?
Can you use multiples of the same tokens against the same attack (ie. a CR-90 using both Evade tokens to cancel 2 dice, or a VSD using both Redirect tokens to shunt damage to both sides?
Does everything start at speed 2 or is there a choice?
If Concentrate Fire command adds another dice to every anti-squadron shot, does the token allow re-rolls against each squadron? Would something like the VSDs "Warlord" title also work vs each squadron? (https://images-cdn.fantasyflightgames.com/ffg_content/star-wars-armada/news/wave1/warlord.png)
What do the crew upgrades do???
With more practice, how fast do you think 6 turns will pass?
How often did you fire from each of the VSDs facings and what is the balance between them over the course of the game?
In practice, just how big is the range difference between black and blue dice?
How "tough" is the Neb-B with the 3front/1side shields and the pair of Brace tokens compared to the CR-90?
What commands have you been using most?
Any chance you could enlighten us as to what upgrades come in the core set?