A different type of swarm

By chilligan, in X-Wing

A different type of swarm

This is a rather long report on the longest running list I've ever had. 50+ games, 6 games lost, 2 of which were outliers (2 Ties one-shotted each turn). These include games at the FLGS, tournaments, Vassal play and Vassal tournaments, playing up to wave 5. I am probably done playing it, just got eliminated from the Vassal tournament (UK Team Covenant Open, top 4), so I think it's time to share :) .

This is also an example (for myself included) of how to think about a tournament squad and prepare for every matchup. I intend to add this to a suite of articles that I will include in a small blog separate from TC, where I also posted it .

Back in October 2014 I was trying to come up with a new list for tournament use. As an Imperial player, I had started out with the Tie swarm, then Krassis mini-swarm, more recently doing an Echo mini-swarm. This final list performed rather well and it could stand up against Whisper mini-swarm or Fat Han. Echo could manage beating those, but the meta was about to get more high-PS turret ships, so it was about to become too much of an uphill battle.

The ships I like most are Tie Fighters, Phantoms and Defenders, in that order. At first I thought about winning the PS battle with a PS11 Echo, courtesy of Decoying Vader. Sadly, Vader in his current state has very little offense so the list couldn't make it (With Autothrusters and Tie Advanced x1 there's a lot more to discuss..). Then I came up with an idea: what if you relied on the offense of the phantom, without even attempting to win a PS-bid to use with Advanced Cloaking Device, just rely on those 2 dice with extra modifiers to keep an X-wing with 1less HP for as long as possible?

sigma_in_formation.png

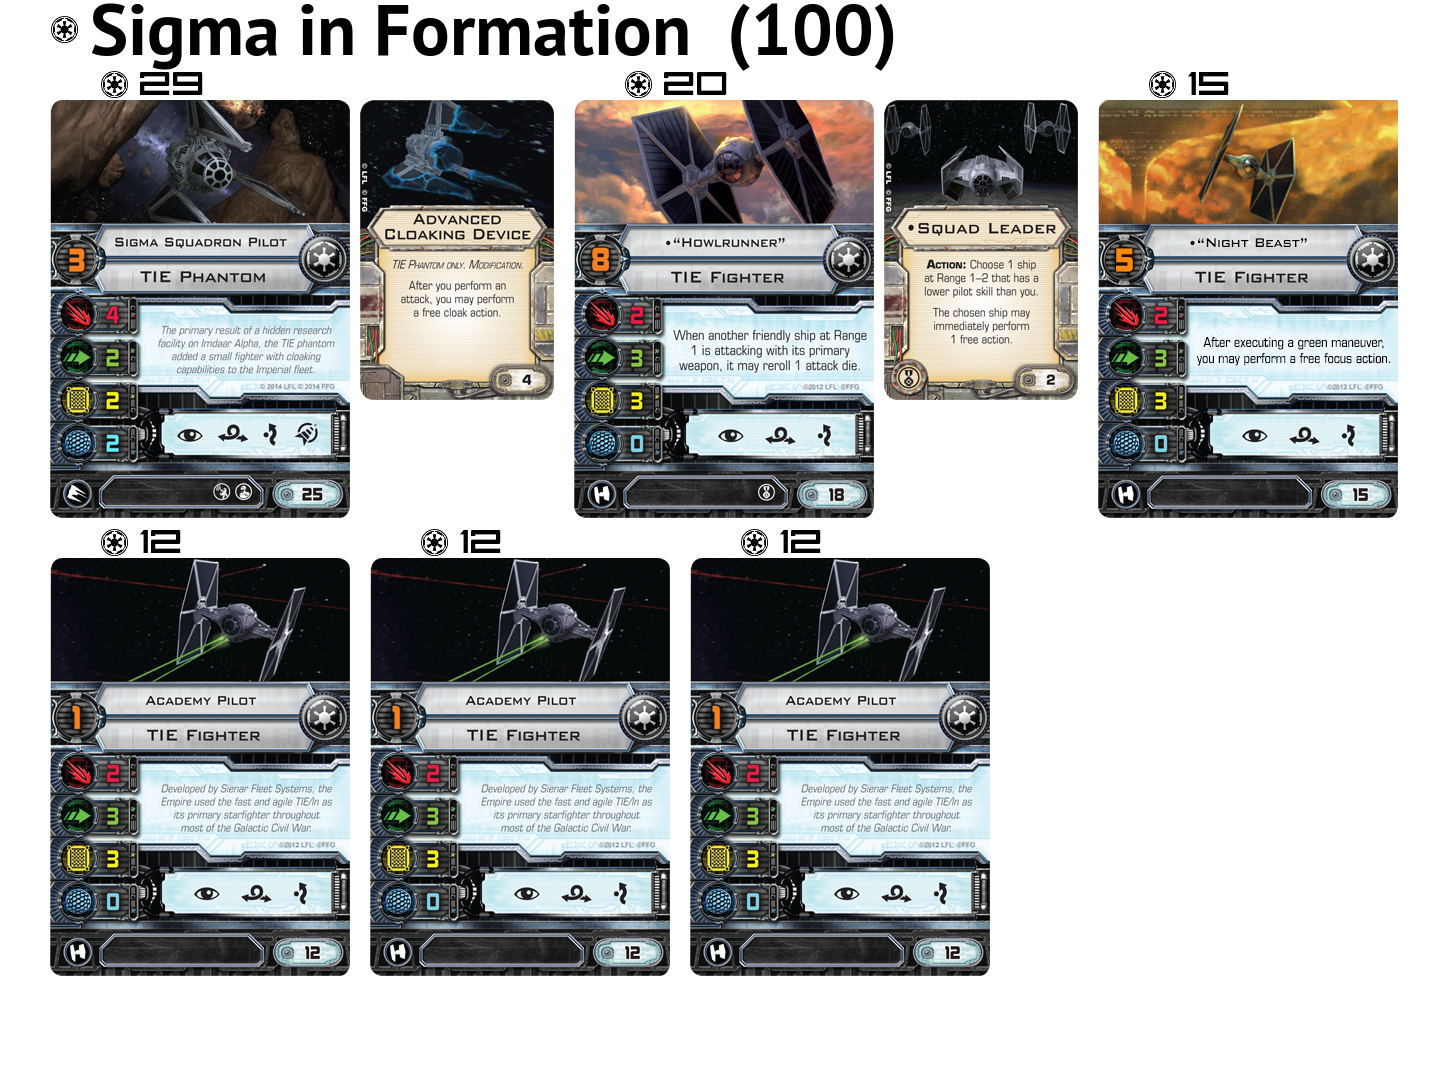
The idea for this variant was rather simple: Force the enemy to go after Howlrunner, while Sigma keeps a focus and evade token, improvise afterwards. If the opponent goes after the Sigma, he's not likely to kill it one round, and it becomes a 5 TIE Fighter squad with an initial damage boost. It did work, but for the most part it meant that Howlrunner was very vulnerable defensively, didn't do any damage, and Night Beast's ability was only good in the late-game, when not flying in a formation. I also didn't like hanging on 100 points, potentially not being able to block with the Academy Pilots.

So what was the next step? Drop Night beast, enter Black Squadron! Since Black squadron is higher PS then the Sigma, suddenly squad leader can work from the Black to the Sigma, instead of Howlrunner.

sigmaswarm.png

So why is this list good? And why is this better than the last?

  • There's a heavy hitter, the Sigma, with a reroll from Howlrunner
  • Sigma has two actions, which will be focus + evade, focus can be spent for attack after higher-PS ships fire
  • Three good blockers, with rerolls on attack
  • An action-less ship, which can also block sideways, you can skip an attack with the Black Squadron if it helps your position, it's not much of an attack anyway.

Interesting choices:

  • You can give a barrel roll or a cloak if you bump with the Sigma by mistake
  • After the Sigma is gone you can boost your Academies with key Barrel rolls at PS4
  • You can choose not to cloak some of time, especially when playing against high-PS ships

I play this list in a pin-wheel formation modified to work with 6 ships. You can turn or bank and ships will not bump each other. The setup for this formation is quite complicated, but worth it, I will describe it a bit later. The formation should be 2x3 with the wider part towards the opponent. It functions relatively well in vertical mode as well, because TIE Fighters are quite fast and don't have that 1 forward. Howlrunner is in the middle, but Sigma is further to the front than the Black, so the formation can move in the beginning as a "vertical" 2x3. Having the Sigma in the corner also allows the Sigma to break formation very easily.

sigmaswarm3bank.png

In general this is highly positional play, where the first two-three moves are key to getting a good shot at oncoming ships. In most cases, I prefer having an opening salvo at range 3 with all my ships, then a "hug" at range 1 with the academies and Howlrunner, with the sigma further behind. Against many lists, getting these good engagements with average dice will get me a big advantage.

The Sigma will mostly stay in formation if there isn't a strong incentive to stay behind. If there is, standing just a bit back might still give the Sigma benefits from Howlrunner and the Black squadron, while giving her an extra defence dice. Another option is to maintain a "semi-formation", where the Sigma shadows the TIE Fighters, even being in range 1 of Howlrunner (pink), or just within range 2 of the Black squadron (red).

sigma_swarm_decloak_formation.png

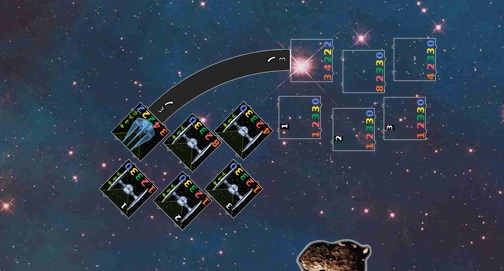
The setup is complicated, as pictured below. I use one edge of the board, I put the first Tie 3.5 bases away from the side. Academy #2 is 0.25 bases behind and 0.25 to his left. The third Academy is one full base behind and two bases to the left. This is a rather wide pinwheel in the middle, I keep almost half a base between AP#1 and the Sigma. The Black follows the same rule (but mirrored) as AP#3. Howlrunner is also offset from the Sigma with the 0.25 base. This may sound hard to achieve, but in reality I make sure the second Academy is in the middle between AP#1 and the edge, and I just align the Sigma to AP#2 and Howlrunner to the edge.

The movements for the first round are then 4 forward for the core (marked with yellow), and 3 forward or 2 forward for the sides, depending on whether I choose to barrel roll backwards or forwards (marked with red and teal, respectively). Barrelling forward is better because it avoids the corner asteroid every time. Alternatively, a 3 forward with the core also works, coupled with a 2 forward with the side ships, barrel-rolling them backwards to get into position. This makes a nice 2x3 formation, which is usually perfect for turning in towards the middle.

sigma_swarm_setup.png

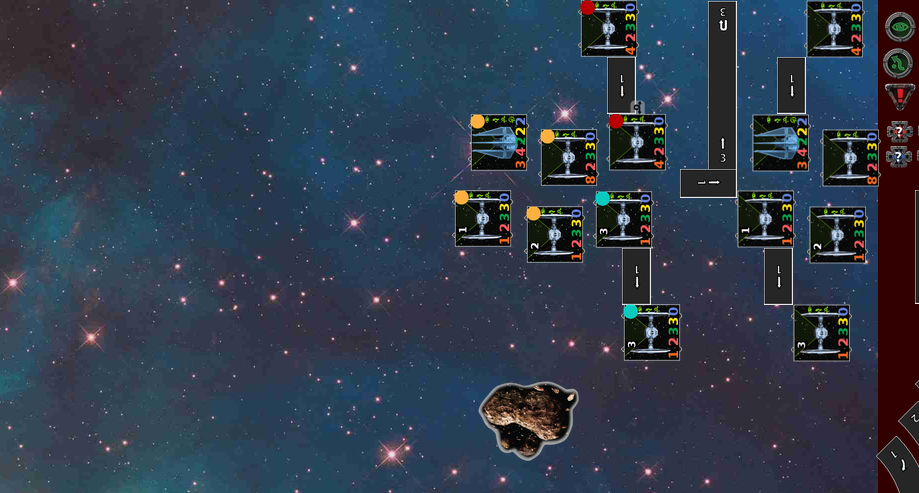
What if your opponent sets up opposite of this, and I want to avoid a frontal engagement? What if I want to feign going forward then turning left? Luckily it's quite possible.

sigma_swarm_3hardleft.png

Not only can it be done, but between going 4 forward then turning 3 or turning 3 from the beginning there's a small gap, big enough for the largest asteroid. As I'll discuss in asteroid placement, you want a normal swarm setup, so setting up the biggest asteroid near your starting position helps a lot.

sigmaswarm3hardpossibilities.png

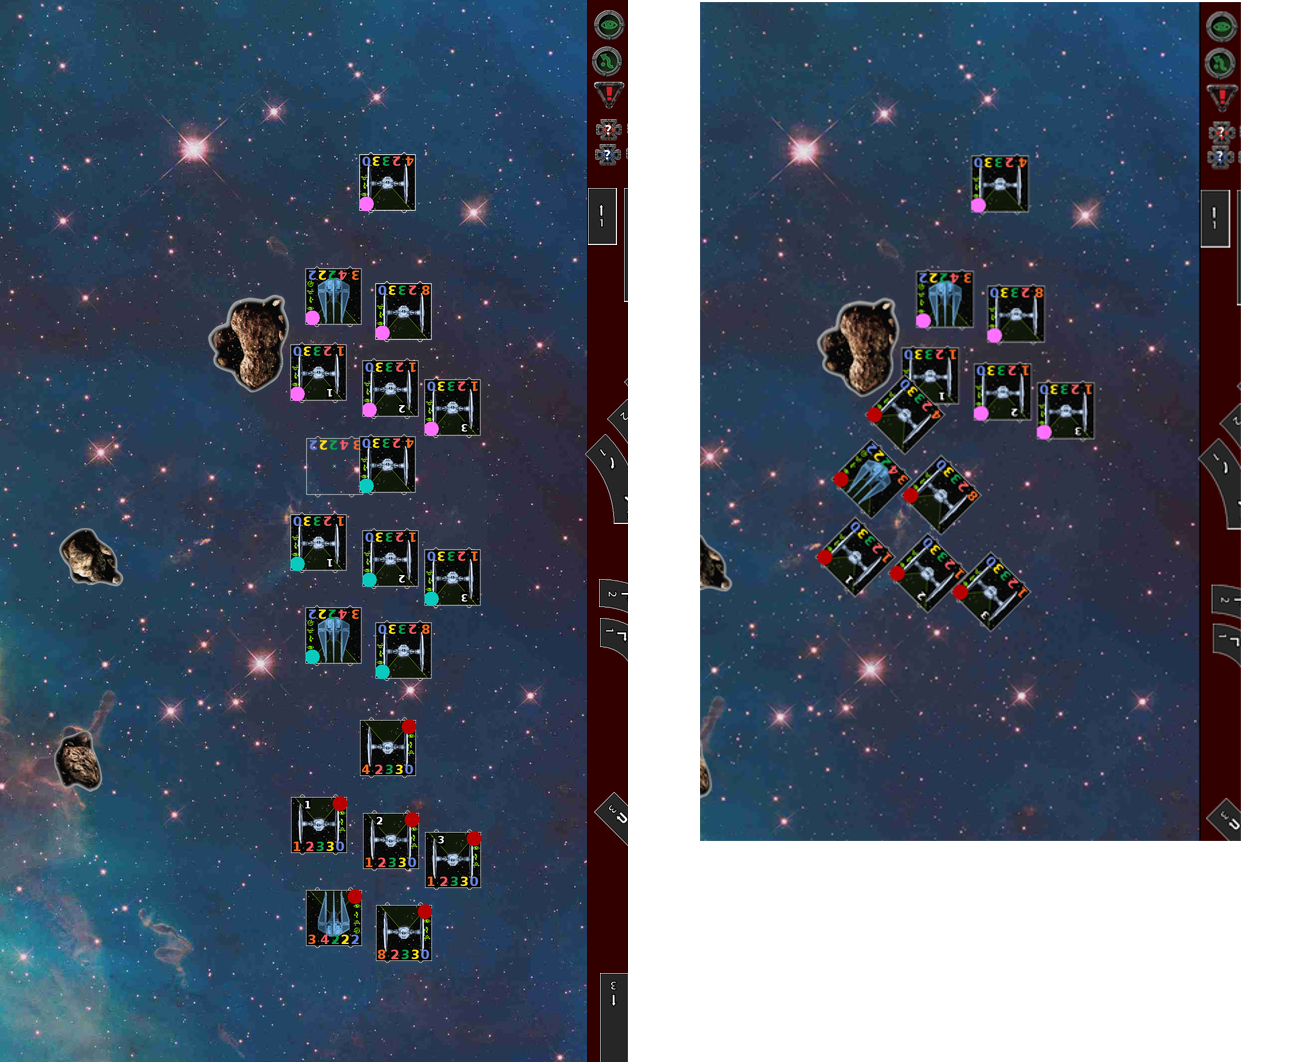
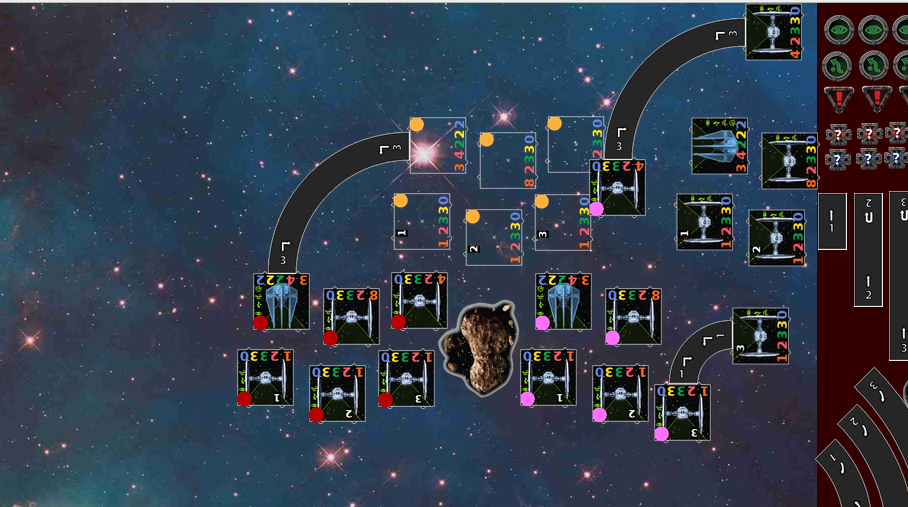
So after making a 3-turn left with everyone except the bottom Academy, which did a 1-turn, the formation doesn't look as good. Is this still a formation? Yes, almost. Banking is considerably closer now, and AP#1 might collide with #2 on the table if they aren't maneuvered carefully (haven't done this sequence on a physical table yet), but it works! Black can also catch up by having him do a larger bank (3-bank, while others 2-bank). This can be seen in the image above on the right side.

The left side of the above duo is a sequence of maneuvers perfect for a K-turn. If the opponents baits a frontal engagement, going full forward, then you have one round of him shooting at the rear of your formation, then you can turn to engage him while he's in the corner. The cost is exactly this, spending a turn to reorient the formation so the Academies are behind the other ships, then K-turning. Works great against dual Decimators! Academies to a 2-forward, Sigma and Howlrunner do a 5-forward (well, Sigma does a 2 + 2 = 5 move :) ) Black does a 4 forward and catches up to the Academies, but won't get past them. Having the Black squadron lagging behind is the sacrifice needed for this added versatility. Additionally, against dual Decimators, he is a perfect blocker, he won't get a shot and his action is passed to the sigma.

Asteroid placement works similar to placement for normal swarms. I try to keep asteroids away from the middle, or at least leave as few as possible in the middle to make room for navigating 6 ships through. I put asteroids in my corners (the big one near the setup point is an example), or I put asteroids at range 3 from the opposing side and range 2 from the board edges, which makes for difficult turn 2 maneuvering for my opponent. After asteroid setup I'm not fixated on a corner, I pick the corner which gives me some alternative "lanes".

Not all matchups are easy with list, on the contrary, some are quite difficult. What helps greatly is the fact that the list allows many different choices at each point between choosing maneuvers for 6 ships, choosing actions with squad leader and playing the phantom. Mid and late-game I can also break formation and start blocking like crazy. The efficiency of the TIE Fighter also helps a lot, a game is never lost until I've lost every single TIE, and I've had many games with below average dice and a disadvantageous position that I was able to turn around with only two Ties and a Sigma or only Ties, etc.

  • Against 4-ship rebel builds, ships will most likely meet in the middle, where I usually go for the range 3 then range 1 plan. If the range 3 is substantially disadvantageous from a statistical point of view, it can be skipped, but then I won't be able to block him with the Academies the following turn. 2 of my genuine losses are against this type, specifically Biggs + R2-F2 with Kyle. Coupled with lower than average rolls on the Sigma in the first turn, I don't stand much of a chance to take down Biggs. A feign or two should make him break formation, but I wasn't able to do that with that opponent. 2 losses in a row, oh well.
  • Swarms won't give the list much trouble, since it has superior firepower, enough to turn the tides decisively in the first engagement. I just get into range 1 and let the dice work some magic. If there are no high-PS ships the Sigma can be used to attack from a different direction after the first engagement, but always keeping in mind to stay close to the Black squadron.
  • Imperial mini-swarms are a bit of a problem in a timed match environment, this is how I got a modified win with this list once and one of the reasons I'm dropping the list. I've discovered it's better to focus on the high-profile ship and take it down quickly, since taking out TIE Fighters is easy in the beginning but gets substantially harder as the list loses ships in return.
  • Wave 5 two-ship builds, Fat Han, all except Phantom Decimator: I'm clumping these all up because the objective with these is the same. Maneuvering so I can get good shots on the big ship, ignoring the escort. In the case of Dual Decimator, I go for the weaker one, the one he'll put forward.This matchup requires a lot of anticipation, some feigning direction on my part, but I can usually pull it off. The Dual Decimator with Oicunn Mara Jade is a big problem, though, and one of my losses. The trick is to do a range 3 engagement first, which the opponent will avoid at all costs. At range 1 with 5 ships shooting into Oicunn, there's a big chance he'll survive the round and trigger Mara Jade, which creates huge problems. This is why I researched the possibility of going 3 hard right/left, then K-turning, specifically to catch large ships in the corner.
  • Phantom lists, specifically ones with 1 Phantom, are doable. I use the Sigma with all its tokens, hope it survives sufficient rounds to make several attacks on the opposing Phantom. Even cloaked, there's a chance of damage with 4 dice. Using the Academies as blockers, it can be done. I never lost to a 1 Phantom list.
  • 2 Phantom lists: Echo + Whisper + 2APs. This is the list from hell, one for which I have not prepared enough and which killed me in the UK Vassal tournament. Blocking can still be done, as long as both Phantoms are not on opposite sides. It's very hard to prepare against this list because the matchup relies heavily on guessing what the Phantoms are doing, training by myself on Vassal doesn't help. I'm also a bit torn on the asteroid placement, as it's easier to block in an open field but it also leaves a lot of options for the Phantom player.
  • The lack of a high-PS pilot hurts sometimes, and overall PS is very low, leading to a possibility of losing many Ties in the first exchange, without them firing back. But then again, that's valid for all swarms.
  • PS 3 is quite low, and in the current meta a lot of ships are higher than that (Talas come to mind). This is has its advantages though, mainly the fact the the opposing player might focus too hard on the Sigma thinking he can kill it in one round, which almost never happens.
  • The Black squadron will often completely whiff rolls, even with Howlrunner.
  • Making a wrong move in the beginning with the entire formation may prove disastrous, much like any other swarm.

This was certainly a fun list to play, but at this moment I don't think it has a place in the current meta mainly because of timed matches and MoV. Timed matches limit my ability to make comebacks with TIE Fighters and get the large ships that run away with very little HP. That may change in the future, but for now this limits the build to Vassal play. Even there, MoV is lowest with this list, since I'll always lose a TIE Fighter or two in a game, even if I outplay my opponent by far. I would be reluctant to take this to a tournament with no top cut.

On the flip side I think this proves you can play a phantom + 5 Ties very differently from the Whisper +5 archetype. This is why I call it a swarm, not a mini-swarm, because the Sigma acts as part of the swarm for a long time and doesn't rely on outmaneuvering to stay on the board. This also helped me learn a lot about positioning, even if I was already familiar with swarm play. It's also the first list I participated with in an online tournament, where I had time to prepare for each match, for which I could know what are the odds for each engagement, how the opposing list plays, how to properly counter it.

Formation flying is over rated.

All swarms I fly...I like them to be all or close to all same PS.

Seems to me that decloaking complicates things.

With low PS, why run ACD at all? If you're using Squad Leader to focus+evade, why not add SU/HU and make it a more powerful Biggs?

Or, why not run Swarm Tactics on Howlrunner to make ACD trigger a lot sooner?

I've run a phantom in a swarm just once before. My experience was that it really wasn't any better than running it as a flanker, because Howlrunner doesn't noticeably increase its damage output like she does for TIE Fighters. It shone late-game, after formation broke, so I thought afterwards that I could have used it more effectively as a distraction, rather than constraining myself to Range 1 of Howlrunner for fairly weak benefits. Thoughts?

Formation flying is over rated.

All swarms I fly...I like them to be all or close to all same PS.

-Maybe...but **** it looks so nice on the table :-)

-Agreed. Having equal PS with swarms, or perhaps 2 sets of equal PS is tremendously helpful.

Edited by Rocmistro

ACD is there in case of low-PS ships and for the extra maneuvering. In later turns, the Sigma not only has focus + evade, but generally has a good position where not many arcs are on her. I would be dead in games against turrets if I weren't able to reposition the Sigma well enough, I need it to shoot efficiently every turn.

I've thought about Swarm tactics on Sigma, but this doesn't help a lot, because a) at PS8 you lose any PSbid, b) you don't have the token advantage any more, c) Howlrunner becomes a bigger target and taking her out removes all the PS8's in the list. As it is, there are 3 potential targets for the opponent, the Sigma with tokens, the Black with no tokens and Howlrunner. Howlrunner is usually ignored, so I can even spend a focus token if it increases my attack roll (if I roll two focus I'll spend).

I don't constrain myself as much to Howlrunner range 1 as much as I constrain the Black to follow the Sigma, which isn't that hard usually. In the first few rounds the reroll is crucial, especially considering you might end up with no modifiers at all after the Sigma gets attacked.

Formation flying is over rated.

All swarms I fly...I like them to be all or close to all same PS.

-Maybe...but **** it looks so nice on the table :-)

-Agreed. Haivng equal PS with swarms, or perhaps 2 sets of equal PS is tremendously helpful.

It's more difficult to run 1,3,4,8 swarm, agreed, but it's what I need here. The ships are well positioned in the formation so that they don't usually bump. I can even do 1-turns with the formation just fine (towards the Academies anyway).

Formation flying is currently severely-underrated because of the perceived rigidity, because right now most lists have too few ships for formation flying and because of counters like Assault Missiles. If you keep your options open like I explained, you combat the rigidity and the "counters" are not as used right now (Assault Missiles never bothered me anyway... ).

I like your list. It not only adds a solid heavy hitter in order to deal with high agility targets, it messes with target priority by encouraging your opponent to fire at your most heavily defended ship. Swarms have always had the potential to win games outright by focus firing on an opponent, and yours does this as well. I also like that you have the potential for a solid end-game closer if your opponent leaves the Sigma for last.

I like your list. It not only adds a solid heavy hitter in order to deal with high agility targets, it messes with target priority by encouraging your opponent to fire at your most heavily defended ship. Swarms have always had the potential to win games outright by focus firing on an opponent, and yours does this as well. I also like that you have the potential for a solid end-game closer if your opponent leaves the Sigma for last.

Thanks for the appreciation. To be fair, I rarely have only the Sigma in the late-game. Usually I either have 2-3 Tie Fighters or 2 Ties and the Sigma. In the games I lost the Sigma went down quickly without doing much damage and I didn't get to make up for it with just the Ties.

I really appreciate the way you're delivering the info with pics!

This is the kind of thing we need more of on these forums! Innovative list-building, detailed explanation of tactics verses a variety of common list-types, and discussion of possible shortcomings/ ways to improve. Well done, indeed. In my opinion, if more of us post this kind of thread, we could use the internet to expand the meta rather than narrow it. :)

I have been saying for a long time that just discussing list-building was not enough, but now I finally had the time to put down some of my notes on this one.

I also had some statistical scripts to give the Sigma a probability of survival in different conditions against different lists, didn't include that because it was vastly unstructured and just dependent on what squads I was facing in the Vassal tournament.

Just finished reading this over on the Team Covenant site. Excellent article chilligan. It's nice to read articles where the diagrams actually help illustrate the main points. I've been looking at smaller Imperial swarms with a eye to coming up with a counterpart to my Rebel A-Wing swarm. I like the fact your list has a 'structure' but also has enough elements that can be 'tinkered' with (Squad Leader/Swarm tactics/ACD/Stygium, etc).

Really nice article, well done!

Can we give you a +Excellent rating?

I love the list but in a times tournament I couldn't ever take it. I hate losing on time. :(

I love the list but in a times tournament I couldn't ever take it. I hate losing on time. :(

Same here. I am very sad I can't keep playing the list. On Vassal it still works though, it's a lot faster to play swarms there, but MoV might still be a problem.

my god i love this build. i fly swarms at the exclusion of almost everything else and i never thought of putting a phantom in there. nice one.

Just a thought, and this doesn't change the stated weakness of the list (timed play), but could you add VI to Howlrunner in that second list or is the bid more important for blockers? I mention it because while she doesn't become a Phantom hunter at PS10, it does give a little edge in close combat. As an area buff to the swarm, she's especially interesting doing this because the rest of your squad moves giving the opposing Phantom something to react to, and then Howlrunner goes somewhere else to try and get the jump. It can catch people by surprise. This only works if Howl is still alive once things get close, but you do have some interesting other targets to go after (unlike a normal swarm).

Overall, though, awesome write-up. Would you mind either dropping a link or a brief summary into a thread I started http://community.fantasyflightgames.com/index.php?/topic/133170-squads-on-the-edges/ "Squads on the edges". I'm trying to collect a lot of non-standard lists and explanations on how they're used successfully in that thread.

Edited by Biophysical

Just a thought, and this doesn't change the stated weakness of the list (timed play), but could you add VI to Howlrunner in that second list or is the bid more important for blockers? I mention it because while she doesn't become a Phantom hunter at PS10, it does give a little edge in close combat. As an area buff to the swarm, she's especially interesting doing this because the rest of your squad moves giving the opposing Phantom something to react to, and then Howlrunner goes somewhere else to try and get the jump. It can catch people by surprise. This only works if Howl is still alive once things get close, but you do have some interesting other targets to go after (unlike a normal swarm).

Overall, though, awesome write-up. Would you mind either dropping a link or a brief summary into a thread I started http://community.fantasyflightgames.com/index.php?/topic/133170-squads-on-the-edges/ "Squads on the edges". I'm trying to collect a lot of non-standard lists and explanations on how they're used successfully in that thread.

I suppose you could, lately initiative has only been helpful against Echo (marginally) and against Oicunn (blocking Oicunn in a list with a lot of ships means spending 1HP on a ship, even Black squadron and in return splitting his damage for one crucial turn). At this point I'm willing to let the initiative go, it's been a while since I blocked PS1 ships with my academies, and that was the main purpose for the initiative bid.

Looks interesting might have to take it for a spin.

I tried this twice last night, and it totally destroyed my opposition. Only one tie lost in both games. I was a little lucky in the second but still, very very nice.

I played this list with Adrenaline Rush on Howl in a store champsionship, placed top 8.

What about changing the Sigma to a Shadow, swapping ACD for Stygium, putting Squad Leader on Howl, and Draw Their Fire on the Black Squadron for 100 points?

No one else in my area flies TIE Fighters, let alone any of the other 1 PS stuff, it's all dumb turret lists and/or super Echo/Whisper. Having initiative at 1 ps is of zero importance. However, everyone has this odd obsession with PS 4, like Talas and Dagger Squadrons, so ps 3 is weird. Shadow gives you 5 PS. So you might be able to do some good damage to some PS 4 stuff even if you then lose the phantom on the return fire. In a match my Sigma just got wiped by Wedge and two Dagger squadron b wings, at least getting an attack off before that would have helped.

The free cloak after a shot that ACD gives you is useful, but half its usefulness is being able to cloak before you're getting shot at. At 3 ps I wasn't shooting before much, and sometimes I was in a tight spot where having to decloak was a detriment so I would opt not to use the free cloak. So if I'm unable to use the free cloak for defense because everything else shoots first anyways and I happen to be in a spot where cloak is of little to no use to me, ACD is a waste of points.

Shadow with Stygium gives you a free evade when you (de)cloak. It opens up the K-turn because you get an evade for decloak + K turn. Next turn you green, cloak and get a free evade, and combo it with squad leader for a focus incase you're in a vulnerable position on the green manuever.

So I would move up my academies, decloak my Sigma Phantom, give it focus/evade as its action, activate my black squadron and give it the other token via Squad Leader, then my opponent would move up his stuff and stack all his target locks on the Sigma Phantom and (attempt to) wipe it.

If you put squad leader on Howl, she will move and activate squad leader AFTER your opponent has moved and activated. If the situation is all of a sudden too sticky for the Shadow Stygium Phantom, you cloak the Phantom with squad leader. If the phantom's action was focus, it now has cloak, focus, and evade. If they planned their movements/actions around taking out the Phantom they've essentially just wasted them because it's invincible now.

Late game I would decloak, plan some, "get out of dodge" manuever like 4 straight or 3 turn, and then recloak for defense. 4 unmodified agility still isn't super good against 3/4 attack. If I had Stygium I could have stacked that with an evade.

One of the strengths of the sigma version of the build is that Howlrunner isn't the first TIE to die because a decloaked Phantom is way too tempting to shoot at first. Putting Squad Leader on Howl might make her target #1, so Draw Their Fire is there to hopefully patch that up and also to potentially help the Phantom (which is particularily vulnerable to getting its shields stripped and then direct hit), or even just to tank a shot for an academy pilot that's about to die to a crit.

Another thing of note is that since Howlrunner's ability doesn't effect herself, I would often focus with her and roll 1 hit and a blank. The black squadron would be boosted by howlrunner's aura but wouldn't be able to convert focuses because it passed its action with squad leader. So doing a squad leader action with Howlrunner isn't giving up much, at least offensively.

Edited by ParaGoomba Slayer

I guess you could run a Shadow + ACD, Howl + SL, 4 APs, but that paints a very big target on Howlrunner. It's certainly better than my night beast version, don't know why I didn't run a Shadow instead of that. Actually, I remember: it was before wave 5 and my local meta didn't have many PS4s, so I just put the bare minimum on the sigma and bumped up a Tie.

I agree with your PS4 assessment, it's the most common type of filler now, probably due to Predator.

I also agree that initiative at PS1 is becoming less and less important.

I have to reconsider the use of Stygium at some point. I've been avoiding it, it seems to me that Stygium loses me a lot of time, which sadly in a timed tournament is important. I might experiment with it in Vassal though, the Shadow /w Stygium + Black /w DtF + Howlrunner /w SL sounds good in that case.

I don't see how getting a free cloak saves you on time. Either you're flying it in formation at the start of the match and you've used an action for cloak, or you're already in range of everything and don't need the cloak to get the Phantom someplace faster

Because with Stygium I'm assuming I would cloak every other turn. Otherwise, the Phantom is too predictable/fragile. Plus it's not all about getting there, cloak helps you get a good shot on a specific place where you think a ship will be, which is essential when fighting a turret (even if it moves after you). If you aren't cloaked, it's just an X-wing without a 1-forward, which means a large ship (especially with EU) will escape your arc quite easily.