Really want this to work, please help!

By emsgoof, in X-Wing Squad Lists

So I'm looking at this and trying to figure out where to go with it. So far I'm 0-2 with it.
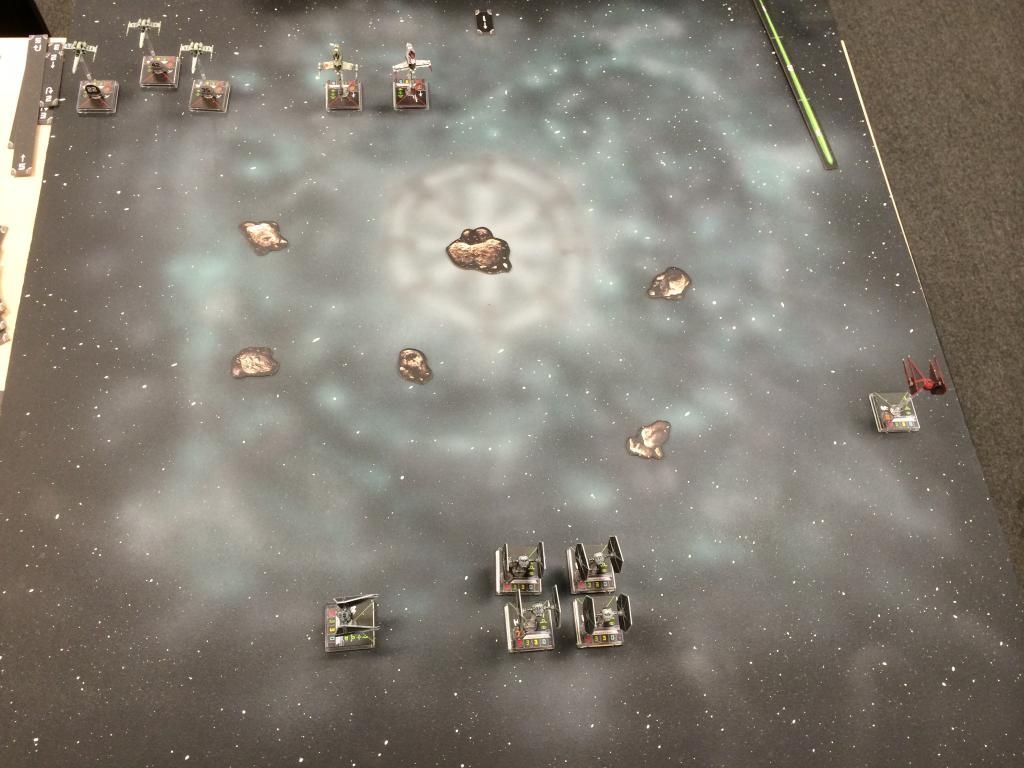
Carnor Jax w/ VI

Alpha Squadron pilot

Mauler Mithel w/ Swarm Tactics

3x Academy pilot

I'm still trying to figure out flying a mini-swarm, so that isn't helping, but I still can't figure out where I'm going wrong. Just me messing up from usually running a rebel list maybe.

First question would be what did you fly against. Second is how did you approach those opponent's squadrons?

First time I ran it (or something very similar), I was up against Corran Horn w/ Predator FCS and R2D2, Keyan Farlander w/ PTL, 2x Bandit Squadron. Report can be found half way down this page
http://community.fantasyflightgames.com/index.php?/topic/126832-after-a-4-0-start-a-flaming-crashing-wreck/

Today I was against Keyan, Ten Numb, and 3 Bandits. I tried to make sure I wasn't exposing the Interceptors unnecessarily, but my swarm piloting still needs some work. I ended up taking out 1 Bandit and Ten Numb, but that was it.

A couple shots from the game before it all went pear-shaped.
int1_zpsb145a4c8.jpg

int2_zpsbe152fe9.jpg

Is PTL the way to go, being able to boost and barrel roll in the same action phase? If so, it seems like high PS pilots are necessary for that, which really eats into points for other stuff.

First thing first, if you plan on flying a mini swarm, I would suggest switching Mauler Mithel for Howlrunner, your whole swarm will benefit from her reroll instead of having a high PS ship with a close fighting skill in the back to not bump: Your mini swarm will benefit greatly.

Second, for Carnor Jax, I would suggest switching VI for the more reliable PtL. This way you can either arc dodge with Boost+Barrel roll or turtle up with Focus+Evade, or a combination of both. PtL really open up the playing field of Interceptors.

Which now leaves you with 17pts to spend, so not enough for the Alpha. You could take Backstabber to serve the same roll as flanker, but now at PS6 instead of 1, much better for a ship that rely on maneuver to survive and give Determination to Howlrunner to help prevent against the dreaded Injured Pilot critical hit. Or a fourth Academy pilot to boost the swarm and give hull upgrade to Carnor for more survivability and Swarm Tactics to Howl so another Tie can fire at PS8.

Carnor Jax + PtL

Backstabber

Howlrunner + Determination

Academy Pilot

Academy Pilot

Academy Pilot

or

Carnor Jax + PtL + Hull Upgrade

Howlrunner + Swarm Tactics

Academy Pilot

Academy Pilot

Academy Pilot

Academy Pilot

Since you said you still had trouble with the swarm, I suggest the first one.

EDIT: If you don't have fifth Tie Fighter or are adamant about running two Interceptors, you could change Jax for Turr and Mauler for Howlrunner:

Turr Phennir + Veteran Instinct

Alpha Squadron Pilot

Howlrunner + Swarm Tactics

Academy Pilot

Academy Pilot

Academy Pilot

When flown correctly, Turr is in serious competition with Soontir for the best Interceptor pilot.

Edited by Red Castle

I think Redcastle gives some good ideas.

I would like to comment on the pics you provided because i don't think you are playing to your squad's strengths. First of all, the asteroid placement: you always want to put asteroids to the outside of the board when you have a lot of ships to minimize their impact on your flight paths. Having said that, your opponent is likely to place his asteroids in the centre of the board to force your fleet to break up or bump into/fly through asteroids. For that reason, its almost always a good idea to deploy your entire fleet in some kind of formation on the outside of the map (either the extreme left or extreme right). If your opponent deploys directly across from you, then great! You are in a strong position to joust anything (especially if you have Howlrunner). If your opponent is smart, he won't do that and deploy away from you. In which case, you need to fly around the asteroids as much as possible and turn towards your opponent with all of your ships so that you can maximize your firepower.

That's my 2 cents on swarms!

I had never really given a lot of thought to asteroid placement. Thank you for that! I'll be sure to pay closer attention in the future! :)

Asteroids are everything. Look at FFG's site on Turn 0 to get some ideas. If you watch tournaments, players put a lot of thought into asteroids. I know they've won games for me. I've used them twice to effect against Fat Han, getting him to fly through the asteroids and causing forced flight paths.

I really like this:

Carnor Jax + PtL

Backstabber

Howlrunner + Determination

Academy Pilot

Academy Pilot

Academy Pilot

I don't know about Determination, but it does NEGATE 1/3 of crits, since you discard pilot crits. I know on a Decimator it feels like cheating. But in this list, you have a pretty good force. My only issue would be too many flankers. I run 5 ties (howlie) with 1 flanker interceptor, either Soontir or Jax. Definitely need PTL though to help Jax get into range one and still have an action to turtle, since range one can be very dangerous.

I think Tur is really good as well, but harder to use, as you have to be more mindful. I've straight turtled Soontir through some absolutely ridiculous things. With Autothrusters coming, it'll be even better.

What about Dark Curse? He's fantastic. Maybe put him in instead of Backstabber and fly him in formation? Or a Black Squadron with Draw Their Fire to pull crits off Howlrunner? She's going to die, it's a given, it just depends on how much you really want to throw into keeping her alive vs souping up the rest of the squad.

Also, try the pin wheel formation rather than a square. It's more forgiving of turns. And be careful going right into the sights of B Wings. I don't know other people's experience, but B Wings want you to close so they can knife fight, and they can throw a lot of red dice.

I'm not understanding your approach. You have your flankers on both sides, which I think is bad, and then you turn your main guys away from the combat? It looks like you tried to turn away, but got caught in the open and shot up.

Personally, I've found Tie Fighters to have their strength in NOT being in a formation. Oh, on the approach I get it, but after that, why do you want to stay in formation? They are nimble ships that can Barrel Roll. They are decent arc dodgers and blockers. I say make the approach together, but then split up and literally swarm the enemy. I dislike Howlrunner for two reasons. One, everyone shoots her down ASAP and you just spent a bunch of points on a pilot that is dead. Two, she encourages you to fly in a formation. Tie Fighters are best when swarming. Oh, you might have a learning curve to figure out how to fly everyone and not bump, but it can become frustrating for your opponent when you end up out of their firing arc and in Range 1. My favorite tactic is to bump someone, and then have everyone else geared to be Range 1 out of arc.

The best technique I've found is to have your main formation and then your flankers (that you keep together). The main formation can be in the middle. That's fine, but the flankers have to have a good path towards the middle. What you need to do is alternate your speeds. You want the enemy to approach your main formation, but be just out of range when your flankers hit them. Or...they go for your flankers, who are just out of range when your main formation flanks them! I find going fast with the flankers and slow-medium with the main unit shows you what they are going to do. You can't have them get too far out of synch with each other as Imperials suffer on the first pass. You want to hit them before they hit you, if you can.

Dark Curse has been my favorite guy to stick in the main formation. Let him lead it. If you mess up, he's in the lead. Your opponent will often TL him or Focus in the idea that they will actually get to use it on him. Don't say anything. The first pass is brutal for Imperial Tie Fighters as they usually kill a ship in the first go. Dark Curse helps you not lose something there. He's your bait. Then, your flankers hit and maybe your Tie Fighters are in Range 3. Just keep firing. You might be surprised at how they get hits in. They will actually wear down B-wings.

After the first pass, then break formation. Tie Fighters are more maneuverable. If you fly predictably, you will suffer. Do what you can to jam up your main targets to prevent actions. This is best against named pilots, but you have to be clever to hit them. That's when the Interceptors can come in at close range and blast them.

Good luck!

Personally, I've found Tie Fighters to have their strength in NOT being in a formation. Oh, on the approach I get it, but after that, why do you want to stay in formation? They are nimble ships that can Barrel Roll. They are decent arc dodgers and blockers. I say make the approach together, but then split up and literally swarm the enemy. I dislike Howlrunner for two reasons. One, everyone shoots her down ASAP and you just spent a bunch of points on a pilot that is dead. Two, she encourages you to fly in a formation. Tie Fighters are best when swarming. Oh, you might have a learning curve to figure out how to fly everyone and not bump, but it can become frustrating for your opponent when you end up out of their firing arc and in Range 1. My favorite tactic is to bump someone, and then have everyone else geared to be Range 1 out of arc.

Dark Curse has been my favorite guy to stick in the main formation. Let him lead it. If you mess up, he's in the lead. Your opponent will often TL him or Focus in the idea that they will actually get to use it on him. Don't say anything. The first pass is brutal for Imperial Tie Fighters as they usually kill a ship in the first go. Dark Curse helps you not lose something there. He's your bait. Then, your flankers hit and maybe your Tie Fighters are in Range 3. Just keep firing. You might be surprised at how they get hits in. They will actually wear down B-wings.

Good luck!

So I'm not really sure I agree with some of your assessments. While TIE fighters aren't bad when it comes to manoeuverability, I certainly wouldn't rank them at the top. Interceptors (especially with PtL) and phantoms are considerably more manoeuverable, and any large base with barrel roll or boost outmanoeuvers TIE fighters quite easily (even small base with boost can do a number on TIEs, provided pilot skill is higher than the TIE).

Also, TIE fighters have a measly 2 attack dice. Its not as bad as the HWK obviously, but on its own, it doesn't exactly 'scare' a defender unless they've only got 1 or 2 green dice and very little hull left.

For these two reasons, breaking up formation against certain builds can basically be handing victory over to your opponent. A phantom, high PS interceptor with PtL doesn't care if you get one or two TIEs shooting at it - its unlikely to get any hits past the green dice. Even durable rebels don't care, like the YT's, b-wings and possibly even undamaged x-wings because they all have 3 attack dice (4 at range 1) and because of comparative hull strength, they are much more likely to one-shot kill one of your TIEs and take none or very little damage in return because you are not in formation and therefore unable to concentrate fire on a single target.

So yeah, staying in formation is powerful because you can put so many 2 attacks on the same target at a time. And howlrunner is golden because the re-roll gives good odds that most of those 2 dice (3 at range 1) will be at least 2 hits (so hopefully some damage will stick).

I've also been reading some attempts at flying TIE fighters with predator and/or more elite swarms, but neither of these build types seem to be gaining a lot of traction or are proving overly successful in tournaments, as far as I can tell (feel free to correct me if I'm wrong).

Anyway, these are generalistic statements, so obviously YMMV and all. But in my experience, breaking up TIE formations is generally a recipe for defeat...

Edited by blade_mercurial

So I'm not really sure I agree with some of your assessments. While TIE fighters aren't bad when it comes to manoeuverability, I certainly wouldn't rank them at the top. Interceptors (especially with PtL) and phantoms are considerably more manoeuverable, and any large base with barrel roll or boost outmanoeuvers TIE fighters quite easily (even small base with boost can do a number on TIEs, provided pilot skill is higher than the TIE).

You are correct. There are more maneuverable ships. I never stated that they were the most maneuverable. I simply stated that they were maneuverable. I think you lose that when you force yourself to fly in formation. You can swarm an enemy and limit their mobility by breaking formation. What you gain from formation isn't worth losing the mobility.

Also, TIE fighters have a measly 2 attack dice. Its not as bad as the HWK obviously, but on its own, it doesn't exactly 'scare' a defender unless they've only got 1 or 2 green dice and very little hull left.

For these two reasons, breaking up formation against certain builds can basically be handing victory over to your opponent. A phantom, high PS interceptor with PtL doesn't care if you get one or two TIEs shooting at it - its unlikely to get any hits past the green dice. Even durable rebels don't care, like the YT's, b-wings and possibly even undamaged x-wings because they all have 3 attack dice (4 at range 1) and because of comparative hull strength, they are much more likely to one-shot kill one of your TIEs and take none or very little damage in return because you are not in formation and therefore unable to concentrate fire on a single target.

The benefit of a Tie Swarm is many shots. If you look at the current meta, most ships that are being used have very little green dice. YT-1300 has 1. YT-2400 has 2. Decimator has none. B-wings have one. These ships will suffer hits from Tie Fighters. But.....we both know this. If Tie Swarm was useless, you would be arguing that. You are just saying it's better in formation.

For me, I heavily use Tie Fighters that bump. It's a way to control the table. So, I often find I am able to concentrate my fire better than if I stay in formation. I am able to get more shots off at the target I want while taking less shots back in return. That's the key factor there. I get less shots back at me. If I stayed in formation to their formation, we just trade shots back and forth and hope one rolls better than the other. If I play smart, I can outmaneuver them and get my shots off while they don't get many shots back at me. I still concentrate my fire, but I take less damage.

Tie Phantoms are the bane of the Tie Fighter. What I argue, though, is if it's better to be in formation against them or not? I see no benefit of being in formation against one. It will most likely outmaneuver you and you get no shots back. If you break things up, you can at least clog the table some and it won't be able to de-cloak in some areas. You regain some measure of control vs. a Phantom. You still will have a horrible time trying to hurt it, though.

I do want to point out that I say these things about being in formation and out of formation because I am not counting Howlrunner at all. To me, she's dead by end of Turn 1 or Turn 2. I'm talking about the rest of the game. So, being in formation without Howlrunner is pointless to me.

So yeah, staying in formation is powerful because you can put so many 2 attacks on the same target at a time. And howlrunner is golden because the re-roll gives good odds that most of those 2 dice (3 at range 1) will be at least 2 hits (so hopefully some damage will stick).

...

Anyway, these are generalistic statements, so obviously YMMV and all. But in my experience, breaking up TIE formations is generally a recipe for defeat...

Howlrunner is great for what she does. She makes all those Tie Fighters more effective. That's exactly why she will die in the first turn....or with luck, on the second. To me, it's just spending more points on something that you will almost never use. Academy pilots are PS1, which means everyone else fires before they do. That means Howlrunner is usually dead before you get to fire at all. MAYBE she lives to Turn 2, which means you get one round of shots off with her. I'd rather spend those points on anything else.

In my experience, keeping Tie Fighters in formation is a recipe for losing a game. You make yourself predictable and easier to handle.

This is a lot of great information. I've only run Imperials twice now, but I'm looking to start running them more. I haven't even tried to get my head around the Phantom yet!